| The simplest way to start using the debugger is to choose Run | Step Into. The program counter (marked by green background highlighting and the  icon, as shown in Figure 7-1) stops one line into the main method of your main project. icon, as shown in Figure 7-1) stops one line into the main method of your main project. Figure 7-1. A suspended program with the green program counter showing the next line to be executed 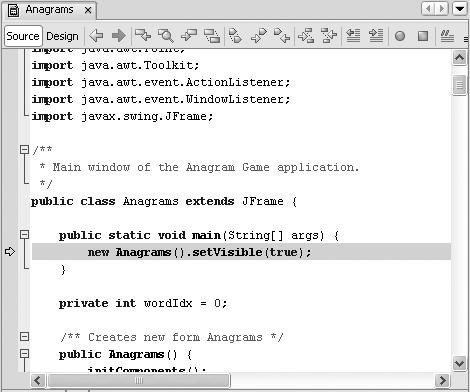
You can then step through your code incrementally with any of the Step commands to observe the program flow and monitor the evolving values of variables in the Local Variables window. See Stepping through Code later in this chapter for a description of all the Step commands and the ensuing topics for information on how to take advantage of the debugger's capabilities.  | You can also use the Run to Cursor command to start a debugging session. In the Source Editor, click in the line where you want execution to suspend initially and choose Run | Run to Cursor. This command works for starting a debugging session only if you select a line of code in the project's main class or a class directly called by the main class in the main project. |
More likely, you will want to start stepping through code at some point after the start of the main method. In this case, you can specify some point in the program where you want to suspend the debugged execution initially and then start the debugger. To do so: 1. | Set a line breakpoint in your main project by opening a class in the Source Editor and clicking in the left margin next to the line where you want to set the breakpoint (or by pressing Ctrl-F8).
You know that the breakpoint has been set when the pink  glyph appears in the margin and the line has pink background highlighting (as shown in Figure 7-2). glyph appears in the margin and the line has pink background highlighting (as shown in Figure 7-2).
Figure 7-2. Code in the Source Editor with a debugger breakpoint set 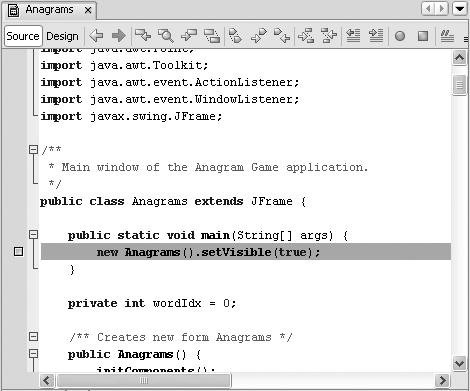
| 2. | Press F5 to start debugging the main project.
|
When the execution of the program stops at the breakpoint (which you can see when the pink breakpoint highlight is replaced by the green highlight of the program counter), you can step through the code line by line while viewing the status of variables, threads, and other information. See the ensuing topics for details on stepping and viewing program information. | If you have set up a free-form project, you need to do some extra configuration to get the debugging commands to work. See Chapter 16 for more details. |
Debugger Windows When you start debugging a program, the Debugger Console appears as a tab in the lower-left corner of the IDE (as shown in Figure 7-3). The Debugger Console logs the execution status of the debugged program (such as whether the code is stopped at a breakpoint). In addition, a tab opens in the Output window to log any application output (as well as the output from the Ant build script the IDE uses when running the command). Figure 7-3. Windows that appear when you start debugging in the IDE, including the Debugger Console, and windows for Watches, Local Variables, and the Call Stack 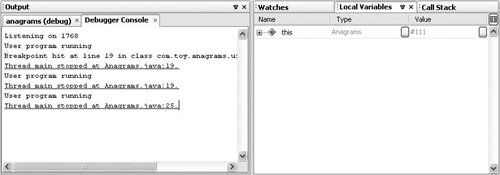
In the lower-right corner, several windows (Watches, Local Variables, and Call Stack) open as tabs and provide current information on the debugging session, such as the current values of variables and a list of current method calls. You can also open individual debugging windows by choosing them from the Windows | Debugging menu. Most of the windows display values according to the debugger's current context. In general, the current context corresponds to one method call in one thread in one session. You can change the context (for example, designate a different current thread in the Threads window) without affecting the way the debugged program runs. See Table 7-1 for a list of all of the windows available and how to open them. |
Table 7-1. Debugger WindowsDebugger Window | Open With | Description |
|---|
Local Variables | Alt-Shift-1 (or Window | Debugging | Local Variables) | Displays all fields and local variables in the debugger's current context and their current values. Fields are listed under the this node. | Watches | Alt-Shift-2 (or Window | Debugging | Watches) | Displays the names of fields, local variables, or expressions that you have placed a watch on. Although all of your watches are displayed no matter the current context, the value displayed is the value for that context (not for the context that the watch was set in). For example, if you have a watch on the this keyword, the this referred to in the Watches window will always correspond to the object referred to from the current method call. | Call Stack | Alt-Shift-3 (or Window | Debugging | Call Stack) | Displays all method calls in the current chain of calls. The Call Stack window enables you to jump directly to code of a method call, back up the program's execution to a previous method call, or select a context for viewing local variable values. | Classes | Alt-Shift-4 (or Window | Debugging | Classes) | Provides a tree view of classes for the currently debugged application grouped by classloader. | Breakpoints | Alt-Shift-5 (or Window | Debugging | Breakpoints) | Displays all breakpoints you have set in all running debugging sessions. | Threads | Alt-Shift-6 (or Window | Debugging | Threads) | Displays the threads in the current session. In this window, you can switch the context by designating another thread as the current thread. | Sessions | Alt-Shift-7 (or Window | Debugging | Sessions) | Displays a node for each debugging session in the IDE. From this window, you can switch the current session. | Sources | Alt-Shift-8 (or Window | Debugging | Sources) | Displays sources that are available for debugging and enables you to specify which ones to use. For example, you can use this window to enable debugging with JDK sources. |
|