ActionScript and Masking


You can't move a mask with ActionScript, but there is nothing to prevent you from controlling the movie clip the mask is in or, for that matter, controlling a movie clip that is being masked.

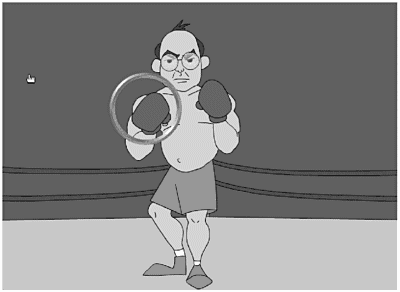
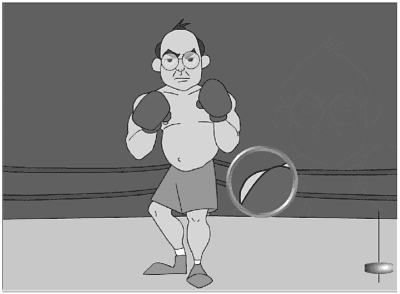
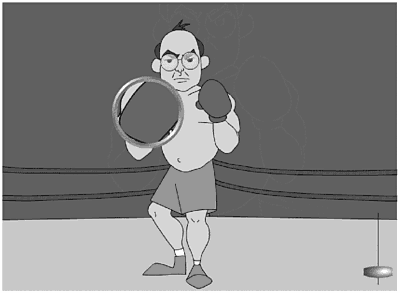
Take a look at draggable_final.swf in the Chapter_09/Assets folder. Try dragging the circle around the Stage. Not impressed? Position the circle over the fighter's head and then drag the slider in the lower-right corner. That's all done with masking and ActionScript.

Believe it or not, this effect is not difficult to create, just time consuming. So, where do you start with a project like this?

Your goal is to create a mask you can drag around the Stage. You already know that you can't attach actions to anything in the masking layer, so that isn't an option. To create a draggable mask, you're going to have to embed the mask in a movie clip. The movie clip needs to be draggable, so you'll also need a button in the movie clip. So what is the inventory of elements you'll need for your movie clip? You'll need the following:

  • The image to be masked

  • The mask itself

  • An invisible button

  • A frame for the mask (if needed)

You already know this is going to be embedded in a movie clip, so that's a good place to start.

Exercise 9.4 Setting Up the Base Movie Clip

few elements of this file already have been created for you, but you have to do all the assembly and coding.

  1. Open draggable.fla from the Chapter_09/Assets folder.

  2. Open the Library. The elements you're interested in for now are the following:

    • The MaskFrame movie clip

    • The Smackdown movie clip

  3. Create a new movie clip symbol (Insert > New Symbol) and name it draggableMovie. You'll be working inside this movie clip for a while.

  4. Drag a copy of the Smackdown movie clip from the Library onto the Stage.

  5. Open the Info panel (Window > Panels > Info ). Next to the X and Y, you'll notice a box composed of nine squares. All the squares are grayed out, except for the upper-left and center squares, which are either white or black (selected). The one that is selected determines the location of the Registration point (where both X and Y equal 0). This point is either the upper-left corner or the center of the movie clip. Click the upper-left square to select it.

  6. With the Smackdown movie clip selected, set the X and Y settings in the info panel to 0.

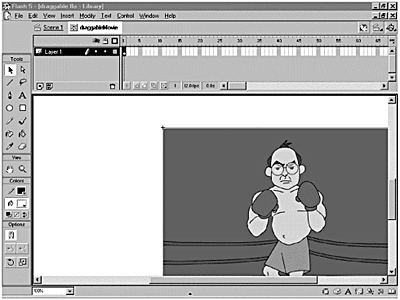
    The upper-left corner of the Smackdown movie clip should be aligned with the Registration point of the draggable movie. (See Figure 9.7.)

    Figure 9.7. Use the Info panel to set the Registration point for your movie clip to the upper-left corner.

    graphics/09fig07.gif

  7. Rename layer 1 Smackdown.

  8. Add a new layer above the Smackdown layer and name it Mask.

  9. You'll do something a little different this time; you'll use a frame for your mask to dress it up a little. Add a new layer above the Mask layer and name it MaskFrame.

  10. With the MaskFrame layer selected, drag a copy of the MaskFrame movie clip onto the Stage. Center the MaskFrame so that its Registration point, which is in the center of the movie clip, is centered on the upper-left corner of the Stage, right over the Registration point for the Smackdown movie clip. This makes the calculations you have to set up later in this exercise simpler to deal with.

  11. Select the Mask layer. The MaskFrame movie clip is 100x100 pixels, so to create a mask to fit neatly under the frame, draw a filled circle (not stroke) on the Stage. Use the Info panel to resize the circle to 95x95 pixels.

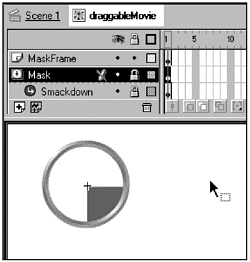
  12. Move the circle in the Mask layer under MaskFrame. Convert the Mask layer to a mask by right- or Control-clicking the layer and choosing Mask. (See Figure 9.8.)

    Figure 9.8. After you have the MaskFrame and the Mask shape in place, you need to convert the Mask layer to a masking layer.

    graphics/09fig08.gif

Well, that's not too exciting. However, it will get better.

Exercise 9.5 Adding a Button to the Masked Movie Clip

You know this movie clip needs to be draggable. To make it draggable, you need to add a button to it.

  1. Choose Insert > New Symbol to create a new symbol. Give it button behavior and name it invisibleButton.

  2. Insert a keyframe in the hit state and draw a circle with no stroke. Resize it to 100100. Center the shape on the Stage.

  3. Reopen the draggableMovie clip by double-clicking it in the Library.

  4. Add a new layer to the top of the stack and name it Button.

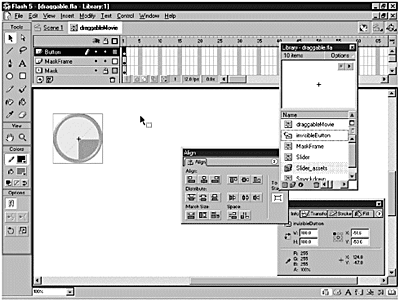
  5. Drag a copy of invisibleButton onto the Stage and center it over the Mask and MaskFrame. (See Figure 9.9.)

    Figure 9.9. To make the draggableMovie draggable, you first have to add an invisible button.

    graphics/09fig09.gif

There's one more thing you need to do before you return to the main timeline. You need to add ActionScript to the button to make it draggable.

Adding Actions

Actions! But we haven't gotten to that chapter yet! Don't worry. This won't be that bad, and you need to get comfortable with ActionScript anyway.

Whenever you want to drag an object around in your movie, that object has to have a button embedded inside it. Why? Because buttons are what react to mouse events, such as press, release, rollover, and so on. (There is an Action called mouseMove that doesn't require a button, but that's for a later chapter.) You've already embedded a button in your movie clip. Now you just need to tell it what you want it to do.

Exercise 9.6 Making the Masked Movie Clip Draggable

You want to be able to drag the draggableMovie clip around the Stage. The logical time to start the dragging action would be when you click (press) the movie clip. When you release the movie clip, it should drop, or stop moving, on the Stage. Fortunately Flash has two functions tailor-made to handle these events: startDrag() and stopDrag().

You still should be working in draggable.fla.

  1. If you're not still in the draggableMovie clip, double-click it in the Library to open it.

  2. Select invisibleButton on the Stage and launch the Actions panel.

  3. Adding a drag action is easy. If you're not comfortable writing code by hand, you can use Normal mode for this part of the exercise. If you already are comfortable working with Actions, go ahead and skip to Step 6 and enter the code listed there.

    If you are going to work in Normal mode, select the black options arrow on the Actions panel and choose Normal from the pop-up list.

  4. In the Actions Toolbox list on the left side of the Actions panel, double-click startDrag in the Actions category. The following code will appear in the Actions list:

     on (release) {     startDrag("");  } 
  5. Click the line that has the on (release) function and change the Event in the Parameters pane from release to press. Make sure you deselect release.

  6. Highlight the last curly brace and double-click stopDrag in the Toolbox list. Your code should look like this:

     on (press) {     startDrag("");  }  on (release) {     stopDrag();  } 

    That's all you need to do code-wise for the button.

  7. Return to the main timeline.

  8. Drag a copy of the draggableMovie clip from the Library onto the Stage.

  9. Save and test your movie.

Okay, your movie is draggable, but you see only the one bit of the movie that's under the mask. That's no fun. You'll fix that next.

Controlling a Masked Movie with ActionScript

You need to be able to control the movie clip that's under the mask inside the draggableMovie clip. First, you need to address the housekeeping issues. Whenever you want to talk to a movie clip to tell it to do something, it needs to have a unique name.

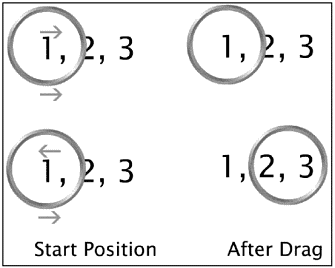
When you drag the Draggable movie clip, the Smackdown movie clip just moves along in synch with it, so the picture under the mask never changes. What you want the Smackdown movie clip to do is move in the direction opposite that in which the Draggable movie clip is moving. What? Well, think about it for a minute. If both movie clips are moving in the same direction, the picture is never going to change. However, if they're moving in opposite directions, you'll see the changing scenery . (See Figure 9.10.)

Figure 9.10. To have your mask reveal different portions of the movie underneath it, you need to have the copy of the movie clip being masked move in the direction opposite draggableMovie.

graphics/09fig10.gif

This might sound like a complex interaction, but it's really not. The relative positions of the two movie clips need to be continuously updated. However, because you're working with a movie clip, you can do that by using the onClipEvent(enterFrame) action. The onClipEvent(enterFrame) action fires continuously as long as the movie clip exists on the Stage. So how are you going to make the two movie clips move in opposite directions? You can do the following:

  • Check the current X and Y positions of the Draggable movie clip.

  • Set the X and Y positions of the Smackdown movie clip based on the current position of the Draggable clip, multiplied by 1. That's all it takes.

How do you check the X and Y positions? Every object on the Stage has certain properties that you can access using ActionScript. The properties you use to get to the X and Y positions are _ x and _ y. To get the X and Y positions of specific movie clips, you need to give Flash directions, through dot syntax, on where to find them. To keep things simple, start your path with the root level of your movie (_root), and then attach the instance name and property you want to access.

So, to get to the X position of draggableMovie (which has an instance name of Draggable), you enter the following:

 _root.Draggable._x 

To get to the X position of the Smackdown movie clip (which has the instance name of Smackdown) inside the Draggable instance, you enter the following:

 _root.Draggable.Smackdown._x 

That's all there is to it. Now, let's get those movie clips moving.

Exercise 9.7 Controlling the Masked Movie Clip

Before you can start controlling your movie clips with actions, you have to assign them instance names . You still should be working in draggable.fla, or you can use the file draggable1.fla from the Chapter_09/Assets folder on the CD.

  1. Double-click the draggableMovie clip in the Library. Make sure the Smackdown layer is unlocked, and select the Smackdown movie clip.

  2. Launch the Instance panel (Window > Panels > Instance) and give the movie clip an instance name of Smackdown. (It's perfectly acceptable for the movie clip and the movie clip instance name to be the same, but only one instance of the movie clip can have that name.)

  3. Return to the main timeline.

    Before you can talk to the Smackdown movie clip inside the draggableMovie clip, you have to give the draggableMovie clip an instance name as well.

  4. Select the draggableMovie clip on the Stage and give it an instance name of Draggable in the Instance panel (Window > Panels > Instance).

  5. Select the draggableMovie clip and launch the Actions panel.

    If you're working in Normal mode, continue with Step 6; otherwise , skip to Step 9 and enter the code directly.

  6. Double-click onClipEvent in the Actions category in the Toolbox list and change the event to enterFrame in the Parameters pane.

  7. With the onClipEvent line still selected, double-click setVariable and enter the following:

    Variable: _root.Draggable.Smackdown._x

    Value: _root.Draggable._x*-1

  8. Make sure that for the Value you select the Expression check box.

    Your code should now look like this:

     onClipEvent (enterFrame) {     _root.Draggable.Smackdown._x = _root.Draggable._x*-1;  } 

    Now you just need to duplicate the same code for the Y values.

  9. Copy the line you just entered (right- or Control-click and choose Copy), and paste it into the code again (right- or Control-click and choose Paste). In the line into which you just pasted, change _x to _y for both the variable and the value. Now your code looks like this:

     onClipEvent (enterFrame) {     _root.Draggable.Smackdown._x = _root.Draggable._x*-1;      _root.Draggable.Smackdown._y = _root.Draggable._y*-1;  } 
  10. Save and test your file.

Okay, that should be working for you. You can drag the movie clip around and reveal what's under the mask. Want to take it a step further? How about if you set the movie up so that Smackdown is in the main timeline and the draggable movie clip enables you to magnify portions of it? To do that, you'll need to add another instance of the Smackdown movie clip to your movie.

Tip

If you're having problems at this point, verify that you have given instance names to both the draggableMovie and Smackdown movie clips. Rememberspelling counts!


Exercise 9.8 Adding a Background and Slider Control

You'll add both a background layer and a slider that will be used to control magnification.

You still should be working in draggable.fla, or you can use draggable2.fla from the Chapter_09/Assets folder on the CD.

  1. On the main timeline, rename layer one Draggable. Add a new layer and name it Background. Drag the Background layer to the bottom of the layer stack.

  2. Drag a copy of the Smackdown movie clip from the Library onto the Background layer and center it on the Stage.

  3. Do a quick test of your movie. Now you can drag the movie clip around, but you also can see the rest of the Smackdown movie clip. (See Figure 9.11.)

    Figure 9.11. With a new instance of the Smackdown movie clip on the Stage, the mask frame appears to be just a window to the background image. In reality, the background image is stationary and the Smackdown clip inside the draggable movie is in motion.

    graphics/09fig11.gif

    In your Library, you'll notice a movie clip called Slider. This is a handy, prebuilt slider that returns a value between 0 and 1, depending on the position of the slider button. You'll actually be building your own version of this in Chapter 17, "Interface Techniques," but for now, just use this version.

  4. Add a new layer named Slider above the Background layer, and drag a copy of the Slider movie clip onto the Stage and position it in the lower-right corner.

  5. Test your movie. You can drag the button up and down.

  6. As the Slider is dragged up and down, it is constantly updating a variable in the root of the movie clip. The variable is named sliderVal. You're going to use this value to control the magnification of the Smackdown movie clip inside the draggableMovie clip.

The first thing you need to decide is how to use the value returned by sliderVal.

Why does sliderVal return a value between 0 and 1? It does so because it makes the returned value easily adaptable to any kind of measurement system you want to use. In this case, you'll set it up so that the maximum magnification is 5X.

So, how do you convert the number returned by sliderVal to a value that you can use to scale your movie clip? First you need to understand how to scale a movie clip. Just as you can set the X and Y positions of a movie clip using the _x and _y properties, you can use the _xscale and _yscale properties to scale a movie clip.

The scale for anything you place on the Stage starts out with an _xscale and _yscale of 100. Anything above 100 increases the size; anything below 100 decreases the size . You want to be able to make your movie clip anywhere from normal size (100) up to five times that size (500). To convert the value returned by the slider, you need to perform a little calculation.

We need to go back to basic math for a moment. Any number multiplied by 0 is going to return a value of 0. That's not an acceptable value for your purposes. The minimum value that you want to have is 100. So right off the bat, you know that you need to add 100 to whatever value is returned. Because you've already established that the maximum scale value is going to be 500, by what number do you multiply the number in sliderVal? Your first thought might be 500, but remember that you'll be adding 100 to the value. The answer? Just multiply sliderVal by 400 and then add 100 to that. That way, your number always is between 100 and 500. Your equation will look like this:

 scaleFactor = (_root.sliderVal*400)+100; 

In the next exercise, you add the code to scale the movie clip that's being masked.

Exercise 9.9 Scaling the Smackdown Movie Clip Under the Mask

All you have to do is add two lines of code to adjust the scale.

  1. Select the draggableMovie clip on the Stage and launch the Actions panel.

  2. If you've been working in Normal mode, it's time to switch to Expert mode. It's not that you can't add the code using Normal mode (setVariable), it's just so much easier to type it directly into the Actions list. Switch to Expert mode by clicking the Options arrow in the Actions panel and then selecting Expert.

  3. You are going to enter the code between the asterisks . Position your cursor after the first curly brace({), add a return, and then type the following:

     onClipEvent(enterFrame) { //*********************************************************      scaleFactor = (_root.sliderVal*400)+100;      _root.Draggable.Sackdown._xscale = scaleFactor;      _root.Draggable.Smackdown._yscale = scaleFactor;  //*********************************************************      _root.Draggable.Smackdown._x = _root.Draggable._x*-1;      _root.Draggable.Smackdown._y = _root.Draggable._y*-1;  } 
  4. Test your movie again. Whoops! That's not quite the desired result. (See Figure 9.12.)

    Figure 9.12. When Flash scales this movie clip, it does so from the upper-left corner. To magnify the image in place, you need to account for that.

    graphics/09fig12.gif

What's happening here? When Flash scales this movie clip, the upper-left corner, which is the 0,0 point, stays the same. The movie scales out and away from that point, essentially changing the position of the rest of the image on the Stage. You have to account for that by adjusting the code where you set the X and Y values of the Smackdown movie clip.

Exercise 9.10 Adjusting the Motion of the Scaled Movie Clip

You know that when you move the slider, the movie clip is changing. At the bottom of the slider track, the movie is its original size. At the top of the slider track, the movie is five times its original size. You need to multiply the X and Y positions of the movie clip by a number between 1 and 5. You get that number by dividing the scaleFactor by 100. Why? Remember that the scaleFactor was set up to accommodate the necessary changes to _xscale and _yscale, both of which needed to start at 100 and go no higher than 500. Because the movie is changing by a factor of 5, if you want to use the scaleFactor value, you have to divide it by 100.

  1. You still should have your movie open and draggableMovie selected. In the Actions panel, change the code between the asterisks:

     onClipEvent(enterFrame) {     scaleFactor = (_root.sliderVal*400)+100;      _root.draggable.smackdown._xscale = scaleFactor;      _root.draggable.smackdown._yscale = scaleFactor;  //*********************************************************      _root.draggable.smackdown._x = (_root.draggable._x*-     1)*(scaleFactor/100);      _root.draggable.smackdown._y = (_root.draggable._y*-     1)*(scaleFactor/100);  //*********************************************************  } 
  2. Now save and test your movie. (See Figure 9.13.)

    Figure 9.13. When you multiply the output by the scaleFactor100, the Smackdown movie clip scales properly.

    graphics/09fig13.gif

If the masked movie clip is scaling, but not staying in place, make sure that the mask (frame and button) you set inside the draggableMovie clip is centered on the upper-left corner of the Stage. The draggableMovie movie clip can be anywhere on the Stage on the main timeline.

Drag the mask around and try changing the scale by using the slider bar. You might notice one little glitch as you approach the edges; you'll see a little twitch and the Background image show through when you increase the magnification. The easiest way to fix that is to constrain the movement of the draggable button to the confines of the Flash movie. You'll be taking a look at constraining drag-and-drop interactions in Chapter 17 when you build your slider.


Inside Flash
Inside Flash MX (2nd Edition) (Inside (New Riders))
ISBN: 0735712549
EAN: 2147483647
Year: 2005
Pages: 257
Authors: Jody Keating

flylib.com © 2008-2017.
If you may any questions please contact us: flylib@qtcs.net