| The spotlight effect is the classic effect people show when they are trying to demonstrate masking. Creating a spotlight effect involves nothing more than doing the following: -
Placing the graphic you want to affect on a layer -
Creating a spotlight by tweening a shape on the layer above the graphic -
Making the layer with the tween a mask layer If you've never used a mask before, this is your chance to give it a try. Exercise 9.1 Creating a Spotlight Mask This file already has been started for you. -
Open spotlight.fla in the Chapter_09/Assets folder on the CD. The file currently has one layer named Tulips with a copy of the tulip graphic symbol on it. -
Add a new layer above the Tulip layer and name it Mask. -
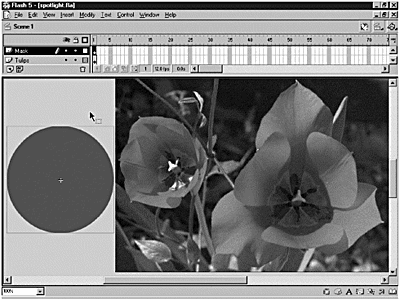
With the first frame of the Mask layer selected, draw a filled circle in the work area to the left of the Stage (see Figure 9.1). The color of the circle is irrelevant. Figure 9.1. Draw a filled circle and place it to the left of the Stage. Convert the circle to a graphic symbol so that you can tween it.  -
Convert the circle to a graphic symbol (F8) and name it circle. -
Extend the timeline (F5) out to frame 30 in both layers . -
Insert a keyframe (F6) in frame 30 of the Mask layer and drag the circle in frame 30 until it is off the Stage in the work area to the right. -
Select any frame between 1 and 30 on the Mask layer and right- or Control-click and choose Create Motion Tween. -
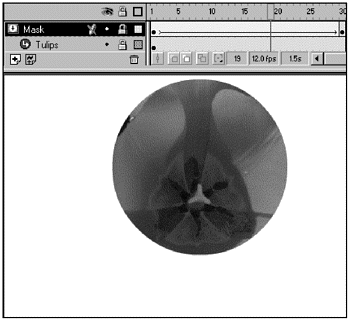
Select the Mask layer. Right- or Control-click and select Mask from the menu. Notice how the layer icons change when you do this. The icon on the masking layer is a downward-pointing arrow in a circle; the masked layer has a right-pointing arrow and is indented under the masking layer. (See Figure 9.2.) Figure 9.2. After you turn on masking for the Mask layer, you see only the portion of the Tulip graphic that is beneath the circle. The layer icons change as well, which indicates which layer is the mask and which layer is masked.  Now you see only the tulip image where the mask is. That's an interesting effect, but why not add a simple twist? -
Add a new layer named Dark Tulips and drag it to the bottom of the stack. Make sure it is not indented under the Mask layer. If it is indented, just hold down the Alt (Windows) or Option (Macintosh) key and click the layer icon to toggle it back to a normal layer. -
Drag a copy of the Tulips movie clip from the Library onto the Stage and align it with the Stage (Window > Panels > Align). -
With the Tulips movie clip selected, open the Effect panel (Window > Panels > Effect) and set the Brightness to 50%. -
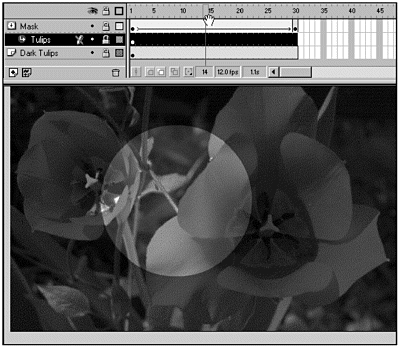
Test your movie again. Now you have a real spotlight effect. (See Figure 9.3.) Figure 9.3. By adding another instance of the Tulip movie clip to the Stage and changing its Brightness settings, you can give an interesting twist to your spotlight effect.  Another simple, yet very effective, way to use masking is to use text as a mask. Using Text as a Mask When you want to apply a gradient or bitmap fill to a block of text, you might want to consider using masking instead of breaking apart the text to modify it. The benefit of using text as a mask, instead of breaking the text apart, is that the mask still is always editable as text. Text masks are applied in exactly the same way as any other mask. You just have to type the text you want to use as a mask on the masking layer. You can take advantage of the ability to animate the layer being masked to create some interesting effects that would be difficult to create in any other way. You'll take a look at a text mask in the Magnatec file in the next section. Masking Examples To see several different examples of masking in a completed movie, take a look at the file magnatec.swf in the Chapter_09/Assets folder on the CD. Play the movie several times and see if you can figure out which elements are masked. After you've played the movie a few times, open the magnatec.fla file and examine the following layers and movie clips: -
Text mask/Cityscene layers. This is a simple text mask of the Magna~Tec logo over a tween of the Cityscene graphic. If you want to add animation to your text fill, masking is the way to go. -
Mask/Gradient graphic/Magnatec ~3D/Streetscene. This is a single mask over three layers. The mask itself is static and creates the shape for the content layer. The Gradient Graphic layer contains the slanted lines that move from left to right when the movie first loads. The Magnatec ~3D layer contains the 3-D version of the Magnatec logo that moves from right to left. The bottom layer, Streetscene, is a static layer containing the Streetscene graphic symbol. To see the other masking elements, you'll need to open the Library. -
Car Views folder/wireframeanime. This is the wireframe of the car being painted over by a completed version of the car. Notice the curved shape of the mask. The curved shape gives a smooth and realistic paint-over effect. A straight-edged mask would not be as effective. -
Content folder/Slide in Movies folder/Innovation/Performance/Technology. These three movie clips contain the content that's displayed when you press one of the navigation buttons . The Mask layer is static and outlines the shape of the content window. The image and text move in from the left on a simple motion tween. The picture on the right side of the movie clip also has a mask applied. Again, this is a static mask that is used to outline the shape of the image. This type of masking is particularly useful when you have a series of images to which you want to apply the same cropping and detail. The mask in this case is a graphic symbol that gets reused in each of the three movie clips. Together, these simple effects combine to create an effective and cohesive movie. You already know that you can't use a gradient as a mask in Flash. You might be wondering, however, if there is a way to soften the edges of your mask. The answer is you canbut you need to use a little trickery .  | 

