| Simple transitions used alone are fine and are frequently all that you need. However, there are times when you'll want to layer transitions to achieve a richer and more complicated effect. The camera flash, for example, is a common simple technique; it's nothing more than inserting a single white frame to give the effect of a camera flash going off. However, by combining a flash with a fade to black, you create a more complex transition. The next exercise expands on the techniques you learned in the previous one. Exercise 8.2 Flash and Fade to Black This time, you'll use a quick flash and fade to black to create your transition. This effect has a camera flash feel to it, and it's a good way to quickly establish your shot or scene and let its image resonate. -
Once again, this file has been started for you. Open FlashFadeToBlack.fla from the Chapter_08/Assets folder on the CD. In this exercise, you'll start with a black screen, and rather than transition gradually to an image, you'll introduce a bright flash and snap immediately to the image, which then fades out. -
Rename layer 1 Train, and then insert a keyframe in frame 6. -
Open the Library (Window > Library) and drag a copy of the InsideTrain graphic symbol onto the Stage. -
Use the Info panel (Window > Panels > Align) to set the both the X and Y of the InsideTrain graphic to 0. -
This time, you'll fade the image partially to black instead of fading in from black. Insert a keyframe in frame 11. With the image on the Stage in frame 11 selected, open the Effects panel and set the Brightness to -75%. -
To apply a tween to the image, select any frame between frame 6 and frame 11, right-click or Control-click that frame, and then select Create a Motion Tween. -
Insert a blank keyframe in frame 12 and extend the timeline out to frame 20 by selecting frame 20 and then pressing F5. -
Now if you test your movie by pressing Return or Enter, you start with a black background, flash to the image, and then see the image fade to black. -
You can give more impact to this effect by enhancing the changeover from black to the image. Start by adding a new layer and naming it White Flash. -
Insert a keyframe in frame 5 of your new layer. -
Select the Rectangle tool and set the Fill to White and the Stroke to None. Draw a rectangle on the Stage. -
With the rectangle selected, open the Info panel (Window > Panels > Info), resize the rectangle to 650x250 pixels, and then set both X and Y to 0. -
You're going to use the white flash only once in this transition, but it will be used multiple times in the next one, so convert the white rectangle to a graphic symbol (F8) and name it whiteFlash. Then, insert a blank keyframe in frame 6 of the WhiteFlash layer. -
Press Enter or Return to test your scene again. Now the transition effect is heightened by the addition of the white flash just before the image becomes visible. -
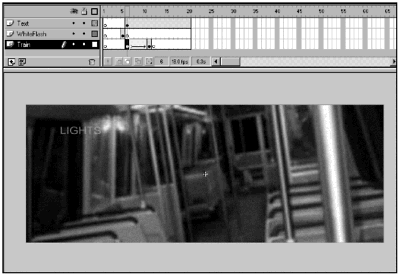
Just to add a little more visual interest, create a new layer and name it Text. Insert a keyframe in frame 6. (See Figure 8.4.) Figure 8.4. When you have completed this transition, you'll have three separate layers : the first for the train image, the second to create the camera flash, and a third to hold the text.  -
Select the Text tool and use the Character panel to set the text fill color to #FFCC33. Choose Arial, or a similar font, and set the size 18 points. -
Type the word LIGHTS in all caps on the Stage. -
Use the Info panel to reposition the text block with X at 80 and Y at 25. -
Select the text block and use the Mixer panel (Window > Panels > Mixer) to set the Alpha to 60%. -
Test your movie again. Now you start with a black screen, get a bright white flash, and then you get the train image, which fades out to black again. Whenever you are setting up transitions, remember that transitions are part of the story. There's actually a story behind the subway sequences you've been using. Doug Clarke, an art director at Fig Leaf Software, came up with the idea of trying to capture the essence of his daily commute on the Metro as a Flash movie. The complete movie is available in the Chapter_08/Assets folder on the CD. Just launch and play Transit.swf. Doug wanted to capture the hypnotic effect of riding the Metro those many late nights and early mornings. In the next exercise, you'll recreate part of Doug's nightmare and capture the transition from a waking state to a subconscious state. So, you see, this exercise is not just about transitions, but also about how transitions impact your story. The next exercise builds on the transition you began creating in the previous exercise. Exercise 8.3 Using Repetition to Create a Transition In this exercise, you'll build a combination flashing transition with a fade to black. This is going to be a repetitive transition with a speed change. To create the flashing sequence, you'll do a lot of cutting and pasting. Cutting and pasting frames on multiple layers in Flash is no big deal, as long as you know a trick or two. When you are copying frames from multiple layers, you have to make sure that you paste them into multiple layers. Although this may seem intuitively obvious, it's not. Follow the directions in the next two steps carefully and you'll be good to go. -
You should have the file you were working on in Exercise 8.2 open, or you can open FlashFadeToBlack_final.fla from the Chapter_08/Assets folder on the CD. -
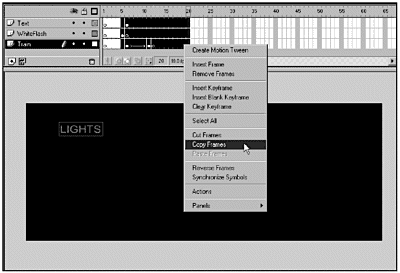
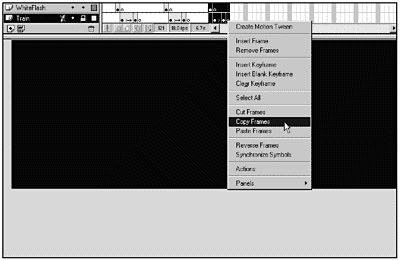
Highlight frames 520 in all three layers. Right-click or Control-click, and then select Copy Frames. (See Figure 8.5.) Figure 8.5. You easily can copy a group of frames by highlighting them and using the Copy Frames option on the pop-up menu that appears when you right-click or Control-click a frame.  -
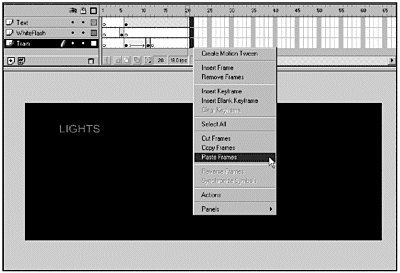
Highlight the first empty frame (frame 21) in all three layers, right-click or Control-click, and then select Paste Frames. (See Figure 8.6.) Your frames should paste neatly into place. Figure 8.6. To paste the frames back in, just highlight the first empty frame in all three layers and choose Paste Frames from the pop-up menu.  -
Repeat Step 3 three times. The frames you'll be highlighting and pasting into are 37, 53, and 69. -
Next, you're going to change the text in the keyframes on the Text layer. Without changing the color or opacity, change the text in the following keyframes as shown here: Frame 22: SUBDUE Frame 38: ME Frame 54: TO Frame 70: SLEEP -
Press Enter or Return to do a quick test of your scene. You'll start with a black screen and get a slow strobing effect. -
Next, you're going to repeat the sequence you just set up, minus the text, and shorten the individual transitions. This will give the effect of rushing toward some kind of a conclusion. Highlight frames 5 through 84 in the WhiteFlash and Train layers. Right-click or Control-click, and then select Copy Frames. -
Highlight frame 85 in both the WhiteFlash and Train layers, right-click or Control-click, and then select Paste Frames. -
Now you'll successively shorten the transitions. The directions here will become a little less exact because the frame numbers will change as you delete frames. However, for the last five transitions, you are going to want to shorten both the tween and the static frames following each tween. Starting with the tween/static frame combo that begins on frame 84, remove one frame of the tween. Also remove one frame from the static frames that follow the tween. On the next sequence, remove two frames from the tween and static frames, and so on. Make the last two tweens the same, with the tween having three frames (two keyframes and a middle frame). -
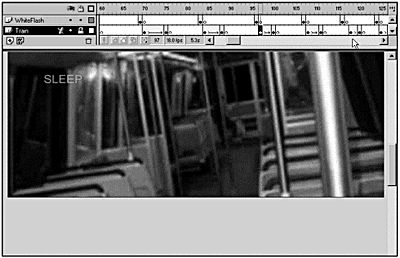
Next, you'll need to adjust the position of the frames in the WhiteFlash layer. You can do this easily by highlighting the frames you want to move and dragging them to their new positions . The frame with the white flash should immediately precede the frame with the image on the Train layer. The frame following the white flash should always be a blank keyframe. (See Figure 8.7.) Figure 8.7. By shortening the transitions, you give the effect of rushing into a change.  -
Now you're building up to a major transition. Speed things up a bit more by first repeating the last transition several times and then alternating between the white flash and the train image set at 75%. -
In the Train and WhiteFlash layers, copy the frames that contain the white flash and the last tween plus the blank keyframe that follows it by highlighting the frames (a total of five frames), right-clicking or Control-clicking, and then selecting Copy Frames. (See Figure 8.8.) Figure 8.8. Copy one complete sequence of the shortest tween. You'll use this to build a strobing effect.  -
Paste your copied frames after the last frame of the current timeline. Remember that you have to highlight a frame in both layers for this to work. Continue pasting in the frames until you have 10 copies. Don't worry about exact numbers here; it simply doesn't matter. -
Alter the last tween sequence so that it consists of two frames: the white flash and the train interior set at a Brightness of 75%. Copy and paste this sequence several more times. -
Now return to the Text layer. Part of this transition is a transition from a state of consciousness to unconsciousness. You currently have the words LIGHTS SUBDUE ME TO SLEEP showing up as the movie progresses. Sleep is the important concept here, so extend the timeline out to 100 in the Text layer by selecting frame 100 and pressing F5. This keeps the word SLEEP on the scene about twice as long as the other words. -
Insert a blank keyframe in frame 101 of the Text layer to make SLEEP disappear, but only momentarily. -
Wait about a second and a half (27 frames) and add SLEEP back in. This time, however, it will be larger and fainter. -
Insert a keyframe in frame 128. Select the Text tool and open the Character panel (Window > Panels > Character) and change the font size to 96. -
Use the Mixer panel (Window > Panels > Mixer) to change the Alpha to 17%. -
Type SLEEP in all capitals on the Stage. Use the Info panel (Window > Panels > Info) to set the X position to 80 and the Y position to 25. -
Extend the timeline out to frame 164 in the Text layer so that SLEEP stays on the Stage for another two seconds. Then, insert a blank keyframe (F7) in frame 165. -
You already know that the whole point of this piece is to complete the transition to the subconscious, so you'll add that in now. Insert a blank keyframe (F7) after the last frame of the Train layer. -
Add another white flash to the last frame of the WhiteFlash layer. -
You're going to play around with brightness again to make your text fade in. You start by inserting a keyframe (F6) in the Text frame that lines up over the last two keyframes you just added. -
Next, select your text tool and make the following changes in the Character panel (Window > Panels > Character): Font: Arial or similar Size: 24 Color: White -
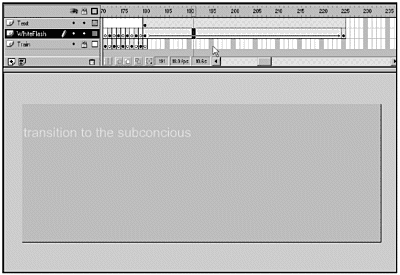
Next, use the Mixer Panel to set the Alpha at 50%, and then type transition to the subconscious. Then, use the Info panel to set the X position of the Text box to 0 and the Y position to 36. -
Almost done! All you need to do now is extend the timeline for the WhiteFlash and Text layers out to frame 225 by highlighting frame 225 in both layers and pressing F5. -
Insert a keyframe in frame 225 of the WhiteFlash layer. -
Select the WhiteFlash graphic on the Stage and use the Effects panel (Window > Panel > Effects) to change the Brightness to 100%. -
Select any frame between 180 and 225 in the WhiteFlash layer, right-click or Control-click, and then select Create Motion Tween. (See Figure 8.9.) Figure 8.9. The final text you'll add is for the transition to the subconscious, which will fade in as the white flash fades to black.  -
That's it! Test away. If you're having problems, you can check yourself against the FlashFadeToBlack2_final.fla file on the CD. As you test, you'll get a slow strobing effect that eventually speeds up until it fades into the transition to the subconscious. In the next section, you'll look at ways that you can immerse your viewer into your scene by using spatial transitions. |
