| The first and most important question to ask is why you want Flash to communicate with another applicationin this case, the browser. The answer is that if you can talk to the browser and the scripting languages supported by the browser, you can start to do some very cool things. For example, you can open and close additional windows and control the appearance of those windows . You can also set client-side cookiesin other words, you can store information on your user 's computer to help you remember them and then personalize your site for them. If you can talk to the browser, then you also have access to any JavaScript or VBScript functions on that page. You can use three Flash actions to communicate with whatever application your Flash movie is embedded in. In fact, these actions work only in conjunction with an outside application: -
loadVariables() -
getURL() -
FSCommand() The obvious host application for most Flash movies is the browser, but SWFs can also be played in a standalone player. Both of these possibilities will be explored in detail later. Additionally, the Flash plug-in has a number of special functions that can be called directly by JavaScript. loadVariables() You've already used loadVariables() several times to load variables from text files into Flash. You can also use loadVariables() to load variables from a variety of other sources, such as a CGI script, a Cold Fusion (CFM) file, a JavaServer Pages (JSP) file, a Personal Home Page (PHP) file, or any other kind of server-side script. The only caveat with using loadVariables() to get external data is that the data must be provided in name /value pairs. That's what Flash understands, so you need to make sure that any script that is retrieving that information for you outputs it in the proper format. Not only can Flash use loadVariables() to receive information, but it also can send information to these external applications. The work of loadVariables() happens behind the scenes. You don't actually see anything happen until Flash or the receiving page processes the variables that were retrieved or sent. In the case of sending variables, you might not see anything happen in the Flash movie at all. You'll be taking a more in-depth look at loadVariables() in Chapter 28. getURL() Similar to loadVariables(), you can use getURL() to pass variables to a server-side script. You can also use getURL() to load a new page or open a new browser window. You can also use getURL() to call a JavaScript function. Calling a server-side script will be covered in more detail in Chapter 28. Using getURL() to load a new page is the simplest and most straightforward use of getURL(). The syntax for the getURL() action is as follows : getURL("URL", "target", "send method"); Only the first argument, the URL that you are loading, is required. You can use the second argument to specify the location of the page to be loaded. You can use one of the standard reserved target names (_self, _blank, _parent, _top). Or, if you want to load to a predefined frame or window, you specify its name. In addition to retrieving the new Web page, you can send variables from your Flash movie to that page. The third option specifies how you would like to send those variables, with either GET or POST. When you do this, Flash simply harvests all the variables in the current timeline (see Figure 27.1) and sends themfor example: getURL ("http://www.figleaf.com", "_blank", "POST"); Figure 27.1. When you use the getURL() action with the method set to POST, Flash harvests all the variables on the main timeline and sends them to the page that you specify the URL for. 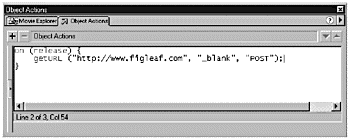 This code loads the Fig Leaf Web site in a new window. Any variables in the current timeline are sent to the Fig Leaf page via POST. But waitthere's more. In the previous example, using getURL() doesn't give you any control over the window that you open. You can get around that by using getURL() to call a JavaScript function on the HTML page. But before you can go down that road, you need to understand a little bit about the Document Object Model (DOM) and how you can actually talk to the browser. The Document Object Model The Document Object Model (DOM) specifies the different objects in a Web page and how those objects can be manipulated. Of course, just to make things fun, the DOMs for Internet Explorer and Netscape are different. For either DOM, though, the basic idea is that each page is composed of a series of objects. Each object has its own elements and attributes. For example, the browser window itself is considered an object that can have a predefined set of attributes that control its height, width, position, and so on. Forms are also objects. Just as embedded Flash movie clips have a hierarchical structure, the DOM has a hierarchical structure. The root of the DOM is the window object, which you refer to using this line: window This is essentially equivalent to _root in a Flash movie. Beneath the window object in the hierarchy is the document object. The document object contains all the elements of the Web page, including, but not limited to, the form, image, and link objects, as well as all of the objects that can be in a form. Just as you name movie clips in Flash, you can name different windows, forms, images, and so on. You also can refer to an element on a page by either its name or its index number (references to objects are held in the objects array). So, for example, if you have two forms on your page, FormA and FormB, to access FormA you can refer to either of these: window.document.form[0] window.document.formA Also like the Flash objects, the different objects have methods that you can use to access attributes and properties. Obviously, there is much more to the DOM than this brief description. As long as you understand the basics, though, you'll find it very easy to work with, especially if you're already accustomed to using dot and array syntax in Flash. Now you'll take a look at how you can use Flash's getURL(), together with a call to a JavaScript function in the browser window. Using getURL() to Call a JavaScript Function Now that you've been introduced to the DOM, it's time to put that new information to use. One of the simplest JavaScript functions that you can set up is a function that will open and size a new window. The function to handle this must exist inside the HTML page, so you need to find a way for Flash to communicate with the browser page it's embedded in. You can do this with either the getURL() or FSCommand() actions. For now, you'll use getURL(); you'll explore the FSCommand() action later in this chapter. To call a JavaScript function from Flash, you use this syntax: getURL("javascript:functionName(variable1,variable2,variable3)"); Here, functionName() is the name of a function that is in the HTML page in which the Flash movie is embedded; the variables are the parameters that you pass into the function. The window object has a method called open() that you can use to both open the window and control its appearance. You have access to a number of attributes. All these attributes, with the exception of width and height, are Boolean values and default to true. The attributes that you'll use most often that are part of both the IE and Netscape DOMs are listed here: -
toolbar. The buttons at the top of the browser window (Back, Forward, Stop, and so on). Set to no to hide. -
location. The input field that displays the current URL. Set to no to hide. -
status. The bar at the bottom of the window that displays the status. Set to no to hide. -
menubar. The text menu bar at the top of the window. Note that you can't control this on a Mac because, on Macs, the menu bar isn't part of the browser window. Set to no to hide. -
scrollbars. Shows scrollbars if the document is larger than the window. Set to no to disable. -
resizable. Allows you to resize the window. Set to no to disable. -
width. Gives the width of the window, in pixels. -
height. Gives the height of the window, in pixels. In this exercise, you'll use getURL() to call a JavaScript function to open a new browser window with specific dimensions. Exercise 27.1 Opening New Browser Windows You'll begin by creating a Flash movie and publishing it. Then you'll open the HTML page created and add the JavaScript function that you want to call to it. -
Create a new Flash movie. -
Create a new button, or drag a button from the Common Libraries onto the Stage (Window > Common Libraries > Buttons). -
Select the button and launch the Actions panel. You're working with a button, so you'll be using an on(mouseEvent) handler. In the Actions panel, set up the shell for the mouse event: on (release) { } -
Next you'll set up a series of variables that will hold the information that you want to pass to the JavaScript function on the HTML page. In this case you'll be passing in the URL of the page to load, the name that you'll be assigning the window, and the settings that you want to control. You could just pass the values directly into the getURL() action that you'll be setting up, but passing the values into variables makes things a little more readable. Enter the following code between the curly braces: url = "http://www.figleaf.com/"; windowName = "myWindow"; settings = "toolbar=no,location=no,status=no,menubar=no, scrollbars=no,resizable=no,width=600,height=400"; You'll be sending your visitor to the Fig Leaf Web site, which will open in a 600x400 pixel window with no tool, menu, or status barsand it won't be resizable. -
To make the actual call to the function using getURL(), all you have to do is add this line of code before the last curly brace : getURL("javascript:openWindow('"+url+"','"+windowName+"','" +settings+"')"); Notice the formatting here. When you are calling JavaScript functions from Flash, you always must pass out literal values (because you are not in JavaScript, you can't just pass out variablesyou have to send their values). So, you need to construct a string that JavaScript will understand. To do so, you need to wrap in quotes each argument that should be interpreted as a string. However, this string that you are building is already an argument of the getURL() function, so it already is surrounded by double quotes. If you put more double quotes inside your JavaScript function call, it would confuse the getURL() function, so you need to do a little trickery . You can represent the quotes that you need for the JavaScript call with either single quotes or escaped quotes (\"). Single quotes, while a little unreadable, don't cause anywhere near as much confustion as \". So, by escaping your double quotes with single quotes, the actual values that are received by the window.open() function in your JavaScript are properly quoted string literals (see Figure 27.2). Figure 27.2. You can pass the values that you want to use into variables to simplify the getURL() code. It's always a good idea to check your syntax (Control+T or Command+T) before you proceed.  Your completed code on the button should look like this : on (release) { url = "http://www.figleaf.com/"; windowName = "myWindow"; settings = "toolbar=no,location=no,status=no, menubar=no,scrollbars=no,resizable=no, width=600,height=400"; getURL("javascript:openWindow ('"+url+"',"'+windowName+"','" +settings+"')"); } -
Save your movie and publish both the HTML and SWF files. -
Open Publish Settings and uncheck the HTML option on the Formats tab. You're going to be adding your own code to this page, and you don't want to overwrite it the next time you publish your movie. Save your file. -
Open the HTML file that you created in your HTML editor of choice. Inside the <HEAD></HEAD>, tag you'll add your JavaScript function. -
First you need to set up your script block. Enter the following code: <script language="JavaScript"> </script> -
Next you'll create your function. You already know that you'll be passing in three arguments, so add the shell for your new function to your existing code: <script language="JavaScript"> function openWindow(url,windowName,settings) { } </script> -
All that's left to do is call the open() method of the window object. Enter the following line of code inside your new function: window.open(url,windowname,settings); Your completed code inside the HEAD tag should look like this (see Figure 27.3): <HEAD> <TITLE>window1</TITLE> <script language="JavaScript"> function openWindow(url,windowName,settings) { window.open(url,windowName,settings); } </script> </HEAD> Figure 27.3. You add the JavaScript function that you want to call directly into the HTML page. Your functions should all be between the <HEAD></HEAD> tags. 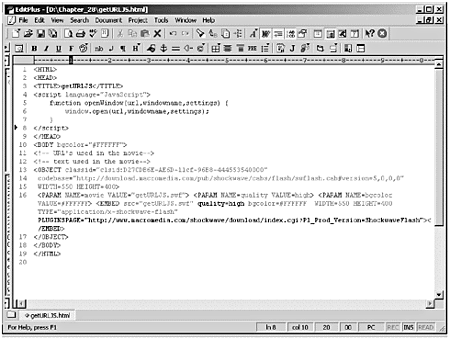 -
Save your HTML file and open it in a browser. Click your button. Assuming that you have an Internet connection open, you should launch the Fig Leaf Web site in a new chromeless (no status bars, menu bars, or toolbars ) window. One thing that you should note: It makes absolutely no difference how you label the arguments in the openWindow function. Rather than url, windowname, and settings, you could have called them cat, dog, and fish. They're just placeholders. All that the function needs to know is that three bits of data are headed its wayit really doesn't care what you call them. Next you'll take a look at how you can serve up some cookieshold the milkusing getURL() and JavaScript. Using getURL() to Set a Cookie Depending on whom you talk to, cookies are either a wonderful thing or the work of the devil . So, what is a cookie? A cookie is just a small bit of code that is stored on your user's machine. What do you use cookies for? -
To maintain state between browser requests -
To remember information about your user, such as name, email, when he last visited your site, and so on You can also have server-side cookies that are stored on your server, but, for now, we'll just deal with client-side cookies. You can't go crazy and try and store huge amounts of information in your cookie. Remember, you and a bunch of other developers are storing information on your user's computer. You don't want to overload the storage spacein fact, you can't. Cookies are limited to be only 4K in length. When you create a cookie, you need to give it some very specific information: -
NAME=VALUE. This is the name/value pair of the information that you want to store on your user's computer. You can pass more than one name/value pair in a single cookie. -
expires =DATE. If you want the cookie to be available the next time your user visits you, you need to set a date sometime in the future for the cookie to expire. If you don't set an expiration date, the cookie will expire as soon as the browser closes . The number that actually gets used here is a little frighteningit's based on UNIX epoch time, the number of milliseconds since midnight on January 1, 1970. -
path= PATH . You use this to set the subset of a domain that the cookie is valid for. -
domain=DOMAIN_NAME. This defaults to the domain name that generated the cookie. -
secure. If you mark a cookie as secure, it will be transmitted only across a secure channel (such as HTTPS). So what does a cookie actually look like? Here's an example of some cookies from my cookie.txt (Netscape browser) file: www.figleaf.com FALSE / FALSE 2137622480 CFID 79246 www.figleaf.com FALSE / FALSE 2137622480 CFTOKEN 99749128 The first part, www.figleaf.com, is the domain that the cookie was sent from. The second item indicates how the cookie was setin this case, it's FALSE because the cookie was set by ColdFusion rather than through the HTTP header Set-cookie. The third item is the path. You might need a cookie to be retrieved for only a specific part of your site you can set the path for which a cookie is returned. In this case, the cookie is returned no matter where you are on the site. The fourth field indicates whether the cookie should be returned only over a secure connection. The fifth field represents the expiration time (represented as the number of milliseconds since January 1, 1970). The last two fields are the name/value pair of the information that you want to store. So how do you actually set a cookie from Flash? A cookie is a property of the document object, so setting a cookie using getURL() and JavaScript is fairly simple. Exercise 27.2 Using getURL(default.htm) to Set a Cookie You'll start by creating a new movie and adding an input field and a Submit button. -
Create a new movie. You're going to set up an input field so that your user can enter his name and save it in a cookie. -
Select the Text tool. Open the Text Options panel (Window > Panels > Text Options), and set the Text Type to Input Text. -
Click once on the Stage to add the Input textbox. With your textbox selected, make the following changes in the Text Options panel: Line Type: Single Line Variable: enterName HTML: Not selected Border/Bg: Selected -
Create your own button, or drag a button from the Buttons Library (Window > Common Libraries > Buttons) onto the Stage. (See Figure 27.4.) Figure 27.4. Set up an input field with a variable named enterName to capture the name/value pair that you're going to save in your cookie. The getURL() action will be attached to the button. 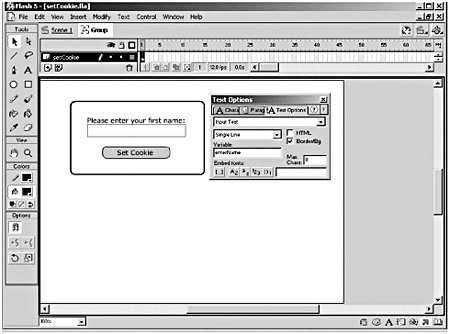 With the button selected, launch the Actions panel and add an on(release): on(release) { } The getURL() call will be to a function called setCookie. setCookie will take six arguments: -
The cookie name (myCookie) -
The name entered in the input field (_root.enterName) -
The number of days before the cookie expires (30 days) -
The path that the cookie should be returned for (/) -
The domain that the cookie is being sent from (leave this blank) -
Whether a secure connection is required (noleave it blank) -
Between the curly braces of the on(release) mouse event, add the getURL() (see Figure 27.5): getURL("javascript:setCookie('myCookie','"+_root.enterName+"', '30','/','','');"); Figure 27.5. The getURL() call to the setCookie function passes six parameters to the browser. 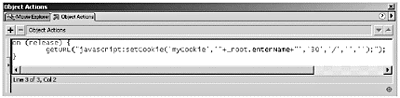 -
Save your file as Cookie.fla, and publish both the HTML and the SWF files. -
Open the HTML file that you just created in your HTML editor of choice. Set up the shell for your new function along with all its arguments. Enter the following code between the opening and closing HEAD tags: <SCRIPT> <!-- function setCookie(name,value,days,path,domain,secure) { } //--> </SCRIPT> -
All the parameters that you need for this function are already being passed in the proper format, with the exception of the expiration date. What you're passing in so far is just the number 30, and that stands for 30 days from now. You need to convert that to UNIX epoch time. You can get the current UNIX epoch time and then convert the number of days until expiration to milliseconds, and add that to the current UNIX epoch time. Sounds a little crazy, but it's actually pretty easy. Start by creating two new date objects: One is for today's date and the other for the expiration date. Add the code between the asterisks : <SCRIPT> <!-- function setCookie(name,value,days,path,domain,secure) { // ****************************************************** var expires = new Date(); var_today = new Date(); // ****************************************************** } //--> </SCRIPT> -
Now you're going to set up the calculation for the expiration date. You'll get today's date and add to it the number of days that you passed in, converted into milliseconds. All you have to do is add the following line: expires.setTime(today.getTime() + (1000*60*60*24*parseInt(days))); So far your code should look like this: <SCRIPT> <!-- function setCookie(name,value,days,path,domain,secure) { var expires = new Date(); var_today = new Date(); expires.setTime(today.getTime() + (1000*60*60*24*parseInt (days))); } //--> </SCRIPT> All you have left to do now is actually set your cookie. Tip The only values that you must pass into a cookie are the name and value, so you need to check the values that came in through the parameters to see whether they are blank. You can do that easily using the ?: conditional. The format is expression_1 ? expression_2 : expression_3, where expression_1 is an expression that evaluates to True or False. If expression_1 is true, the value of expression_2 is returned. Otherwise , the value of expression_3 is returned. -
By definition, name, value, and expires have values, so you can go ahead and reference them directly. You're going to be building a string to pass to document.cookie. Add the code between the asterisks: <SCRIPT> <!-- function setCookie(name,value,days,path,domain,secure) { var expires = new Date(); var_today = new Date(); expires.setTime(today.getTime() + (1000*60*60*24*parseInt (days))); // **************************************************************** ***** document.cookie = name + "=" + value + "; expires=" + expires + // **************************************************************** ***** } //--> </SCRIPT> -
On the next line, you'll start testing to see if the parameter being passed in has a value and then you'll print the appropriate string. For example, if the path was left blank, you'll add "" to the string; otherwise you'll add "; path=" + path . You'll do the same for domain and secure. Add the code between the asterisks (see Figure 27.6): <SCRIPT> <!-- function setCookie(name,value,days,path,domain,secure) { var expires = new Date(); var_today = new Date(); expires.setTime(today.getTime() + (1000*60*60*24*parseInt (days))); document.cookie = name + "=" + value + "; expires=" + expires + // **************************************************************** ***** ((path == "") ? "" : ("; path=" + path)) + ((domain == "") ? "" : ("; domain=" + domain)) + ((secure == "secure") ? "; secure" : ""); // **************************************************************** ***** } //--> </SCRIPT> Figure 27.6. The completed setCookie function gets the UNIX epoch time and sets all the variables that you need for your cookie. 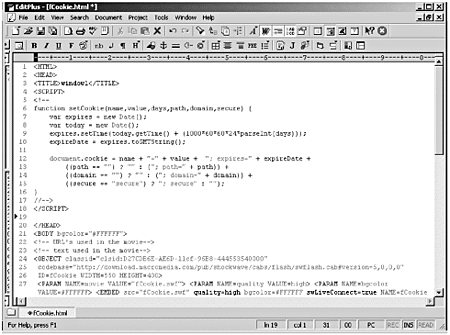 -
Save your file. Now open the HTML page in a browser. Enter your name into the text field, and press the button. Nothing happens. Or does it? How are you going to tell whether your cookie was set? You could try to find the cookie on your hard drive. If you're using Netscape, it'll be in a file called cookies.txt. Under IE, you'll need to find the appropriate Cookies folder in your user profile. Rather than go through all that, how about trying to retrieve the cookie that you just set? Setting the cookie is the hardest part. To retrieve a cookie, you have to know its name. First you check to see whether there are any cookies by checking the length of the document.cookie object. If there are, then you need to check whether the cookie you were trying to set exists. Exercise 27.3 Using getURL(default.htm) to Retrieve a Cookie Before you start writing the function to retrieve your cookie, you'll go back into your Flash movie and add a button that you can press to initiate the call to the new function. -
If you closed the Flash movie that you were using in the previous exercise, open it now. -
Before you do anything else, select Publish Settings and deselect HTML on the Format tab. You don't want to overwrite the JavaScript function that you've already written with a new HTML page. -
Select the Text tool and open the Text Options panel (Window > Panels > Text Options). Set the Text Type to Dynamic text, and click on the Stage to add a new textbox. -
With your textbox selected, make the following changes in the Text Options panel: Line Type: Single Line Variable: cookieName HTML: Not selected Border/Bg: Selected -
Duplicate your existing button, or drag another button from the Buttons Library (Window > Common Libraries > Buttons) onto the Stage. (See Figure 27.7.) Figure 27.7. Set up a dynamic text field with a variable named cookieName to capture the name/value pair that is stored in your cookie. As before, the getURL() action will be attached to the button.  -
With the new button selected, launch the Actions panel and add an on(release) mouse event. Inside the mouse event, add the following code to call the function that you are going to build: on (release) { getURL("javascript:getCookie('myCookie');"); } -
Save and publish your file. So far, all of your communication has been in one directionfrom Flash to the browser. Now you're going to do something a little different. You need to have the browser talk back to Flash. Fortunately, there is a way to do this. The plug-in and ActiveX control for both major browsers have built-in Flash methods that you can access with JavaScript. To get these methods to work, though, you have to make a few changes to your HTML file: -
The <OBJECT> tag must contain the ID attribute. -
The <EMBED> tag must contain the NAME attribute. -
The attribute swLiveConnect=true must be added to <EMBED> tag. The ID and NAME attributes identify your movie to JavaScript and must be the same for both tags. For now, you'll be working with only one of the Flash methods, SetVariable. The other methods will be covered in the last part of this chapter. In the next part of this exercise, you'll add these new elements to your HTML file and set up the function to retrieve your cookie. -
You should still have your HTML page open in your favorite HTML editor. -
Add the attribute ID=fCookie to the <OBJECT> tag. -
Add the attributes swLiveConnect=true NAME=fC to the <EMBED> tag. -
Now you're going to add a new function, getCookie(Name), between the opening and closing HEAD tags. The getCookie() function takes one parameter: name. Set up the shell for function by entering the code between the asterisksthe two lines inside the function add the hooks for Internet Explorer so that you can access the cookie object directly: <SCRIPT> <!-- // **************************************************************** ***** function getCookie(name) { var isIE = navigator.appName.indexOf("Microsoft") != -1; var fCookieObj = isIE ? fCookie : document.fCookie; } // **************************************************************** ***** function setCookie(name,value,days,path,domain,secure) { var expires = new Date(); var_today = new Date(); expires.setTime(today.getTime() + (1000*60*60*24*parseInt(days))); document.cookie = name + "=" + value + "; expires=" + expires + ((path == "") ? "" : ("; path=" + path)) + ((domain == "") ? "" : ("; domain=" + domain)) + ((secure == "secure") ? "; secure" : ""); } //--> </SCRIPT> -
You want to search the cookies based on the cookie name that you set earlier rather than just by the domain that set it. A single domain may set multiple cookies in your browser. If you look for a cookie set just by a specific domain, you'll get only the first cookie in that domain's list. You've already got the shell of your function set up. This time, instead of adding the code line by line, I'll show you the whole function and then break it down with comments. The completed getCookie() function looks like this: function getCookie(Name) { var isIE = navigator.appName.indexOf("Microsoft") != -1; var fCookieObj = isIE ? fCookie : document.fCookie; var search = Name + "="; if (document.cookie.length > 0) { start = document.cookie.indexOf(search); if (start != -1) { start += search.length; end = document.cookie.indexOf(";", start); if (end == -1) { end = document.cookie.length; } var value = document.cookie.substring(start,end); value = unescape(value); fCookieObj.SetVariable("cookieValue", value); } } } So what does all this mean? Just read through the commented lines here, and you should get the idea: function getCookie(Name) { var InternetExplorer = navigator.appName.indexOf("Microsoft") != -1; var fCookieObj = InternetExplorer ? fCookie : document.fCookie; // Set up a new variable called search to hold the value of // the parameter passed into the function plus =. In this // case, the value of search will be "myCookie=" var search = Name + "="; // Check to see if there are any cookies set for the browser if (document.cookie.length > 0) { // If the length of document.cookie is greater than 0, use the // indexOf() property of the string to find and return the // start position of the occurrence of "myCookie=". // If "myCookie=" is not found, indexOf() returns a value // of 1 start = document.cookie.indexOf(search); // If the index is not 1, "myCookie=" was found if (start != -1) { start += search.length; // The end of the string is marked by a ;, so find the index of // the semi-colon begin the search at the index of start end = document.cookie.indexOf(";", start); if (end == -1) { end = document.cookie.length; } // Use the start and end variables to extract the substring you // want from the document.cookie string var value = document.cookie.substring(start,end); value = unescape(value); // Use the Flash method, SetVariable, to send a name/value pair back // to the main timeline of your Flash movie. fCookieObj.SetVariable("cookieValue", value); } } } -
After you've entered the getCookie() function, save your HTML file and load it into a browser. You set your cookie in the previous exercise, and you should be able to immediately check for itjust click the second button. (See Figure 27.8.) Figure 27.8. When you have your getCookie() function in place, all you have to do is click on the button to retrieve your cookie. 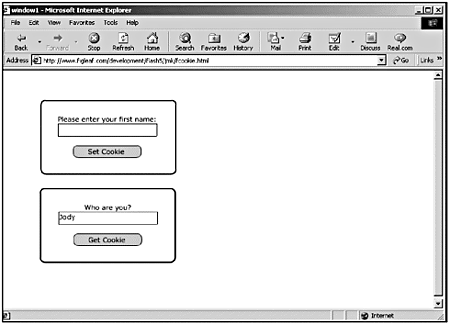 Tip When you are troubleshooting these files, make liberal use of the SetVariable Flash method. Just set up a series of dynamic textboxes in your Flash movie, and use SetVariable to send them values at critical points.
Using getURL() isn't the only way to get Flash to talk to your browser. You can also use the FSCommand() action. FSCommand() The FS commands have been part of Flash since its inception as Future Splashand, in fact, that's what the FS originally stood for: Future Splash. The FSCommand() action enables you to send up to two strings to whichever application is hosting your Flash movie. In a Web browser, the FSCommand() action can be used to call either JavaScript or VBScript functions that exist in the HTML much in the same way that the getURL() action does. The obvious question becomes why you would choose one action over another. You'll probably find that you use getURL() much more frequently than you use FSCommand() when communicating with the browser, for these reasons: So why would you ever use FSCommand()? -
You can get rid of the annoying click that you get whenever you call the getURL() action from Internet Explorer. -
FSCommand() is a fire-and-forget solution. In other words, it doesn't matter whether there is a script on the HTML page to catch itit won't throw an error. On the other hand, if you call a JavaScript function with getURL() and there is no function on the page to catch it, getURL() will generate an ugly little JavaScript error. If you use the Flash with FSCommand template in Publish Settings, your life will be even easier because Flash will create an HTML page for you with all the hooks that you need to use the FSCommand(). It automatically adds the ID and NAME attributes, as well as the swLiveConnect attribute and the shell for the function that you can call. With getURL(), you called a function based on its name, and you could have had as many functions as you wanted to. It's a little different with FSCommand(). When using FSCommand() in Netscape, Flash automatically calls a JavaScript function named MOVIENAME_FSCommand(); in Internet Explorer, Flash calls a VBScript function named MOVIEID_DoFSCommand(), where MOVIENAME and MOVIEID are derived from the NAME and ID attributes of the OBJECT and EMBED tags. Fortunately, the Flash with FSCommand template includes the VBScript function, which, by default, simply calls the JavaScript function. This eliminates the need to actually write your code in both scripting languages. You've got to love that. It is also important to know what browsers don't support FSCommand(). The two most notable browsers are Netscape 6 (all platforms) and Internet Explorer on the Mac. FSCommand doesn't work on those browsers because they both lack the code that is used to connect plug-ins with JavaScript. That being said, it's time to take a look at one of the ways you can use the FSCommand(): to create alert messages. Try this one in Internet Explorer, and listen for the click when you click your buttonit won't be there. Exercise 27.4 Using FSCommand() with Web Browse For this example, you'll be making an interface for Flash to create JavaScript alert messages. This can come in very handy when you are trying to debug a movie outside the Flash authoring tool. -
Create a new Flash movie. -
Select the Text tool and draw a textbox long enough to hold a short message on the Stage. Open the Text Options panel (Window > Panels > Text Options) and make the following changes: Text Type: Input Text Line Type: Single Line Border/BG: Selected Variable: alertText -
Create a new button, or copy a button from the Common Libraries, and place it beneath the text field. (See Figure 27.9.) Figure 27.9. To capture a message to display for this exercise, you need to set up an input text field and a Submit button. 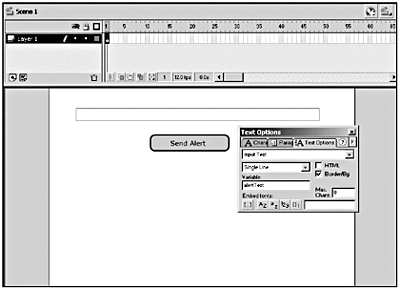 -
Select the button, launch the Actions panel, and add the following code: on(press){ fscommand("alert", alertText); } -
Save your file as fsalert.fla. -
Now open the Publish Settings dialog box (File > Publish Settings) and make sure that both Flash and HTML are selected on the Formats tab. Select the HTML tab. For Template, choose Flash with FSCommand; then click Publish. -
In your text editor of choice, open your new fsalert.html file. It should look like this: <HTML> <HEAD> <TITLE>fsalert</TITLE> </HEAD> <BODY bgcolor="#FFFFFF"> <SCRIPT LANGUAGE=JavaScript> <!-- var InternetExplorer = navigator.appName.indexOf("Microsoft") != -1; // Handle all the FSCommand messages in a Flash movie function fsalert_DoFSCommand(command, args) { var fsalertObj = InternetExplorer ? fsalert : document.fsalert; // // Place your code here. . . // } // Hook for Internet Explorer if (navigator.appName && navigator.appName.indexOf("Microsoft") != -1 && navigator.userAgent.indexOf("Windows") != -1 && navigator.userAgent.indexOf("Windows 3.1") == -1) { document.write('<SCRIPT LANGUAGE=VBScript\> \n'); document.write('on error resume next \n'); document.write('Sub fsalert_FSCommand(ByVal command, ByVal args)\n'); document.write(' call fsalert_DoFSCommand(command, args)\n'); document.write('end sub\n'); document.write('</SCRIPT\> \n'); } //--> </SCRIPT> <!-- URL's used in the movie--> <!-- text used in the movie--> <OBJECT classid="clsid:D27CDB6E-AE6D-11cf-96B8-444553540000" codebase="http://download.macromedia.com/pub/shockwave/cabs/flash/ swflash.cab#version=5,0,0,0" ID=fsalert WIDTH=550 HEIGHT=400> <PARAM NAME=movie VALUE="fsalert.swf"> <PARAM NAME=quality VALUE=high> <PARAM NAME=bgcolor VALUE=#FFFFFF> <EMBED src="fsalert.swf" quality=high bgcolor=#FFFFFF WIDTH=550 HEIGHT=400 swLiveConnect=true NAME=fsalert TYPE="application/ x-shockwave-flash" PLUGINSPAGE="http://www.macromedia.com/ shockwave/download/index.cgi?P1_Prod_Version=ShockwaveFlash"> </EMBED> </OBJECT> </BODY> </HTML> Notice that Flash automatically added the NAME, ID, and swLiveConnect attributes to the <EMBED> and <OBJECT> tags. Quite nicely , Flash has also pointed out to you where your JavaScript code will go, right where it says "Place Code Here"! -
Replace that entire line (including the comments) with the following code: if (command == "alert"){ alert(args); } -
Save your file, open it in your favorite browser, and give it a go. Enter a message in the input box and click the buttoninstant pop-up message. (See Figure 27.10.) Figure 27.10. If you enter a message and click the button, you get a pop-up message. 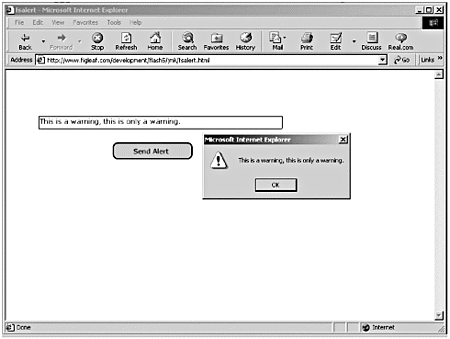 The Standalone Player Although the previous example was very cool, FSCommand() is actually most often used in conjunction with the Standalone Player. A special set of FSCommand() options exists for the Flash Standalone Player: -
allowscale. If set to false, the movie will not scale if the window size is changed. -
exec . Launches an external application, which can be referenced relative to the Standalone Player, or specified as an absolute path. The path uses forward slashes (/) rather than backslashes (\). -
fullscreen. If set to true , the Standalone Player is maximized to fill the entire screen. -
quit. Exits the movie. -
showmenu. If set to true, the menu will not be displayed. -
trapallkeys. If set to true, all keystrokes are sent to the Flash movie. Using getURL() in the Standalone Player will cause Internet Explorer to open a Web page, even if Netscape is your default Web browser. There is currently no workaround for this. LoadVariables() can be used to send and receive variables from a text file or middleware on the server. The GET method will always be used when called by the Standalone Player, even if POST is specified. Note When publishing HTML, Flash does not insert the swLiveConnect=true argument in the <EMBED> tag unless you use the Flash with FSCommand template in Publish settings. Be sure to add this argument manually, or the Flash methods will not work in Netscape.
JavaScript can be used to both get and set Flash variables, as well as to perform operations in Flash by using Macromedia's JavaScript methods for Flash objects. You'll look at these next. |