The Basic Smart Clips
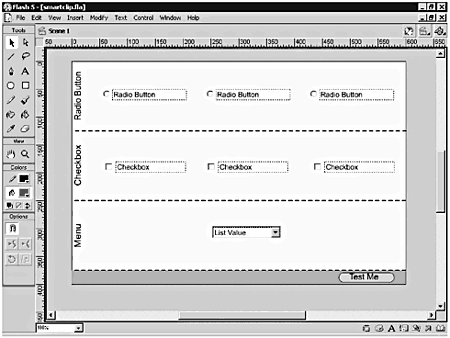
| Radio buttons , check boxes, and drop-down menus are familiar interface elements to anyone who has ever spent time on the Internet. You probably just take them for granted because they are so easy to implement using HTML and JavaScript. Creating those same elements in Flash, however, is a bit more involved. Fortunately, Macromedia has taken care of this problem for you by prepackaging these same elements as smart clips in Flash. Smart clips are preprogrammed to accept specific parameters or values. By changing the values of the parameters that are passed into a smart clip, you can customize its appearance or functionality. (See Figure 20.1.) Figure 20.1. Smart clips are generic movie clips that are created in Flash and that you can customize for use in any project. When you want to use one of these smart clips in a project, all you have to do is the following:
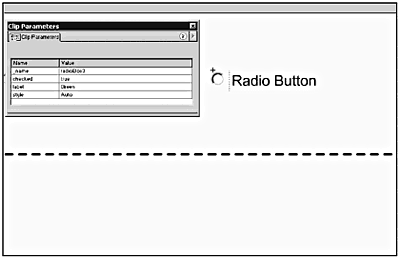
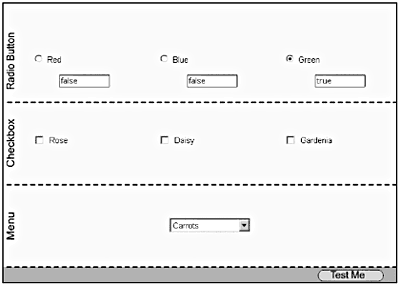
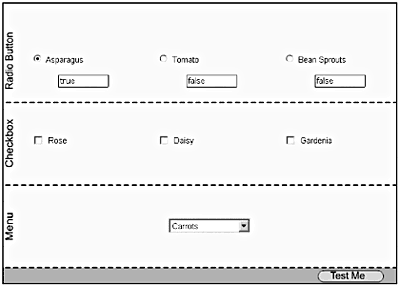
That's really all there is to itdrag and drop and change a few values. The three smart clips that come with Flash 5 look like their HTML form counterparts. In the following sections, you learn how to incorporate these basic clips into your Flash projects. RadioButton Smart ClipThe RadioButton smart clip has the same functionality and purpose as the HTML radio button. You use radio buttons when you want your viewer to pick one item out of a list of several. You can pass four different parameters into the RadioButton smart clip:
Adding radio buttons to the Stage is as simple as drag and drop. Tip The _name property overrides the instance name, if it has been set in the Clip Parameters panel. Tip Changing the default variable values in a smart clip symbol does not change the values of the instance(s) on the Stage. Exercise 20.1 Adding RadioButton Smart Clips Before you can begin to work with the RadioButton smart clip, you need to open the Smart Clip Library (Window > Common Libraries > Smart Clips) and drag an instance of the RadioButton onto the stage.
The CheckBox smart clip is very similar to the RadioButton smart clip. They share most of the same parameters. CheckBox Smart ClipCheck boxes are best used when you want your user to have the ability to select more than one choice for a particular question. The smart clip check boxes created in Flash behave the same way as HTML check boxes. The parameters you can pass into the CheckBox smart clip are exactly the same as the ones for the RadioButton smart clip:
Exercise 20.2 Adding CheckBox Smart Clips to the Stage You add check boxes to the Stage in the same way that you add radio buttons.
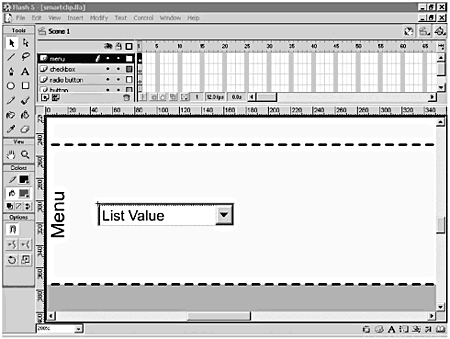
The next smart clip, the Menu smart clip, adds another level of complexity to the smart clips that come with Flash. Menu Smart ClipOf the three smart clips included in Flash 5, the Menu smart clip is the most complex. (See Figure 20.6.) However, you'll see that implementing a complex smart clip is still a relatively painless process; you just need to fill out the Clip Parameters panel. With this smart clip, you limit users to one selection from a drop-down list. Figure 20.6. The Menu smart clip is the most complex of the basic smart clips. When your user clicks the menu, the entire list opens with all choices displayed. This enables the user to make a new choice. When the user clicks one of the items to make a choice, the menu closes again, showing the new choice in the display window. The parameters you pass into the Menu smart clip are quite different from those you passed into the RadioButton and CheckBox smart clips. In this case, you are passing in an array (see Listing 20.1). Listing 20.1 The Parameter Passed to This Smart Clip Is an ArrayParameter Info: items[] - A dynamic list of text items that you want to appear in your menu structure. Remember that arrays are used to hold lists of data that might be unpredictable in order or length. Each element of an array is referenced by its index, which appears in brackets next to the array name. In the next exercise, you add a Menu smart clip to your movie and configure it by making changes in the Clip Parameters panel. Exercise 20.3 Adding Menu Smart Clips to the Stage Adding a Menu smart clip to the Stage is no different from adding any other smart clip just drag it from the Smart Clips Library onto the Stage.
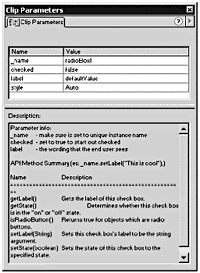
That's all well and good, but now what? How do you get information you can use from the smart clips you just set up so that you can actually do something? Getting Information from Smart ClipsTake a look at the Description pane of the Clip Parameters panel for the RadioButton smart clip. You'll see two sections: the Parameter info and the Application Programming Interface (API) Method Summary (see Listing 20.2). Listing 20.2 The Clip Parameters Panel for the RadioButton Has Two Sections in the Description Pane: Parameter Info and API Method Summary Parameter info: _name - make sure is set to unique instance name checked - set to true to start out checked label - the wording that the end user sees API Method Summary (ex: _name.setLabel("This is cool");) Name Description ====================================================== getLabel() Gets the label of this checkbox. getState() Determines whether this checkbox is in the "on" or "off" state. isRadioButton() Returns true for objects which are radio buttons. setLabel(String) Sets this checkbox's label to be the string argument. setState(boolean) Sets the state of this checkbox to the specified state. The Parameter info section tells you a little bit about the parameters that you pass into the clip. The API Method Summary is even more interesting. This tells you what functions have been built into this smart clip. Pay attentionyou can use these functions to control the behavior of the smart clip. You also can pass the values returned by these functions into variables you create in your Flash movie. The RadioButton smart clip has five built-in functions:
The parameters and functions are almost identical for the RadioButton and CheckBox smart clips. The one exception is that the CheckBox smart clip does not have an isRadioButton function. If you try to call that function for a check box, you get a value of false because the function doesn't exist. If you're interested in the actual code where these functions are created, check Listing 20.3. The best thing about Listing 20.3 is that you didn't have to write a single line of it! Listing 20.3 The Functions for the RadioButton Smart Clip Are Embedded in the Clip Itself onClipEvent(load) { // check style preference if (_parent.style.toUpperCase() == "AUTO") { playerVersion = getVersion(); _parent.platform = playerVersion.substr(0, 3); } else { _parent.platform = _parent.style.toUpperCase(); } // create methods for the parent class _parent.child = this; _parent.getLabel = function () { return child.label; } _parent.getState = function () { return child.checked; } _parent.isRadioButton = function () { return true; } _parent.setLabel = function (label) { child.label = label; } _parent.setState = function (state) { if (state) { // turn off all of the buttons for (var tmp = head; tmp != null; tmp = tmp.next) tmp.setState(false); // now turn on ours if (platform == "MAC") { child.gotoandstop(4); } else { child.gotoandstop(2); } } else { if (platform == "MAC") { child.gotoandstop(3); } else { child.gotoandstop(1); } } child.checked = state; } // set the initial state stop(); label = _parent.label; _parent.head = _parent; // make our parent the start _parent.head.next = null; // init the next ptr to null var obj = _parent._parent; // point to the object where the radio buttons are instantiated // link all of the radio buttons for (var i in obj) { // check to see that the container is a radio button // and make sure the container is not our container if (obj[i].isRadioButton() && obj[i] != _parent) { var rButton = obj[i]; rButton.head = this._parent; rButton.next = _parent.head.next; _parent.head.next = rButton; } } if (_parent.checked.toLowerCase() == "true") { _parent.setState(true); } else { _parent.setState(false); } } onClipEvent(mouseDown) { if (hitTest(_root._xmouse, _root._ymouse, false)) { if (_parent.getState()) { _parent.setState(false); } else { _parent.setState(true); } updateAfterEvent(); } } Tip If you want to use more than one set of radio buttons, you'll need to group each set of smart clips inside a separate movie clip; otherwise , Flash enables only one radio button to be selected. The same holds true for check boxes and menus. So how do you use those built-in functions? Getting information from the smart clip is the easiest place to start. Each radio button has a unique instance name (you assigned them in the previous exercise): radioBox1, radioBox2, and radioBox3. To call one of the built-in functions for a radio button, just use dot syntax and then pass the value returned by the function into a variable. In the next exercise, you do just that. Exercise 20.4 Getting Information from RadioButton Smart Clips The first thing you do is put a placeholder for a variable on the Stage so that you can see the values returned by the functions.
You can do exactly the same thing for the getLabel() and isRadioButton() functions. After you have those values in variables, you can do whatever you want with them. Now that you can get values out of your smart clip, how can you send values back in? What if you wanted to change the Label names or the currently set button states without actually going back in and editing the Clip Parameters panel? Piece of cakeyou do it with ActionScript. Exercise 20.5 Passing Information to RadioButton Smart Clips The easiest way to pass information back into your smart clip is to add some additional actions to the Test Me button.
What if you wanted to change the Label names without having to open up the FLA file, edit it, and re-export the SWF? Not a problem. All you have to do is store the information in a text file and load the variables from there. Tip When you use loadVariables() to load data from a text file, the format of the text file is important; the extension on the file is not. That means that as long as the text in the file is in the proper name/value pair format, the file can be created as a .txt (simple text file), .asp (Active Server Page), .cfm (Cold Fusion), .pl(Perl), .php (PHP), or whatever kind of file. It doesn't matter. Exercise 20.6 Updating RadioButton or CheckBox Smart Clips from a Text File The format for the text file is fairly straightforward; it is just a list of name/value pairs separated by ampersands (&). Before you create the text file, you remove the variables that you initialized in frame 1 of the main timeline. Then you create the text file. Last, you add new Actions to the Test Me button.
By now it should be pretty clear how you get information into and out of smart clips. You can use the Clip Parameters panel or you can use ActionScript to retrieve and send variables. With some smart clips, you won't be provided with convenient functions that enable you to set your parameters with ActionScript. In some cases, you have to dig into the underlying code to figure out how to do that. Exchanging Data with the Menu Smart ClipIn terms of extracting information out and sending information back in, the Menu smart clip is a horse of a different color. There are no prebuilt functions for you to use to set the values of the parameters. You already know the information is stored in an array. You might be wondering if there is a way to populate the array using ActionScript. Of course there is. You just need to create a new Array object. Where do you load the array? That's easy. You get that information from the Parameters info in the Description pane of the Clip Parameters panel (see Listing 20.4). The array used by the smart clip is items[]. Listing 20.4 The Parameter Passed into This Smart Clip Is an Array Named Items[ ]the CallBack Summary Tells You Where to Create a Function to Control the Menu Clip Parameter Info: items[] - A dynamic list of text items that you want to appear in your menu structure. CallBack Summary: // Define the following method in the onLoad() handler. // OnMenu() will be invoked whenever you select any items // in the menu. onClipEvent(load) { // item - a string in the form "itemXX" where "XX" // is the item offset // label - the text string for the item function onMenu(item, label) { //+ // your code goes here //- } } To load the array using ActionScript, all you have to do is select the smart clip on the Stage and add an onClipEvent: onClipEvent(load) { FigArray = new Array("Branden","Doug","Jody"); this.items = FigArray; } Now you know how to get information into the Menu smart clip, but how do you get information back out? The CallBack Summary in the Clip Parameters panel (refer to Listing 20.4) describes where you need to add code to make your menu do something when the user makes a selection. You'll be creating an onMenu() function that gets called every time the user makes a selection from your menu. Where is the code that calls onMenu()? It's attached to the Menu Assets movie clip in frame 2 on the Values layer in the menuwin or menumac movie clip (see Listing 20.5). Listing 20.5 The Call to the onMenu() Function Is Nested Two Movie Clips Deep in the Menu Smart Clip onClipEvent (mouseDown) { // see if we pressed on our menu item if (hitTest(_root._xmouse, _root._ymouse, false)) { // call the method before doing a goto(1) // a goto(1) in the parent will cause // this handler to go away _parent._parent.OnMenu(parseInt(_name.substr(4, 3)), label); _parent._parent.currentValue = _parent["item"+parseInt(_name.substr(4, 3))].label; _parent.prevFrame(); updateAfterEvent(); } else if (_parent.currentitem.hittest(_root._xmouse, _root._ymouse)) { _parent.prevFrame(); updateAfterEvent(); } } So what do you want to have happen when someone clicks a menu selection? You have a number of choices. You could send him or her to another frame in your current movie. You could load a new movie. You could redirect him or her to another Web site entirely, or you might just store the information in a variable for later use. In fact, you can do just about anything you want. The onMenu() function takes two parameters: item and label. Item is the position in the array, and label is the text string in the array. In the next exercise, you set up the onMenu() function to send the user to a labeled frame in another movie clip. Exercise 20.7 Creating the onMenu Function The onMenu() function is triggered when a user makes a selection from your list. First, you set up the onClipEvent(load) function to populate your list. Then all you need to do is add a little code to that function to make your list do something. You need to be able to associate a location to go to with the index of the item in the array. What better way to do that than use another array?
This works great, but what if you wanted to pass the data in from a text file? That gets a little more complex and requires some reworking of your file. Using a Text File to Populate the Menu Smart ClipYou probably want to know whether you can populate the array from a text file like you did for the other smart clips. The answer is "yes"; it's just a little more complex. You have to pass the array values to a variable as a delimited string of information. Then you have to parse that string inside Flash and place it in an array. What does that mean in English? The easiest way to explain it is to show you. First, take a look at the format for the text file: data=Pick a Fig,Branden,Doug,Jody&labels=Fig_1,Fig_2,Fig_3,Fig_4 In this case you are passing a comma-delimited list into the variables named data and labels . The comma just separates what will be the different elements of the arrays. Right now, these are just strings of information; to break them up and pass them into arrays, you have to use the split method of the String object. You can use Flash's internal string object to parse the string into arrays, but it's notoriously slow. Alternately, you can include an ActionScript file, written by Branden Hall, that overrides Flash's internal string functions with more efficient ones. All you have to do is place the file (string.as, found in the Chapter_16/Assets folder) in the same directory as your Flash file and include it as an external .as file in your Actions list: #include "string.as" Notice that there is no semicolon at the end of this statement. That flies in the face of what you were told earlier about always ending statements with semicolons. In this case, however, it is the proper syntax. If you slap a semicolon on the end of the line, you get a syntax error. If you're interested in what's in the string.as file, take a look at Listing 20.6. Listing 20.6 The string.as File Is Used to Override Flash's Internal String Object's Methods //-------------------------------------------------------------------- // String object rewrite v1.5 // Branden J. Hall // Fig Leaf Software // // Thanks to Damien Morton for the indexOf code // Thanks to Steven Yi for the *great* idea for the split code // Thanks to Dave@opaque.net for an additional speed boost to split // Thanks to Jobe Marker for a bug fix to the split code //--------------------------------------------------------------------- String.prototype.charAt = function(index){ return(substring(this, index+1, 1)); } String.prototype.concat = function(){ var r = this.toString(); for (var i=0; i<arguments.length; ++i){ r += arguments[i]; } return (r); } String.prototype.indexOf = function(sub, i){ if (i == null) i = 0; var size = sub.length; var last = this.length - size + 1; while ((i <= last) && (substring(this, 1+i++, size) != sub)); return (i <= last ? (i-1) : -1); } String.prototype.lastIndexOf = function(sub, i){ size = sub.length; i == null ? i = this.length - size + 1 : ++i; if (sub.length == 0) return i-1; while ((i >= 0) && (substring(this, i--, size) != sub)); return (i == -1 ? -1 : (i)); } String.prototype.slice = function(s, e){ return(substring(this, s+1, e-s)); } String.prototype.split = function{ if (d != null){ var r = new Array(); var size = this.length; var c = 0; var n = 0; if (d != ""){ for (var i=0; i<=size; ++i){ if (substring(this, i+1, 1) == d){ r[n] = substring(this, c+1, i-c); c = i+1; ++n; } } if (c != i){ r[n] = substring(this, c+1, i-c); } }else{ for (var i=0; i<s; ++i){ r[i] = substring(this, i+1, 1); } } }else{ r = new Array(this.toString()); } return (r); } String.prototype.substr = function(s, l){ if (l == null){ l = this.length - s; } return(substring(this, s+1, l)); } //------------------------------------------------------------------- There is another version of this .as file floating around that has the white space removed. Yes, it does make for a smaller file, but it's completely unreadable. If you never plan to make any modifications to the code, that's fine. Otherwise, stick with this one. To actually split the strings into arrays, you have to first create a new array object and then call the split function: FigArray = new Array(); FigArray = data.split(","); FigLabel = new Array(); FigLabel = labels.split(","); Before you can split your strings, however, you're going to have to use the loadVariables() function to get them into your movie. You can do that part inside onClipEvent(load) or on the first frame of the main timeline, but you'll need to use onClipEvent(data) to make sure the variables have loaded before you try to parse them. Remember that issue of latency? Whenever you use loadVariables(), you have to wait until the variables have loaded before you can use them. That has a major impact here. If the Menu smart clip is already on the Stage and you use the variables from a loadVariables() call to populate it, a funny thing happens. Everything loads and works just fine, except the value of the default label is going to be picked up from whatever is set in the smart clip parametersnot from the data you send in. As soon as you click the menu to expand it, everything is fine. Until then, however, you have a problem. How do you work around this? One way to set this up is to use the attachMovie() method to attach the Menu smart clip as soon as the data is loaded. However, you're then left with no place to put your onClipEvent(data). You're going to have to get a little creative here. You really need to use onClipEvent(data) because you want to be sure the variables have loaded. Why not just create a blank movie clip to be a container for the Actions you need? That works, but there is one more issue to resolve. Where do you put the onMenu() function? You can't attach it to the Menu smart clip; it's not on the Stage yet. You're going to have to modify the Menu smart clip in the Library just a little. You'll need to add the onMenu() function to the Actions list in frame 1 of the smart clip. You can go a step further and make this extremely modular by loading the Figs movie from an external SWF file instead of having it embedded as a movie clip. That way, if you want to make changes to the overall movie, you need to edit just the Figs.fla file and the text filenothing else. You know you're going to add Actions in three places: the main timeline, a container movie clip, and the Menu smart clip itself. You know the pieces you need to put this together. Why not do it? Exercise 20.8 Loading the Menu from a Text File The end result of this exercise will look, and perform, exactly like the last exercise, but this one is more adaptable. If you add more frames to the Figs movie clip on the Stage, all you have to do is update the text file to add the additional variables you'll need.
If you modify this movie, all you have to do is open the Figs.fla file, add what you want, export the SWF, and then modify the text file to add the new variables. That's it. You won't actually have to open or publish this movie again. |

EAN: 2147483647
Pages: 257