Custom Cursors With Flash 5, it's easy to create custom cursors. You can replace the existing boring arrow with just about anything you like. You also can set up the cursor to react to objects. You can control the cursor only while users are inside the Flash movie; after they roll off the movie, the cursor returns to its default state. The steps for creating a custom cursor are fairly straightforward: -
Hide the existing cursor. -
Create a movie clip to replace the cursor. -
Track the x and y coordinates of the mouse so that you can control your cursor. Hiding the existing cursor is easy. All you need to do is take advantage of the new Flash 5 Mouse() object. The Mouse() object has two methods : hide and show. The hide method, big surprise here, hides the cursor. You probably can guess what the show method doesit shows a cursor that's been hidden. If you hide the cursor, you need to replace it with something. That something will be a movie clip that you create. Here's where the fun begins. Your new cursor can have as many different states as you want it to have. It can react differently to each and every object on the Stage, if you want it to. You've hidden the default cursor, but you still want your new cursor to follow your user 's mouse movements. How do you do this? The onClipEvent() has a method called mouseMove. Use the _xmouse and _ymouse properties to track the mouse position at any point in time. In the next exercise, you create a movie that will have an irregular shape on the Stage. When the mouse pointer rolls over the shape, the pointer will change to an open hand. If you click the shape, the hand closes and you can drag the shape around. Here, you have a combination of actionsyou're combining what you already know about drag-and-drop with cursor control. Exercise 17.3 Setting Up the Basic Movie Before you can set up the actions to create a custom cursor, you need to get the basic movie elements in place on the Stage. -
Open cursor.fla in the Chapter_17/Assets folder on the CD and save it to your hard drive. -
Open the Library (Windows > Library). You'll see a single folder named cursor art with two movie clips: cursor and hit area. The cursor movie clip has two labeled frames : Open and Closed. The Open frame corresponds to the open hand, and the Closed frame corresponds to the closed hand. -
Select the cursor layer and drag a copy of the cursor movie clip onto the Stage. Give the cursor movie clip an instance name of cursor. -
With the cursor movie clip selected, launch the Actions panel. When the movie clip first loads, you want the cursor movie clip to be invisible, so add the following code to the Actions list: OnClipEvent(load){ this._visible = false; } -
Save and test your movie. The default cursor should still be active and the cursor movie clip should be invisible. Next you set up the hit area. This is the area over which the custom cursor will be visible. The hit area also will be draggable. Exercise 17.4 Setting Up the Hit Area for the Custom Cursor The code for the hit area movie clip will be a lot more complex than the one for the cursor clip because it will handle all the interactions. When you're done, it will capture four events: load, mouseMove, mouseDown, and mouseUp. You start with the least complex event (load) and build up to the most complex event (mouseMove). -
Continue with the cursor.fla movie clip or open cursor_1.fla from the CD. Select the Area layer and drag a copy of the Area movie clip onto the Stage. -
After the movie first loads, you need to initialize two variables. These keep track of whether the cursor is over the hit area and whether the mouse is being held down. To initialize these variables on load, enter the following code: onClipEvent(load){ over = false; down = false; } -
The next event you're going to code is the mouseDown event. This event fires any time the mouse is pressed, no matter where the cursor is on the Stage. First you need to check whether it's currently over the movie clip. If the mouse button is down and the variable over is true (if the cursor is over the hit area), you'll make the cursor switch to the closed hand. Then you start your drag operation. After the last line of code you entered in Step 2, add the following: onClipEvent(mouseDown){ if (over){ _root.cursor.gotoAndStop("closed"); down = true; this.startDrag(); } } -
The next event you have to script is mouseUp. This script should run only if down is currently set to true because you care about the mouseUp event only if the movie clip is being dragged around. If it is, you need to change the cursor back to the open hand, set the down variable back to false, and stop dragging the movie clip. To accomplish this, enter the following code: onClipEvent(mouseUp){ if (down){ _root.cursor.gotoAndStop("open"); this.stopDrag(); down = false; } } The final event you have to account for is the mouseMove event. This event fires every time the mouse is moved, so you need to keep your code as compact and efficient as possible. Because this code runs at every slight twitch of the mouse, long or inefficiently written code will slow down your movie. -
Your first test is to see whether the mouse is currently over the hit area movie clip. To do this, you need to use the hitTest() method of the movie clip object. You pass this method three parameters: the current x position, the current y position, and whether you want to check for the actual shape of the movie clip (true) or just its bounding box (false). This is known as the Shape Flag option. To set up the shell for the mouseMove() event and the hitTest(), enter the following code: onClipEvent(mouseMove){ if (this.hitTest(_root._xmouse, _root._ymouse, true)){ } } -
Think about what needs to happen if the cursor is over the hit area. Remember that you initialized the over variable to false when the movie loaded. Check whether that variable is still false; if it is, you want to change it to true. This also is when you'll hide the default cursor and change the visibility of the cursor movie clip (which currently is set to the open hand) to true. Enter the following code: onClipEvent(mouseMove){ if (this.hitTest(_root._xmouse, _root._ymouse, true)){ if (!over){ over = true; Mouse.hide(); _root.cursor._visible = true; _root.cursor.gotoAndStop("open"); } } } -
Save your movie and test your file. You should be able to mouse over the shape on the Stage and watch the cursor change to the open hand. Even though you can change your cursor at this point, you won't be able to move it yet. You can click the hit area and drag it, but your custom cursor won't move. (See Figure 17.2.) Figure 17.2. At this stage, when you mouse over the hit area, your mouse pointer disappears and is replaced by the open hand. 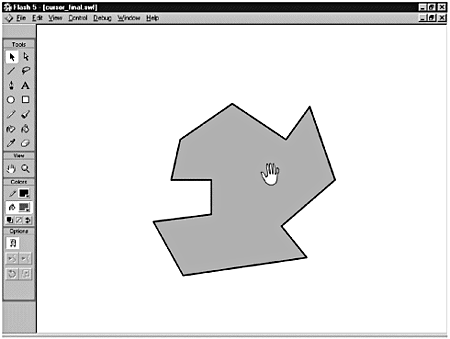 You don't need to do anything special if the over variable was already set to true because that means nothing has changed that you're concerned about. If you were over the hit area the last time the mouse moved and you're still over the hit area, nothing needs to be adjusted. Now you need to set up an else statement to handle what will happen if you roll off the movie clip. If you're no longer over the hit area, you need to check whether over is still set to true. You also need to check whether down is false. Why do you care if down is false? Well, if down is true, you're actually dragging the hit area; if you move your mouse quickly enough, the drag action might not keep up with you, but that doesn't count as rolling off the hit area. You basically need to reverse the process you set up when you rolled over the hit area: Set over to false, show the mouse pointer, and hide the custom cursor. -
Position your cursor and enter the code between the asterisks : onClipEvent(mouseMove){ if (this.hitTest(_root._xmouse, _root._ymouse, true)){ if (!over){ over = true; Mouse.hide(); _root.cursor._visible = true; _root.cursor.gotoAndStop("open"); } //************************************************** }else{ if (over && !down){ over = false; Mouse.show(); _root.cursor._visible = false; } //************************************************** } } Note If you did any ActionScripting in Flash 4, you'll notice some differences in the operators that get used in Flash 5. This is particularly noticeable for the logical AND, OR, and NOT operators. In the new syntax, AND is replaced by &&. Also known as the short-circuit AND, && first evaluates the left side of the expression and then returns a Boolean true or false. If the expression is true, Flash evaluates the right side of the expression. If both expressions are true, the final result is true. If either side of the expression evaluates to false, the final result is false. The logical OR is replaced by . Using , Flash evaluates both sides of the expression. If either side of the expression is true, the final result is true. The Logical NOT is replaced by !, which inverts the value of an expression or variable and returns a Boolean true or false. -
There's one more major issue with which you need to deal. You need to be able to move the custom cursor around. When do you need to do this? You need to do this when you are either over the movie clip or dragging the movie clip. In either case, you need to update the position of the cursor movie clip. All you need to do is set the x and y positions of the movie clip equal to the x and y positions of the mouse. (See Figure 17.3.) Figure 17.3. Now when the custom cursor is in the "Closed" state, you can drag the hit area while updating the position of the custom cursor at the same time. 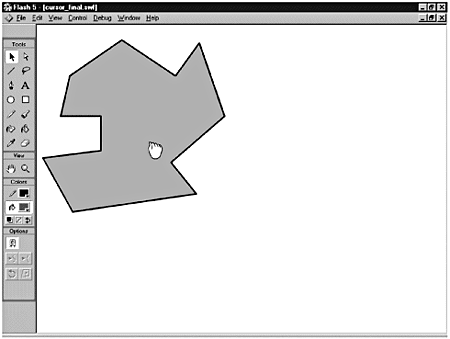 The code you enter should go just after the close of the initial if statement. Enter the code between the asterisks: onClipEvent(mouseMove){ if (this.hitTest(_root._xmouse, _root._ymouse, true)){ if (!over){ over = true; Mouse.hide(); _root.cursor._visible = true; _root.cursor.gotoAndStop("open"); } }else{ if (over && !down){ over = false; Mouse.show(); _root.cursor._visible = false; } } //************************************************** if (over down){ _root.cursor._x = _root._xmouse; _root.cursor._y = _root._ymouse; } //************************************************** } -
All you have to do to finish your code is to add a special action to make the dragging a little more smooth. This action is called updateAfterEvent(). It forces the movie clip to redraw any time this event is fired . Between the last two curly braces, enter the following: updateAfterEvent(); -
Check your code and make sure you don't have any syntax errors, and then save and test your movie! If you have any questions about the code, refer to Listing 17.2. Listing 17.2 The Completed Actions for the Hit Area Movie Clip onClipEvent(load){ over = false; down = false; } onClipEvent(mouseDown){ if (over){ _root.cursor.gotoAndStop("closed"); down = true; this.startDrag(); } } onClipEvent(mouseUp){ if (down){ _root.cursor.gotoAndStop("open"); this.stopDrag(); down = false; } } onClipEvent(mouseMove){ if (this.hitTest(_root._xmouse, _root._ymouse, true)){ if (!over){ over = true; Mouse.hide(); _root.cursor._visible = true; _root.cursor.gotoAndStop("open"); } }else{ if (over && !down){ over = false; Mouse.show(); _root.cursor._visible = false; } } if (over down){ _root.cursor._x = _root._xmouse; _root.cursor._y = _root._ymouse; } updateAfterEvent(); } Now take a look at yet another way to use the drag-and-drop action.  |