|  | | | Chapter 10 - Componentization | | | byJohn Kauffman, Fabio Claudio Ferracchiatiet al.? | | | Wrox Press ?2002 | | | | | We've learned how to write and use a class library, so now we'll examine how to involve ADO.NET in such development. In this section, we'll be examining a class library called ProductInfo that you'll find in the code download in a file called ProductInfo.vb. Due to its size, we won't be presenting all of its code in this text. Instead, we will: -
Cover a brief introduction to the theories involved in designing a database access class -
Review the key parts of a class designed to hold data values as an in-memory cache, including the sections that manage the cache and provide data that can be used in ASP.NET pages -
Show the class library being used in an ASP.NET page If you're using the Access version of the Northwind database, please refer to ProductInfo_Access.vb instead. That class file has a few comments in it that you will need to follow before using it as a replacement for the class presented in the book. The classes are, more or less, logically the same - but there are a number of small changes needed to make the code work with both Access and SQL Server databases. Designing Classes for Database Access In this section, we'll talk about designing classes for database access. Such classes could be used exclusively to manage interactions between an application and a database, or just as one of several classes for working with data at various levels in an application. Our sample class library combines pure data access with some simple presentation support; however, the bulk of the presentation logic is left to ASP.NET pages. If you've been asked to work with a database that already exists (like, say, Northwind), there's a standard approach to structuring your classes that will work well on most occasions. The rule is to represent each table in the database with a separate class, and to have properties in each class that correspond to the columns of the table in question. However, this won't always be the right approach, since there's some dependence on how the database was designed and normalized. There may also be some disagreement on exactly where the methods should go. Some developers will say, "Keep the methods with the class." In this design, a method that updates the table will be in the class that represents that table. The advantage of this is that it promotes encapsulation and abstraction. The disadvantage is that it can make the object model more complex, and will not help to produce the simplest programming solution. Other developers will say that a root class should hold most of the functionality, while the classes representing the tables should essentially just be 'property bags' (classes that encapsulate the columns of the table, but have little functionality beyond this). The advantage of this approach is that it tends to make for the simplest object model, but it tends to under-use abstraction and encapsulation. We're going to use this plan for our example, simply because it helps to keep the programming easy. NwtLibrary Overview We're going to construct quite a complex class library: the NwtLibrary. The purpose of the classes in this library is to load and cache data from three tables in the Northwind database: Suppliers, Categories, and Products. The cache will enhance the performance of our web applications by holding data in memory, rather than issuing a query to the database for each web page transition. This particular cache also allows for products, categories, or suppliers to be added, changed, or removed, and propagates these changes back to the database for permanent storage. In an entity-relationship diagram, the parts of the database we need to use look like this: 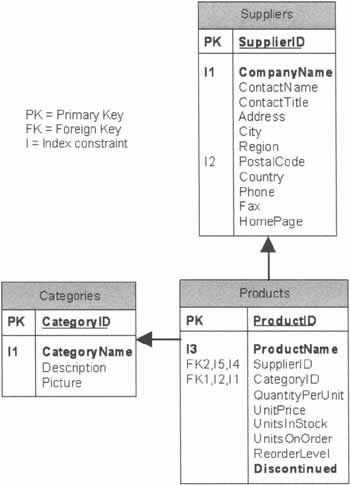 A slightly simplified diagram of the relationships between the classes in the library, represented in UML (Unified Modeling Language), looks like this: 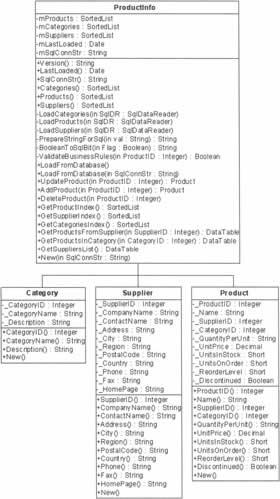 We've provided this view to help you see how the library will be structured, and how we'll go about using it in our ASP.NET pages. We won't be presenting all of the code in the chapter, but the full version is of course available in the download code for this book. The Category, Product, and Supplier Classes As you can see from the above diagram, the three subclasses of the main ProductInfo class are used to represent individual categories, products, and suppliers. Each of the classes is fairly simple, and uses the same three-part structure: -
Private variables to hold the actual values being stored -
Public properties to allow the other classes to read or change one of the private variables -
A class constructor with one parameter for each of the private variables Try It Out - Constructing the Category Class Let's put together the simplest of these classes - Category - to get an idea of what this structure actually looks like. -
In Visual Studio, create a blank new solution called NwtLibrary in the C:\BegASPDB\webroot\Ch10 directory. Then, add a new Visual Basic Class Library project, also called NwtLibrary. Lastly, to the project you just created, add a Visual Basic class file called Category.vb. -
The first part of the class definition should be familiar: we simply import the System namespace: Imports System Public Class Category -
We said that each class has private variables for holding the actual values in the database. In this example, we will give these variables the same names as the database columns, so that we can easily remember which value represents what data. The underscores that precede each name are there to help distinguish them from the properties we're about to look at. Private _CategoryID As Integer Private _CategoryName As String Private _Description As String -
Because we're storing the values in private variables, we need some way of providing public access to them. The most common way to do that is through the use of properties; there should be one property for each variable you need to expose. Public Property CategoryID() As Integer Get Return _CategoryID End Get Set(ByVal Value As Integer) _CategoryID = Value End Set End Property Public Property CategoryName() As String Get Return _CategoryName End Get Set(ByVal Value As String) _CategoryName = Value End Set End Property Public Property Description() As String Get Return _Description End Get Set(ByVal Value As String) _Description = Value End Set End Property -
Implementing the properties like this means that we could, if we wished, add some data validation rules to the 'get' and 'set' methods. We know, for example, that the category name is limited to fifteen double-byte characters, and cannot be null. We could have written this: Public Property CategoryName() As String Get Return _CategoryName End Get Set(ByVal Value As String) If Value.Length > 15 Then Throw New OverflowException("The category name can't exceed" & _ " 15 characters in length.") End If If Value.Length = 0 Then Throw New NoNullAllowedException("The category name can't be null.") End If _CategoryName = Value End Set End Property -
On this occasion, however, we're going to have a centralized function at a higher level for validating data as it's being changed - and we'll look at that in the next section. The last part of this class, then, defines its two constructors: one that has no parameters, and one that has three - one for each of the private variables. Having the second constructor allows us to create and populate an object in one operation. Public Sub New() End Sub Public Sub New(ByVal CategoryID As Integer, _ ByVal CategoryName As String, _ ByVal Description As String) MyBase.New() _CategoryID = CategoryID _CategoryName = CategoryName _Description = Description End Sub End Class -
To check that this class will build properly, go to Build | Build Solution. Provided that goes well, we can move on to the next stage.  | Try It Out - Constructing the ProductInfo Class We will now construct the ProductInfo class, which holds collections of Category, Product, and Supplier objects that are created in its constructor. It loads data from the database into the cache, and has methods for saving it back. It also has methods for adding, updating, and removing a product from the cache and the database, and a few utility methods that will make developing our web applications easier. -
Create a new Visual Basic class file in the NwtLibrary project, and call it ProductInfo.vb. -
This class contains a great deal of code, and to get the examples to work you'll need to download the complete file from the Wrox web site. Here, we'll focus on some of its most important members, starting with the function that's responsible for getting the data from the database into the cache. Its name is LoadFromDatabase(), and it looks like this: Public Sub LoadFromDatabase() Dim conn As New SqlConnection(mSqlConnStr) Dim cmd As SqlCommand Dim sqlDR As SqlDataReader If mCategories.Count > 0 Then mCategories.Clear() End If If mProducts.Count > 0 Then mProducts.Clear() End If If mSuppliers.Count > 0 Then mSuppliers.Clear() End If Try If mSqlConnStr.Length = 0 Then Throw New Exception("SQL Connection string cannot be zero-length") End If cmd = New SqlCommand(LOADSTATEMENT, conn) cmd.CommandType = CommandType.Text LOADSTATEMENT is defined at the top of the file as a VB.NET string that holds a set of SQL statements, as follows: Private Const LOADSTATEMENT As String = "SET NOCOUNT ON;" & _ "SELECT CategoryID, CategoryName, Description FROM Categories " & _ "ORDER BY CategoryID;" & _ "SELECT ProductID, ProductName, SupplierID, CategoryID, " & _ "QuantityPerUnit, UnitPrice, UnitsInStock, UnitsOnOrder, " & _ "ReorderLevel, Discontinued FROM Products ORDER BY ProductID;" & _ "SELECT SupplierID, CompanyName, ContactName, Address, City, " &_ "Region, PostalCode, Country, Phone, Fax, HomePage FROM Suppliers " &_ "ORDER BY SupplierID;" -
The following call opens a connection to the database; after that, we can use the ExecuteReader() method of a SqlCommand object to return an instance of the SqlDataReader class. We can then pass the SqlDataReader object to other functions in order to load specific columns of the result set into the appropriate collections. conn.Open() sqlDR = cmd.ExecuteReader(CommandBehavior.CloseConnection) LoadCategories(sqlDR) LoadProducts(sqlDR) LoadSuppliers(sqlDR) -
It's almost always helpful to use the CommandBehavior.CloseConnection option on the ExecuteReader() method call. When the command is executed, the associated Connection object is closed when the DataReader object is closed. This frees the resources used by the database connection for you automatically, just in case you forget to add code to do so. mLastLoaded = DateTime.Now Catch SqlExc As SqlException ' Error handling code Catch Exc As Exception ' Error handling code Finally If Not cmd Is Nothing Then cmd.Cancel() End If If Not conn Is Nothing Then If conn.State <> ConnectionState.Closed Then conn.Close() End If End If End Try End Sub -
The code for loading the various columns into memory is fairly straightforward. As long as data remains to be read, we pull each of the fields out in sequence, and then use those values to create a new instance of the underlying collection type. The new instance is then added to the appropriate collection. The listing below shows the LoadCategories() method; the LoadProducts() and LoadSuppliers() methods are entirely analogous to this one. Private Sub LoadCategories(ByVal SqlDR As SqlDataReader) Try While SqlDR.Read ' Provide some default values Dim CategoryID As Integer = 0 Dim CategoryName As String = "" Dim Description As String = "" If Not SqlDR.IsDBNull(0) Then CategoryID = SqlDR.GetInt32(0) End If If Not SqlDR.IsDBNull(1) Then CategoryName = SqlDR.GetString(1) End If If Not SqlDR.IsDBNull(2) Then Description = SqlDR.GetString(2) End If mCategories.Add(CategoryID, _ New Category(CategoryID, CategoryName, Description)) End While SqlDR.NextResult() Catch SqlExc As SqlException ' Error handling code Catch Exc As Exception ' Error handling code End Try End Sub -
Products in the cache can be updated or deleted, and a new product can be added to the cache. The functions that perform these tasks are fairly similar to one another, so here we will just look at the one that updates a product. Here's how it begins: Public Function UpdateProduct(ByVal ProductID As Integer, _ ByVal Name As String, _ ByVal SupplierID As Integer, _ ByVal CategoryID As Integer, _ ByVal QuantityPerUnit As String, _ ByVal UnitPrice As Decimal, _ ByVal UnitsInStock As Short, _ ByVal UnitsOnOrder As Short, _ ByVal ReorderLevel As Short, _ ByVal Discontinued As Boolean) As Product Dim conn As SqlConnection Dim cmd As SqlCommand Dim prod As Product -
This function knows what server, database, and credentials are used, as these are stored in the mSqlConnStr variable that was set up in the constructor and is available throughout the class. If mSqlConnStr.Length = 0 Then Throw New Exception("SQL Connection string cannot be zero-length") End If If Not mProducts.Contains(ProductID) Then Throw New Exception("Unknown and non-updateable ProductID of " & _ ProductID.ToString() & " used.") End If -
Before we update the product, we need to make sure its data is valid. The ValidateBusinessRules() function does exactly that. Try If ValidateBusinessRules(ProductID, Name, SupplierID, CategoryID, _ QuantityPerUnit, Discontinued) Then -
In the next part of the function, we use basic ADO.NET functions to create a Command object and populate it with an appropriate T-SQL UPDATE command. cmd = New SqlCommand() cmd.CommandType = CommandType.Text cmd.CommandText = "SET NOCOUNT ON;" & _ "UPDATE Products SET " & _ "ProductName = '" & PrepareStringForSql(Name.ToString()) & "'," &_ "SupplierID = " & SupplierID.ToString() & "," & _ "CategoryID = " & CategoryID.ToString() & "," & _ "QuantityPerUnit = '" & _ PrepareStringForSql(QuantityPerUnit.ToString()) & "'," & _ "UnitPrice = " & UnitPrice.ToString() & "," & _ "UnitsInStock = " & UnitsInStock.ToString() & "," & _ "UnitsOnOrder = " & UnitsOnOrder.ToString() & "," & _ "ReorderLevel = " & ReorderLevel.ToString() & "," & _ "Discontinued = " & BooleanToSqlBit(Discontinued) & " " & _ "WHERE ProductID = " & ProductID.ToString() & ";" -
We then create and open a connection to the database, and associate it with the command object we just set up. Then we can execute the command. conn = New SqlConnection(mSqlConnStr) conn.Open() cmd.Connection = conn cmd.ExecuteNonQuery() -
Finally, we need to update the cached version of the product. To do that, we need to find out where in the collection the updated product is. With that information, we can update its properties, and then drop the updated product into the collection. prod = CType(Products(ProductID), Product) prod.CategoryID = CategoryID prod.Discontinued = Discontinued prod.Name = Name prod.QuantityPerUnit = QuantityPerUnit prod.ReorderLevel = ReorderLevel prod.SupplierID = SupplierID prod.UnitPrice = UnitPrice prod.UnitsInStock = UnitsInStock prod.UnitsOnOrder = UnitsOnOrder Products(ProductID) = prod Return prod End If Catch SqlExc As SqlException ' Error handling code Catch Exc As Exception ' Error handling code Finally If Not cmd Is Nothing Then cmd.Cancel() End If If Not conn Is Nothing Then If conn.State <> ConnectionState.Closed Then conn.Close() End If End If End Try End Function -
There are three public functions that return SortedList objects containing the names of the products, suppliers and categories respectively. One of these, GetSupplierIndex(), returns a SortedList that's keyed by the SupplierID. This is rather useful for populating a drop-down list, as you'll soon see. Public Function GetSupplierIndex() As SortedList Dim sl As New SortedList() Dim sup As Supplier For Each sup In mSuppliers.Values sl.Add(sup.SupplierID, sup.CompanyName) Next Return sl End Function -
The GetProductsFromSupplier() function takes a SupplierID as a parameter and returns an ADO.NET DataTable. This is an ideal way to get a list of all of the products that Northwind offers from a particular vendor, because it can be bound to an ASP.NET DataGrid web control. The function starts by creating a new DataTable and then adds the desired columns to it. Public Function GetProductsFromSupplier(ByVal SupplierID As Integer) As DataTable Dim dt As New DataTable("Products") Dim prod As Product Dim cat As Category Dim dr As DataRow Try dt.Columns.Add(New DataColumn("ProductName", GetType(String))) dt.Columns.Add(New DataColumn("CategoryName", GetType(String))) dt.Columns.Add(New DataColumn("QuantityPerUnit", GetType(String))) dt.Columns.Add(New DataColumn("UnitPrice", GetType(String))) dt.Columns.Add(New DataColumn("UnitsInStock", GetType(Short))) dt.Columns.Add(New DataColumn("UnitsOnOrder", GetType(Short))) dt.Columns.Add(New DataColumn("ReorderLevel", GetType(Short))) dt.Columns.Add(New DataColumn("Discontinued", GetType(Boolean))) -
Then it becomes a simple matter to iterate through the products collection, find products from the given supplier, and populate its values into a DataRow. The DataRow can then be appended to the DataTable. For Each prod In mProducts.Values If prod.SupplierID = SupplierID Then dr = dt.NewRow() dr("ProductName") = prod.Name cat = CType(mCategories(prod.CategoryID), Category) dr("CategoryName") = cat.CategoryName dr("QuantityPerUnit") = prod.QuantityPerUnit dr("UnitPrice") = prod.UnitPrice.ToString("c") dr("UnitsOnOrder") = prod.UnitsOnOrder.ToString dr("UnitsInStock") = prod.UnitsInStock.ToString dr("ReorderLevel") = prod.ReorderLevel.ToString dr("Discontinued") = prod.Discontinued.ToString dt.Rows.Add(dr) End If Next Return dt Catch Exc As Exception ' Error handling code End Try End Function -
Now that we've completed our review of the component class, let's see it in action. The best place to start is to make sure that you've loaded and compiled the NwtLibrary project into the NwtLibrary solution. Ensure that you've added the Product and Supplier classes from the download to your solution, and you'll be ready to go. | Using the Class Library in a Web Application In this section, we'll use the class library that we just reviewed in a fairly straightforward ASP.NET web application that will present the user with a drop-down list of suppliers, and list the products supplied by whichever one they choose. Try It Out - Creating Another Web Application -
In the NwtLibrary solution, create a new Visual Basic ASP.NET Web Application, calling it Nwt. -
Delete the WebForm1.aspx page from the newly created project. -
From the Visual Studio .NET main menu, select Project | Add Reference. -
Select the Projects tab, then select the NwtLibrary project, and add that as a reference. -
In the Solution Explorer, right-click on Nwt and select Set as StartUp Project. Just like an Internet application, we want to make the best use of the available computing resources on the intranet servers. With that in mind, we'll use the familiar technique of placing an instance of our class into the ASP.NET Application object. To do this, we will make a change to global.asax file in the Nwt project. -
Update the Application_Start() procedure in the global.asax file of Nwt as follows: Sub Application_Start(ByVal sender As Object, ByVal e As EventArgs) ' Fires when the application is started ' Put the database connection string into the application space Application.Add("ConnStr", _ "Data Source=localhost;Initial Catalog=Northwind;" & _ "User ID=sa;Password=password;Persist Security Info=True") ' Create a new instance of the ProductInfo class based on the given ' connection string, then put the instance into the application space Application.Add("ProductInfo", _ New NwtLibrary.ProductInfo(CStr(Application("ConnStr")))) End Sub -
Add a new Web Form to the Nwt project and call it ProductsFromSupplier.aspx. -
Add the following code as the HTML for this page. There's nothing in this that you haven't seen before; we're just placing a drop-down list and a data grid on the page, ready to receive data from the code-behind file. <%@ Page Language="vb" AutoEventWireup="true" Codebehind="ProductsFromSupplier.aspx.vb" Inherits="Nwt.NwtNet.ProductsBySupplier"%> <!DOCTYPE html PUBLIC "-//W3C//DTD HTML 4.0 Transitional//EN"> <html> <head> <title>Products From Supplier</title> <meta name="GENERATOR" content="Microsoft Visual Studio.NET 7.0"> <meta name="CODE_LANGUAGE" content="Visual Basic 7.0"> <meta name="vs_defaultClientScript" content="JavaScript"> <meta name="vs_targetSchema" content="http://schemas.microsoft.com/intellisense/ie5"> <link rel="stylesheet" href="wrox6195.css"> </head> <body> <form method="post" runat="server"> <h1>NwtNET - Products From Suppliers</h1> <p>Please select a supplier: <asp:DropDownList runat="server" AutoPostBack="True"> </asp:DropDownList> </p> <p> <hr/> <asp:DataGrid runat="server" Font-Size="9pt" CellPadding="2" CellSpacing="2" BorderWidth="0px"> <AlternatingItemStyle VerticalAlign="Top" BackColor="#E0E0E0"> </AlternatingItemStyle> <HeaderStyle Font-Bold="True"></HeaderStyle> </asp:DataGrid> </p> <p> Data as of: <asp:Label runat="server"></asp:Label> <br/> Component Version: <asp:Label runat="server"></asp:Label> <br/> </p> </form> </body> </html> -
Next, we need to add code to the automatically generated code-behind file. Much of this is located in the Page_Load() event handler, which creates a ProductInfo object, places it in the ASP.NET Application object, and then uses it to populate the drop-down list. Imports NwtLibrary Namespace NwtNet Public Class ProductsFromSupplier Inherits System.Web.UI.Page Protected WithEvents SupplierSelector _ As System.Web.UI.WebControls.DropDownList Protected WithEvents ProductsGrid As System.Web.UI.WebControls.DataGrid Protected WithEvents LastLoaded As System.Web.UI.WebControls.Label #Region " Web Form Designer Generated Code " <System.Diagnostics.DebuggerStepThrough()> _ Private Sub InitializeComponent() End Sub Private Sub Page_Init(ByVal sender As System.Object, _ ByVal e As System.EventArgs) Handles MyBase.Init 'CODEGEN: This method call is required by the Web Form Designer 'Do not modify it using the code editor. InitializeComponent() End Sub #End Region Private Sub Page_Load(ByVal sender As System.Object, _ ByVal e As System.EventArgs) Handles MyBase.Load Dim pi As ProductInfo Dim sl As SortedList Dim key As Integer Dim str As String If Not IsPostBack Then pi = Application("ProductInfo") sl = pi.GetSupplierIndex() SupplierSelector.Items.Add( _ New ListItem("Please select a supplier", "0")) For Each key In s1.Keys SupplierSelector.Items.Add(New ListItem(CStr(sl(key)), key.ToString)) Next LastLoaded.Text = pi.LastLoaded.ToString("u") End If End Sub -
The SupplierSelector_SelectedIndexChanged() handler responds to changes in the user's selection from the drop-down list by re-calling the ProductInfo object's GetProductsFromSupplier() method with the new information: Private Sub SupplierSelector_SelectedIndexChanged( _ ByVal sender As System.Object, ByVal e As System.EventArgs) _ Handles SupplierSelector.SelectedIndexChanged Dim SelectedItem As Integer Dim pi As ProductInfo SelectedItem = Convert.ToInt32(SupplierSelector.SelectedItem.Value) If SelectedItem > 0 Then pi = Application("ProductInfo") ProductsGrid.DataSource = pi.GetProductsFromSupplier(SelectedItem) ProductsGrid.DataBind() Else ProductsGrid.DataSource = Nothing ProductsGrid.DataBind() End If End Sub End Class End Namespace -
Finally, in the Solution Explorer, right-click on this Web Form, and select Build and Browse to run this page. When executed, the page should look something like this: 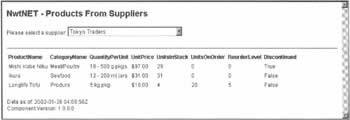 | What we've Learned In truth, there's not very much that's new here... we've just taken what you already knew about database access with ASP.NET and ADO.NET, and combined it with the fruits of this chapter's research into class libraries, to produce this application. Let's take a few moments to review the key points: -
We've simplified our ASP.NET pages, which no longer have to make database connections for themselves. In addition, we've simplified access to the data itself. We don't have to deal with tables and columns directly, and there are no SQL statements in the ASP.NET pages, either. -
We've given a double boost to the performance of our ASP.NET applications by caching the product data in the Application space. The first boost comes from having just one load of the data take place, when the application starts. Any subsequent request can just fetch the in-memory values of data from the component instead of from the database. Second, by putting the component into the Application object, all pages can share that one instance, saving the additional queries that would come from having that code in every web page. -
We've encapsulated the data within the classes in our class library. Any changes to the cached data must be made through properties of the classes. Changes to these values are managed through well-defined interfaces that make sure Northwind's business rules are adhered to. -
We have a somewhat sustainable design. If Northwind decides to change to a different database - perhaps MySQL, or DB/2 - we should be able to update the component to use the OLE DB versions of ADO.NET's connection and command objects to read the data from these sources, without necessitating a change to our ASP.NET pages. You'll doubtless have noticed that our sample application here doesn't use all of the functionality of the class library - the ProductInfo class has a number of methods that we haven't called. However, this is entirely consistent with designing our libraries to be reusable. By anticipating the needs that users are likely to have, but being careful not to include inappropriate functionality, we're hoping that the library will become an attractive proposition. When you've finished examining the worked examples in this chapter, you could try building some applications that make further use of it. |