Updating a Database
|
ADO.NET provides several different ways of updating the records in a database. If you know what records need to be updated, what their new values should be, and you want to update them immediately, you can use a command object to execute an SQL UPDATE statement or a stored procedure (see the next chapter). If you need some input from your users, you can create a dataset and populate it with the records you want the users to modify. A user can then look at the records and modify them as they wish; once they're done, you create a data adapter object to push the changes back to the database.
SQL UPDATE StatementsIn the last chapter, we created new records using the SQL INSERT statement. SQL also defines a UPDATE statement to update one or more existing records. The generic form of the UPDATE statement's syntax is represented below.
UPDATE { table_name } { SET column1_name = expression1, column2_name = expression2, ... columnM_name = expressionM [WHERE condition1 AND|OR condition2 AND|OR ... AND|OR conditionN] } Where:
Syntax alone is rather dry, though, so let's look at some SQL code that would make changes to the Categories table of the Northwind database, to see how you can apply the theory in practice. If you followed the examples in the previous chapter, you now have an entry in the Categories table called Books/Magazines, created with the following INSERT statement:
INSERT INTO Categories (CategoryName, Description) VALUES ('Books/Magazines', 'Some books, some magazines') Now, if you wanted to change the description associated with this category, you could use an UPDATE statement like this one:
UPDATE Categories SET Description = 'Great books' WHERE CategoryName = 'Books/Magazines' What it says is, "Find all records with a CategoryName of Books/Magazines, and change their Description value to Great books." In this case, of course, there's only one record that satisfies this condition. In addition to assigning a literal value to a column, the SET clause also allows you to assign an expression to a column, or to assign values to several columns at once. Assuming that the CategoryID of the Books/Magazines record is 9, the following UPDATE statement would update both CategoryName and Description columns:
UPDATE Categories SET CategoryName = 'Magazines/Books', Description = 'Interesting magazines' + ' and ' + 'books' WHERE CategoryID = 9 When it comes to updating records with ADO.NET, the two options available are very much like the ones we had in the last chapter when we wanted to insert records. You can use a command object to execute an UPDATE statement directly, or you can use a DataSet object to modify records in memory, and then update the database with those changes. In the next section, we'll demonstrate how to update records using a command object. The DataSet solution will be covered after that.
Using a Command Object to Update RecordsYou're already familiar with a number of operations that use command objects, so extending that knowledge to cover updating a database shouldn't prove to be too tricky a task. The sequence of actions goes like this:
The skeleton code below shows a simple database update operation along precisely these lines. In the example that follows, we'll give it a spin.
Dim strConnection As String = ConfigurationSettings.AppSettings("NWind") Dim objConnection As New SqlConnection(strConnection) Dim strSQL As String = "UPDATE Categories " & _ "SET Description = 'Great books' " & _ "WHERE CategoryName = 'Books/Magazines'" Dim dbComm As New SqlCommand(strSQL, objConnection) objConnection.Open() dbComm.ExecuteNonQuery() objConnection.Close() Try It Out – Displaying and Updating Database information with ASP.NET
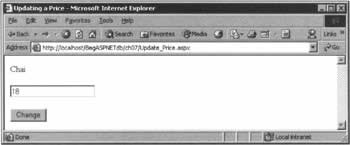
For this chapter's first example, we'll create an ASP.NET page that displays the name and price of a product in the Northwind database, and allows the user to enter a new price for the product, thereby updating the database. For simplicity, we'll hard-wire the code to use the product with a ProductID of 1 from the Products table of the database.
How It WorksAlthough the SQL statement in question has changed, this is similar to the examples we've been considering elsewhere, and you should be starting to feel comfortable with this form of database access. In the btnChange_Click () event handler, we open a connection, execute a command, and close the connection. On this occasion, the command in question is an UPDATE statement that assigns whatever the user entered in the txtPrice textbox to the UnitPrice field. Once the query has run, we call the LoadProduct() procedure to reload the modified record from the database and display the new price on the page. Before we move on, there's one more thing worth mentioning. While the code we've written so far works, it has some deficiencies that we can improve. To demonstrate the basic techniques of reading and updating database records, LoadProduct () and btnChange_Click() are self-contained - each of them has code to open and close a connection for its own use. In a production-quality application, you'd put the common code (in this case, the code for opening and closing connections) in some centralized procedures, and call it from all other places that such functionality is needed. The code below suggests one way of doing this:
Dim strConnection As String = ConfigurationSettings.AppSettings("NWind") Dim objConnection As SqlConnection Sub LoadProduct() Connect() Dim strQuery As String = "SELECT ProductName, UnitPrice " & _ "FROM Products WHERE ProductID = 1" Dim dbComm As New SqlCommand(strQuery, objConnection) Dim reader As SqlDataReader = dbComm.ExecuteReader() reader.Read() lblProductName.Text = reader.Getstring(0) txtPrice.Text = reader.GetSqlMoney(1).ToString() reader.Close() Disconnect() End Sub Sub btnChange_Click(ByVal Sender As Object, ByVal E As EventArgs) UpdateProduct() LoadProduct() End Sub Private Sub UpdateProduct() Dim strSQL As String = "UPDATE Products" & _ " SET UnitPrice = " & txtPrice.Text & _ " WHERE ProductID = 1" Connect() Dim dbComm As New SqlCommand(strSQL, objConnection) dbComm.ExecuteNonQuery() Disconnect() End Sub Private Sub Connect() If objConnection Is Nothing Then objConnection = New SqlConnection(strConnection) End If If objConnection.State = ConnectionState.Closed Then obj Connection.Open() End If End Sub Private Sub Disconnect() objConnection.Close() End Sub Now, the code for connecting to and disconnecting from the database is in dedicated procedures, as is the code that actually updates the product information. Such changes result in cleaner, more structured, more extensible code.
Updating Records Using a DataSetAn ADO.NET DataSet object provides better programmatic database update functionality. Because a DataSet object is always disconnected from the database, you can add to, modify, and delete any of the records it contains offline. Once you've finished making your changes, you can transfer them to the database by linking the DataSet to a data adapter object. In this section, we'll explore how to do that. Firstly, assume that you've filled a DataSet with records from the Products table in the Northwind database, as illustrated in the code snippet below:
Dim strSQL As String = "SELECT ProductID, ProductName, UnitPrice FROM Products" Dim adapter As New SqlDataAdapter(strSQL, objConnection) Dim ds As New DataSet() adapter.Fill(ds, "ProductTable") In the last line of code here, we're naming the table in the DataSet that will hold these records as ProductTable, but in general this name can be anything you like - it certainly doesn't have to be the same as the name of a table in the database. The advantage of this feature is that you can easily separate the in-memory representation of a table from its source in the database. As far as your application is concerned, you're always dealing with the table called ProductTable, as in:
Dim tbl As DataTable = ds.Tables("ProductTable") If your friendly DBA later decides that the table in the database should be named differently, the only place where you need to change your code is the SELECT statement. (In fact, most applications use stored procedures to execute database operations, so your DBA can modify all the stored procedures that reference the table, without you having to change your code at all.)
Modifying Records In a DataSetWith a DataSet object in your hands, you can modify one or more of the records it contains. The code snippet below shows how you might change the price of a product:
Dim tbl As DataTable = ds.Tables("ProductTable") tbl.PrimaryKey = New DataColumn() _ { _ tbl.Columns("ProductID") _ } Dim row As DataRow = tbl.Rows.Find(1) row.Item("UnitPrice") = 100 A key element to be aware of here is that in order to modify a record in a DataSet, we've got to find it first, and that's something we haven't done before. The first step in this process is to set up a column (or a selection of columns) in a dataset table as a primary key into that table. We can then use the primary key as an index to the rows of the table, so that we can quickly find the record we're looking for. As suggested above, it's sometimes the case that a single column can be used as the primary key. On other occasions, the primary key may be a composite of several columns. As a result, the DataTable.PrimaryKey property is defined as a collection of columns that together make up the primary key, and you initialize it with all of the columns concerned, as shown in the second statement above. By contrast, if the primary key had consisted of a composite of the CategoryID and ProductID columns, we would have had to define the primary key like this:
tbl.PrimaryKey = New DataColumn() _ { _ tbl.Columns("CategoryID"), _ tbl.Columns("ProductID") _ } Moving on to the next line of our sample, the Find() method of the DataRowCollection object that's represented by the DataTable.Rows property accepts a primary key value, and returns the DataRow containing the matching key. If the primary key consists of multiple columns, you pass in an array of values. For example, if the primary key consisted of a composite of the CategoryID and ProductID columns, the code snippet below would find a row with CategoryID value 1 and ProductID value 3.
Dim KeyValues(1) As Object KeyValues(0) = 1; KeyValues(1) = 3; Dim row As DataRow = tbl.Rows.Find(KeyValues) Once you have the row, you can modify any field in the record it represents simply by assigning a new value to it. The above example modified the UnitPrice field by assigning it with the value 100. You can make as many changes as required to this record, and you can modify more records by searching for them and executing the same set of operations. Remember that the changes you're making here only affect the DataSet - the database is not being updated at this point.
Updating Records in the DatabaseTo push the changes you make in a DataSet object to the database, you must first reconnect to the database, and then use the same data adapter object that you used to retrieve the data to update the database with your new information:
objConnection.Open() adapter.Update(ds, "ProductTable") objConnection.Close() Just as we saw when we were inserting records into the database in the previous chapter, the call to the data adapter's Update () method neatly encapsulates the task of transferring the new information to the database. Then, as now, we needed to set up a command builder object in order to make the mechanism work, but this time the work going on behind the scenes is rather more involved, and it's interesting to examine exactly how it works. ADO.NET determines which records in the database to update by examining all of the records in the specified table in the DataSet object - ProductTable in this example. When you first fill the DataSet with records from a database, ADO.NET saves two copies of each field: Original and Current. If you wish, you can get access to these values individually by specifying the one you want in expressions like these:
row.Item("UnitPrice", DataRowVersion.Original) row.Item("UnitPrice", DataRowVersion.Current) In addition, each row has a property called RowState that indicates the current state of that row. It may be one of the following five values defined in the System.Data.DataRowState enumeration.
When you modify a record by changing the value of a field (as we did with UnitPrice), ADO.NET changes the row's Current value to the newly assigned value, and changes the RowState property to Modified. When you then invoke the data adapter's Update() method, ADO.NET updates the corresponding field in the database with the current value. If you wish, you can call the AcceptChanges () method of a DataRow object to change the original values of all fields to the current value. (This method also sets the RowState to Unchanged.) Alternatively, you can call the AcceptChanges () method on a DataTable to accept changes to all rows in the table. The opposite of AcceptChanges() is RejectChanges(),which is also supported by both row and table objects, and discards any changes that you've made to the DataSet. Calling a row's RejectChanges() method changes its RowState back to Unchanged. If you call the RejectChanges() method of a table, changes to all rows will be lost, and the RowState of all rows will be reset to Unchanged. Calling the table's RejectChanges() method will also remove any rows that you've added to the table.
Using a Command BuilderWe said in the last chapter - and repeated above - that the creation of a command builder object is essential to the operation of the data adapter's Update() method. Once again, though, the increase in complexity here makes it useful to explore the subject in more depth.
Dim cb As New SqlCommandBuilder(adapter) As a result of the above line of code, the SqlCommandBuilder's constructor will create a SqlCommand object with an SQL UPDATE statement based on the adapter's SELECT command, and then assign this command object to the data adapter's UpdateCommand property. Command builder classes can build INSERT and DELETE commands as well, and do so automatically when you create instances of them.
Creating a Update Command ManuallyWhile command builder objects are undoubtedly handy and can save you a lot of coding, they have their drawbacks - or at least, their limitations:
If any of these describes your situation, command builder objects won't work for you, and you'll have to build the update command manually.
Dim cmd As New SqlCommand("UPDATE Products SET UnitPrice = @Price " & _ "WHERE ProductID = @ProductID", objConnection) Dim param As SqlParameter = cmd.Parameters.Add("@ProductID", SqlDbType.Int) param.SourceColumn = "ProductID" param.SourceVersion = DataRowVersion.Original param = cmd.Parameters.Add("@Price", SqlDbType.Money) param.SourceColumn = "UnitPrice" param.SourceVersion = DataRowVersion.Current adapter.UpdateCommand = cmd In this code, we create a command object and pass to its constructor the SQL UPDATE statement (or the stored procedure) that performs the update. Because at this point we don't know the exact record to be updated, or the price it will be updated with, we specify that the ID and price of the product will be provided later by parameterizing the statement. The SQL statement must include every column in the table that you want to update. If you change the values of some fields, but don't include the relevant columns in the UPDATE statement, none of the changes you make will find their way to the database. Next, we add two parameters to the command. The first, @ProductID, is an integer - we specify that it should be bound to the ProductID column in the table, and ensure that we're dealing with the right row by binding it to the original value of this field in the database through the parameter's SourceVersion property. The second parameter, @Price, is bound to the UnitPrice column, and the current version of the value it contains. Having defined the command object, we then assign it to the data adapter object's UpdateCommand property. When we invoke the data adapter's Update() method, this command is executed to update the correct product record in the database. Try It Out - Editing Database Entries in a DataGrid in ASP.NET
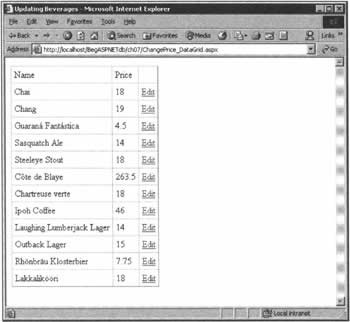
With the theory under our belts, we can think about putting it into practice. In this exercise, we'll load all of the beverage product records from the Products table in the Northwind database, and display them in a DataGrid control on an ASP.NET page. The DataGrid control is configured in such a way that you can edit a record inline, and update it.
How It Works (1)When the ASPX page is loaded for the first time, the Page_Load () event handler calls LoadGrid() to do the data binding work. In this exercise, we associate the DataGrid with the ProductTable in the DataSet, and then call the DataGrid's DataBind() method to bind it. This populates the DataGrid with the records in the table. So far, so good. To go further, it's interesting to take a look at how ASP.NET renders the DataGrid. If you take a look at the source of the generated page, each record is a row in the table, and each field is an HTML cell. The first row of the DataGrid, for example, looks like this:
<tr> <td>Chai</td> <td>18</td> <td> <a href="javascript:__doPostBack('dgProducts:_ct12:_ct10' , ' ') ">Edit</a> </td> </tr> As you can see, the Edit button is rendered as a link. When you click on the Edit link, an automatically generated JavaScript function called __doPostBack() is triggered to post the form to the server. On the server, ASP.NET checks the posted form, and generates an EditCommand event. It's now up to you to create an event handler to respond to this event, and that's where we need to go next.
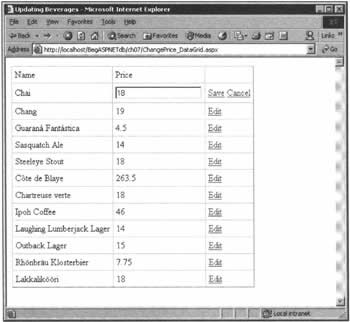
How It Works (2)The EditItemIndex property of a DataGrid specifies which row should be put into edit mode. When you click an Edit link, ASP.NET adds the row to a DataGridCommandEventArgs object and exposes it as the object's Item property. As you can see above, the event handler gets the DataGridCommandEventArgs object as an argument of the EditCommand event. You can then retrieve the row by reading its Item property, which returns a DataGridItem object, and the row index with the ItemIndex property. The LoadGrid () function will again populate the DataGrid with all of the records in the table, but this time it will behave differently, because we've assigned the DataGrid's EditItemIndex property with the index of a row. ASP.NET checks the DataGrid column definitions to find out which fields can be edited, and renders those fields as HTML text input controls. Our sample HTML row now looks like this:
<tr> <td>Chai</td> <td><input name="dgProducts:_ct12:_ct10" type="text" value="18" /></td> <td> <a href="javascript: __doPostBack('dgProducts: _ct12:_ct11', '')">Save</a> <a href="javascript:_doPostBack('dgProducts:_ct12:_ct12','')">Cancel</a> </td> </tr> Now you can change the value in the Price column, and click either the Save or the Cancel button. These buttons raise an UpdateCommand and a CancelCommand event respectively, and to progress further with this demonstration, we need to define handlers for both of them.
How It Works (3)To update the record, you need to figure out which product and field(s) have been changed. To help in this task, the E.Item property again returns the row that has been changed. Its Cells property returns a collection of cells, which is a TableCellCollection object. You retrieve a cell in this collection by providing its index; unfortunately, it doesn't provide a method to retrieve a cell using the column name. Once you have the cell, you can extract the value in its Text property. In our event handler code, the product ID is bound to the first column, and therefore E.Item.Cells(0).Text returns the ID of the product being updated. Because it's an integer, we convert and assign it to an integer variable called ProductID.
Getting the value of the changed field requires a little more work. When it's being edited, the field is represented as an input text control inside a table cell, and you need to go via an enumeration containing the all of the controls in the cell in order to get hold of it.
Dim PriceTextBox As TextBox = CType(E.Item.Cells(2).Controls(0), TextBox) Dim Price As Decimal = Convert.ToDecimal(PriceTextBox.Text) Breaking this down a little, you can get to the cell containing the changed price with E.Item.Cells (2). Once you have the cell, you can look further into its Controls property to find the input box, which is the one and only control in the cell: E.Item.Cells(2).Controls(0). In the above code, it's cast to a TextBox control, from which you can get the value in the Text property. This value is then converted to a Decimal type, which maps to SQL Server's money type.
How It Works (4)Does that look familiar? It should - this essentially contains the same code as we used to illustrate the theory section. The first block reads an entire result set from the database, and fills a DataSet object. The second block finds a record with the product ID passed to this procedure, and updates its price with the new price. The third block builds the UPDATE command (plus the INSERT and DELETE commands, which we don't use here), and then updates the record in the database. Finally, on return to UpdateRecord (), the grid is re-bound to the DataSet. Try the application one last time, and you'll find that it does everything we've asked of it. And that's just about all for our discussion about updating database records. In the next section, we'll move on to see how to delete records from a database. | |||||||||||||||||||||||||||||||||||||||||||||||||||||

EAN: 2147483647
Pages: 263