Section 8.2. Permissions and Security
|
8.2. Permissions and SecuritySetting the permissions for a file or folder allows you to permit access to some users while restricting access to others. Before you start messing with permissions, you'll need to turn off Simple File Sharing. Go to Control Panel Note that permissions can only be used on files and folders stored on NTFS volumes (see the discussion of NTFS in Chapter 5). 8.2.1. Setting Permissions for an ObjectBy default, everyone on your computer has access to every file on your hard disk. In order to restrict access, you'll have to change the permissions for your folders, files, and drives that contain more sensitive data. It gets a little confusing when you realize that there are two different Permissions windows for any given object (file, folder, printer, etc.).
Fortunately, all Permissions windows look and work the same; the only difference is their scope. Figure 8-4 shows a typical Permissions window. Figure 8-4. The standard Permissions window allows you to permit or deny access to other users on your computer or in your workgroup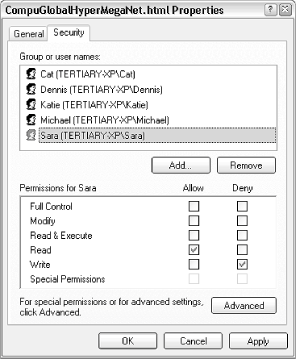 Typically, a single entry, "Everyone," will appear at the top of the list. In the example in Figure 8-4, only five single users are shown here. Any user not in the list will not be allowed to view or modify the object. Select any user in the list, and then use the checkboxes in the list below to modify the permissions for that user. In this example, the user named Sara is allowed to read the selected file, but not allowed to write to it. Although this window only shows the permissions for one user or group at a time, you can click Advanced to see a better overview, as shown in Figure 8-5. Figure 8-5. Open the Advanced Security Settings window to see all users and permissions for an object at once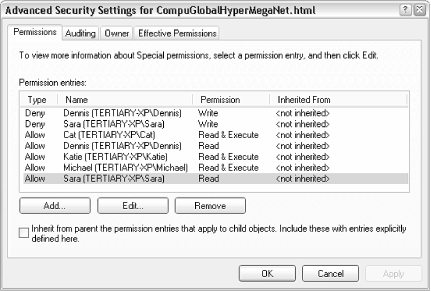 In some cases, when you attempt to remove or modify permissions in the standard Permissions window (Figure 8-4), Windows will complain about the fact that the object is inheriting permissions. The reason is the Inherit from parent option in the Advanced Security Settings dialog (Figure 8-5). 8.2.1.1 Inheritance and other advanced optionsInheritance can be confusing at first, but it does save time in the long run. Essentially, if you set the permissions of a folder, those permissions will propagate to all of the files and subfolders contained therein (although Windows will usually ask you whether or not you want this to happen). When the permissions for a parent folder propagate to a child folder or file, that child object is said to inherit the permissions of its parent folder. Furthermore, these permissions are locked, at least until you turn off the aforementioned Inherit from parent option. The Auditing tab in the Advanced Security Settings window allows you to log access activity relating to the selected object. Before Auditing will work, you'll need to set up an Auditing policy by opening the Group Policy window (gpedit.msc). Then, navigate to Computer Configuration\Windows Settings\Security Settings\Local Policies\Audit Policy. Then, open the Event Viewer (eventvwr.msc) to view the corresponding logs. Note that settings in the Auditing tab obey inheritance like Permissions, discussed earlier. The Owner tab is used to assume ownership of one or more objects. I use this option most when I have a dual-boot system (see Chapter 1), and I have to access files that were placed on the hard disk by the other operating system. In most cases, Windows won't let you access such files until you "take ownership" using the Owner tab of this window. 8.2.1.2 Adding new users to the Permissions windowTypically, a single entry, "Everyone," will appear at the top of the Group or user names list in the Permissions window. More than likely, though, you'll want to eliminate the "Everyone" entry and add only those users and groups to which you need to specifically grant access. Start by deleting any unwanted users by selecting them and clicking Remove. Then, click Add to add new users and groups. The Select Users or Groups window appears, as shown in Figure 8-6. Figure 8-6. New users and groups are added to a Permissions list with this rather confusing dialog Most users visiting this dialog for the first time will expect a list of the users on their machine; unfortunately, such a list isn't here. Instead, you'll have to type the name(s) of the users and groups you wish to add in the Enter the object names to select field. If you enter more than one user, simply separate them with semicolons. In the example in Figure 8-6, you'll notice that the third entry, SCHOOLBUS\Wendell, is unlike the others. While "Seth" and "Munchie" are users on the machine (or in the domain to which the machine belongs), the third entry shows how a user on a different machine is specified; in this case, the user "Wendell" on the computer SCHOOLBUS is to be added. So, why aren't user and group names listed here? The reason is that this dialog has been designed to accommodate a single computer with two users, as well as a company-wide network with thousands of users, and everything in between. Naturally, you can always open the User Accounts window to look up the users on the local machine. Or, if you're part of a Windows domain, you can click Advanced to search for users on your network. When you click OK, Windows will verify the user and group names you've entered and, if all is well, will add them to the Permissions window. You can also click Check Names here to verify your entries without closing the window. When a new user has been added to the Permissions window (Figure 8-4), highlight the user or group name, and selectively click the checkmarks in the Allow or Deny columns. Note that Deny entries take precedence over Allow entries. Depending on the type of object you've selected, you may see any number of different types of entries here, such as Full Control, Read, Write, and Modify. After playing with the checkmarks, you'll notice that there is quite a bit of redundancy in this list; for example, Modify is an umbrella term that includes Read & Execute, Read, and Write. For more control over permissions, click Advanced to show the Advanced Security Settings window (Figure 8-5), select the user, and click Edit. The Permission Entry window, shown in Figure 8-7, will allow you to fine-tune permissions and allow only those permissions that are absolutely necessary for the object. Figure 8-7. The Permission Entry window lets you fine-tune permissions When you're done choosing permissions, click OK. If you're modifying the permissions for a folder, Windows may or may not prompt you to have your changes propagated to all subfolders and files. 8.2.1.3 Notes
8.2.2. Protecting Your Files with EncryptionEncryption effectively adds another layer of protection for your especially sensitive data, ensuring that a file can only be viewed by its creator. If any other user even someone with administrator privileges attempts to view the file, they will see only gibberish. When a file is marked for encryption, the encryption and decryption of the file are handled by Windows invisibly in the background when its creator writes and views the file, respectively. The problem is that Windows XP's on-the-fly encryption can be somewhat unpredictable, and security is one place where you don't want there to be any guesswork.
Here's how to encrypt a file:
After a file has been encrypted, you can continue to use it normally. You'll never have to manually decrypt an encrypted file in order to view it. Encrypting a file may not guarantee that it remains encrypted forever. For example, some applications, when editing and saving files, will delete the original file and then re-create it in the same place. If the application is unaware of the encryption, then it will be lost. The workaround is to encrypt the folder containing the file, rather than the file itself. If you change the ownership of a file, as described in Section 8.2.1, earlier in this chapter, and the file is encrypted, the encryption will remain active for the original owner and creator of the file, even though that user no longer technically "owns" the file. Since all users need to access files in certain folders, such as the \Windows and \Windows\System folders, Windows won't let you encrypt system files in system folders or the root directories of any drives.
8.2.2.1 Highlighting encrypted filesWindows Explorer has an option to visually differentiate encrypted files, which can be very handy, especially if you're just getting started with encryption. Start by going to Control Panel By default, encrypted files appear in green, and compressed files appear in blue (except for icons on the Desktop). Note that files can't be simultaneously compressed and encrypted (as mentioned in the previous section), so you'll never see any turquoise files. If you wish to change these colors, open TweakUI (see Appendix A), and select Colors in the Explorer category. 8.2.2.2 Allowing others to view encrypted filesBy default, only you can access your own encrypted files. The easiest way to allow other users on your machine (or network) to view one of your encrypted files is to unencrypt it. A more elegant (and safer) solution is to modify the file's permissions:
Figure 8-8. Use the Encryption Details dialog to choose other users who can view your encrypted files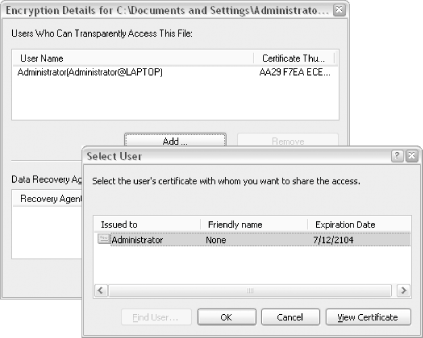 So, how do you view someone else's encrypted files without their permission? (This is an important question to ask if you care about the security of your data.) If you try to view someone's encrypted files, you'll get an "Access is Denied" error message, as shown in Figure 8-9. Figure 8-9. Try to access someone else's encrypted file, and you'll get this error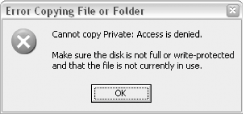 First of all, not even administrators can view files encrypted by other users. However, an administrator can change any user's password, and then subsequently log in to that user's account and view (or unencrypt) any of his protected files. This means that your files won't be totally secure unless you're the only administrator on the machine. There is a little-known exception: if the owner of encrypted files deletes his or her encryption keys, neither the user nor any administrator will be able to read the encrypted files until the key is reinstalled. See Section 8.2.2.5, later in this chapter, for more information. 8.2.2.3 The ins and outs of folder encryptionYou can also encrypt a folder and all of its contents using the procedure for files shown earlier. It gets a little more complicated, though, when you mix and match encrypted and unencrypted files and folders, and it can be difficult to predict what will happen to the contents of the folders. Now, if a file contained in an encrypted folder is moved into an unencrypted folder, the file will become unencrypted. The exception is when you've specifically encrypted a single file; in this case, the file will remain encrypted, no matter where you put it. Whenever you try to encrypt a file located in an unencrypted folder, Windows warns you and gives you the option to encrypt the folder as well (shown in Figure 8-10). Figure 8-10. Windows displays this warning if you encrypt a file located in an unencrypted folder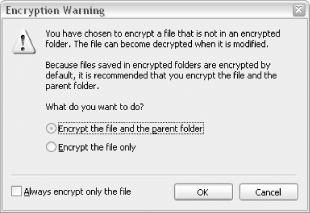
Moving encrypted files around is complicated, too. If an unencrypted file is placed in an encrypted folder, the file will become encrypted. The catch is when one user has encrypted a folder and another user places a file in that folder; in this case, the file is encrypted for the creator of the file, which means that the owner of the folder, the one who originally implemented the encryption, will not be able to read it. On the other hand, if the user places a file in a folder, and a different user comes along and encrypts the folder, only the user who implemented the encryption will be able to subsequently read the file, even though the file is technically owned by a different user. 8.2.2.4 Add Encrypt/Decrypt commands to context menusIf you find yourself frequently encrypting and decrypting files, having to repeatedly open the Properties window can be a pain. Instead, use this next solution to add Encrypt and Decrypt commands to the context menus for every file and folder.
If at least one of the selected items is a folder, you'll have the option of encrypting only the folder or all the folders contained therein. If encrypting any individual files, you'll also be asked if you wish to encrypt only the file or the parent folder as well. 8.2.2.5 Using the NTFS Encryption Utility and working with keysThe NTFS Encryption Utility (cipher.exe) is the command-line equivalent of the Encrypt contents to secure data option discussed earlier, but it adds several powerful features not normally available through Explorer. Note that the NTFS Encryption Utility is included with Windows XP Professional only. Open a Command Prompt window (cmd.exe) and type cipher without any arguments to display the encryption status for all the files in the current folder. (Use the cd command discussed in Chapter 10 to change to a different working folder.) Encrypted files will be marked with an E; all others will marked with a U. To encrypt a file, type cipher /e filename, where filename is the name of the file or folder (include the full path if it's in a different folder). Likewise, type cipher /d filename to turn off encryption for the item. These functions are no different than using Explorer to control encryption, except that they have the advantage of being able to be executed from scripts (see Chapter 9) or batch files (see Chapter 10). Type cipher /? for more options. The real meat, however, is in cipher's ability to work with cryptographic keys.[1] Windows XP's encryption system employs symmetric key cryptography, which uses the same key to encrypt and decrypt data. Windows generates a unique key for each user, so that no user can decrypt another user's data.
So, what happens if your computer crashes, and you need to retrieve your encrypted data? As long as you've backed up your encryption key, it's not a problem. At the command prompt, type the following: cipher /r:filename where filename is the prefix of the output filename (the filename without its extension). Cipher ask for a password, and then generate two separate files based on the specified filename. For example, if you type cipher /r:julius, you'll end up with two files:
You can also generate a new key at any time by typing cipher /k (without any other options). Then, type cipher /u to update the encrypted files on your system with the new key. 8.2.2.6 Securing free spaceNormally, when a file is deleted, only the file's entry in the filesystem table is deleted; the actual data contained in the file remains in the folder until it is overwritten with another file. Cipher allows you to wipe a folder, which means that it goes back and cleans out any recently deleted files, overwriting the leftover data with random bits. This effectively makes it impossible to subsequently recover deleted data with an "undelete" utility. Think of the wipe feature as a virtual paper shredder. To wipe a folder, type cipher /w:foldername, where foldername is the full path of the folder to wipe. Note that the /w option does not harm existing data, nor does it affect any files currently stored in the Recycle Bin. It also works on unencrypted folders and encrypted folders alike.
|


|
EAN: 2147483647
Pages: 97