7.3. Connect to the Internet Although connecting to the Internet is really not any different than connecting to a workgroup, at least as far as Windows is concerned, you'll typically encounter different types of problems. Use these procedures to connect your computer (or your workgroup) to the Internet. 7.3.1. Connection Types The procedure to initiate an Internet connection varies with the type of connection you wish to establish: DSL, cable, T1, or other high-speed connection with a static IP address (no username and password) DSL, cable, or other high-speed connection via PPPoE (username and password required) Connection provided by a router or another computer via Internet Connection Sharing Dial-up connection, including analog modems over standard phone lines
If your connection doesn't fit neatly into one of the above categories, your setup may still be similar to one of the following sections anyway. Otherwise, you'll need to contact your service provider for specific instructions and software for Windows XP. Details on each of these connection types are as follows. 7.3.1.1 DSL, cable, or other high-speed connection with a static IP address High-speed connections with static IP addresses are probably the easiest of the aforementioned connections to set up in Windows XP. A static IP address means you have the same IP address on the Internet every time you start your computer. If you're not sure if you have such a connection, check to see if your connection requires a username and password to log on; if so, you most likely have a PPPoE connection, described in the next section. Otherwise, proceed with these steps:  | If you're using a router, don't use this procedure. Instead, enter your connection's IP address directly into your router's setup page (explained later in this chapter). Then, use the procedure later in this section to set up each workstation. |
|
Connect your network adapter directly to the device that supplies your Internet connection, whether it's connected to a DSL adapter, a cable modem, or an Ethernet outlet in your wall. (If you're connecting to a router, see the section on routers later in this chapter.) Open the Network Connections window, locate the connection icon corresponding to the network adapter plugged in to your Internet connection, and rename it "Internet Connection." Then, right-click the newly named Internet Connection icon and select Properties. Under the General tab, make sure only the following entries are enabled (checked): If there are any other entries enabled here, clear their checkmarks. Highlight Internet Protocol (TCP/IP) and click Properties. Click the Use the following IP address option and enter the IP address, subnet mask, default gateway, and preferred (primary) DNS server and alternate (secondary) DNS server addresses provided by your Internet service provider. Click OK, and then click OK again; the change should take effect immediately. Test your connection by loading a web page or using Ping (as described in the previous section).  | If, after completing these steps, Windows ever prompts you to connect to the Internet, go to Control Panel  Never dial a connection option. Never dial a connection option. |
|
7.3.1.2 DSL, cable, or other high-speed connection via PPPoE PPPoE is used to establish temporary, dynamic-IP Internet connections over high-speed broadband lines. If your Internet connection has a dynamic IP address, it means your Internet service provider assigns you a different IP address every time you connect to the Internet. The PPPoE (Point-to-Point Protocol over Ethernet) protocol facilitates this connection by sending your username and password to your provider. | If your ISP provides special software that connects to the Internet (such as Efficient Networks's truly awful NTS Enternet 300 software or RASPPPoE), you can abandon it in favor of Windows XP's built-in support for PPPoE, explained here. |
|
One of the differences between this type of connection and the static IP connection discussed in the previous section is that PPPoE connections must be initiated every time you start Windows or every time you wish to use the Internet, which is somewhat like using old-fashioned dial-up connections (discussed in a subsequent section). Such connections are automatically disconnected when you shut down Windows. | If you have a PPPoE connection and you're using a router to share your Internet connection (explained later in this section), don't use this procedure. Instead, you'll need to enter your username and password into your router's configuration screen, as described in Section 7.5.1 later in this chapter. |
|
Here's how to set up a PPPoE connection in Windows XP: If you have PPPoE software (such as Enternet 300) installed, remove it from your system now. This is typically accomplished by going to Control Panel Open the Network Connection Wizard, as explained in Section 7.1.3, earlier in this chapter. Click Next to skip the introductory page, choose the Connect to the Internet option, and then click Next again. Choose the Set up my connection manually option, and click Next. Choose the Connect using a broadband connection that requires a user name and password option, and click Next. Type a name for this connection, and click Next. A good choice is the name of your ISP, or just "DSL" or "cable." Enter your username and password, choose the desired options underneath (if you're not sure, turn them all on), and click Next. Click Finish to complete the wizard. To start the connection, double-click the icon you just created in the Network Connections folder. If you elected to create a desktop shortcut in the wizard, double-click the desktop icon. By default, a Connect dialog will appear at this point. Click Connect to initiate the connection.
Here are some tips for working with PPPoE connections. To skip the Connect dialog, right-click the connection and select Properties (or click the Properties in the Connect window itself), choose the Options tab, and turn off the Prompt for name and password, certificate, etc. option. To have Windows connect automatically whenever the connection is needed, first right-click the connection icon and select Set as Default Connection. Then, go to Control Panel Always dial my default connection option. To have Windows connect automatically when you first start your computer, place a shortcut to the connection in your Startup folder. You'll also need to make sure that the Prompt for name and password, certificate, etc. option is turned off, as described earlier. If you need to make several similar PPPoE connections, you can save time by right-clicking the connection you just created and selecting Create Copy. Then, right-click the newly copied connection and select Properties to modify it. If you're having trouble getting your new PPPoE connection to work, check your DSL or cable modem first to see if the correct lights are lit (refer to your documentation). Sometimes, turning off the adapter, waiting several minutes, and then turning it back on solves the problem. If you're using PPPoE in conjunction with Internet Connection Sharing, discussed later in this chapter, and you've found that some web pages won't load on the client computers, see Section 7.3.3, later in this chapter.
7.3.1.3 Connection provided by a router or another computer via Internet Connection Sharing If you're using Internet Connection Sharing, described later in this chapter, the setup for the clients (all the computers on your network, other than the one with the physical Internet connection) is a snap. This procedure is also appropriate if you're using a router to share an Internet connection. This procedure assumes you've already set up the aforementioned shared Internet connection (facilitated by either ICS or a router), as well as a properly functioning peer-to-peer workgroup, as described in Section 7.2.1, earlier in this chapter. Follow these steps to connect a computer to an existing shared Internet connection: Open the Network Connections window, right-click the connection icon corresponding to the network adapter plugged into your workgroup, and select Properties. Under the General tab, make sure that at least the following entries are enabled (checked): Any other protocols and services enabled here should be left alone, as they may be needed for other purposes. Highlight Internet Protocol (TCP/IP) and click Properties. If you're not using fixed IP addresses on your LAN (which will be the most common case), select both the Obtain an IP address automatically and Obtain DNS server address automatically options, and click OK. Skip the next two steps, and proceed directly to step 7. Otherwise, if you've set up your network with fixed IP addresses such as 192.168.0.1, 192.168.0.2, and so on (explained in Section 7.1.2, earlier in this chapter), select the Use the following IP address option and enter the IP address you wish to assign the machine. (Note that most routers use the 192.168.1.x subnet instead of 192.168.0.x.) Remember, this is the IP address of your computer in your workgroup, not the IP address of your Internet connection. Type 255.255.255.0 for the subnet mask. For the gateway, type the IP address of the computer hosting the shared Internet connection. If you're using a router to share your Internet connection, type the IP address of the router (refer to the instructions that came with the router for possible exceptions). Lastly, type the Preferred (primary) DNS server and Alternate (secondary) DNS server addresses provided by your Internet service provider. Click OK when you're done. Click OK, and then click OK again; the change should take effect immediately. Test your connection by loading a web page or using Ping (as described earlier in this chapter). If the connection doesn't work at this point, open the Network Setup Wizard, as described in "The Network Setup Wizard" sidebar, earlier in this chapter. Click Next on the first two pages, and choose the This computer connects to the Internet through another computer and click Next on the third page. Depending on your network configuration, the remaining pages will vary here; answer the questions the best you can and complete the wizard. If you're able to view some web sites but not others, and you're connecting to a shared Internet connection facilitated by PPPoE (described in the previous section), you may have to change the MTU setting. See Section 7.3.3, later in this chapter.
7.3.1.4 Dial-up connection, including analog modems over standard phone lines Of the connection types listed here, dial-up is the least expensive and probably still the most common. All you need is an ordinary analog modem, a standard telephone line, and a dial-up account with an Internet service provider. You can have as many dial-up connections configured at one time as you like, especially useful if you travel; just repeat these steps for each subsequent connection. | If you're using America Online, MSN, or some other proprietary service, these instructions may not apply to you. Contact your service provider for setup instructions for Windows XP. |
|
Open the Network Connection Wizard, as explained in Section 7.1.3, earlier in this chapter. Click Next to skip the introductory page, choose the Connect to the Internet option, and then click Next again. Choose the Set up my connection manually option, and click Next. Choose the Connect using a dial-up modem option, and click Next. Type a name for this connection and click Next. A good choice is the name of your ISP, or just "Analog." If you're setting up multiple dial-up connections, choose descriptive names, such as "On the road" and "At home." Enter the phone number for the connection, obtained by your service provider, and click Next. If your ISP provides two or more phone numbers, you have the option of creating multiple connections (one for each phone number), or creating a single connection that cycles through a list of phone numbers until a connection is established. If you choose the latter, you'll have the opportunity to enter additional phone numbers for the connection at the end of the procedure. Enter your username and password, choose the desired options underneath (if you're not sure, turn them all on), and click Next. Click Finish to complete the wizard. To start the connection, double-click the icon you just created in the Network Connections folder. If you elected to create a desktop shortcut in the wizard, double-click the desktop icon. By default, a Connect dialog will appear at this point. Click Dial to initiate the connection.
Here are some tips for working with Dial-up connections. To skip the Connect dialog, right-click the connection and select Properties (or click the Properties in the Connect window itself), choose the Options tab, and turn off the Prompt for name and password, certificate, etc. option. To have Windows connect automatically whenever the connection is needed, first right-click the connection icon and select Set as Default Connection. Then, go to Control Panel Always dial my default connection option. To have Windows connect automatically when you first start your computer, place a shortcut to the connection in your Startup folder. You'll also need to make sure that the Prompt for name and password, certificate, etc. option is turned off, as described above. If you need to make several similar dial-up connections, you can save time by right-clicking the connection you just created and selecting Create Copy. Then, right-click the newly copied connection and select Properties to modify it. To enter additional phone numbers for this connection (as opposed to making several separate connections), right-click the new connection icon, select Properties, choose the General tab, and click Alternates. Use the up and down arrow buttons to the right to change the priority of each phone number entered; numbers appearing higher on the list will be dialed first. Make sure to turn on the If number fails, try next number option.
7.3.2. Sharing an Internet Connection Naturally, it doesn't make much sense to invest in a separate Internet connection for each computer in your home or office. Instead, you can use one of several different methods to share a single Internet connection among many separate computers. The first solution utilizes the Internet Connection Sharing feature built into Windows XP. If you used the ICS feature found in Windows 98 Second Edition or Windows Me, you'll find that the system in XP makes a lot more sense and is much easier to set up. The advantage to ICS is that it is free; no additional software or hardware is required, but it does have its limitations. Alternatives to ICS are discussed subsequently. 7.3.2.1 Setting up Internet Connection Sharing ICS is a system by which a single computer with an Internet connection acts as a gateway, allowing all other computers in the workgroup to use its connection to access the Internet. The computer that is connected directly to the Internet is called the host; all the other computers are called clients. | If you're using Windows XP Home Edition, you can share your Internet connection with a maximum of five other computers. If you're using Windows XP Professional, that limit is increased to 10. |
|
In order to get ICS to work, you'll need the following: At least two computers, each with an Ethernet adapter properly installed and functioning. ICS can be used with both conventional and wireless networks. It is assumed you've already set up your local network, as described in Section 7.2.1, earlier in this chapter. Your Internet connection can be shared with as many clients as your LAN will support. One of the computers must have an Internet connection properly set up, as described in Section 7.3, earlier in this chapter. | You do not need a special type of Internet connection, nor do you need to pay your Internet service provider extra fees to use Internet Connection Sharing. The whole point of ICS is to take a connection intended for a single computer and share it with several other machines. |
|
There is no minimum connection speed, but you should keep in mind that when two users are downloading using the shared connection simultaneously (the worst-case scenario), each user will experience half of the original performance. In other words, you probably don't want to bother sharing a 14.4 Kbps analog modem connection; see the discussion of "Bandwidth" at the beginning of this chapter, and Section 7.3.4, later in this chapter, for more information. If you're sharing a DSL, cable modem, or other high-speed, Ethernet-based Internet connection, the computer with the Internet connection must have two Ethernet cards installed. See Figure 7-5 for a diagram of this setup.
| If your Internet connection is accessed through a router or you've allocated multiple IP addresses, you don't need Internet Connection Sharing; see Section 7.3.2.3, later in this chapter, for details. |
|
The first step in setting up ICS is to configure the host, the computer with the Internet connection that will be shared: Open the Network Connections window. If you haven't already done so, select Details from the View menu. Here, you should have at least two connections listed: one for your Internet connection, and one for the Ethernet adapter connected to your LAN. If they're not there, your network is not ready. See the tips above for what you need, and try again. | For clarity, I recommend renaming the two connections to "Internet Connection" and "Local Area Connection," respectively, as illustrated in Figure 7-7. |
|
Right-click the connection icon corresponding to your Internet connection, and select Properties. In most cases, it will be the Ethernet adapter connected to your Internet connection device. However, if you're using a DSL or cable connection that requires a login with a username or password, the icon to use is the broadband connection icon corresponding to your PPPoE connection. See Section 7.3, earlier in this chapter, for further instructions. Choose the Advanced tab, and turn on the Allow other network users to connect through this computer's Internet connection option, as shown in Figure 7-12. Figure 7-12. Any Internet connection can be shared with other computers in your workgroup 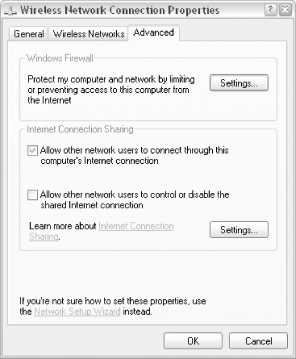
(For more information on the Firewall option shown here, see Section 7.6.2, later in this chapter.) Click OK when you're done. Verify that Internet Connection Sharing is enabled; it should say "Enabled, Shared" in the Type column of the Network Connections window, as shown in the example in Figure 7-7. That's it! The change will take effect immediately. Verify that the Internet connection still works on the host by attempting to open a web page. If the Internet connection doesn't work on the host, it definitely won't work on any of the clients.
The next step is to configure each of the client computers to use the shared connection. The only requirements of the client machines are that they are running an operating system that supports networking and that their network connections are properly set up. The clients can be running Windows 2000, Windows Me, Windows 9x, Windows NT, Windows 3.x for Workgroups, or even Mac OS, Unix, Linux, or FreeBSD. See Section 7.3, earlier in this chapter, and follow the instructions in Section 7.3.1.3. Do this for each "client" machine on your network. While the instructions are specific to Windows XP, the settings explained therein can be adapted to any OS; refer to your operating system's documentation for more information. 7.3.2.2 Troubleshooting Internet Connection Sharing Here are some tips that should help you fix the problems you might encounter with ICS: If the Internet is accessible by one client machine, it should work for them all. If none of the clients work, the problem is most likely with the host; if some of the clients work and others don't, it's a problem with clients that don't work. ICS works over existing network connections, so those connections must be functioning before ICS will operate. Refer to Section 7.2.1, earlier in this chapter, for further troubleshooting details. Check to see if you have any firewall software installed on the host or clients that might be interfering with the connection. The Windows Firewall included with XP SP2 (discussed later in this chapter) won't interfere with ICS, however. The IP address of the host on the workgroup must be set to 192.168.0.1, or ICS won't work. Among other things, this means that no other computers can be using that address. If you can't get ICS to work with the default Windows XP configuration, try assigning a fixed IP address to each of your clients, as described in Section 7.1.3, earlier in this chapter. If you're experiencing poor performance, it's important to realize that whatever bandwidth is available though a given Internet connection will be shared among all of the computers actively using the connection. The worst-case scenario is when two or more users simultaneously download large amounts of data; in this case, they would each receive only a portion of the total connection bandwidth. Bandwidth sharing is dynamic, though, so most of the time you shouldn't notice much of a decrease in speed. If you're using special connection software for use with your DSL or cable (such as Efficient Networks's NTS Enternet 300 software), it's best to remove it and use Windows XP's built-in support for PPPoE (described earlier in this chapter). If you're using PPPoE and find that you can access some web sites but not others from the client machines, see Section 7.3.3, later in this chapter.
7.3.2.3 Alternatives to Internet Connection Sharing The Internet Connection Sharing feature built into Windows XP has its limitations. For example, the host computer must be on and connected to the Internet for the other computers to have Internet access. If this "host" computer crashes or is shut down, Internet access will be cut off for the whole workgroup. This may be a small price to pay, considering that ICS is free, simple, and pretty convenient, but if you don't want your network's Internet connection to rely on any single computer, you may wish to consider the following alternatives to see if they make sense for you:
- Use a router
-
A router works similarly to a hub or switch, both discussed at the beginning of this chapter, except that it will also be capable of sharing a single Internet connection with all members of your workgroup (and without the arbitrary 5- or 10-computer limits imposed by XP). Routers have added advantages, such as built-in firewalls and wireless access points; see Section 7.1.2 earlier in this chapter for details. Figure 7-13 illustrates a workgroup connected to the Internet with a wireless router. Figure 7-13. Instead of connecting a single computer to the Internet and then sharing the connection, a router allows you to plug an Internet connection directly into your LAN, providing Internet access to all your PCs, whether wired or wireless 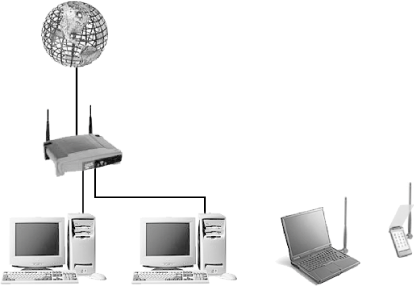
Just plug your broadband modem into the WAN or Internet port in the back of the router, and then plug your PCs into any of the numbered ports (or connect them wirelessly, if applicable). | Avoid installing the software that comes with your router, as it will be almost certainly unnecessary. Instead, open a web browser and go to 192.168.1.1 (or whatever IP address your router uses by default), and complete your setup there. See the Wireless section later in this chapter for more information, including some important security precautions. |
|
Refer to the documentation that comes with the router for basic setup instructions, and see the Section 7.3.1.3, earlier in this chapter, for instructions on connecting a Windows XP system to a router. | If you're shopping for a router, get one with wireless support, even if you don't need it. Wireless-G (802.11g) is faster than Wireless-B (802.11b), only marginally more expensive, and backwards-compatible, so there's little reason to go with the slower standard. Avoid routers that only work with specific Internet connections (e.g., DSL, cable), and instead get one that will work with any connection type. |
|
- Use multiple IP addresses
-
Some ISPs may provide, at extra cost, multiple IP addresses, with the specific intent that Internet access be provided for more than one computer. Since each computer has its own true IP address, there's no need for any "sharing" software or hardware. Instead, your hub or switch is plugged directly into your Internet device (DSL, cable, T1, or whatever), and each computer will effectively have its own Internet connection. Refer to the instructions in Section 7.3.1.1, earlier in this chapter, to set up each of your computers to access the Internet. The advantages of multiple IP addresses over ICS or using a router, as described earlier, is that the setup is very easy, and no additional hardware or software is required. The downside is that Internet connections with multiple IP addresses are often much more expensive (in noncorporate environments, that is) than standard Internet connections, and provide no additional security. In fact, the added monthly cost will most likely exceed the one-time cost of a router very quickly.
7.3.3. Fix Your Shared Internet Connection with a New MTU There are some circumstances when a shared Internet connection doesn't quite work as it's supposed to. The problem, where some web pages load and some do not, typically affects client computers that access a shared Internet connection facilitated by PPPoE. Although all web sites will be accessible on the host computer, certain web sites will never load successfully from any of the client machines. If you don't know what "hosts" or "clients" are with regard to Internet Connection Sharing, you'll want to review the previous section before you proceed. Also, see Section 7.3.1.2, earlier in this chapter for more information on PPPoE connections. Note that this applies to Windows XP's built-in PPPoE support, as well as PPPoE provided by third-party software and even some routers. The following solution is intended to fix this specific problem. Sit down in front of one of your client machines, and type the following: PING -f -l 1500 192.168.0.1
This assumes that 192.168.0.1 is the IP address of the host computer (or router); substitute the correct address if it's different. If you don't know the IP address of the host computer, open a Command Prompt window (cmd.exe) on the host, and type ipconfig at the prompt. (If a router is providing your Internet connection, consult the router documentation for details on obtaining its IP address.) You'll probably get an error message indicating that it must be fragmented. (If not, then this solution doesn't apply to you.) Next, type the following: ping -f -l 1492 192.168.0.1
If that results in the same error message, try this instead: ping -f -l 1480 192.168.0.1
If you still get an error, try: ping -f -l 1454 192.168.0.1
The numbers in each of these examples (1500, 1492, 1480, and 1454) are values for the MTU (Maximum Transmission Unit). Continue issuing this command with lower and lower MTU numbers until you get normal ping responses instead of an error message. The highest MTU value that does not result in an error is the correct one for your network. It's not unheard of for an MTU as low as 576 to be required, although Microsoft recommends no value smaller than 1400 for Windows XP. Once you've found an MTU that works for you, open the Registry Editor (see Chapter 3) on the client machine. Expand the branches to HKEY_LOCAL_MACHINE\SYSTEM\CurrentControlSet\Services\Tcpip\Parameters\Interfaces. There should be several subkeys under the Interfaces key; most likely, you'll find three. View each key's contents, and find the one that corresponds to your primary network adapter; it will be the one with more values than the other two, and will have an IP address value set to the IP address of the machine. Once you've found the correct subkey, create a new DWORD value in it by selecting New and then DWORD Value from the Edit menu. Name the value MTU. Double-click the new value, choose the Decimal option, type the MTU value you earlier in this procedure, and click OK. Close the Registry Editor when you're done; you'll need to restart Windows for this change take effect. Repeat steps 3-7 for each client machine on your network (but not the host).
In most cases, this should solve the problem. However, on some systems, you may need to set the MTU in another registry location as well. If you've found that a lower MTU value is what you need, but the above procedure didn't work, try this as well: Navigate to HKEY_LOCAL_MACHINE\System\CurrentControlSet\Services\Ndiswan\Parameters\Protocols\0. If any keys in this Registry path aren't there, just create them by going to Edit Once you're in the key, create a new DWORD value called ProtocolType and give it a Decimal value of 2048. Then, create a new DWORD value called PPPProtocolType and give it a Decimal value of 33. Finally, create a new DWORD value called ProtocolMTU and give it a Decimal value of the MTU you determined above. Close the Registry Editor and restart your system when you're done.
7.3.4. Test Your Throughput Throughput is the practical measurement of bandwidth: the quantity of data you can transmit over a connection in a given period of time. Now, most types of connections are classified for their bandwidth (discussed at the beginning of this chapter); a good ol' 33.6 Kbps modem is so-named because at its best, it can transmit and receive 33,600 bits per second. Because there are eight bits to the byte, this connection would give us a theoretical throughput of 4.1 kilobytes per second. In reality, however, you're not likely to see a throughput any faster than about 3.6 kilobytes per second with the connection in this example. That's a difference of about 14%; a file that you would expect to take a minute to download will actually take about 70 seconds. The reason for this discrepancy is that there are other things that get transferred along with your data; error correction and lost packets because of noise on the line can make the actual throughput lower as well. Unfortunately, most of the factors that affect the actual throughput are beyond our control. Broadband connections, such as DSL, cable, and T1, are also rated similarly and suffer the same throttling effect, but generally these connections are fast enough that the discrepancy isn't really that noticeable. Throttling Quality of Service The Quality of Service (QoS) Packet Scheduler is a service included with Windows XP Professional that, when connected to a QoS-enabled network, reserves about 20% of your bandwidth for certain applications. Since this could mean that a rather large amount of your precious bandwidth is being wasted, you may wish to throttle or disable it. Note that this does not apply to Windows XP Home Edition or any computer connected to a network that does not use the QoS service. You must be logged into the Administrator account (see Chapter 8). Open the Group Policy Editor (gpedit.msc, available in Windows XP Professional only). Expand the branches to Computer Configuration\Administrative Templates\Network\QOS Packet Scheduler. Double-click the Limit reservable bandwidth entry in the right pane, and choose the Setting tab. Select Enabled, and change the Bandwidth limit (%) value to 0 (or whatever value you prefer). Click OK and close the Group Policy Editor when you're done. You'll need to restart Windows for the change to take effect.
Note that disabling the QoS Packet Scheduler (by unchecking the QoS Packet Scheduler option in General tab of the Properties sheet for your network connection) won't accomplish this. |
Among the factors within our control are the hardware and software we use and various settings and conditions in which we work. So it is often advantageous to test the throughput under different conditions and with different equipment so that you can achieve the best performance. The simplest way to measure the throughput is to transfer a compressed binary file (such as a large .jpg or .zip file) from your computer to another location and then back again, recording the time it takes to complete the transfer each way. Just divide the file size by the transfer time to get the throughput, typically in kilobytes per second. Note that we test the "upload" as well as the "download" speed. Many types of connections are asymmetrical; 56 K modems, for example, download at around 53.2 Kbps, but upload at only 33.6 Kbps. Likewise, a midrange DSL connection might be rated at 768 Kbps download and 128 Kbps upload. Note also that you wouldn't want to use ASCII files (such as plain-text files and web pages) to test the throughput, because compression will yield uncharacteristic results. Average throughputs for common connection speeds are shown in Table 7-1. Table 7-1. Ideal download/upload throughputs for various connection speeds| Connection method | Ideal throughput (KB per sec) |
|---|
| 14.4 Kbps modem | 1.6 download, 1.6 upload | | 28.8 Kbps modem | 3.2 download, 3.2 upload | | 33.6 Kbps modem | 3.6 download, 3.6 upload | | 56 Kbps modem | 5.4 download, 3.6 upload | | ISDN (dual channel, 128 Kbps) | 14 download, 14 upload | | Cable Modem (~800 Kbps synchronous) | 84 download, 84 upload | | DSL (asynchronous 1.2 Mbps/384 Kbps) | 128 download, 42 upload | | T1, fast DSL (1.5 Mbps) | 160 download, 160 upload |
Note that you shouldn't fret if your throughput doesn't exactly match the values in the table they're only examples. If you find that you're getting substantially slower performance, however, you should test your equipment and cabling and see if there's any software that could be interfering with the connection. For example, a noisy phone line is the most common cause of poor performance of a dial-up connection. For DSL or cable, try turning off your modem for a minute or two and then turning it back on. Do Download Accelerators Really Work? There are a number of "download accelerator" software products available, all of which promise to speed up the transfer of files downloaded to your computer. As you might have guessed, none of them are actually capable of increasing the bandwidth or throughput of your Internet connection. Rather, they employ download managers that compensate for inefficiencies in the download process. These programs work by downloading a file in pieces, via multiple concurrent download streams (not unlike the TCP/IP protocol that powers the transfer explained at the beginning of this chapter). While two concurrent downloads would each be allotted half the bandwidth normally consumed by a single download, this boundary only applies when your Internet connection is the bottleneck. So, in theory, a download manager may improve your download speed if the other computer's connection is slower than yours. Any speed advantage you notice may be offset by the annoying and cumbersome interfaces these programs add to the mix, but in the end, the convenience afforded by some of these programs' extra features may make them worth the hassle. Here are a few recommended download managers: Fresh Download (freeware, http://www.freshdevices.com) Download Express (freeware, http://www.metaproducts.com) Free Download Manager (freeware, http://www.freedownloadmanager.org) Download Accelerator Plus (http://www.speedbit.com)
| Be aware that some download accelerators contain spyware (see Chapter 6 ), so use caution when trying an unproven product. |
|
Some programs also can resume aborted downloads, find alternative servers from which to download your files, and schedule downloads for off-peak times. At the time of this writing, however, there was no "perfect" download manager, or even one that I'd necessarily recommend over using no manager at all. But if you're so inclined, you'll probably it find worth the time experimenting with these tools, if only to get some of the aforementioned special features. |
Another way to test the actual bandwidth of your connection is to visit one of the many bandwidth-testing web sites: In addition to calculating your bandwidth and reporting the results, these services typically ask for your zip code and connection type to compile statistics on typical connection speeds in your area. See Chapter 5 for solutions on improving overall system performance, some of which will also have a noticeable impact on your connection speed. |