In many ways, Windows XP is able to better take advantage of your hardware than Windows 9x/Me, but that doesn't mean it's configured for optimal performance right out of the box. Because all the software you run is dependent upon the operating system, tweaking Windows for better performance can result in performance gains across the board.
To start off, there are several easy settings that can have a substantial effect on Windows responsiveness. The next few sections explain these settings.
5.1.1. Tame Mindless Animation and Display Effects
Windows XP adds animation to almost every visual component of the operating system. While these affectations may be cute, they can easily make a 2 GHz computer perform as though it were an antiquated 386. Rather than watch your Start Menu crawl to its open position, you can configure your menus and list boxes to snap to position. You'll be surprised at how much faster and more responsive Windows will feel.
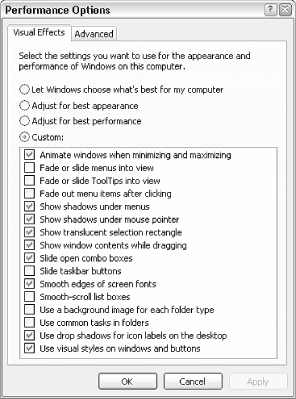
The settings that can affect performance are scattered throughout the interface, but the ones that control display effects are the ones that concern us here. Double-click the System icon in Control Panel, choose the Advanced tab, and click Settings in the Performance section. The Visual Effects tab, shown in Figure 5-1, contains sixteen settings, all explained later.
Figure 5-1. The Performance Options window is a good place to start when looking for Windows bottlenecks to eliminate
Unfortunately, the four selections above the list are rather misleading. For example, the Let Windows choose what's best for my computer option reverts all settings to their defaults, chosen by a marketing committee at Microsoft to best showcase their product's features. The Adjust for best appearance option simply enables all features in the list, while the Adjust for best performance option just disables them.
Keep in mind that disabling some of these options will definitely improve Windows performance, while others may only be of benefit if you are using older video hardware.
Newer video cards (display adapters), especially better 3D-accelerated AGP cards, have built-in processors that handle drawing routines, such as shadows and translucent effects. If your video card is fast enough, these effects won't cause a performance hit. Other settings, such as animated menus, rely on time-based delays and slow down everyone's system, regardless of hardware.
Ultimately, the choice comes down to personal preference: some of these features are just plain annoying, and turning them off can be beneficial to your sanity. Others are actually kinda cool:
Animate windows when minimizing and maximizing
If enabled, this option causes windows to appear to shrink into their respective taskbar buttons when minimized, and expand to their full- size windows when restored or maximized. Although not as slick as the minimize/maximize animation in Apple's OS X, it can nonetheless give a quick clue as to where your window goes when it's minimized. If you see excessive flickering when you minimize or maximize, try turning this one off.
If you have both the Auto-hide the taskbar setting in Taskbar and Start Menu Properties and the Show window contents while dragging option (described later) enabled, turning off the Animate windows option will also disable the animation for the disappearing taskbar.
Fade or slide menus / ToolTips into view
This is the option that enables or disables animation shown when menus are opened. Turn this option off to have menus "snap" open.[1]
[1] By default, there will still be a short delay before a menu is opened. See "Speed Up Menu Responsiveness," later in this chapter, for more information.
If you choose to keep menu animation, you can change the type of animation used by double-clicking on the Display icon in Control Panel, choosing the Appearance tab, and clicking Effects.
Show shadows under menus / mouse pointer
If you have a newer video card, disabling this option should have no discernible effect on performance.
Show translucent selection rectangle
The translucent selection rectangle (referred to as a "rubber band" in Chapter 2) takes advantage of extended support for alpha channels in your display driver. Only those systems with older video cards will see a performance hit from this feature. With this option disabled, rubber bands appear as dotted rectangles.
Show window contents while dragging
Disable this option to show only window outlines when dragging and resizing windows. Unless you have a very old video card, you most likely won't see any difference in performance with this turned off. In fact, your system is likely to seem more responsive with this feature enabled, as windows will appear to respond immediately to dragging rather than responding only after you let go of the mouse button.
Slide open combo boxes
This option controls the animation of drop-down listboxes, similar to the fade or slide menus option described earlier.
Slide taskbar buttons
When a window is closed, its taskbar button disappears. If this option is enabled, the taskbar buttons to its right will slide to the left to close the gap. Since this animation doesn't cause any delays, you're unlikely to achieve any performance gains by disabling this option. However, I find the taskbar animation rather annoying and personally prefer to have this one turned off.
Smooth edges of screen fonts
Using a process called anti-aliasing, Windows fills in the jagged edges of larger text on the screen with gray pixels, making the edges appear "smooth." Turn this option off to slightly improve the speed at which larger fonts are drawn on the screen.
If you're using a flat-panel display (laptop or otherwise), you may find smoothed fonts more difficult to read. Instead of simply turning the option off, you may wish to try an alternate anti-aliasing method. Double-click the Display icon in Control Panel, choose the Appearance tab, and click Effects to choose between the Standard and Clear Type smoothing methods. Experiment with this setting to see which one looks best on your display.
Smooth-scroll list boxes
Just because standard listboxes don't "open" like menus and drop-down listboxes doesn't mean they're not animated. By default, when you scroll a listbox, its contents move slowly. Turn this option off to improve the responsiveness of listboxes.
Use a background image for each folder type
Turn this off to disable the background image shown in some system folders, such as Control Panel (category view only) and the My Pictures folder. These folders will not only open more quickly without the background images, but they'll be more readable as well.
Use common tasks in folders
The common task pane can also be disabled by opening Folder Options in Control Panel, and selecting Use Windows classic folders. Common tasks, described in more detail in Chapter 2, are the panes shown on the left of single-folder windows and contain links to related areas and features.
Use drop shadows for icon labels on the desktop
This option does more than simply enable or disable shadows for desktop icon captions. If you turn this option off, not only will the shadows disappear, but the background behind the text will no longer be transparent. Windows XP is the first version of Windows to offer this option. See Figure 5-2 for an illustration of this setting.
Figure 5-2. If you turn off shadows for desktop icon labels and you're using a background image, desktop icon labels will be shown over rectangles of the current background color
Use visual styles on windows and buttons
Turning this option off is essentially the same as choosing Windows Classic style from the Windows and buttons list in Control Panel
Other settings that affect your display performance can be found by going to Control PanelTroubleshoot tab has a couple of settings that allow you to disable some video functionality, useful to help isolate video driver problems. See also "Get the Most Out of Your Games, Speed-Wise" for more settings, including those that affect the Direct3D and OpenGL subsystems.
You'll find additional settings in TweakUI, although many are simply duplicates of the settings described above. See also Appendix A, for details on TweakUI and additional performance-related settings.
5.1.2. Speed Up Menu Responsiveness
In addition to turning off the menu animation, as described in the previous section, there's another setting that affects how responsive menus (including the Start Menu) are. By default, there's a half-second or so delay between the time you move the mouse over a menu item and the time the menu is opened. If you reduce this value, your menus will open much more quickly.
There's another feature that is incidentally affected by this setting. In all releases of Microsoft Windows since Windows 95, all menus "follow" the mouse, which allows you to navigate through menus without having to click repeatedly. The problem with this design is that it can be very difficult to navigate menus unless you're able to hold your mouse or other pointing device very steadily. Even the smallest unintentional move in the wrong direction can cause the menu you're using to disappear. This can be even more annoying to those with more sensitive pointing devices, such as touch pads, pens, and other digitizers. This behavior can be completely disabled by increasing the menu open delay to a sufficiently large value:
Open the Registry Editor (described in Chapter 3).
Expand the branches to HKEY_CURRENT_USER\Control Panel\Desktop.
Double-click the MenuShowDelay value. If it's not there, go to Edit
The numeric value you enter here is the number of milliseconds (thousandths of a second) Windows will wait before opening a menu. The default is 400 (a little less than half a second). Enter 0 (zero) here to eliminate the delay completely, or a very large value (65534 is the maximum) to disable the automatic opening of menus.
Click OK and close the Registry Editor when you're finished. You may have to log out and then log back in for this change to take effect.
This setting can also be changed in the Mouse category of TweakUI (see Appendix A) or in Creative Element Power Tools (available at http://www.creativelement.com/powertools/).
5.1.3. Speed Up System Startup
Several factors can impact the amount of time it takes for your computer to load Windows and display the desktop so you can start working. As you install software and add devices, Windows gets more and more bogged down. The most effective way to combat this is to routinely format your hard disk and reinstall the operating system and all applications. In fact, the computer on which I wrote this book was wiped clean before I began the project. Initially, I had upgraded a Windows 2000 system with XP, and it took 2-3 minutes to boot each time. After wiping it clean and reinstalling, the boot time dropped to about 45 seconds.
Unfortunately, reinstalling is a whole lot easier said than done, and is simply not practical for many of us. The following is a checklist of ways to more easily (although less substantially) reduce Windows boot time.
5.1.3.1 Add more memory
You should have a minimum of 256 MB of memory (RAM) to run Windows XP, but 384 MB to 512 MB is better. Many systems can accept up to 768MB or even 1 GB (1024 MB), although only users of graphic-intensive applications (such as Photoshop) are likely to benefit from that much memory.
Memory prices are always dropping, typically making it remarkably inexpensive to add more RAM to your system, and doing so will significantly improve performance across the board.
5.1.3.2 Make more free disk space
You may not have sufficient free disk space for your swap (paging) file. Windows uses part of your hard disk to store portions of memory; the more disk space you devote to your swapfile, the easier it will be for Windows to store data there. See "Optimize Virtual Memory and Cache Settings" later in this chapter for more information.
The easiest way to create more free disk space is to delete the files on your hard disk that you no longer need. It's best to back up your system before deleting anything, or at least to rename (or move) files to see if they're being used before you get rid of them permanently. See "Increasing Disk Space (or What to Throw Away)," later in this chapter, for more information.
Lastly, a new hard disk will give you dramatically more disk space. A faster hard disk can also improve boot time. If you're on the fence about replacing that older drive, consider the performance boost of getting a larger, faster drive.
5.1.3.3 Clean out your Temp folder
Sometimes having too many files in your \Windows\Temp folder can not only slow Windows startup but, in extreme cases, can prevent Windows from loading at all. Windows and your applications use this folder to temporarily store data while you're working with documents. When those applications and documents are closed (or when the applications just crash), they often leave the temporary files behind, and they accumulate fast.
See "Mirror a Folder with Folder Shortcuts" in Chapter 4 for more information on the Temp folder, including a hint on automatically clearing out the Temp folder when Windows starts.
5.1.3.4 Thin out your fonts
If you have more than 600 fonts installed on your system, it may be negatively impacting the time it takes to load Windows. If you can survive without 400 different decorative fonts (especially if all you ever use is Times Roman), try temporarily removing them. If you periodically need a lot of fonts, you might want to invest in font-management software, such as Adobe Type Manager, which can remove and reinstall fonts in groups at the click of a button.
5.1.3.5 Tame antivirus software
Antivirus programs are typically configured to be run whenever you turn on your computer. These programs are always in memory, scanning programs as you open them and files as you download them. In some cases, this is overkill. For most usersespecially those who take the proper precautionsgetting a computer virus is about as likely as getting struck by lightning.
I certainly wouldn't recommend getting rid of all antivirus programs; just restrict their use to manually scanning your system when you want by disabling the automatic feature. You'll notice a faster startup for Windows and applications alike. See "Viruses, Malware, and Spyware" in Chapter 6 for details.
5.1.3.6 Eliminate autostart programs
Probably the most common thing that slows down the loading of Windows is all of the programs that are configured to load at boot time. Not only do they take a while to load, but they commonly eat up processor cycles while they're running. There are several places such programs are specified. Look carefully in each location, and feel free to remove anything you don't want running. See "Programs Run by Windows when It Starts" in Chapter 5 and "Eliminate Unwanted Windows Components" later in this chapter for details.
5.1.3.7 Nitpicking
Leaving removable media (such as memory cards and removable hard disks) connected when you boot up may add boot delays. This is reportedly fixed in Service Pack 2, but it's still good practice to remove all CDs, disks, and cards from your computer when you're not using them.
Some people recommend using Microsoft's free BootVis tool to analyze your system's boot time and make appropriate changes to speed things up. Although it has some snazzy graphs, it has not been proven to have any noticeable effect on your system's boot time. Of course, because of the interest in this tool, Microsoft has decided to remove it from their site (see http://www.microsoft.com/whdc/system/sysperf/fastboot/bootvis.mspx), although you will likely be able to find it elsewhere.
Another thing that can increase boot time is network adapters that aren't plugged in. Windows polls each active network connection on your system when you boot your system and quits as soon as a connection is confirmed. If Windows can't establish a connection, it waits as long as 30 seconds before it gives up and moves on. (You can tell that Windows is doing this when hard disk activity ceases and the activity lights on your network devices start to blink.) To solve this problem, open the Network Connections window (see Chapter 7), right-click on each network connection you're not using, and select Disable.
While you're at it, disable any other networking components you don't need, including unnecessary protocols and drivers. Also, disable drive-letter mapping (discussed in Chapter 8) unless you use those drive letters all the time.
5.1.4. Start Windows Instantly
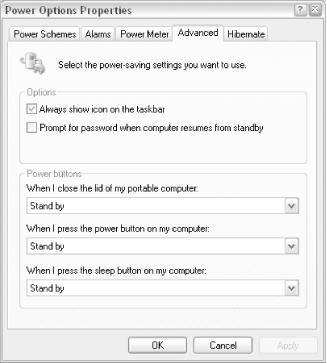
You can optimize Windows all you want, possibly shaving ten to fifteen seconds off your boot time (see the last section), or you can approach the problem from a different angle. Most new computers, and nearly all laptops, have a functional Stand by mode, allowing you to shut down Windows quickly, and more importantly, start it back up in only a few seconds.
Start by going to Control Panel and opening Power Options. Choose the Advanced tab, and then choose Stand by from all available listboxes in your Power buttons section, as shown in Figure 5-3. Click OK when you're done.
Figure 5-3. Make the Stand By mode more accessible to facilitate near-instant boots
If any of these options (or the entire Advanced tab) isn't available in your Power Options Properties window, then your computer's support for Advanced Power Management (APM) is likely disabled in your system's BIOS. See Appendix B for details on APM and APM-related settings, or jump to the next section for APM troubleshooting.
Then, while Windows is still running, press your computer's power switch (or, if it's a laptop, close its lid). Don't go through the normal shut down process via the Start Menu; just turn it off. Windows will briefly display a "Preparing to stand by . . . " message, and then your computer should shut itself off.
Now, press the power switch again. Your computer should power itself on, and the Windows desktop should appear in less than five seconds, allowing you to pick up where you left off. You can even leave applications open. The problem, of course, is when this doesn't work like it's supposed to, which, as it turns out, is most of the time.
5.1.4.1 Hibernate vs. Stand by
When you place a computer into Stand by mode, you're placing it into a "deep sleep" power-saving mode (known as the S3 sleep state), instead of actually turning it off. During Stand by, power to your system memory is maintained while power is cut to most of the rest of your system's hardware. This allows your computer to resume to the exact state it was in before it entered Stand by mode with a minimum of power consumption. Unfortunately, if power is cut completely, which can happen if you unplug your desktop system or remove the battery from your laptop, it will be equivalent to powering it off without going through the shutdown procedure, and you may lose data.
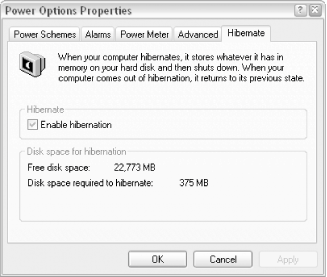
The other option is to have your computer enter hibernation mode (S4 sleep state), which saves an image of your system memory into a file on your hard disk (known as a memory dump) before power to the computer is completely shut off. The obvious benefit over Stand by mode is that the system memory isn't being kept alive with electricity, making it a better choice if you're shutting the computer down for the weekend. The downside is that writing to disk takes more time, as does reading the image file from disk when you wake up the system.
To enable hibernation mode, go to Control Panel Power Options Enable hibernation option, and you'll see that the disk space required to hibernate is equal to the amount of installed RAM in your computer.
Figure 5-4. Use Hibernate instead of Stand by to enable more robust, yet slightly slower system boots
Other Ways to Wake Your Computer
You can use your computer's power switch to wake up your system from Stand by or Hibernate mode, but it may not be your only choice. Provided that your mouse and its respective driver supports it, you can wake up a sleeping system as though it were nothing but a screensaver. To configure your mouse to wake your system, follow these steps:
Open Device Manager (devmgmt.msc).
Expand the Mice and other pointing devices category, right-click the entry for your mouse, and select Properties.
Choose the Power Management tab, and turn on the Allow this device to bring the computer out of standby option. (If this Properties box doesn't have a Power Management tab, then your mouse driver doesn't support this feature.)
Click OK when you're done.
These other devices may also be capable of waking up your computer:
Network adapters
Using the Wake-on-LAN protocol (sometimes called Remote Wake Up), you can wake a computer remotely over a network connection.
Modems
Wake your computer every time your phone rings. Of course, this may be an annoyance you're trying to solve, rather than a feature you're trying to enable, but, nevertheless, now you know where it is.
IEEE 1394 (FireWire) devices
Actually, you'll probably never have a reason to enable this option for FireWire controllers or devices, but the option can appear by mistake in some circumstances and can cause problems if it's enabled. Make sure it's turned off on your system.
Next, choose the Advanced tab and change all the Power buttons options to Hibernate (just like in the last section). Click OK when you're done. You can make your computer hibernate at any time by simply pressing the power switch (or closing the lid, if you're using a laptop).
Whether you choose to have your computer Stand by or Hibernate, you can configure Windows to go to sleep after a certain period of inactivity. It works like a screensaver, but saves power instead of displaying a cheerful animation. Just choose the Power Schemes tab of the aforementioned Power Options properties dialog, and set the System standby (or System hibernates) option to a suitable amount of time (e.g., "After 30 mins").
You can also make your computer enter Stand by mode by selecting Shut Down (or Turn Off Computer) from the Start menu and then selecting Stand by. If you're using the classic log-off screen, you'll also see a Hibernate option in the list (assuming the option above has been enabled). But if you're using the default Welcome screen and the corresponding Turn Off Computer dialog (discussed in Chapter 8), you'll only see the Stand by option. Just press and hold the Shift key to temporarily switch the button to Hibernate, should you need it.
5.1.4.2 Troubleshooting Stand by and Hibernate modes
If you experience a problem with one of the sleep modes (Stand by or Hibernate), it's likely one of the following:
Windows won't go to sleep at all; either nothing happens when you try to stand by, or the system just crashes in the middle of the process.
Windows wakes up after going to sleep, or Windows simply boots normally instead of recovering your previous session.
Some features stop working after waking from hibernation or Stand by, such as the Internet connection. (Hint: restart Windows to fix the problem.)
Once Windows has been placed in Stand by or Hibernate mode and is then woken up, it's unable to go back to sleep.
Some or all of the power-management features and settings discussed here are grayed-out (disabled) or missing.
Unfortunately, all of these problems are extremely common, mostly because of the sloppy and inconsistent support for Advanced Power Management (APM) and Advanced Configuration and Power Interface (ACPI) in the computer industry. The good news is that there are a few things you can do to help improve your computer's support for APM and ACPI, should you be experiencing any of the above problems:
Get a BIOS update
Check with the manufacturer of your computer system (or motherboard) for a BIOS update, the most likely fix (if available) for any power-management problems you might be having. See Appendix B for details.
Here's a little Microsoft-sponsored paradox for you: you'll know that your motherboard isn't fully APM-compliant if your Power Options dialog box has an APM tab. If the APM tab is present on your system, try turning on the Enable Advanced Power Management support option and then clicking Apply. (If there's no tab, then your computer does indeed support ACPI and APM, and you don't have to do anything.)
Look for incompatible hardware or drivers
The second-most common cause of power-management problems is a hardware device or driver that isn't fully APM-compliant, meaning that it doesn't support S3 sleep mode or can't be woken up after entering this power-saving state. Video cards (display adapters) and many USB devices are common culprits; check with their respective manufacturers for firmware and driver updates (see Chapter 6). See the "Increase the USB Polling Interval" sidebar for another solution.
Increase the USB Polling Interval
One of the things that can prevent your computer from entering its Stand by or Hibernate modes is Windows's support for USB. In order to detect newly connected USB devices, Windows polls your USB controller(s) once each millisecond by default. Unfortunately, this frequent polling may prevent your processor from believing that it is idle, a necessary condition before it can initiate any power-saving features.
The solution is to give your CPU a rest by increasing the interval between polls to the USB controller. Open the Registry Editor (see Chapter 3) and expand the branches to HKEY_LOCAL_MACHINE\SYSTEM\CurrentControlSet\Control\Class\{36FC9E60-C465-11CF-8056-444553540000}. You'll know you have the right key if its (default) value is "Universal Serial Bus controllers."
In this key, you'll find one or more numbered subkeys (e.g. 0000, 0001, 0002), each of which represents a USB controller. Now, if you've ever upgraded the motherboard in your computer, you'll likely see a lot of subkeys here. Most represent controllers no longer installed on your system; only the last couple (with the highest numbers) are likely still active. To find out which ones are currently active, cross-reference the names (in the DriverDesc value) with the USB controllers that currently show up in Device Manager (devmgmt.msc). If in doubt, you can always repeat this procedure for all the subkeys displayed here.
Select a subkey for an active USB controller, and create a new DWORD value inside (Edit
Make room for the hibernation file
As explained earlier, the Hibernate feature creates an image file on your hard disk equal in size to the amount of installed memory. If you have 384 megabytes of RAM, then Windows will need 402,653,184 bytes of free space. This feature may not work reliably if you don't have enough disk space, or if there's excessive fragmentation, so try deleting some unnecessary files and running Disk Defragmenter (dfrg.msc, discussed later in this chapter) if your PC is having difficulty hibernating.
Turn off the Indexing Service
If your hard disk won't turn off after a certain period of inactivity, Windows Indexing Service may be keeping them awake. See Microsoft Knowledge Base article 313300 (http://support.microsoft.com/?id=313300) for more information.
Use Sleeper
Go to http://www.passmark.com/products/sleeper.htm and download the free PassMark Sleeper utility to help test your computer's ability to enter and recover from sleep and hibernation modes.
Keep in mind that you may never get your system to reliably go to sleep and wake up, but if you are able to get it working, it can be very convenient.
5.1.5. Speed Up System Shutdown
Theoretically, when you shut down Windows, your computer should be powered down in under fifteen seconds. The problem is that all of the cleanup that is done before Windows considers it "safe" to power the system downincluding shutting down your open applications, stopping any running services, and writing any pending cache data to the diskcan sometimes delay the shutdown procedure.
In the course of using your computer, Windows sometimes postpones writing data to the disk to improve performance. This is called write caching, and as a consequence, Windows must take a few seconds before you shut down to make sure all data queued to be written is actually, physically written to the disk before power is lost. See the discussion of removable drives in Chapter 6 for a way to disable this feature.
The following solutions should help eliminate the sometimes-unnecessary delays that can accompany system shutdown.
5.1.5.1 Part 1: Reduce the hung application timeout
When shutting down, Windows attempts to stop all running tasks. If a task is not responding or refuses to shut down, there's a built-in delay before Windows will force the task to end. This delay is called the timeout, and it can be shortened if you're experiencing problems or unreasonable delays when shutting down your system:
Open the Registry Editor (described in Chapter 3 ).
Expand the branches to HKEY_CURRENT_USER\Control Panel\Desktop.
Double-click the WaitToKillAppTimeout value. This number controls the time to wait, in milliseconds, before unresponsive applications are forced to close. The default is 20000 (twenty seconds), but it can be decreased to any value; the minimum is 1 millisecond, although it's impractical to use any value smaller than about 2000 (two seconds) here.
Also in this key is the HungAppTimeout value, which does pretty much the same thing as WaitToKillAppTimeout; just enter the same number for both values.
Expand the branches to HKEY_LOCAL_MACHINE\SYSTEM\CurrentControlSet\Control.
Double-click the WaitToKillServiceTimeout value. This works the same as the WaitToKillAppTimeout value described above, except that it applies to services instead of applications. See Chapter 7 for more information on services.
Close the Registry Editor when you're done. You'll have to restart Windows for the change to take effect.
These values also affect the timeouts at times other than just shutting down, such as when you click End Process in the Windows Task Manager.
5.1.5.2 Part 2: Use the User Profile Hive Cleanup Service
Occasionally, Windows has trouble unloading the hive containing the HKEY_CURRENT_USER branch of the Registry (see Chapter 3). If your system appears to repeatedly take a long time to log out and shut down, download and install Microsoft's UPHClean utility. See Microsoft Knowledge Base article #837115 (http://support.microsoft.com/default.aspx?scid=kb;en-us;837115) for details.
5.1.5.3 Part 3: Have Windows power down your computer automatically
You may have noticed that some computersespecially laptopsare able to power themselves off when you choose Shut Down from the Start Menu, rather than displaying the "It's now safe to turn off your computer" screen. This is convenient and makes for faster shutdowns.
In order to configure your computer to behave this way, you'll need the following: if you're using a desktop (as opposed to a portable) computer, you must have an ATX-compliant case and motherboard. You can tell an ATX system from the power button; if it's a momentary pushbutton (that doesn't stay in when you press it), you've likely got an ATX case. The difference is that power switches in ATX systems send a "shut down" command to the motherboard, rather than simply cutting power. All new computers are ATX-compliant, as is any machine that is likely to be capable of running Windows XP.
Secondly, you must have Advanced Power Management (APM) enabled in your system BIOS. Enter your system BIOS setup screen when first starting your computer (usually by pressing the Del key), and make sure any options labeled "Advanced Power Management," "APM," or "APM-aware OS" are enabled. See Appendix B for more information on BIOS settings, and the previous section for more details on APM troubleshooting.
If these two conditions are met, Windows should automatically power down your system the next time you shut down.
5.1.6. Eliminate Unwanted Windows Components
In addition to the settings and tweaks described elsewhere in this chapter, a common and effective technique for removing the bottlenecks in Windows is to eliminate the programs and Windows components you don't use.
Most optional Windows components can be removed by double-clicking on the Add or Remove Programs icon in Control Panel, clicking Add/Remove Windows Components, and unchecking any unwanted components. Single programs may not seem to make much of a difference, but they do add up. Note, however, that not all optional components are listed here. To add unlisted Windows components to your Control Panel, follow these steps:
Start Notepad (or your favorite plain-text editor), and open \Windows\Inf\Sysoc.inf.
The structure of this file is that of an .ini file, discussed in Chapter 3. The [Components] section lists the components shown in the Windows Components Wizard. Each entry in this section has this format:
name=options
where options is a list of parameters, separated by commas. The second to last parameter is the one that interests us. If it's empty (nothing between the surrounding commas), the corresponding entry will appear in the Windows Components Wizard. Otherwise, if the parameter is hide, the entry will not appear. To "unhide" the entry, simply delete the hide keyword. For example, the entry for Windows Messenger looks like this:
msmsgs=msgrocm.dll,OcEntry,msmsgs.inf,hide,7
To add Windows Messenger to the list, allowing you to remove the component, simply change the line so it reads:
msmsgs=msgrocm.dll,OcEntry,msmsgs.inf,,7
When you're done, save the file, and reopen the Windows Components Wizard to see the new entries.
5.1.7. Get the Most Out of Your Games, Speed-Wise
Dude, don't tell me only kids play games. I know you play Freecell more often than you check your email. The catch, of course, is that Freecell spends much more time waiting for you to move a card than it spends on any calculations. Speed is primarily a concern with the more processor-intensive games, such as 3D games or anything with full-screen animation.
Improving game performance, as with improving performance in any other application, involves removing software bottlenecks and upgrading hardware where necessary. However, games are unique in that they can benefit greatly from certain types of hardware, such as 3D accelerators and sound cards with digital signal processors. Games also suffer the most from background applications and out-of-date drivers. Here are some ways to improve performance in the more processor-intensive games:
Most high-end games rely on DirectX, essentially a set of optimized video, sound, and game input drivers supported by Microsoft. Make sure you have the latest DirectX drivers by using the Windows Update feature (see Chapter 6) or going to http://www.microsoft.com/directx /.
Many games are also optimized to work with specific types of video and sound hardware. For example, a particular game's setup screen might allow you to choose between Direct3D and OpenGL for the video output; sometimes you even need to choose a particular video chipset (e.g., nVidia GeForce4). Your 3D accelerator might support several standards, but a given game might run better using the DirectX drivers, and another game might prefer the OpenGL setting.
The speed at which a video card can draw to your screen is somewhat dependent on the current color mode and resolution. If your games are running slowly, try reducing the color depth and resolutioneither globally in Windows or in a particular game's setup screen (if it supports it)to increase the speed. It's funny, thoughI've seen some games run smoother in 24-bit mode than 16-bit mode, even though in theory the extra colors should cause a performance hit. Better video cards will not show any performance hit when run at higher resolutions or color depths.
Games are highly optimized for speed, which tends to make them finickya game might run beautifully with one video card but horribly with another. Check the documentation (manual, readme file, online FAQs) released by the game manufacturer for details that may affect you. Also look for updates to the game software that can fix performance issues, as well as add features and even new levels. Check the web sites of both the video card manufacturer and the game manufacturer for tips and patches.
Most 3D accelerators and even some games allow you to modify or disable certain 3D features, such as 8-bit palletized textures, gamma adjustment, zbuffer, and bilinear filter. In most cases, you'll probably just end up leaving these alone. However, some games might have conflicts with some hardware, and fiddling with these settings may make one or more of your games run smoother. Game fan web sites and discussion boards are the best places to find recommended settings relating to particular games and hardware.
Any unnecessary background applications should be disabled, either temporarily or permanently. Each program that runs invisibly or in your system tray takes precious CPU cycles away from the processor-intensive games and can make the difference between 20 frames per second and 30 frames per second. See "Speed Up System Startup" elsewhere in this chapter for details.
If a game runs off a CD or DVD, the Windows Autorun feature, which continually polls the CD drive, can sometimes interrupt data transfer. Symptoms include hiccups in video clips and music and slow loading of levels. See "Curb AutoPlay for CDs and DVDs" in Chapter 4 for details. Note that old CD drives can also cause problems like this. Also, try gently rubbing the disk against a soft, clean cloth (or barring that, your shirt) to remove dust and fingerprints.
If you're playing a network game, either on a local network or over the Internet, you can improve performance by optimizing your network settings. See Chapter 7 for details.
Lastly, the performance of high-end games is extremely dependent on game hardware, such as 3D accelerators and sound cards. High-end video and sound cards not only will add features, but also will handle many of the calculations themselves, freeing up your processor significantly. A good 3D accelerator does more than just make 3D performance acceptable at high resolutions; it can even make the renderings look better, too. Your gaming system will actually benefit much more from a fast 3D card than from a doubling of processor power. Likewise, a good sound card with 3D environmental audio and a good digital signal processor (DSP) can add background sounds that will bring any game alive, without eating up processor cycles. I'm not trying to sell you any hardware, but don't overlook the value of dedicated hardware if you're serious about gaming.


 Power Options