Use Illustrator s Effects
As you explore and experiment with Illustrator s wide- ranging set of effects, keep a few cautions in mind. First, be aware that effects can add vast numbers of anchors to your object or make drastic changes in fills. Using effects is like using a shotgun, not a rifle, to make changes to your illustrations. For this reason, many hard- core professional designers don t use effects much, preferring instead to rely on their skills with the Pen tool.
Beyond making radical changes to your illustration, some effects ”3-D effects in particular ”require tremendous processor resources and can multiply your file size .
With these cautions in mind, you ll certainly have fun experimenting with Illustrator s effects and filters.
| Note | Chapter 19 focuses on Illustrator's limited bitmap editing features and explores filters in more detail. |
Use Convert to Shape Effects
The effects on the Convert to Shape menu convert a path to a rectangle, a rounded rectangle, or an ellipse. One use of this feature is to create a rectangular or elliptical shape to use as a layout guide for old-fashioned pasteup.
The effect is simple to apply. Just select an object, choose Effect Convert to Shape, and then choose either Rectangle, Rounded Rectangle, or Ellipse from the submenu. Each menu choice opens a Shape Options dialog box in which you can define the shape and size of the generated shape.
Apply Distort and Transform Effects
The effects on this menu offer a zany set of hypertransformations. The Distort & Transform effects are illustrated in Figure 14-3.
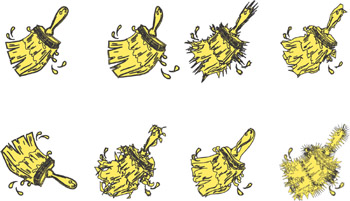
Figure 14-3: Adding effects from the Distort & Transform menu
The Free Distort menu option opens an interactive dialog box for a selected image. You can click and drag on the corner handles in the dialog box to transform the selected object, as shown in Figure 14-4.
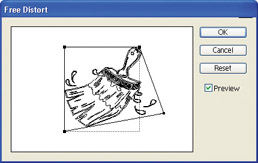
Figure 14-4: Stretching the paintbrush with the interactive Free Distort effect
You use the Free Distort effect to alter the perspective on an object. The four corner handles function as vanishing points ”dragging them creates the illusion of an object emerging or fading from front to back or from left to right.
The popular Pucker & Bloat effect was known as Punk & Bloat in earlier versions of Illustrator, and it creates a pointy or puffy distortion of your original image. The slider in the dialog box allows you to assign relatively more pucker (pointiness) or bloat (puffiness), as shown in Figure 14-5.

Figure 14-5: Assigning pucker to generate a star
The Roughen effect is kind of the opposite of the Simplify menu command (Object Path Simplify) discussed earlier in Chapter 6. Instead of smoothing a path, this command roughens up a path by adding anchors. The Roughen dialog box allows you to choose either smooth or corner anchors. The Size slider defines how much the paths will be distorted either by percent (if you choose the Relative option) or in pixels or another unit of measurement (if you use the Absolute option). The Detail slider defines how many new anchors will be added. Lower settings produce less distortion.
The Transform effect allows you to rescale, move, or rotate selected objects. You expand or contract vertical and horizontal scaling by using sliders. The Move sliders move selected objects right or left, up or down ”but remember, these changes are applied to your illustration as effects, so the basic path of the object is unchanged. The Rotation dial allows you to change the angle of your objects. The Copies box lets you generate additional copies as you transform your selected objects. The Reflect boxes let you flip your object horizontally (reversing left and right [Reflect X]) or vertically (reversing up and down [Reflect Y]).
Using the Tweak effect is a little like throwing your object against a wall to see what happens! Lower Horizontal and Vertical slider settings produce less distortion. The Relative option assigns distortion levels relative to the object size, while the Absolute option defines the distortion in your selected unit of measurement. The Anchor Points, In Control Points, and Out Control Points check boxes in the Modify area of the dialog box allow you to change anchor points or alter only the control points (either the In or the Out control points).
| Note | In defining Tweak, Illustrator uses the phrase control point to refer to control points and their direction lines. See Chapter 6 for an explanation of how to use anchor point control points and direction lines to alter curves. |
The Twist effect is something like twirling an object and watching the shape and fill appear as if they are spinning around. You can increase the intensity of the effect by selecting an angle of a higher degree in the dialog box.
The Zig Zag effect literally applies zig zags or a curvy distortion to paths in a selected object. The Size slider determines how large the zig zags or curves are. The Relative options define curves or zig zags relative to the size of the object. The Absolute options let you use a unit of measurement such as pixels to define zig zag or curve size. The Ridges Per Segment slider defines how many curves or zig zags to create. The Smooth option generates curves, and the Corner option generates zig zags.
Explore Path Effects
When you select Effect Path, you can choose from three effects that allow you to duplicate or transform an object s outline: Offset Path, Outline Object, and Outline Path. The Offset Path effect allows you to create a new path that is offset from the original. You can determine the offset distance by changing the value in the Offset area of the Offset Path dialog box.
You can also change join types and miter values for those joins. You use the Outline Object and Outline Stroke effects to convert complex objects ”such as those imported from a multilayer Photoshop file ”into simpler paths. You use Outline Stroke to convert strokes, while you use Outline Object to simplify fills and strokes.
Try Pathfinder Effects
The Pathfinder effects (selected from the Effect Pathfinder menu) are very similar to the tools available from the Pathfinder palette discussed in Chapter 5. Like the tools in the Pathfinder palette, Pathfinder effects combine or divide intersecting paths, and the object on the bottom usually assumes the fill and stroke attributes of the object on top.
Before you apply any Pathfinder effect, you will want to arrange objects front to back (choose Object Arrange). Pathfinder effects don t work with bitmaps, but they do work with type and vector objects.
Rasterize
You can apply many of the transformations available from the Effect menu only to raster (bitmap) images. However, Illustrator provides a unique option for applying these effects without permanently destroying the vector object to which you want to apply the bitmap filter. That option is to create a raster version of your vector object, while preserving the underlying vector paths and anchors. This method is called rasterizing an object.
When you rasterize an object, you get the best of both the vector and bitmap worlds . You can still edit paths and anchors, and your objects are still easily rescalable. But you can also apply effects that work only on raster images. After you rasterize an image, it will appear as a bitmap on the artboard ”jaggy lines, coarse resolution, and all those other attributes associated with bitmaps. If you want to see the paths and anchors, choose View Outline to view your object without the bitmap attributes.
To rasterize a selected object, choose Effect Rasterize. The Rasterize dialog box opens, as shown in Figure 14-6.
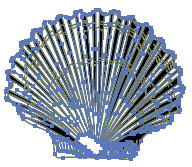
Figure 14-6: Rasterizing a vector object
If your graphic is destined for a web site, choose 72 ppi from the set of Resolution options. If your graphic is going to be used with print output, select a higher resolution. The Color Model options are those available for digital or web graphics: RGB (best for web graphics), Bitmap, or Grayscale. In the Background section of the dialog box, choose the Transparent option for web graphics when you want the web page background or background color to show through behind uncolored portions of the image.
Stylize
Somewhat buried in Illustrator s vast Effect and Filter menus are the very useful Stylize effects. They include such popular appearance changes as arrowheads, drop shadows, and cool color tinting.
To add arrowheads to a path, first select the path and then choose Effect Stylize Add Arrowheads. The intuitive Add Arrowheads dialog box appears, as shown in Figure 14-7.
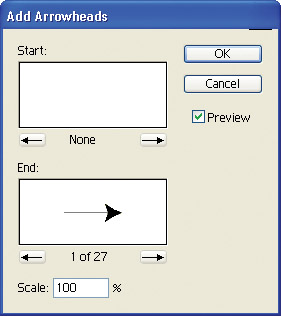
Figure 14-7: Defining an arrowhead at the endpoint of a path
You can define an arrowhead for the start and/or for the end of a path. The Scale area allows you to adjust the size of the arrowhead relative to the size of the path stroke. Clicking on the arrows scrolls through a set of symbols to use as arrowheads. Use the Preview check box to watch changes interactively on the artboard.
The other Stylize effects alter path or fill effects. With the Preview box checked, experiment with different options in the dialog boxes to see changes on the artboard before you finalize effect settings.
The Inner Glow and Outer Glow effects add subtle glowing tints to colors, moving either toward the center (Inner Glow) or beyond the edges (Outer Glow) of a selected object. Inner Glow is illustrated in Figure 14-8.
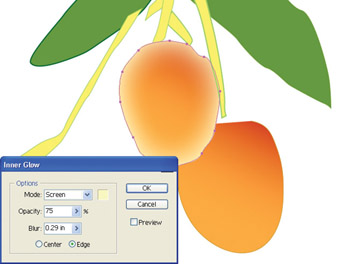
Figure 14-8: The Inner Glow effect is added to the inside of the selected mango path.
The Drop Shadow effect is great for quick shadows. The Feather effect creates a transitional fade at the edges of an object, and the Round Corners option produces some interesting distortions of your original image.
Apply SVG Filters
Adobe is promoting Scalable Vector Graphics (SVG) format for web browsers. The SVG filter set provides interesting vector-based mutations of the fill for a selected object. If you are saving your illustration to SVG format, you ll be able to preserve and display these effects in web graphics.
Unlike other vector-based effects, SVG filter effects don t have dialog boxes, much less a preview option. You can try em, like em, or undo em. For an explanation of SVG graphics, how to use them, when they work, and their limitations, see Chapter 23.
Warp
You can use Warp effects to make waving flags or surf on water or to create distortion-like bulges and arcs in selected objects. Illustrator makes it easy to experiment with Warp effects because they are all available in the dialog box of any warp you select. To experiment with warps, select an object, choose Effect Warp, and then select any Warp effect.
The resulting dialog box allows you to choose from the entire array of warps. And by activating the Preview check box, you can try on any warp from the same dialog box, as shown in Figure 14-9.
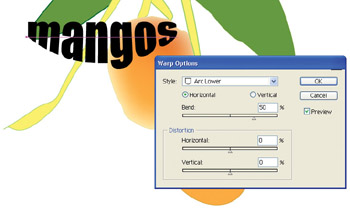
Figure 14-9: Distorting text with a lower arc effect
EAN: 2147483647
Pages: 175