Resize Precisely with the Scale Tool
The Scale tool has a couple of advantages over sizing freehand with a bounding box or the Free Transform tool. The Scale tool allows you to resize to an exact percentage ”so, for instance, you can resize an object to 50 percent to make it exactly half size . And you can use the Scale tool to resize an object from a defined point, as opposed to just scaling from a selected anchor point with the Free Transform tool.
Using the Scale tool interactively is a bit like driving on an icy road ”controlling the process is a bit scary until you get comfortable with the tool.
When you resize using the Scale tool, you simply click and drag on a selected object to change the size. If you hold down the SHIFT key and click and drag out at about a 45-degree angle from a corner handle, you can maintain the height-to-width ratio of the original drawing. If you hold down the SHIFT key and drag up or down, you will change only the height or the width, as shown in Figure 7-7.
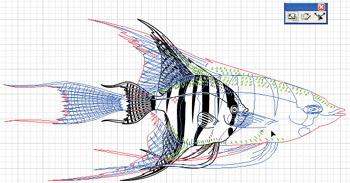
Figure 7-7: Using the shift key with the Scale tool to change only width while maintaining the original height
By default, when you resize a selected object with the Scale tool, the center of the object is used as the point from which the object is enlarged or compressed. You can change that point by clicking within a selected object with the Scale tool. Then, when you resize the object, the newly selected point is the pivot and hub from which the object is resized, as shown in Figure 7-8.
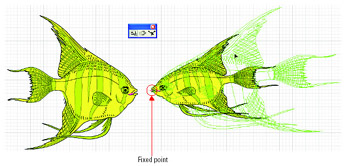
Figure 7-8: Rescaling around a point fixed by the Scale tool
The Scale dialog box resizes digitally ”no clicking and dragging required. It also allows you to control whether to rescale an object s stroke (outline) proportionally as you rescale the object.
To resize using the Scale dialog box, follow these steps:
-
Select any object(s).
-
With the object(s) selected, double-click the Scale tool. The Scale dialog box appears.
-
Use the Scale box in the Uniform section to enter a percentage if you want to resize the object while maintaining the same height-to-width ratio.
-
Use the Horizontal and Vertical boxes in the Non-Uniform section of the dialog box to enter different percentages if you want to resize the height and width independently.
-
Click the Preview check box to see the object interactively resize on the artboard as you enter values in the sizing boxes.
-
Click the Scale Strokes & Effects check box if you want to proportionally resize strokes and effects.
-
Click the Objects check box to resize objects. You ll almost always want to select this option; otherwise , the object itself won t resize.
Tip For the very rare occasions when you want to resize the pattern fill in an object but not the object itself, deselect the Objects check box. You'll explore pattern fills in Chapter 18.
-
Click the Patterns check box to proportionally resize patterns within a shape.
-
When your object is correctly resized, click OK (or press ENTER ).
Figure 7-9 shows an object rescaled with and without rescaling the associated stroke.

Figure 7-9: The rescaled fish with unchanged stroke now has proportionally thicker lines.
EAN: 2147483647
Pages: 175