Identify Tools in Illustrator
You can identify a tool by hovering over it. Illustrator will display a tooltip, and a shortcut key if one exists for that tool.
| Note | Shortcut keys are keys, or combinations of keys, on your keyboard that provide an alternative to selecting a tool with your mouse. For example, typing the letter T on your keyboard activates the Type tool (used to create or work with text), and shift-k activates the Slice tool (used to chop up artwork in order to save it as separate files). Veteran Illustrator artists learn the shortcuts for tools they use frequently. |
The following sections in this chapter will identify each tool in each tearoff of the Toolbox. You will return to many of these in other chapters in this book, but you can use the following sections for easy reference to find tools.
Find Illustrator s Default Displayed Tools
By default ”until you start choosing other tools ”a set of tools is visible in the Toolbox. Those tools are identified in Figure 1-11.

Figure 1-11: The default tools displayed in Illustrator s Toolbox
Explore the Tearoffs
Most of the tools in the Toolbox will be explored in depth in different chapters of this book. But here you ll get a quick introduction to all of them.
Some tools in the Toolbox are not part of tearoff sets. The Selection tool is used to select objects for editing. The Magic Wand tool selects objects with similar attributes ” color , stroke weight, and so on. The intuitively named Paintbrush tool draws freehand lines that look like brush strokes. The Mesh tool is used for complex gradient fills and reshaping objects. The Lasso tool is used to select irregularly shaped areas of your illustration.
The Free Transform tool allows easy resizing and reshaping of objects. The Gradient tool defines gradient fills. And the Zoom tool allows you to zoom in and out. Figure 1-12 shows an illustration with a gradient fill being edited with the Free Transform tool. The Zoom tool was used to draw a marquee (border) around the area that is displayed.
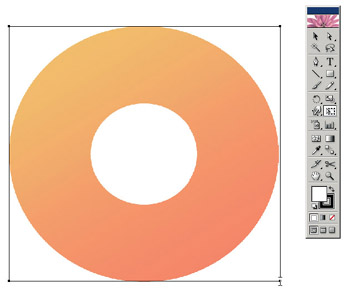
Figure 1-12: Sizing the gradient that will be the background for a CD sticker using the Free Transform tool
While a few of the most commonly used tools are not associated with tearoffs, most tools are part of tearoff sets. You ll get introduced to each of these sets of tools in this section of the chapter, and you ll get a quick preview of how some of the most frequently used tools are used in illustrations.
The bottom section of the Toolbox, which displays icons for other useful techniques, will be discussed in the next section, Identify Tools for Fills and Views.
Peruse the Pen Tools
The Pen tools are the essence of Illustrator. They are used to draw and edit curves. The Pen (P) tool is used to generate curved and straight lines. The Add Anchor Point (+) and Delete Anchor Point ( “) tools allow you to add new anchor points or delete existing anchor points from a curve. The Convert Anchor Point ( SHIFT-C ) tool changes sharp angles to curves, and vice versa, and allows you to tweak the exact character of a curve.
Figure 1-13 shows the Pen tool tearoff, along with a drawing created mainly by drawing curves with the Pen tool.
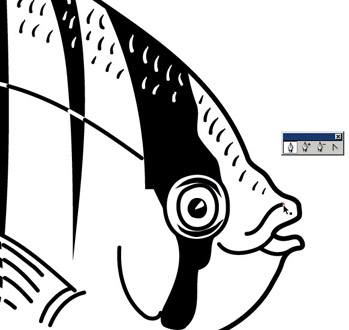
Figure 1-13: Touching up a Pen tool curve
Look at the Line Segment Tools
Some of the uses for the Line Segment tools are pretty obvious. The Line Segment (\) tool draws straight lines; the Arc tool draws arcs. The Spiral tool draws spirals , and the Rectangular Grid and Polar Grid tools quickly generate grids. Each of these tools and its use is illustrated in Figure 1-14.
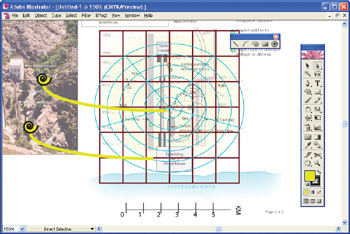
Figure 1-14: Line segments, arcs, spirals and grids
Reveal the Rotate Tools
Rotate tools are used to rotate selected objects clockwise or counterclockwise and to create mirror images of selected objects. The Rotate (R) and Reflect (O) tools are displayed in Figure 1-15.
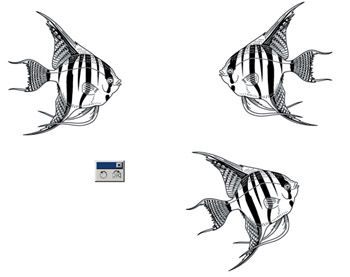
Figure 1-15: Rotating and reflecting an image
View the Warp Tools
The Warp ( SHIFT-R ), Twirl, Pucker, Bloat, Scallop, Crystallize, and Wrinkle tools are referred to as the liquify tools because they can apply interesting sets of distortion to objects. These tools are illustrated in Figure 1-16.
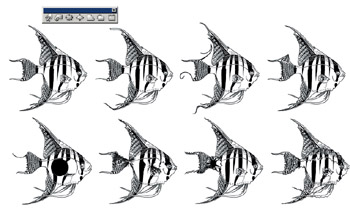
Figure 1-16: Changing an image s appearance using the liquify tools
| Caution | Some of Illustrator's tools, such as the liquify set, have pretty unpredictable results. You'll simply use experimentation and trial-and-error to discover effects you want to preserve. |
Survey the Symbol Sprayer Tools
The symbol feature is a sophisticated technique for creating many instances of a single object. You ll be introduced to this technique in Chapter 21.
The Symbol Sprayer ( SHIFT-S ) paints selected symbols on the screen as if you are using a paintbrush. The Symbol Shifter, Symbol Scruncher, Symbol Sizer, Symbol Spinner, Symbol Stainer, Symbol Screener, and Symbol Styler tools are used to modify the appearance of symbols in your document.
The Symbol tools are illustrated in Figure 1-17.
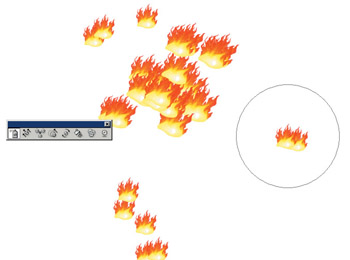
Figure 1-17: Using the Symbol tools to create, apply, and manipulate multiple instances of an object
Eye the Eyedropper Tools
The Eyedropper (I) and Paint Bucket (K) tools are used to grab colors. The Eyedropper tool is used to grab colors from objects on the screen, while the Paint Bucket tool assigns your defined fill color (shown in the Fill palette at the bottom of the Toolbox) to selected objects. (The Fill palette will be discussed in the next section, Identify Tools for Fills and Views. )
When you select the Measure tool, you can click and drag to reveal the distance and direction of any dimension in your document, as shown in Figure 1-18.
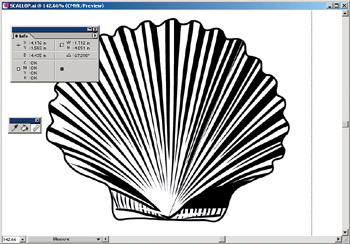
Figure 1-18: Measuring angle and distance within the shell
See the Slice Tools
Slicing tools are used to break illustrations into more than one savable section. This is especially helpful in preparing large illustrations for the Web. You ll investigate slicing in Chapter 23.
Handle the Hand Tools
The Hand (H) tool functions as a grabber hand and allows you to drag your document around in your monitor window. The Page tool can be used to redefine page size for printing.
Detect the Direct Selection Tools
The Direct Selection (A) tool is used to select a specific anchor point or line segment within an illustration. The Group Selection tool selects grouped objects within a larger object.
Tour the Type Tools
In the course of this book, you ll explore Illustrator s ability to create, edit, and shape type in detail. Along with the Type (T) tool ”used to type and edit text ”the Type tool tearoff reveals the Area Type, Path Type, Vertical Type, Vertical Area Type, and Vertical Path Type tools.
Type tools can be used to flow text around an object, or to fill an object, as shown in Figure 1-19.
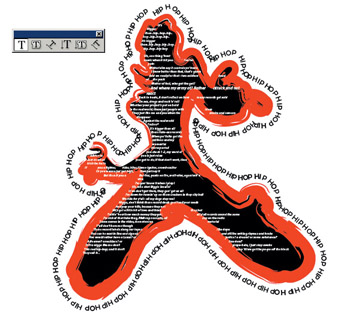
Figure 1-19: The Path Typetool flows text around the drawing, and the Area Type tool is used to fill the figure with lyrics.
Shape-Shift Through the Shape Tools
The Rectangle (M), Rounded Rectangle, Ellipse (L), Polygon, and Star tools create shapes familiar to everyone who s ever created an illustration. These tools create objects that lay the basis for a wide variety of drawings, even very complex ones.
The Flare tool is somewhat out of place in the shapes family. It creates an outer-space-type effect. All these shape tools are found on the Rectangle tool tearoff, as shown in Figure 1-20.
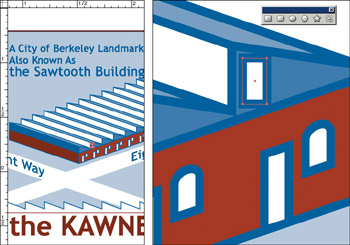
Figure 1-20: Basic shapes, such as the rectangle and circle, form the basis of many elements of professional graphic design projects.
Scale the Scale Tools
The Scale (S), Shear, and Reshape tools allow you to resize and reshape objects. The Scale tool opens a dialog box with properties that control exactly how much to enlarge or shrink a selected object. The Shear tool is used to skew shapes ”for instance, to turn a rectangle into a parallelogram. You click and drag with the Reshape tool to interactively reshape objects. Figure 1-21 shows an illustration being resized with the Scale tool.
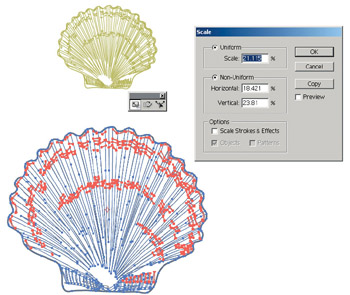
Figure 1-21: Resizing an illustration using the Scale tool dialog box
Pass Through the Pencil Tools
Expert Illustrator designers use the Pen tool to draw with because of the intricate control that tool provides over curve segments. The Pencil (N), Smooth, and Erase tools are Illustrator s concessions to users who are new to vector drawing, or who just never make the adjustment to the Pen tool s challenging but powerful features.
In other words, if you plan on launching Illustrator only occasionally, you may want to crack open the Pencil tool tearoff and use tools that are more intuitive. The Pencil tool works the way a real pencil does ”you draw with your mouse or on your drawing tablet to create lines and curves in the Illustrator document. The Smooth tool smoothes out awkward or jaggy lines, while the Erase tool works like a pencil eraser. Figure 1-22 shows the Pencil tool in action.
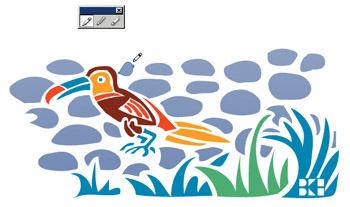
Figure 1-22: Drawing with the Pencil tool
Chart the Graph Tools
Illustrator s graphing tools are an interesting combination of not very powerful and confusing. Serious graphing is done with dedicated graphing programs, or even the graphing tools found in spreadsheet programs such as Excel. The good side of graphing in Illustrator is that you can touch up your graph with Illustrator s powerful array of editing features.
Those who must whip up a quick graph in Illustrator select the Column Graph (J), Stacked Column Graph, Bar Graph, Stacked Bar Graph, Line Graph, Area Graph, Scatter Graph, Pie Graph, or Radar Graph tool from the Graph tearoff and draw a marquee that indicates the size of the graph. A data grid appears after you draw the graph area. Enter values to graph in the rows and columns as shown in Figure 1-23.
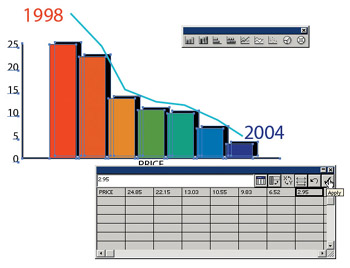
Figure 1-23: Generating a bar graph
After you enter graph values in the grid, you click the Apply check icon (as shown in Figure 1-23) to add or update the graph data.
Buzz Past the Blend Tools
The Blend (W) and Auto Trace tools share the Blend tool tearoff, and both are essential in creating artwork in Illustrator. Blends generate images that transition between two objects. They are used to create many objects at once, or to generate transitions so smooth that they look like gradients.
Each update of Illustrator improves the Auto Trace tool s ability to convert scanned or imported bitmap images into vectors. Both the Blend and Auto Trace tools will be invoked throughout this book. Figure 1-24 shows an illustration with both a step blend and a smooth blend.
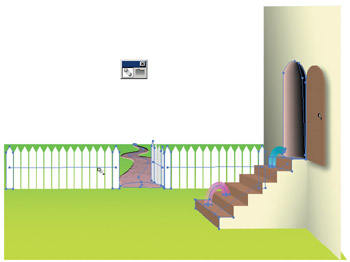
Figure 1-24: The fence, the steps, and the Slinkys are step blends. The path and the doorway were generated with smooth blends.
Knife Through the Scissors Tools
As is the case with many tools in Illustrator, the Scissors (C) and Knife tools are alternatives to other options. These tools are used for cutting sections of illustrations. Most designers use cropping instead of these tools, but they are handy for occasional trimming of shapes, objects, or paths. Figure 1-25 illustrates both the Knife and Scissors tools.
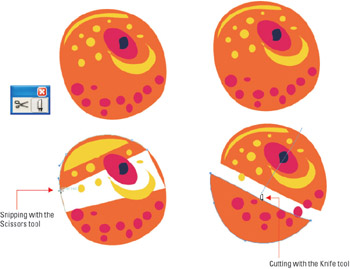
Figure 1-25: The Scissors tool breaks up paths, the Knife tool cuts through objects.
Identify Tools for Fills and Views
Now that you ve been quickly introduced to Illustrator s vast tool set, it s time to investigate the final elements of the Toolbox. Underneath the default tool set in the Toolbox you ll find icons that provide quick access to stroke and fill color and display.
The Fill (X) icon displays the currently selected fill color that will be applied to newly created objects. The Stroke (X) icon displays the currently selected color that will be assigned to the outline of a new object. They both have the same keyboard shortcut (X) because that key toggles between the Fill and Stroke icons. The smaller Swap Fill and Stroke ( SHIFT-X ) icon reverses the fill and stroke of a selected object. The Default Fill and Stroke icon (D) assigns a black stroke and white fill to an object.
The Color (<) button activates Illustrator s Color palette and allows you to choose a new color for Fill or Stroke (depending on whether the Fill or Stroke icon is active when the Color button is clicked).
The Gradient (>) swatch assigns gradient fills ”fills that merge two or more colors from one point in an object to another, and the None (/) icon assigns no color to either Fill or Stroke.
The bottom row of the Toolbox defines view. The Standard Screen mode displays Illustrator in a window within your operating system. The Full Screen with Menu Bar option displays only Illustrator, along with a menu bar. The Full Screen Mode button is used to preview your illustration without any interface display (except for the Toolbox and open palettes).
| Tip | The screen options all have the same shortcut key (F) because it toggles between the three viewing modes. |
These tools at the bottom of the Toolbox are displayed in Figure 1-26.
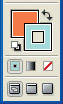
Figure 1-26: The bottom tools in the toolbox control stroke and fill color along with viewing modes
| Tip | As you work on an illustration, you can move the Toolbox out of the way by clicking and dragging the blue bar at the top of the Toolbox. |
EAN: 2147483647
Pages: 175