Set Transparency Options
Transparency presents interesting challenges when you send illustrations to a printer or to a web-compatible graphic format. The problems involved in printing Illustrator documents with transparency will be returned to in Chapter 22, and the options for creating web-compatible graphics are focused on in Chapter 23. Here you ll learn how to manage your Illustrator files to minimize the hassles and quality issues that you ll have to face when you send your files to print or web.
The basic problem you ll confront when you send a transparent object to a printer is that printers put ink on paper (or other surfaces), and ink is never, in reality, transparent. Therefore, your illustration will be flattened in some form ”the effect produced by transparency will be preserved, but the actual transparent character of color fills and strokes will not. Those properties will be saved as part of your Illustrator (AI) file or Illustrator EPS file.
Web graphics do support a form of transparency, but it s quite different from the transparency that you manage in Illustrator. Transparency has two meanings in digital graphic design. Web graphics that have one color knocked out so that the web page background shows through are called transparent images. This feature can be applied to GIF- or PNG-format bitmap images. You ll see how this works in Chapter 23.
The second meaning is the one we ve been using in this chapter. This type of transparency is partial opacity, where an underlying image is partially visible. And, as a matter of fact, you can use this kind of transparency with printed output, but it is very difficult to transfer to images destined for the Web. Therefore, you should avoid it if you are designing web graphics.
Set Background View Options
You can configure Illustrator to make it easier to anticipate what your transparent objects will look like when printed on colored paper. Do this by assigning a checkerboard background, and use the paper color you ll be printing on as one of the checkerboard squares.
| Tip | To take one example of a fairly economical transparency project, you can simulate two-color printing by using black ink on a colored paper background. And, by having some of your objects semi-transparent , you can mix black with the paper background. |
On the other hand, if you want to simulate what your project ”including semi-transparent objects ”will look like when printed on colored paper, you can select the same background color for both checkerboard squares using the two available color swatches, as shown in Figure 17-9. Check the Simulate Colored Paper check box to display the background color.
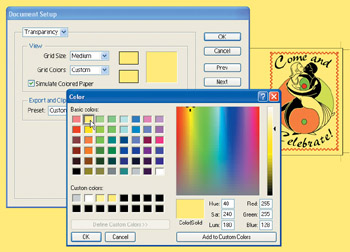
Figure 17-9: Defining a background color simulates the results of printing on colored paper.
To configure your document settings to display transparency options, select File Document Setup. Select Transparency from the drop-down menu at the top of the dialog box to configure transparency settings.
If you want to have a background that makes it easy to distinguish the white of the artboard from the color white, you can simply accept the default settings to place a gray and white checkerboard as a background grid.
Print Illustrations with Transparency
As mentioned, the ink your printer (or your printer s press) uses can t really have semi-transparent attributes. Instead, the effects of applied transparency are translated for printing. There are two basic methods of performing this operation ”creating printable vector objects to fill in for semi-transparent objects, or creating printable raster (bitmap) objects. In general, bitmaps are faster and easier for printers to handle, while vectors are more accurate but slower for printers to handle.
You define the basic way that Illustrator will handle these options in the bottom half of the Document Setup dialog box. The Export and Clipboard Transparency Flattener Settings drop-down list provides three options: High Resolution, Medium Resolution, and Low Resolution. You can fine-tune and have more control over these options if you click the Custom button in the Document Setup dialog box. Doing that opens the Custom Transparency Flattener Options dialog box.
The Raster/Vector balance slider defines how much rasterization (conversion to bitmap) you want to do. Remember, more rasterizastion = lower quality and faster printing. The Line Art and Text Resolution drop-down list allows you to set resolution for vector objects that are converted to bitmaps. The Gradient and Mesh Color Resolution drop-down list allows you to set resolution for gradients and mesh objects that will be converted to bitmaps for printing or export. Higher values produce better quality, along with slower printing and larger files.
| Note | Gradient fills were covered in Chapter 16, and gradient meshes were explored in Chapter 15. Gradient fills and mesh objects present challenges similar to those presented by transparency when they need to be printed or exported to different file formats. |
Other options in the Document Setup dialog box define printing and export options not specific to documents with transparency.
EAN: 2147483647
Pages: 175