NETWORK PRINTERS
| | ||
| | ||
| | ||
Auto-created network printers allow an administrator to import available printers from network print servers. The import process will install, if it is not already installed, the print driver from the network print server onto the Presentation Server server when a user logs on. Once the printers are imported, an administrator can have that printer auto-created automatically for users according to a Presentation Server policy. Additionally, it is possible to set basic default print properties for that printer. Users can then be given the ability to change those print settings, or the administrator can push those settings back down to the user at each user logon.
The advantages of network auto-created printers are:
-
– Printers can be auto-created for users according to a Presentation Server policy.
-
– Printer settings can be set for the user.
-
– Presentation Server integration with network print servers is seamless.
-
– Network traffic is minimized by taking the client out of the print process.
The disadvantages of network auto-created printers are:
-
– Users cannot utilize local printers unless client auto-creation is also used.
-
– The Presentation Servers must have direct IP connectivity to the print device outside the ICA channel.
Importing Network Print Server
The import of Network print servers (Figure 18-2) is rather simple:
-
Log on to the Management Console for Citrix Presentation Server 4.
-
Right-click Printer Management.
-
Click Import Network Print Server.
-
Enter the NETBIOS name or IP address of the print server in the Server field; then enter an account that has full permission to all printers on that server and click OK.
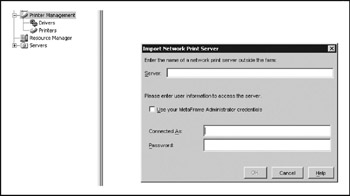
Figure 18-2: Importing network print servers
The printers from that server should now appear under Printers in the Printer Management section of the Management Console.
Assigning Network Printers to Users Through Policies
By configuring session printer rules in policies, you can assign default printers and connect users to printers according to specific attributes of users' sessions (filtering).
-
In the console, select the Policies node.
-
On the Contents tab, choose the policy for which you want to configure printing rules.
-
From the Actions menu, choose Properties.
-
In the policy's Properties dialog box, expand Printing, and then select Session printers.
When configuring session printers for a policy:
-
Identify network printers to which you want the applicable sessions to connect by adding printers to the list.
-
Use the drop-down list to choose the default printer for all sessions to which the policy is applied.
-
Use a filter to apply the policy.
When multiple policies are applied to a user session, printer rules are merged.
EAN: 2147483647
Pages: 137