Chapter 11: Deploying .NET Applications on Wireless Devices
Connectivity to enterprise data and services is essential to any large corporation. Desktop applications provide a rich and powerful interface that connects users to enterprise resources. Web applications extend the reach of the enterprise by connecting users to the enterprise over greater distances. In the wireless world, users connect to enterprise resources regardless of where they are.
Microsoft offers two powerful development platforms that enable mobile application development for the enterprise: the .NET Compact Framework for Smart Devices and the Microsoft Mobile Internet Toolkit (MMIT). These tools take different approaches to building mobile applications, and each offers specific strengths depending on the purpose of the mobile application. This chapter explores how to build mobile applications that extend the reach of the enterprise. The chapter outlines both mobile development platforms and provides specific examples that reflect the needs of typical mobile enterprise applications.
Exploring the .NET Compact Framework
Mobile applications and wireless applications are not necessarily the same thing. The key difference between the two is where they store data. In many cases, users need to operate outside of the enterprise but still need to interact with or reference critical enterprise data. Typically, a wireless application uses its wireless connection to retrieve real-time enterprise data straight from the source. A mobile application can store critical data locally (on the device itself) and synchronize with the enterprise data at specific intervals. Handheld computers, such as Personal Digital Assistants (PDAs), have grown tremendously powerful and popular. Typical PDAs include a color display, an optimized microprocessor, generous storage space, and, naturally, the Microsoft Windows operating system.
The .NET Compact Framework is a mobile application development platform that targets smart devices . Smart devices are largely consumer electronic devices, such as Pocket PC devices, that have embedded microprocessors, memory, and an operating system. The Compact Framework is essentially a scaled-down version (approximately 12 percent) of the .NET Framework. A large number of library classes have been removed, especially those related to ASP.NET. Otherwise, everything else ”from multiple language support to managed code and the common language runtime ”is still available. Microsoft is also actively engaging PDA manufacturers to integrate the .NET Compact Framework into devices' standard Read-Only Memory (ROM) images.
In Visual Studio .NET, a smart device application's user interface uses the same form designer that is used to build desktop applications. The only difference is that a number of user interface controls have either been removed from the Toolbox or substituted with new device-specific controls.
The Compact Framework also provides a subset implementation of ADO.NET that includes a SQL Server CE .NET data provider. This allows device applications to locally replicate critical enterprise data for users who need to work outside of the enterprise.
Understanding the Platform Architecture
As mentioned, the Compact Framework is essentially a scaled-down version of the .NET Framework that has been ported to the Pocket PC operating system. The Compact Framework enables applications to interact with the native operating system of the device, including accessing native operating system services. Both the Compact Framework and the native applications can run side by side on the same device without the user really knowing which is the native application and which is the Compact Framework application. The Compact Framework's application domain host, also a native application, starts an instance of the common language runtime environment and manages the application's access to all device resources. Figure 11-1 illustrates the .NET Compact Framework platform architecture.
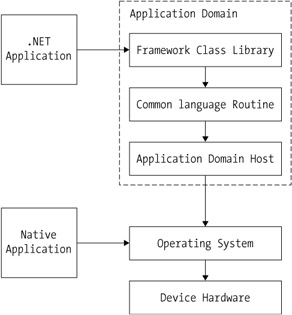
Figure 11-1: The Compact Framework platform architecture
As Figure 11-1 illustrates, all Compact Framework applications run within a runtime environment called an application domain . The application domain host is essentially a native application that starts an instance of the common language runtime. The Compact Framework application interacts with the application domain like any other operating system process. Just as in the full .NET Framework, the Compact Framework ensures that all managed resources used by a .NET Framework application are freed and returned to the operating system when the application ends.
The .NET Compact Framework uses available system memory carefully . No Read-Access Memory (RAM) is accessed until the application starts, and all RAM is immediately released when the application terminates. The operating system is not required to have its own memory protection, and exceptions are always thrown when unowned memory is accessed.
When memory is low, the Compact Framework releases internal data structures that the application does not need. This enables the application to continue running when available memory is low. If the application requires more memory than is available, the Compact Framework cleanly closes the application and releases all underlying resources.
Building Device Applications for the Enterprise
Developing device applications for the enterprise requires significantly more planning than their desktop counterparts. This is largely because of the limitation of resources, such as display area and memory storage. Therefore, device applications require special design emphasis in two critical areas: simplicity and usability.
In a device application, simplicity refers to how easily the application interacts with users. Typically, PDA device users want to perform quick searches and easily enter data without a complicated user interface. In general, device applications should not attempt to mirror their desktop counterparts by supporting an enormous list of features. Rather, they should identify the two or three most important functions of the enterprise application and implement them cleanly.
In the case of the IssueTracker application, viewing a list of issues, viewing an issue's detail, and creating new issues are probably the most important features. It would be nice to include user management or even reporting functions within the device application, but that would increase the application's complexity. The more functions supported by the device application, the more cluttered the user interface becomes. Menus grow longer and forms become flooded with user controls, making the device application harder to use. If a device application displays multiple views, menus , and controls, it can confuse and frustrate someone trying to perform tasks quickly.
The focus of the mobile enterprise application must center on the capability of entering and managing small amounts of data in short sessions as well as synchronizing data and information with the enterprise data.
To simplify an application's interface, it is important to automate as many processes as possible. If a feature is able to function without user interaction, for example, then it should not have a user interface. When you need to add a new feature, try modifying an already existing feature to incorporate the new one. The user interface design goal should always be to minimize the choices that a user needs to make. You should always keep the number of steps needed to complete tasks to a minimum. To validate a device's user interface, examine the most common activities a user is expected to perform and then determine the minimum number of steps necessary to complete them. Try to find ways to decrease the resulting number of steps.
A simple device application only shows the most important user interface controls within a form. You should place important commands either as buttons within the menu bar or as items in menus. You should display only the most relevant data to the user. Because entering data into a device is usually a pain, try to minimize the amount of data entry that users must perform and find ways to reuse data or obtain it from existing sources. Furthermore, minimize the number of characters and fields the user must edit to complete a task or activity and present common data choices or selections in drop-down list boxes. Where text entry is necessary, try to include functionality that remembers recent (or most often entered) text. Figure 11-2 illustrates IssueTracker's summary page. The Issues list shows only the three most important columns .
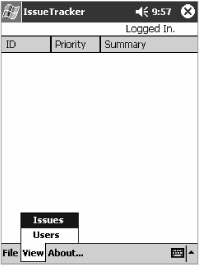
Figure 11-2: Simplicity applied to the IssueTracker's summary page
With a smaller display, device applications require careful planning as to how controls are placed within a form so a user can more quickly and easily accomplish tasks. In most cases, usability often translates into how easily a user can identify and use interface controls. As in desktop and Web application development, device applications should also group similar controls together. Logically grouped controls will be discovered more easily.
Controls should be clearly visible, especially when viewed in dim lighting. Controls should also be large enough to interact with as the user is in motion. Placing user interface controls for frequently used tasks near the top level of the application is always helpful.
Controls should always have enough spacing between each other. Without enough spacing, a user is likely to accidentally select one control while intending to select another. In addition, added spacing helps users who move around while using their device as well as those with limited coordination. At the same time, however, it is important to ensure that controls fit properly within the limited screen space and that they do not overlap. Figure 11-3 illustrates the New Issue form with balanced spacing of user interface controls.
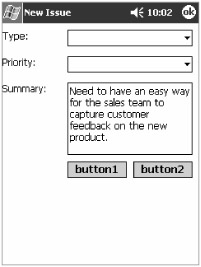
Figure 11-3: Usability applied to the New Issue device application page
Controls should be easy to distinguish from each other with easily recognizable differences. You can make controls easier to identify by using a unique size , position, shape, and contrast. You can simplify device applications by making user interface controls easier to understand through representations such as image icons.
Finally, controls should be predictable and consistent, and they should function the same way in different parts of the application. For example, if clicking a green plus icon adds a new object, such as an Issue, a green plus icon should always be associated with an add function, even when referring to User objects.
Implementing a Smart Device Application
Visual Studio .NET provides a powerful development environment for creating applications for smart devices. With the .NET Compact Framework, developers can create, build, debug, and distribute applications that run on any device configured with the Pocket PC or Windows CE operating system. Implementing a smart device application typically involves creating the project, adding controls to forms, adding event handlers that accomplish specific business tasks, and deploying the application.
Creating the New Project
Creating a new project for a specific device follows the same general process as creating a new project for the desktop. To create a device project, click Add ˜ New Project from the Solution Explorer's context menu. In the Add New Project dialog box, select the Smart Device Application template, enter the project name as shown in Figure 11-4, and then click the OK button.
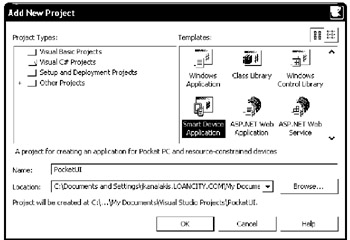
Figure 11-4: Adding a new device application to the IssueTracker solution
Next , the Smart Device Application Wizard starts and prompts you for additional details about the device application. In the case of the IssueTracker application, you will implement a device client that targets the common Pocket PC operating system. Select Pocket PC as the target platform and Windows Application as the project type, as shown in Figure 11-5.
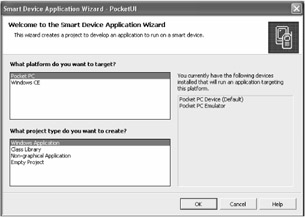
Figure 11-5: Designating the device application's target platform and project type
Adding Forms and Controls
As mentioned, developing a device application's user interface is similar to developing a desktop application's interface. In fact, the form designer shown in Figure 11-6 has only a few differences, such as a different user control list in the Toolbox and a different default form size set to fit within a Pocket PC display area.
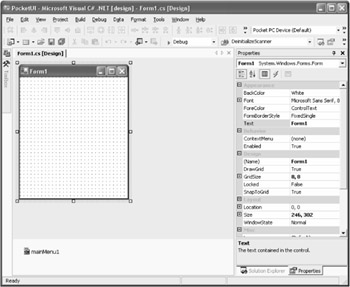
Figure 11-6: Creating device application forms using the form designer
You add controls to the form and set properties in the same manner as you do for a desktop application. After placing user interface controls into a form, you can define event handlers to implement the application's business logic.
Building and Deploying the Application
You also build device applications in the same manner as their desktop counterparts. When you select a device project to run from within the design environment, a message box prompts you for the deployment preference, as shown in Figure 11-7. Visual Studio .NET integrates a fully functional device emulator that realistically simulates the Pocket PC environment.
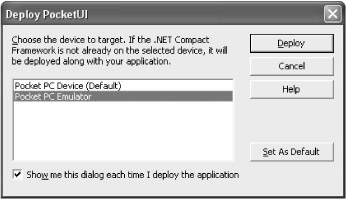
Figure 11-7: Selecting a target deployment platform for the device application
Alternatively, you can package the device application into a cabinet file and deploy it directly to the device. When the mobile application is completed and ready for broad deployment, a cabinet file packaging greatly simplifies the installation process for the user. Individual users may be required to install the mobile client as the device recovers from a completely drained battery or cold boot.
To deploy the device application directly to the device, you must connect with the desktop using ActiveSync or Visual Studio .NET. When deploying from ActiveSync, you must install the cabinet containing the .NET Compact Framework first. When deploying from Visual Studio .NET, Visual Studio examines the target device to determine if the .NET Compact Framework is already installed. If not, Visual Studio .NET first deploys the Compact Framework, followed by the newly built device application.
Enhancing Smart Device Enterprise Clients
Device applications really differentiate themselves from mobile applications by storing and accessing data locally rather than connecting to a remote server (although devices are also capable of connecting to remote servers via wireless adapters). There are many different approaches to storing data on a device; the two most common approaches are Extensible Markup Language (XML) document exchange and SQL Server CE database storage.
Accessing XML Document Data
Exchanging data using XML documents is a popular form of device data exchange for many reasons. The primary reason for its popularity is simply that many different types of applications are capable of generating XML documents. This enables the device application to access data from a variety of data sources.
Because XML is intended to be a data exchange format and not a data storage format, it is worth mentioning that accessing XML document data is very slow. You should ideally store data in a device database, such as SQL Server CE.
Developers typically configure the data exchange via XML as an automated process. In most cases, applications that generate an XML export document can do so at designated times or intervals and place them into specific directories. At the same time, the ActiveSync application is capable of moving files, along with contacts and appointments, between the desktop and the device. Together, these systems can form the basis of integration between the desktop application and the mobile device. All that remains is the functionality within the device application to read the transferred XML file and display its data. Listing 11-1 implements functionality to read the XML document containing issues generated in Chapter 2, "Accessing Data in ADO.NET," and display them in a list view control, as shown earlier in Figure 11-2.
| |
private void menuViewIssues_Click(object sender, System.EventArgs e) { string strResponse; ListViewItem listItem; //prepare the ListView control, initially hidden from user lstViewer.Items.Clear(); lstViewer.Visible = true; try { //create and populate a new DataSet DataSet datasetIssues = new DataSet(); datasetIssues.ReadXml( "\Windows\issues.xml" ); //iterate through the rows to populate the ListView control foreach( DataRow row in datasetIssues.Tables["Dat_Issue"].Rows ) { listItem = new ListViewItem(); listItem.Text = row["IssueID"].ToString(); listItem.SubItems.Add( row["PriorityID"].ToString() ); listItem.SubItems.Add( row["Summary"].ToString() ); //add the created entry to the ListView control lstViewer.Items.Add( listItem ); } } catch( Exception x ) { MessageBox.Show( x.Message ); } return; } | |
The method begins by declaring working variables , clearing the contents of the list view control, and making the control visible to the user. Next, the method creates an empty DataSet object. Its ReadXml method is invoked to open the local XML file, infer its schema structure, and fill the DataSet with the document's data. Next, each row of the DataSet object is iterated while filling in a ListViewItem object to add to the list view control.
Accessing SQL Server CE Data
Developers with experience building embedded Visual C++ device applications have a number of differences to adapt to when working with the Compact Framework. Most important, native support for data storage in Pocket Access (the Pocket PC version of Microsoft Access) has been dropped in favor of the latest release of SQL Server CE. SQL Server CE has been selected as the preferred device data storage platform largely because of its support for multiple tables, SQL querying, and data replication capabilities. Developing data-driven device applications is essentially divided into four stages: configuring the necessary servers, creating a SQL Server CE database on the device, synchronizing the device's database, and interacting with the device's database.
Configuring SQL Server CE begins on the server side with the installation of an additional setup application, known as Server Tools. This installation configures the Internet Information Services (IIS) server to relay requests between the device and the enterprise SQL Server database. You accomplish this by adding an Internet Server Application Programming Interface (ISAPI) service agent and specifying a virtual directory for the replication service. Incoming Hypertext Transfer Protocol (HTTP) requests from the device are received and managed, as illustrated in Figure 11-8.
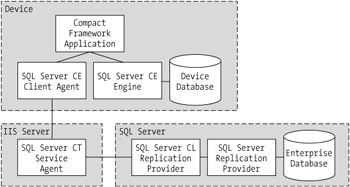
Figure 11-8: The SQL Server CE data replication components
After you have prepared the IIS server, you must configure the enterprise SQL Server database to publish specified data. From the SQL Server Enterprise Manager, choose Tools ˜ Replication ˜ Create and Manage Publications. The Create and Manage Publications dialog box will display. Click the Create Publication button to start the Create Publication Wizard.
During the course of the wizard, you need to select the database to be replicated and choose a publication type. The publication type depends largely on the purpose of the mobile client. In the case of IssueTracker, the purpose of the mobile client is to browse data and enter new data. Therefore, the merge replication type of publication works best. Next, select the publication clients ”in this case, select only servers running SQL Server 2000 and devices running SQL Server CE. Finally, the wizard prompts you for the specific data that should be published. Rather than share the entire enterprise schema, specify only the issues, users, and supporting validation tables. When the Create Publication Wizard ends, the enterprise SQL Server database will be capable of replicating useful enterprise data to validated connecting clients. At any time, you can view and modify the publication settings within the Publication Properties dialog box, as shown in Figure 11-9.
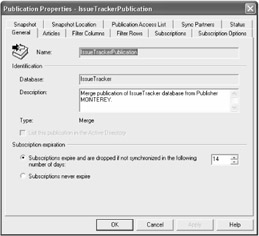
Figure 11-9: SQL Server publication properties define data replication to SQL Server CE.
After you complete the server configuration, you implement the remaining work in the enterprise device application. You must add two administrative functions to the device application: one that creates the device database and another that synchronizes it with the enterprise database.
Begin by adding a project reference to the SQL Server CE namespace. The next time the device application is deployed, the SQL Server CE engine will be deployed to the device along with the Compact Framework binaries. Select Project ˜ Add Reference from the Visual Studio .NET menu. Select the SqlServerCe component, as shown in Figure 11-10.
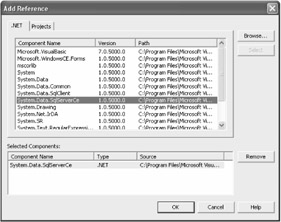
Figure 11-10: Adding the SqlServerCe namespace reference
In the code-behind file, include the necessary namespace using this reference:
using System.Data.SqlServerCe;
The CreateSqlDatabase method shown in Listing 11-2 creates the device database. The database itself is stored as an .sdf file in the device's My Documents directory.
| |
private void CreateSqlDatabase() { //specify the location of the local device database string strDataPath = "\My Documents\IssueTracker.sdf"; try { //check to determine of local device database already exists if( ! System.IO.File.Exists( strDataPath ) ) { //define a connection string and create the device database file SqlCeEngine engine = new SqlCeEngine( "Data Source=" + strDataPath ); engine.CreateDatabase(); } } catch( SqlCeException x ) { MessageBox.Show( x.Message ); } catch( Exception x ) { MessageBox.Show( x.Message ); } return; } | |
The CreateSqlDatabase method begins by identifying the location of the device database file. In this case, the file resides in the device's My Documents folder. Next, the device application determines if the file already exists locally. If not, then it creates the SqlCeEngine with a connection string pointing back to the device database file. The CreateDatabase method actually creates the file. This creates an empty database on the device; you need to add tables and data separately.
After creating the device database, you need to populate it. The device application can create the schema manually through CREATE TABLE statements in SQL, or it can synchronize everything from the enterprise SQL Server. The SynchronizeSqlDatabase method appears in Listing 11-3. Its purpose is to connect to the enterprise database and replicate specific tables, structure, and data.
| |
private void SynchronizeSqlDatabase() { //specify the location of the local device database string strDataPath = "\My Documents\IssueTracker.sdf"; //create the data replication object SqlCeReplication replication = new SqlCeReplication(); try { //define the source of the replication data replication.Publisher = "server_name"; replication.PublisherDatabase = "IssueTracker"; //database name replication.Publication = "IssueTrackerPublication"; //define the login credentials replication.PublisherLogin = "sa"; replication.PublisherPassword = ""; //define the subscriber-side connection string replication.SubscriberConnectionString = "Provider=Microsoft.SQLServer.OLEDB.CE.2.0;" + "Data Source=" + strDataPath; replication.Subscriber = "iPAQ Mobile Device"; //define the location of the IIS replication service agent replication.InternetUrl = "http://jkanalakis/sqlce/ssceca20.dll"; //define the replication mode and begin the process replication.ExchangeType = ExchangeType.BiDirectional; replication.Synchronize(); } catch( SqlCeException x ) { MessageBox.Show( x.Message ); } catch( Exception x ) { MessageBox.Show( x.Message ); } return; } | |
This method begins with the instantiation of the SqlCeReplication object. Next, it sets each replication attribute, including the source database server, source database, and source publication. The publication identifies which source database tables are to be synchronized, how much of the data is accessed, and how the database is synchronized. Connection parameters such as username and password must also be supplied, along with a name that identifies the device and the Uniform Resource Locator (URL) pointing to the ISAPI service agent. The final call to the Synchronize method initiates the data exchange process. When completed, the device's file explorer application can navigate to the My Documents directory and open the .sdf file. The Query Analyzer device application now shows a populated list of tables stored in the device database, as shown in Figure 11-11.
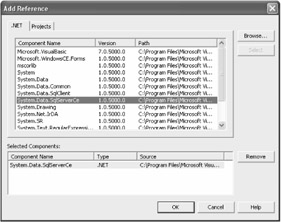
Figure 11-11: The Query Analyzer view of the device database
The final step in developing a data-driven device application is to add the source code that stores and retrieves data records. Data access from a device database works the same way as any of the other ADO.NET data providers. Listing 11-4 outlines the DisplayIssues method, which retrieves a list of issues from the already synchronized device database and displays them in a list view control.
| |
private void DisplayIssues() { string strDataPath = "\My Documents\IssueTracker.sdf"; ListViewItem listItem; //create the connection object SqlCeConnection conn = new SqlCeConnection( "Data Source=" + strDataPath ); try { //open the device database connection conn.Open(); //create and initialize the command SqlCeCommand command = conn.CreateCommand(); command.CommandText = "SELECT IssueID, PriorityID, RTRIM(Summary) " + "FROM Dat_Issues ORDER BY IssueID"; //execute the query SqlCeDataReader reader = command.ExecuteReader(); //build the display list lstViewer.Items.Clear(); while( reader.Read() ) { //build the display list row entries listItem = new ListViewItem(); listItem.Text = reader.GetInt32(0).ToString(); listItem.SubItems.Add( reader.GetInt16(1).ToString() ); listItem.SubItems.Add( reader.GetString(3) ); lstViewer.Items.Add( listItem ); } } catch( SqlCeException x ) { MessageBox.Show( x.Message ); } catch( Exception x ) { MessageBox.Show( x.Message ); } finally { //close the database connection conn.Close(); } return; } | |
This method begins by initializing a SqlCeConnection object with a connection string that points to the device database file. Next, the connection is opened and a command object is created to perform the database query. After specifying the query, the SqlCeCommand object's ExecuteReader method is invoked. The results of the query are iterated and displayed in a list view control.
The biggest concern related to data-driven device applications is reliability. Ideally, the device database file should be stored or created within Compact Flash (CF) memory. Files stored in CF are immune to critical power loss and cold boots. If not available, however, enterprise applications should attempt to handle data loss as cleanly as possible.
Integrating XML Web Services
XML Web services define a communication framework where messages can be exchanged in a loosely coupled environment using standard protocols. Because Web services are based on standard protocols, just about any client running any operating system can integrate with them, including device applications.
The problem with Web service integration is performance. Retrieving data over a wireless HTTP connection and rendering its resulting data in a form is a lengthy process. Unfortunately, the remoting framework is included in the Compact Framework, so faster binary communication is not available.
Because Web services can pull data straight from the enterprise database, its data is up-to-date. In the IssueTracker device application, two data retrieval systems are in place. First, the high-level issue information is retrieved from a locally synchronized device database. This provides the best possible performance. Next, the user can optionally request to view the issue details in a form that pulls its data from the Web service created in Chapter 9, "Using XML and Web Services." Any additional data entered at the last minute still appears in the details view, as shown in Figure 11-12.
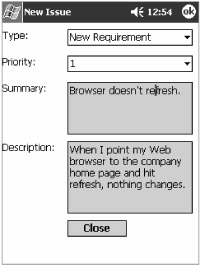
Figure 11-12: The issue details form
Implementing the issue details form begins to look similar to the Web service client created in Chapter 9, "Using XML and Web Services." It begins with a Web reference that needs to be added to the project. Select the new PocketUI project within the IssueTracker Solution Explorer. From the context menu, click References ˜ Add Web Reference. The Add Web Reference dialog box appears, as shown in Figure 11-13. You can use the Add Web Reference dialog box to either enter a URL pointing to a specific Web service or browse a Universal Description, Discovery, and Integration (UDDI) registry for any other available Web services. Enter the URL that points to the issues retrieval Web service developed in Chapter 9 ( http://server_name/IssueTracker_WebService/IssueServices.asmx ) and click the Go button.
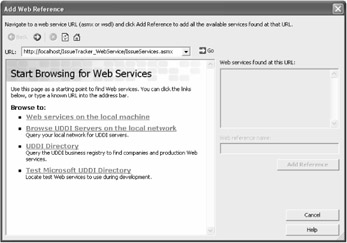
Figure 11-13: Adding a Web reference to an existing Web service
Next, the Add Web Reference dialog box displays a test view of the Web service, listing all exposed methods . Click the Add Reference button to establish the project reference to this Web service. Visual Studio .NET adds the reference to the Web service, which is noticeable within the Solution Explorer. Although the underlying files, such as .wsdl and .disco files, are named to match the Web service, the Web reference's name matches the source server name. Fortunately, you can rename the node within the Solution Explorer to also match the Web service. In this case, the Web reference named jkanalakis has been renamed to IssueService . This way, the namespace appearing within the source code makes more sense when reading.
The code that interacts with the Web service is fairly small (see Listing 11-5). When you establish a Web reference, Visual Studio .NET creates a proxy class that abstracts access to the Web service. Instead of formatting Simple Object Access Protocol (SOAP) headers and messages, the Web service client can simply interact with the Web service as if it were any other object.
| |
private void FormViewIssue_Load( object sender, System.EventArgs e ) { try { //instantiate the Web service proxy IssueService.IssueServices webserviceIssue = new IssueService.IssueServices(); //invoke the Web service method string strResponse = webserviceIssue.GetSpecificIssue( m_strPassword, m_longIssueID ); //initialize a new DataSet DataSet dsIssue = new DataSet(); //initialize an XmlTextReader with the Web service results XmlTextReader xreader = new XmlTextReader( strResponse, XmlNodeType.Element, null ); //feed the Web service response to the DataSet dsIssue.ReadXml( xreader ); //Set the display fields based on values within the DataSet lblPriority.Text = dsIssue.Tables["Dat_Issue"].Rows[0]["PriorityLabel"].ToString(); lblType.Text = dsIssue.Tables["Dat_Issue"].Rows[0]["TypeLabel"].ToString(); txtSummary.Text = dsIssue.Tables["Dat_Issue"].Rows[0]["Summary"].ToString(); lblAuthor.Text = dsIssue.Tables["Dat_Issue"].Rows[0]["Lastname"].ToString().Trim() + ", " + dsIssue.Tables["Dat_Issue"].Rows[0]["Firstname"].ToString().Trim(); txtDescription.Text = dsIssue.Tables["Dat_Issue"].Rows[0]["Description"].ToString(); } catch( Exception x ) { MessageBox.Show( x.Message ); } return; } | |
In Listing 11-5, the FormViewIssue form connects to the IssueServices Web service to return specific details about a selected issue. First, the automatically generated Web service proxy object, webserviceIssue, is instantiated . Next, a specific Web service method, GetSpecificIssue, is invoked. This method is supplied with a password and a specific issue ID. The Web service response is captured as a string, and an XmlTextReader is used to map the raw XML in the string into a schema-inferred DataSet object. Finally, the form's user interface elements are set to various fields of the DataSet.
Displaying Graphics Within a Form
It is common for any application to display a splash screen that identifies the software creator at startup. In just about every case, the splash screen is represented by an image containing text about the application and its producer. The picture box control can easily create and render simple images. However, anything more than simply displaying the image, such as drawing a border, is beyond its capabilities. Another approach to rendering an image that supports customization is to use the drawing methods available within the System.Drawing namespace. Figure 11-14 illustrates using the System.Drawing methods to create the splash screen for the IssueTracker device application.

Figure 11-14: Displaying a graphic as an application splash screen
You can use just about any image format to render the splash screen, including .bmp, .jpg, and .gif files. The process begins by creating the source image and adding it to the PocketUI project with its Build Action property set to Content. Listing 11-6 outlines the specific steps involved in manually rendering the image.
| |
public class FormSplash : System.Windows.Forms.Form { private System.Windows.Forms.Timer timerSplash; private Bitmap m_bmpImage; private int m_intTimeElapsed = 0; private int m_intTimeInterval = 100; private int m_intTimerDuration = 2000; //initializes the source image and timer interval private void FormSplash_Load(object sender, System.EventArgs e) { try { //create and initialize the bitmap object m_bmpImage = new Bitmap( "\Windows\app_splash.jpg" ); //activate the timer timerSplash.Interval = m_intTimeInterval; timerSplash.Enabled = true; } catch( Exception x ) { MessageBox.Show( x.Message ); } return; } //handles the Tick event and determines if enough time has elapsed private void timerSplash_Tick(object sender, System.EventArgs e) { try { //compare the elapsed time against the expected duration if( m_intTimeElapsed >= m_intTimerDuration ) { //time is up, close the splash screen timerSplash.Enabled = false; Close(); } else { //still waiting, increment the elapsed time m_intTimeElapsed += m_intTimeInterval; } } catch( Exception x ) { MessageBox.Show( x.Message ); } return; } //display the bitmap image protected override void OnPaint( PaintEventArgs e ) { try { //initialize a Graphics engine object and draw the image Graphics graphics = e.Graphics; graphics.DrawImage( m_bmpImage, 1, 1 ); } catch( Exception x ) { MessageBox.Show( x.Message ); } return; } } | |
The client side of the splash screen code exists in a few lines of code within the main form. The parent form only needs to instantiate the FormSplash object and display it. After a determined elapsed time, the splash screen will close itself and allow the application to continue:
private void FormMain_Load( object sender, System.EventArgs e ) { FormSplash splash = new FormSplash(); splash.ShowDialog(); return; } Integrating Native Device Functionality
The Compact Framework does not support interop services with Component Object Model (COM) objects. However, you can access native operating system services and custom DLL methods with the help of platform invoke services.
An example of the platform invocation services is audio playback. Although a Compact Framework method is not available for audio playback, you can access the native device services packaged within the coredll.dll file. You can abstract the details of the platform invocation into a single object. Listing 11-7 adds a new class, SoundLayer, to the PocketUI project.
| |
using System; using System.Runtime.InteropServices; public class SoundLayer { //specify the bitwise control flags [Flags] public enum AudioBitFlags : int { FILENAME = 0x00020000, ASYNC = 0x0001 } //import a method from an unmanaged dll [DllImport("coredll")] private static extern bool PlaySound( string szSound, IntPtr hMod, AudioBitFlags flags ); //abstract the external function with an exposed static play method public static void Play( string strFilename ) { try { PlaySound( strFilename, IntPtr.Zero, AudioBitFlags.FILENAME AudioBitFlags.ASYNC ); } catch( Exception x ) { MessageBox.Show( "Unable to playback sound file." ); } return; } } | |
The first step is to add a reference to the Compact Framework's interop services. Next, the class defines a set of bitwise flags that are required by the native method. Flag values are packaged nicely into an enumerator to allow named referencing. Next, the class identifies the PlaySound method as exported from an unmanaged DLL ( specifically , coredll.dll). Finally, the exposed static method, Play, is implemented. This method wraps the exported DLL method to minimize impacts on the application client in the event a different implementation is used in the future.
The client code comes down to a few simple lines. In Listing 11-8, the PlayAlertSound method calls the Play method defined in the SoundLayer class. Because the Play method is marked as static, a new instance of the SoundLayer object is not necessary.
| |
public void PlayAlertSound() { //sound file should be added to project with 'Content' build type SoundLayer.Play( "\Windows\AlertSound.wav" ); } | |
Given the limited processing power that devices offer, there will most likely be a need to display a "busy" cursor to inform the user that the device has not frozen but rather that it needs time to continue processing. Although these cases should be kept to a minimum, it sometimes cannot be helped. Simple file access and Web service invocation can easily take a few seconds, leaving the user to wonder if everything is still operating normally. Listing 11-9 uses platform invocation to change the cursor state from normal to busy and back.
| |
//import a method from an unmanaged dll [DllImport("coredll.dll")] private static extern int LoadCursor(int zeroValue, int cursorID ); //import a method from an unmanaged dll [DllImport("coredll.dll")] private static extern int SetCursor( int cursorHandle ); // show or hide the wait cursor public void ShowWaitCursor( bool boolShowWait ) { try { int cursorHandle = 0; if( boolShowWait ) { //load the busy cursor cursorHandle = LoadCursor( 0, 32514 ); } SetCursor( cursorHandle ); } catch( Exception x ) { MessageBox.Show( "Unable to set cursor." ); } return; } | |
The ShowWaitCursor works similarly to the PlaySound method. A couple of external methods, LoadCursor and SetCursor, are imported from the coredll.dll file. Next, the method accepts a boolean flag that determines if the busy cursor, 32514, should display or the default system cursor, 0, should display.
With support for platform invocation services, the Compact Framework leaves the door open to extensibility, much like its desktop counterpart . It provides enterprise application developers with the tools needed to build extensions to mobile clients capable of presenting a familiar user interface and supporting local data storage. The next section explores an alternative platform for building truly wireless applications with even more limited resources.
EAN: 2147483647
Pages: 119