Adding Dynamic Data to Windows Forms
Chapter 7, "Building Web Applications," described data binding as a powerful mechanism used to create a connection between form controls and the underlying application data. This connection enables a form control to read and write values stored in databases and in other structures, such as arrays and collections. Data binding is just as effective at setting form control properties at runtime for Windows forms as it is for Web forms.
A valid data source for data binding is any data collection that supports indexed access to the elements of the collection ” specifically , any collection implementing the IList interface, such as DataSets, arrays, and ArrayLists.
Applying Data Binding
Simple data binding connects a single value within a data source to a single property of a form control. In Listing 8-7, the Form_Load event handler for the FormIssueDetails form binds edtEmailAddress.Text to Dat_Issue.EmailAddress. In this case, the Bindings collection of the edtEmailAddress textbox control manages simple data binding.
Complex data binding binds a list control to a collection of data elements. You implement complex data binding to bind each list control to its respective data source. In Listing 8-12, the new data entry form displays three combo box controls that retrieve their list options from validation tables.
| |
private void FormIssueDetails_Load(object sender, System.EventArgs e) { //reference the application's DataSet object ReferenceDataManager mgrReference = new ReferenceDataManager(); //bind the validation data cboPriority.DataSource = mgrReference.GetPriorities(); cboPriority.DisplayMember = "PriorityLabel"; cboPriority.ValueMember = "PriorityID"; cboType.DataSource = mgrReference.GetIssueTypes(); cboType.DisplayMember = "TypeLabel"; cboType.ValueMember = "TypeID"; cboStatus.DataSource = mgrReference.GetStatuses(); cboStatus.DisplayMember = "StatusLabel"; cboStatus.ValueMember = "StatusID"; txtEntryDate.Text = DateTime.Now.ToString(); if(ViewMode == Controller.ControllerActions.View ViewMode == Controller.ControllerActions.Edit) { IssueManager managerIssue = new IssueManager(); Issue issue = managerIssue.GetIssue(m_intIssueID); txtEntryDate.DataBindings.Add("Text", issue, "EntryDate"); cboType.DataBindings.Add("Text", issue, "TypeID"); cboStatus.DataBindings.Add("Text", issue, "StatusID"); cboPriority.DataBindings.Add("Text", issue, "PriorityID"); txtSummary.DataBindings.Add("Text", issue, "Summary"); txtDescription.DataBindings.Add("Text", issue, "Description"); } return; } | |
| Note | For each combo box control, be sure to set the DropDownStyle property to DropDownList. Otherwise, a user will be able to enter their own text values rather than choose ones from a list. |
This updated version of the Form_Load event handler for the FormIssueDetails form has a couple of advancements over its predecessor in Listing 8-7. First, an instance of the ReferenceDataManager is created from the Business Facade project. This object accesses the underlying reference tables that are bound to the combo box controls. Three properties complete each data binding. The DataSource property identifies the data collection to which to bind. The DisplayMember property identifies the data column to appear as in the Text field. The ValueMember property identifies the numeric value stored in the database.
The other advancement is that the original data binding of field values only occurs when the form is displayed in a View or Edit state. The resulting form appears in Figure 8-10 as a new issue is entered.
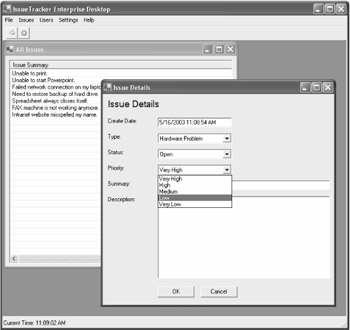
Figure 8-10: Filling combo box controls with complex data binding
Setting the Data Binding Context
Windows forms also support a binding context between a data source and a set of form controls. The BindingContext property points to a data collection to which one or more form controls are bound. This property also maintains the current position within the data collection. This enables a form to track its position within a collection and inform controls about the object in the data collection to which they should bind. As the current position changes, controls update to reflect the change in data.
To use a binding context, implement the simple data binding outlined in Listing 8-6. You bind each Label.Text property to a column value in the current record of the Dat_Issue table using the control's DataBindings property. Because the BindingContext maintains the tableIssues object, changing the current object requires incrementing or decrementing the Position property of the data collection. In Listing 8-13, the currently viewed object is identified by the form's BindingContext property.
| |
private void btnBack_Click(object sender, System.EventArgs e) { BindingContext[managerIssue].Position; return; } private void btnNext_Click(object sender, System.EventArgs e) { BindingContext[managerIssue].Position++; return; } | |
Listing 8-13 implements the event handler for the Back and Next buttons in the FormIssueView form. The Next button's Click event handler increments the Position property of the data source managed by the BindingContext. The Back button's Click event handler decrements the Position property. This enables the form to cycle through the issues in response to the Next and Back buttons.
Displaying Data in a DataGrid
The DataGrid control is probably one of the most important controls available to the enterprise developer. It displays information stored in an array, collection, or DataTable as a series of columns and rows. You can optionally edit each row in place, allowing changes to be reflected in the source data as the user moves from one row to another. When the DataGrid displays a DataSet, the user can also move across related DataTable objects by navigating their relationships.
To see the capabilities of the DataGrid control, you can create another Windows form, named FormDataManager, and add it to the ApplicationFramework project. You can use this form to view and set rows of reference data, allowing the application administrator to customize the application. Table 8-2 outlines this form's five form controls.
| CONTROL ID | CONTROL TYPE |
|---|---|
| datagridTypes | DataGrid |
| datagridPriorities | DataGrid |
| datagridStatuses | DataGrid |
| btnOK | Button |
| btnCancel | Button |
Listing 8-14 displays a collection of records in each DataGrid control by setting the DataSource property to the collection of objects that will be displayed. Set the DataSource property of the DataGrid control to the application's reference DataSet object. Then, set each DataMember to a reference table appropriate for each control.
| |
private void FormDataManager_Load(object sender, System.EventArgs e) { datagridTypes.DataSource = mgrReference.GetEntireDataSet(); datagridTypes.DataMember = "Val_IssueType"; datagridStatuses.DataSource = mgrReference.GetEntireDataSet(); datagridStatuses.DataMember = "Val_IssueStatus"; datagridPriorities.DataSource = mgrReference.GetEntireDataSet(); datagridPriorities.DataMember = "Val_Priority"; return; } | |
The problem with only setting a DataSource property to an entire DataTable is that all of the columns that make up the DataTable will be displayed. Because you might only want to show a couple of columns, you will need to apply a table style.
To apply a table style, select a DataGrid control, such as datagridTypes, and view its list of properties. Select the TableStyles property and click the ... button to display the DataGridTableStyles Collection dialog box. This dialog box lets you create table styles for one or more tables that belong to any data collection, such as a DataSet. If a DataSet has five separate tables, then you can create and stylize five separate table styles. Each table style defines how a DataGrid control should appear for the specified table. Properties include read-only state, specific row and column sizes, colors, grid lines, visibility of headers, and so on. Click the Add button to create a new table style named tablestyleTypes then set the MappingName property to the name of the DataTable to display. Figure 8-11 shows the DataGridTableStyle Collection Editor dialog box settings for the Val_IssueTypes table.

Figure 8-11: The DataGridTableStyle Collection Editor dialog box
Just as you can create multiple table styles for a data structure, you can create multiple column styles for each table. By default, if you do not specify any column styles, then every column in a DataTable object will display. By adding column styles, you can specify which columns to include and how they should be appear. You can also customize the format of string values, such as dates, using string formatting specifiers. Appendix C, "Using String Format Specifiers," contains a list of the most common format specifiers.
| Note | You can create a hidden column containing reference IDs by setting the column width to zero. |
To add column styles to a table style, select the GridColumnStyles property in the DataGridTableStyle Collection Editor dialog box and click the button. The DataGridColumnStyle Collection Editor dialog box appears. You can add individual column styles by clicking the Add button and filling in the appropriate column properties. Figure 8-12 shows some of the settings used by the Val_IssueTypes dialog box.
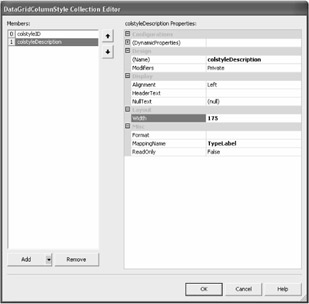
Figure 8-12: Setting column styles with the DataGridColumnStyle Collection Editor dialog box
Filling in the table and column styles within the Visual Studio .NET environment definitely saves a lot of time. The properties set within the table and column style editors translates to pages of code that create and customize a series of DataGridTableStyle and DataGridTextBoxColumn objects. Figure 8-13 shows the completed child form that displays the three DataGrid controls containing reference information.

Figure 8-13: The completed FormDataManager viewer
Displaying Current Time with the Timer Control
Often it is necessary for an application to perform an activity at specific intervals. The Timer control enables this functionality by generating an event at specified intervals. You define the actual length of the interval with the Interval property, measured in milliseconds . When the control is enabled, a Tick event is raised at every interval. The key methods of the Timer control are Start and Stop, which turn the timer on and off, respectively.
To add a timed response to a form, select the Timer component from the Toolbox and drag into the specified form. Next, set the Interval property for the timer in terms of milliseconds to determine how much time will pass before the next Tick event is generated. In Listing 8-15, the IssueTracker application uses a timer to periodically check the time and display it to the user as a local clock.
| |
private void InitializeTimer() { Timer1.Interval = 1000; Timer1.Enabled = true; } private void Timer1_Tick(object Sender, EventArgs e) { statusbar.Text = "Current Time: " + DateTime.Now.ToLongTimeString(); } | |
| Note | The more often a timer event occurs, the more processor time is used in responding to the event. This can slow down the overall application performance. Avoid setting a time interval smaller than needed. |
Set the Enabled property to true to start the timer. The Tick event will begin to occur, executing the target procedure at the set time interval. Set the Enabled property to false to stop the timer because setting the interval to 0 does not cause the timer to stop.
EAN: 2147483647
Pages: 119