Chapter 7: Building Web Applications
This chapter explores ASP.NET and shows how to use this powerful technology to build enterprise Web applications. Although ASP.NET is derived from its ASP predecessor, ASP.NET has evolved with a new framework specifically designed for building complex, scalable, and robust Web applications. Two fundamental framework components of ASP.NET include Web forms and Web services. This chapter provides some background into Web forms, including how forms are processed and how events are handled. It also examines how to construct Web forms, use server and user controls, and accomplish important application functions, such as form validation, browser detection, and page redirection. From the examples presented, you will continue to build the IssueTracker enterprise application.
Standardizing Web Forms with Templates
When multiple developers are working together to build an enterprise solution, many unexpected problems tend to surface. The most common problems include code replication and user interface inconsistencies. Code replication occurs when a user interface element or client-side function is needed in one or more regions of the application. Different developers working on those different regions often implement the same element differently rather than using a single shared element. User interface inconsistencies occur when different developers implement application forms that are similar but execute certain details slightly different, such as font selection, positioning, or alignment.
The simplest solution to these problems is to use templates. User interface templates for common application elements can go a long way to add consistency and reduce errors in an application. To determine how many or what type of templates you need, build a map of the entire Web application, form by form. Then, look for common patterns. In the IssueTracker Web application, there are three different types of Web forms: static content forms, list forms, and data entry forms. A more complex application will have even more refined template pages than the three mentioned. Before implementing Web form templates, it is important to have a clear understanding of how you present Web forms using page layouts.
Exploring Page Layout Options
A layout mechanism determines how controls are placed within a Web page. Web forms support two basic page layout mechanisms: flow layout and grid layout. Developers with a strong background in Web application development will best relate to the flow layout because its top-to-bottom relative positioning of controls closely resembles Hypertext Markup Language (HTML). Conversely, developers with a strong background in desktop application development will best relate to the grid layout because the absolute positioning of the controls closely resembles traditional Visual Studio form building. Each layout mechanism has its own unique benefits, and selecting the appropriate one depends upon your project's requirements.
Choosing the Flow Layout
The flow layout works best for Web applications that are targeted for a wide range of clients . Because you place controls in a relative position, it is easier to build an application capable of sizing itself to fit in any size Web browser window. As Figure 7-1 demonstrates , you lay out server controls from left to right and from top to bottom. If a server control does not fit on a line, it wraps around to the next line. As a browser window narrows, the server controls continue to shift, moving down the page.
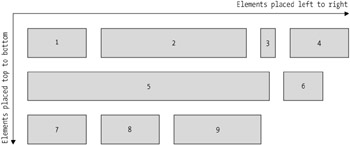
Figure 7-1: A representation of the flow layout
With this method, users operating at different screen resolutions can view the application differently. At higher resolutions, users see more content within a single view, and at lower resolutions , users can avoid horizontal scrolling.
Web applications rely heavily upon the HTML table control to help with page formatting. Because you can specify the width and height properties of a table control, you can effectively accomplish absolute positioning of form controls even when applying the flow layout to a Web form.
Choosing the Grid Layout
The grid layout works best for Web applications that want to enforce consistency among all users. Because controls placed within a page using the grid layout remain in a fixed position, each user, regardless of Web browser version or screen resolution, will see the same user interface. Users with lower resolution screens may need to scroll around to see the entire application, but the position of the controls remains constant. This is especially useful when trying to keep a data entry user interface consistent with the printed form. Listing 7-1 demonstrates the same login page using the grid layout.
| |
<%@ Page language="c#" Codebehind="login_enter.aspx.cs" Inherits="IssueTracker.LoginForm" %> <!DOCTYPE HTML PUBLIC "-//W3C//DTD HTML 4.0 Transitional//EN" > <HTML> <body MS_POSITIONING="GridLayout"> <FORM id="LoginForm" method="post" runat="server"> <DIV style="DISPLAY: inline; Z-INDEX: 101; LEFT: 240px; WIDTH: 70px; POSITION: absolute; TOP: 24px; HEIGHT: 15px" ms_positioning="FlowLayout">Username:</DIV> <INPUT style="Z-INDEX: 102; LEFT: 328px; POSITION: absolute; TOP: 24px" type="text" name="edtUsername"> <DIV style="DISPLAY: inline; Z-INDEX: 103; LEFT: 240px; WIDTH: 70px; POSITION: absolute; TOP: 56px; HEIGHT: 15px" ms_positioning="FlowLayout">Password:</DIV> <INPUT style="Z-INDEX: 104; LEFT: 328px; POSITION: absolute; TOP: 64px" type="password" name="edtPassword"> <INPUT style="Z-INDEX: 105; LEFT: 328px; POSITION: absolute; TOP: 96px" type="button" value=" OK " name="btnOK"> <INPUT style="Z-INDEX: 106; LEFT: 400px; POSITION: absolute; TOP: 96px" type="button" value="Cancel" name="btnCancel"></FORM> </FORM> </body> </HTML>
| |
Controls placed into a Web form using the grid layout only look slightly different in HTML. The type, name, and size attributes of the input tag remain the same, but a lengthy style attribute has been added. The z-index value refers to the layering order of controls placed within a Web form. Web forms can layer controls over each other and partially cover each other. A higher z-index value puts a control on top of those with lower values. Figure 7-2 demonstrates how two overlapping controls appear in a Web form.
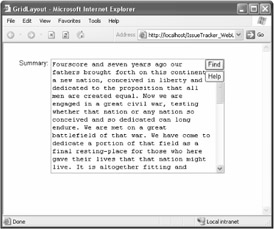
Figure 7-2: A Web form with overlapping button controls
The left and top values identify the horizontal and vertical position of a control, respectively. The position value identifies how the control should be placed when rendered: static, absolute, or relative. A static value places the control according to the natural flow of the page, ignoring the left and top values. A relative value also places the control according to the natural flow of the page, but it is influenced by the left and top values. An absolute value places the control exactly where it is specified as defined by the left and top values.
The grid layout depends heavily upon the style attribute within HTML. The problem is that the only Web browsers that support it are Microsoft Internet Explorer 4.0 and higher. Web forms include a targetSchema property that identifies the Web browser and optimize the rendering. To support older Web browsers, ASP.NET can render HTML pages by placing controls within tables to achieve the grid layout positioning specified. Listing 7-2 outlines the HTML code produced by the ASP.NET engine when the targetSchema form property is set to Netscape Navigator 4.0. The produced code uses HTML table formatting to approximate the exact control positioning specified in the form designer.
| |
<!DOCTYPE HTML PUBLIC "-//W3C//DTD HTML 4.0 Transitional//EN" > <HTML> <HEAD> <title>GridLayout</title> <meta name="GENERATOR" Content="Microsoft Visual Studio .NET 7.1"> <meta name="CODE_LANGUAGE" Content="C#"> <meta name="vs_defaultClientScript" content="JavaScript"> <meta name="vs_targetSchema" content="http://schemas.microsoft.com/intellisense/nav4-0"> </HEAD> <body MS_POSITIONING="GridLayout"> <TABLE height="377" cellSpacing="0" cellPadding="0" width="218" border="1" ms_2d_layout="TRUE"> <TR vAlign="top"> <TD width="218" height="377"> <form name="Form1" method="post" action="GridLayout.aspx" id="Form1"> <input type="hidden" name="__VIEWSTATE" value="dDwtMTMxMzA2ODI5ODs7PmyeHStznlqmkTb090NU3FrpXTeC" /> <TABLE height="201" cellSpacing="0" cellPadding="0" width="365" border="1" ms_2d_layout="TRUE"> <TR vAlign="top"> <TD width="96" height="96"></TD> <TD width="112"></TD> <TD width="157" rowSpan="2"></TD> </TR> <TR vAlign="top"> <TD height="8"></TD> <TD rowSpan="2"> <span id="Label1">E-mail Address:</span></TD> </TR> <TR vAlign="top"> <TD height="32"></TD> <TD> <input name="TextBox1" type="text" id="TextBox1" /></TD> </TR> <TR vAlign="top"> <TD height="40"></TD> <TD> <span id="Label2">Password:</span></TD> <TD> <input name="TextBox2" type="text" id="TextBox2" /></TD> </TR> <TR vAlign="top"> <TD colSpan="2" height="25"></TD> <TD> <input type="submit" name="Button1" value=" OK " id="Button1" /></TD> </TR> </TABLE> </form> </TD> </TR> </TABLE> </body> </HTML>
| |
This code has been altered to make the tables visible, revealing how the ASP.NET engine accomplishes absolute control positioning in HTML. Figure 7-3 illustrates the login page with the border size set to 1.
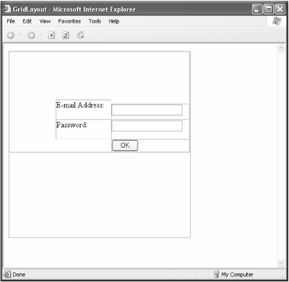
Figure 7-3: A Web form using HTML tables to position controls in a grid layout
With a better understanding of Web form layout options, it is time to implement Web form templates.
Creating a Cascading Style Sheet
A Cascading Style Sheet (CSS) broadly sets the look and feel of a Web application by creating styles of text formatting and applying them to different HTML user interface elements. CSS values replace the need to hard-code font settings for each HTML element. This brings consistency to the application's look and feel and further accelerates application development time.
To create a CSS document, create a styles folder under the WebUI project. Next, select the styles folder and select Add ˜ Add New Item. In the Add New Item dialog box, select the Style Sheet template and assign its name to match the application name, such as issuetracker.css for the IssueTracker application. Next, fill in the style details for the various HTML elements:
body { font-size: 12px; font-family: verdana, arial, helvetica, sans-serif; color: #000000; } A:Hover { font-size: 11px; font-family: verdana, arial, helvetica, sans-serif; background: transparent; text-decoration: underline; color: #FF6600; } A:Link, A:Visited, A:Active { font-size: 11px; font-family: verdana, arial, helvetica, sans-serif; background: transparent; text-decoration: none; color: #000000; } In this case, you can set a style for all unformatted HTML body text to display a 12-point Verdana font in black. Also, hyperlinks should only appear underlined when the mouse hovers over them, and they should appear the same whether active, inactive, or visited.
To reference CSS files within Web forms, place the following statement into the <HEAD> section of each Web form's HTML:
<LINK href="../styles/issuetracker.css" type=" text/css" rel=" stylesheet">
Once each Web form includes a reference to a style sheet, you can update the entire application to use different font settings by changing only the referenced CSS file.
Creating a Static Content Template
Begin creating Web form templates by organizing the Web application project into folders. From the Visual Studio .NET Solution Explorer, select the Web application project and choose Add ˜ New Folder from the context menu. Create the following folders:
-
controls: Contains custom developed user controls that can be easily reused between Web forms
-
images: Contains all application image files
-
pages: Contains all application Web forms
-
static: Contains all static content related to the Web application
-
styles: Contains all CSS files related to the application
-
templates: Contains all application Web form templates
After you have created the folders, select the templates folder and choose Add ˜ Add HTML Page from the context menu. In the Add New Item dialog box, enter StaticTemplate.html for the filename. When the new blank page appears, select Table ˜ Insert ˜ Table from the menu. In the Insert Table dialog box, specify a new table that has one column, four rows, 100-percent width, and a 0 border size. Next, insert some placeholder text, such as $$PAGE_HEADER$$, where form elements should appear. These placeholders should indicate where to place the page header, footer, menu, title, and so on. You can apply row shading and colors to match the company's or product's color scheme. Also, if any of the rows should apply custom fonts or formatting, you should also specify it within the template. Figure 7-4 illustrates the static content template that applies to the IssueTracker application. It might look simple, but it will go a long way to reduce the time needed to build the entire Web application.
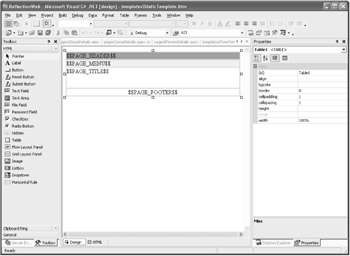
Figure 7-4: Creating the static content template
The static content template is always simple. Its principal purpose is to display static text, such as online help or corporate messaging. It can also act as a starting point for building the remaining templates.
In any Web application, the real advantage of a template comes when you want more complicated formatting, custom menus , mixed fonts, and so on. When you create a new Web form, for instance, you can open the HTML view and paste the contents of the template's HTML view. The result is a new Web form with a consistent starting point for adding specialized user interface elements.
Creating a Data Entry Template
The data entry Web form template does not add too much more to the existing static content template. Create a new HTML page named FormTemplate.htm . The only item really added is another nested table within the center of the static content space. This new table has the following properties: two columns, three rows, 80-percent width, and a 0 border size. The two columns will contain the field labels and data entry controls, so add two additional placeholders to the first row. The specific dimensions of the inserted table are completely arbitrary and should be consistent with your corporate Web site's formatting. Figure 7-5 shows the data entry template created for the IssueTracker application.
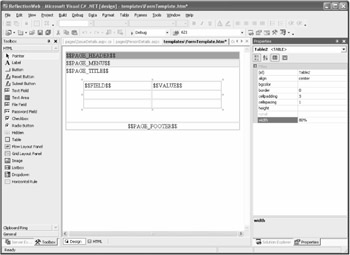
Figure 7-5: Creating the data entry template
Creating a Web Form from a Template
After producing the foundation form templates, it is time to put them into action and create application Web forms. In the Solution Explorer, select the pages folder under the IssueTracker_WebUI project. Select Add ˜ Add Web Form from the context menu. Enter IssueDetails.aspx as the new filename. When the empty Web form appears in the Visual Studio .NET form designer, click the HTML tab at the bottom.
To apply an existing template pattern, open the FormTemplate.html file and click the HTML tab button at the bottom. Select the entire HTML text from top to bottom and copy it to the Clipboard. Return to the new IssueDetails.aspx HTML view and paste the Clipboard contents to replace all the HTML beginning with (and including) the following line:
<!DOCTYPE HTML PUBLIC "-//W3C//DTD HTML 4.0 Transitional//EN" >
Next, return to the design view of the IssueDetails.aspx Web form. The new Web form should appear just as the data entry template. With the Web form structure now in place, begin adding controls associated with Issue business object. Table 7-1 summarizes what data entry controls should appear down the right column of the Web form and their related control IDs.
| MATCHING LABEL | CONTROL TYPE | CONTROL ID |
|---|---|---|
| Entry Date: | TextBox | Issue_EntryDate |
| Issue ID: | TextBox | Issue_IssueID |
| Type: | DropDownList | Issue_TypeID |
| Status: | DropDownList | Issue_StatusID |
| Priority: | DropDownList | Issue_PriorityID |
| Summary: | TextBox | Issue_Summary |
| Description: | TextBox | Issue_Description |
| OK | Button | btnOK |
| Cancel | Button | btnCancel |
You should name the control IDs consistently. Because these controls will be later bound to the Issue business object, each data entry control ID should be prefixed with Issue_. The sizes of the data entry controls should also match the expected data. Figure 7-6 shows the resulting Web form.
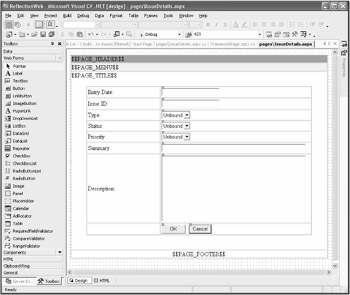
Figure 7-6: The completed IssueDetails.aspx Web form
To test this page, select it as the start page for IssueTracker_WebUI. Next, select this project as the startup project for the entire solution and then start the debugger. The new IssueDetails Web form should appear without any real functionality. The next step is to enable this form to display and capture dynamic data.
EAN: 2147483647
Pages: 119