Defining and Configuring Site Systems
|
| < Day Day Up > |
|
New site systems for the SMS site are defined as site settings for the site. As such, you could consider these site systems to be properties of the site as well. In this section we’ll review the site systems that you can define and examine how each becomes a site system for your SMS site. The various site roles that you can assign to an SMS 2003 site system are listed here:
-
SMS Site Server
-
SMS SQL Server
-
SMS Client Access Point (CAP)
-
SMS Component
-
SMS Distribution Point
-
SMS Management Point
-
SMS Reporting Point
-
SMS Server Locator Point
Each of these roles is supported to a greater or lesser extent depending on the operating system platform the site system is using. Chapter 2 described the server requirements for the SMS Site Server and SMS SQL Server in detail. Like the SMS Site Server, you can assign the site system roles to any server running Windows 2000 Server or the Windows Server 2003 family of servers. Table 3.1 outlines additional requirements for specific site system roles.Table 3.1: Additional requirements for site system rolesWe’ve already looked closely at installing and configuring the site server and the site database server (the SQL Server). Let’s now focus on the other site system roles. The SMS administrator generally assigns site system roles. The SMS administrator can assign all the site system roles mentioned so far to any server that meets the requirements already outlined.
| Site System Role | Requirement |
|---|---|
| Distribution Point | If you intend to use the Background Intelligent Transfer Service (BITS) for Advanced Clients, both the site server and the distribution point must have Internet Information Services (IIS) installed and enabled. |
| Management Point | If you intend to use a server as a management point, you must install and enable IIS on that server. |
| Reporting Point | If you intend to use a server as a reporting point, you must install and enable IIS. Any server or client that will use the Report Viewer component must have Internet Explorer 5.01 with Service Pack 2 or later installed, as well as Office Web Components to use graphs in the reports. |
| Server Locator Point | If you intend to use a server as a server locator point, you must install and enable IIS. |
However, some site system roles are assigned automatically when another component is enabled. When you first install the site server, it’s automatically assigned as a CAP and distribution point. When a sender is installed on a server, or when the CAP role is assigned to a site system, that site system is automatically assigned the role of component server. A component server is generally defined as any site system running the SMS Executive service, although we typically refer to a server acting as an alternate sender for facilitating site-to-site communication within a hierarchy as a component server. Chapter 4 will talk more about senders.
In either case, you must be sure that the proposed site system meets the requirements outlined in Table 3.1. In addition, check for space and partition requirements as outlined in the relevant sections later in this chapter for each site system role. For example, CAPs require an NTFS partition because of security that SMS 2003 applies to the directories it creates on those site systems. Clients must be able to access site systems such as CAPs, distribution points, and management points in order to access advertisements and client component files and configuration updates, to write discovery and inventory data, and to read and execute package scripts. In large part, SMS 2003 assigns the appropriate level of permissions, but this doesn’t totally absolve you from checking and testing permissions and access.
Site System Connection Accounts
If you administered SMS 2.0 sites in the past, you’re already well acquainted with the great number of accounts that SMS 2.0 created and supported. In contrast, the number of accounts required and used by SMS 2003 depends on whether you’re running in standard security mode or advanced security mode. The number, type, and purpose of SMS 2003 accounts related to standard and advanced security are discussed in detail in Chapter 17. However, since we’re talking about site systems here, it’s appropriate to speak about the accounts used by SMS 2003 to facilitate communications between the site server and its site systems. Consequently, we’ll now have a brief discussion about SMS 2003 accounts as they relate to site systems.
No matter which security mode you’re using, SMS 2003 uses some account type to facilitate communications between the site server and its site systems. Site servers need to connect to site systems to transfer information such as advertised programs, package information, client component option updates, and so on. Site systems, on the other hand, need to connect to site servers to transfer information that they’ve collected, such as client inventory data and discovery information. These connection accounts fall into three categories: common accounts, advanced security accounts, and standard security accounts.
Common Accounts
SMS 2003 creates and uses some common accounts regardless of the security mode in which it’s running. Whether you can use these accounts effectively depends on whether your servers are running Active Directory or not, whether any SMS servers are running Windows NT 4 or not, and whether you’re running advanced security or not. Chapter 17 provides a complete list and description of all the accounts used by SMS.
There are three security groups that facilitate communications between the SMS site server and a site system. They are as follows:
-
Site System to Site Server Connection This group gives site systems the ability to connect to the site server to read and write resources such as advertised programs and inventory. Its members are preferably the site system computer accounts, although they can be Site Server Connection accounts that you create and manage.
-
SMS Server Connection In sites running standard security, this account gives CAPs access to the SMS site server. This account is preferably the computer account of the SMS site server, but it can also be the SMS Service account.
-
Site System Connection The SMS site server uses this account to connect to its site systems. This account is preferably the computer account of the SMS site system, but it can also be a specific account created and managed by the SMS administrator.
Advanced Security
As we’ve mentioned several times already, one great advantage of using advanced security is that you don’t need to rely on anything other than Active Directory computer accounts when communicating between servers. In fact, as we stated earlier, the preferred membership of the SMS Site System To Site Server Connection group account is the computer accounts of the site systems. By making these computer accounts members of this group, site systems will automatically have the appropriate level of access to the appropriate shares and folders on the site server. You don’t need to worry about creating separate connection accounts, making sure that they have the correct level of security and access, and so on.
Standard Security
When you’re using standard security mode, especially when in a mixed mode Active Directory, accounts are created and maintained largely as they were in SMS 2.0. When you identify and assign site system roles, the site server automatically creates a SMS Server Connection Account called SMSServer_sitecode. Site systems such as CAPs use this account to connect to the site server and transfer data such as inventory and discovery data. SMS creates and maintains this account on its own so you should not modify it in any way.
When you installed SMS 2003 on the site server, the Setup program created the SMS Service account. Among other tasks, the site server uses this account to connect to site systems to transfer data. You can, however, create additional accounts, called SMS Site System Connection Accounts, depending on your site’s security requirements. You do so through Active Directory Users And Computers. The account must be a member of the site system’s local Administrators group and must be granted the Log On As A Service user right. It should also have the Password Never Expires option selected since service accounts can’t change their own passwords. You can also use the site server’s computer account to accomplish this communication by making it a member of the local Administrator’s group on the site systems. This is a more secure method than using the SMS Service account.
When a site server needs to connect to a site system, SMS will attempt a connection first through any existing service connection. It then tries the Site System Connection Account if one exists. If the attempt fails, SMS tries the SMS Service account.
After you have created the connection account in Windows, you need to identify the account to the SMS site server using the following steps:
-
In the SMS Administrator Console, navigate to the Site Settings folder, and expand it.
-
Expand the Connection Accounts object, highlight and right-click the Site System object, as shown in Figure 3.23, and choose New\Windows User Account from the context menu. This option will be dimmed if SMS 2003 is running in advanced security mode.
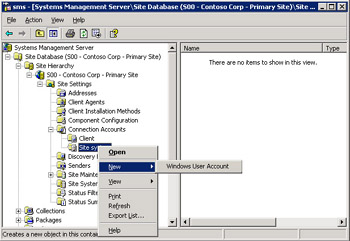
Figure 3.23: The SMS Administrator Console, showing the Site System object selected and the available connection account type. -
In the Connection Account Properties window, click the Set button to display the Windows User Account dialog box. Enter the account name in the dialog box Domainname\Username and enter and confirm a password, as shown in Figure 3.24. Click OK.
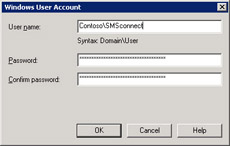
Figure 3.24: The Windows User Account dialog box. -
Click OK again to close the Connection Account Properties window.
Assigning Site System Roles
Now that you have identified the servers that will become site servers and created any necessary connection accounts, you must tell SMS that the server should be considered a site system. To do so, follow these steps:
-
In the SMS Administrator Console, navigate to the Site Settings folder and expand it.
-
Select the Site Systems folder. Initially, the only entry you’ll see is the site server itself.
-
Add a new site system by right-clicking the Site Systems folder and choosing New from the context menu to display the two site system options list available, as shown in Figure 3.25.
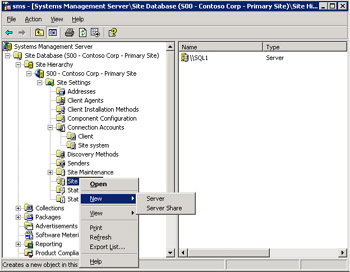
Figure 3.25: The Site System context menu options. -
Choose either Server or Server Share.
-
Choosing Server will display the Site System Properties dialog box shown in Figure 3.26. Click Set and enter the name of the Windows server that you want to make a site system. Then select the tab for the site system role you want to assign to the server and make the appropriate option choices. When you’re finished, click OK.
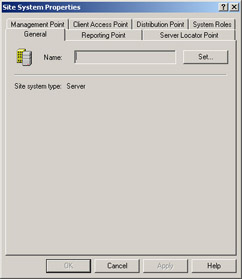
Figure 3.26: The Site System Properties dialog box for a server. -
Choosing Server Share will display a slightly different Site System Properties window, as shown in Figure 3.27. Click Set and enter the name of the server and share (which you have already created) that you want to define as the site system. Select the tab for the site system role you want to assign to the server and make the appropriate option choices. Notice that only the CAP and distribution point roles can be assigned to a share. When you’re finished, click OK.
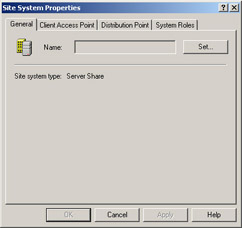
Figure 3.27: The Site System Properties dialog box for a server share.Planning It’s not necessary that you assign a site system role immediately. You might choose to wait until you have completed your assessment as to the best number and placement of site system servers. This is particularly useful when you’re planning a phased rollout of your site.
The main difference between the Server and Server Share options is that by creating a share on a server first and defining that share as the site system, you can direct where SMS will create and write the support files for the CAP and distribution point roles. However, if you use Server Share, SMS will not create a discovery record for that site system.
Tip If you need a discovery record for the site system created as a Server Share, perhaps because you want to use the Network Trace utility to monitor its health, create the site system as both a Server Share and Server. Simply assign the desired roles to the Server Share site system entry; don’t assign any site system roles to the Server site system entry.
-
-
Click OK to close the Site System Properties window and save your new site system.
In the next few sections we’ll explore each site system role and the options that are available to you when you assign that role to a server.
Client Access Points
The CAP is an SMS site system that functions as the main exchange point between SMS Legacy Clients and the SMS site server. If you’re using Advanced Clients only in your SMS site, you don’t need to configure any additional CAPs. Components of SMS Legacy Clients such as the Remote Tools and Hardware Inventory agents are installed from a CAP. Inventory, status, and discovery information that’s collected on a client is written to a CAP. Advertisement information and other client instructions are obtained from the CAP. When a client receives an advertisement for a program, it also includes a list of distribution points at which the client can find the package files.
When the site server is installed, it becomes a CAP by default. Typically, however, you’ll want to assign other site systems the CAP role and remove this role from the site server to reduce its resource requirements and improve its performance as well as load balancing the CAP function within your site network. CAPs are installed through the SMS Administrator Console as a site system setting. To assign the CAP role, follow these steps:
-
In the SMS Administrator Console, navigate to the Site Settings folder and expand it.
-
Highlight the Site Systems folder to display the list of site systems you have defined.
-
Right-click the site system you want to assign as a CAP, and choose Properties from the context menu to display the Site Systems Properties window, as shown in Figure 3.28.
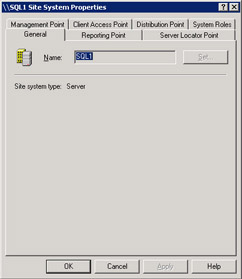
Figure 3.28: The General tab of the Site System Properties dialog box. -
Select the Client Access Point tab, as shown in Figure 3.29. Select the Use This Site System As A Client Access Point check box, and then click OK.
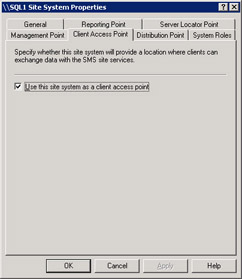
Figure 3.29: The Client Access Point tab of the Site System Properties dialog box. -
Click OK again to save this setting and begin the Site Control Manager process that will set up the new CAP.
If you want to remove the CAP role from the site server, right-click the site server and just follow the same procedures that you used to assign a CAP role to the site system; however, you should clear the Use This Site System As A Client Access Point check box when you’re in the Client Access tab.
When you enable a new CAP, you have identified a change to the site control information for the site. A new site control file will be created according to the process described in the section entitled “The Site Configuration Process Flow” earlier in this chapter. Recall that during that process, after the new site control file is generated, other components wake up and read the file to determine whether they need to perform any tasks. One of these components is Site Component Manager.
In this scenario, Site Component Manager wakes up and installs the SMS Executive service and the Inbox Manager Assistant thread on the new CAP if it’s a Windows server. The SMS Executive runs the Inbox Manager Assistant, which is used to copy inventory files, discovery records, and so on from the CAP to the site server. In addition, the Inbox Manager thread on the site server wakes up and creates the directory structure and share needed on the CAP for the Windows, as shown in Figure 3.30. The directory name and share is CAP_sitecode. This directory includes all the inboxes needed for client agents to write information generated on the client to the CAP and to write instructions that the client needs from the site server to the CAP. As you can see, the folder names in the CAP directory structure are fairly descriptive of the data that’s written.
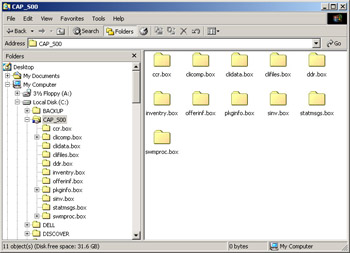
Figure 3.30: The CAP directory structure, which contains the inboxes needed to write data from both the client and the site server.
Those of you who come from an SMS 2.0 or earlier environment might recognize the functions of Inbox Manager and Inbox Manager Assistant. For SMS 2003, both Inbox Manager and Inbox Manager Assistant are responsible for writing information from the site server to the CAP (Inbox Manager) and from the CAP to the site server (Inbox Manager Assistant), maintaining the integrity of the data and ensuring that it’s written to the appropriate inbox on the appropriate server.
Inbox Manager copies client component and configuration information, the site assignment list, advertisements, package instructions, and the SMS_def.mof file (hardware inventory definition) to the CAP. It wakes up when the site control file changes and when any inbox is written to or modified, and it reports status messages and logs activity in the Inboxmgr.log file if logging was enabled for this thread.
Inbox Manager Assistant copies client data records from the client inboxes on the CAP (Ccr.box, Ddr.box, Inventry.box, Sinv.box, and Statmsgs.box) to their counterpart inboxes on the site server. It wakes up when an inbox on the CAP has been written to or modified, reports its status messages, and logs activity to the Inboxast.log file on the CAP if logging was enabled for this thread.
For example, the client uses Ddr.box, Inventry.box, and Sinv.box to write discovery data records, hardware inventory files, and software inventory data. The site server uses Clicomp.box, Offerinf.box, and Pkginfo.box to write client configuration parameters, instruction and offer files for advertisements and packages, and package contents and location information.
The amount of time that the CAP installation takes will, of course, depend on your network’s performance level and on whether the installation will need to take place across a WAN connection. As with all site systems, Microsoft strongly suggests that CAPs be located on a LAN or be accessible through a fast and reliable remote connection.
The actual number of CAPs that you create will depend on several factors. Certainly the most significant factor will be the number of Legacy Clients that the site manages and their location within your network. Recall that CAPs provide the main point of contact between the SMS Legacy Client and the SMS site. The CAP provides client component configuration, advertisement, and package information to the Legacy Client, and it records and relays inventory, discovery, and status information from the client. The more Legacy Clients managed, the greater the resource requirement on the CAP. From another perspective, the larger the number of packages and advertisements the site generates, the greater the resource requirement will be at the CAP. In other words, there is no cookie- cutter approach in determining the optimum number of CAPs that should be created. You need to monitor resource usage on the CAP itself (using the Windows Performance console’s System Monitor utility, for example), monitor the network traffic that’s generated (using the SMS Network Monitor, for example), and consider the needs of the site and your organization.
Distribution Points
The distribution point is an SMS site system that stores the package files, programs, and scripts necessary for a package to execute successfully at an SMS client computer. When the site server is installed, it becomes a distribution point by default. As with CAPs, however, you’ll want to assign other site systems as distribution points and remove this role from the site server to reduce its resource requirements and improve its performance as well as to load balance the potentially significant network traffic generated by clients downloading package source files.
BITS-Enabled Distribution Points
Advanced Clients, also known as roaming clients, can take advantage of a new feature called Background Intelligent Transfer Service (BITS). BITS is a service that can be enabled on distribution points that serve Advanced Clients. It’s used to help control the amount of bandwidth used by an Advanced Client during download, as well as to insure that the Advanced Client doesn’t necessarily have to wait a lengthy period for a package while, say, being connected to the network through a slow or unreliable connection. BITS provides a checkpoint restart of a package. If the download of package files is interrupted—the connection is lost accidentally or because the user needs to disconnect—the download can continue at the point it was interrupted once a new connection is established rather than starting over from the beginning.
| Caution | The checkpoint restart will restart the download with the last file that was being accessed at the time the connection was lost. If this was the 10th file out of 20, the download will restart with the 10th file when the connection is reestablished. However, if your package consists of a single executable file such as an .EXE or .MSI file, the download will restart at the beginning, since that was the file that was interrupted. |
The Advanced Client remains assigned to its original site. However, when the Advanced Client needs to retrieve an advertised package, it can download or run the package from a local distribution point, rather than from its assigned site. Remember this when you choose remote servers to be distribution points.
To protect your Advanced Clients from excessive bandwidth consumption, enable BITS on your distribution points that serve Advanced Clients. This provides an efficient file transfer mechanism through client-sensitive bandwidth throttling. It also provides checkpoint restart download of packages, which allows files to be transferred to the client in a throttled manner.
Protected Distribution Points
The protected distribution point is designed to protect network links to distribution points from unwanted traffic. The SMS administrator specifies which roaming boundaries or site boundaries Advanced Clients must be in to use the protected distribution point. Any clients outside those boundaries are unable to download or run packages from that distribution point.
To restrict access to a distribution point that’s across a slow or unreliable network link, plan to enable it as a protected distribution point. This is beneficial at remote locations, where a small number of SMS clients and a distribution point are connected to the primary site by a WAN. For example, consider configuring a protected distribution point on secondary site servers that are connected to their parent primary site by a WAN link.
Distribution points are installed through the SMS Administrator Console as a site system setting.
To assign the distribution point role, follow these steps:
-
In the SMS Administrator Console, navigate to the Site Settings folder and expand it.
-
Highlight the Site Systems folder to display a list of the site systems you have defined.
-
Right-click the site system you want to assign as a distribution point and then choose Properties from the context menu to display the Site Systems Properties dialog box.
-
Select the Distribution Point tab, shown in Figure 3.31. Select the Use This Site System As A Distribution Point check box. If you want to enable BITS, select the Enable Background Intelligent Transfer Service (BITS) check box as well. Then click OK.
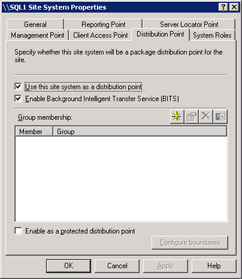
Figure 3.31: The Distribution Point tab of the Site Systems Properties dialog box. -
Click OK again to save this setting and begin the site configuration change process that will set up the new distribution point.
If you want to remove the distribution point role from the site server or disable BITS, right-click the site server and just follow the same procedures as you did to assign a distribution point role to the site system; however, you should clear the Use This System As A Distribution Point or the Enable Background Intelligent Transfer Service (BITS) check boxes (or both) when you’re in the Distribution Point tab.
When you enable the new distribution point, you have identified a change to the site control information for the site. A new site control file will be created according to the process described in the section entitled “The Site Configuration Process Flow” earlier in this chapter. However, no SMS components are installed on the distribution point.
The distribution point is not written to until a package is actually distributed. At that time, the Distribution Manager thread on the site server checks the distribution point for the partition with the most free space. On that partition, it creates a shared folder named SMSPkgx$, where x is the drive letter of the partition. The share is a hidden share—a change from earlier versions of SMS. Then the Distribution Manager component on the site server copies the package and program files to a subfolder beneath SMSPkgx$. If in the course of copying packages to the distribution point, you begin to run low on disk space, the Distribution Manager will find the next partition with the most free space and create another shared SMSPkgx$ folder there. We’ll encounter the Distribution Manager again in Chapter 12, “Package Distribution and Management.”
| Tip | If you want or need to specify where the package files will be copied on the distribution point, create the SMSPkgx$ folder and share yourself. Be sure to give your users at least Read access to the folder and give the SMS Service account Full Control access. Alternately, you can create your own share structure using your own naming conventions on each distribution point (the same structure on each distribution point). Then when you create your package you can reference the appropriate share that you want the package files distributed to. |
You can also use the Distribution Point tab in the Site Properties window to create what are known as distribution point groups. Basically, distribution point groups let you group your distribution points into more manageable units. Packages can then be targeted to a distribution point group rather than to individual distribution points.
To create a distribution point group, follow these steps:
-
In the SMS Administrator Console, navigate to the Site Settings folder and expand it.
-
Highlight the Site Systems folder to display a list of the site systems you have defined.
-
Right-click any site system you have assigned as a distribution point and choose Properties from the context menu to display the Site Systems Properties dialog box.
-
Select the Distribution Point tab, shown in Figure 3.31.
-
In the Group Membership frame, click the yellow star button on the right to display the Distribution Point Group Properties dialog box, as shown in Figure 3.32.
-
Enter the name of the distribution point group you want to create. If you want the site system you selected to be included in the group you’re creating, select the Include This Site System In This Distribution Point Group check box. Then click OK.
-
Click OK again to save this setting and begin the site configuration change process that will set up the new distribution point group.
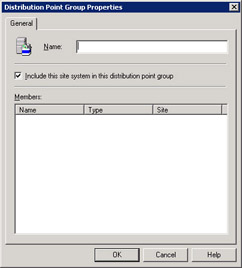
Figure 3.32: The Distribution Point Group Properties dialog box.
Now when you create a new distribution point or display the properties of an existing distribution point site server, any distribution point groups you created will be displayed in the Group Membership list in the Distribution tab of the Site Systems Properties dialog box, as shown in Figure 3.33, and you’ll have the opportunity to include the distribution point in one or more of the distribution point groups.
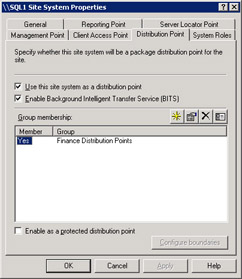
Figure 3.33: The Group Membership list in the Distribution Point tab.
Unlike CAPs, distribution points can be shared among SMS 2003 sites. This sharing enables you to leverage equipment and place distribution points closer to the users and clients that will need to access them. The most significant resource consideration for a distribution point is disk space. Since you’re copying source files and scripts for package installation there, you’ll need enough disk space to accommodate all the packages. The next most significant resource consideration will be network access and traffic. You can use Network Monitor to track and gauge this factor. This tool can also help you determine when an additional distribution point might be necessary. The amount of network traffic that’s generated will depend on the size of your packages, the number of clients accessing the DP to execute a program, and whether you scheduled the package to run at an assigned time.
Management Points
Similar to the relationship between a CAP and a Legacy Client, the management point is an SMS site system that functions as the main exchange point between SMS Advanced Clients and the SMS site server. Components of SMS advanced clients such as the Remote Tools and Hardware Inventory Agent are installed from a management point. Inventory, status, and discovery information that’s collected on an advanced client is written to a management point. Advertisement information and other client instructions are obtained from the management point. When a client receives an advertisement for a program, it will also include a list of distribution points at which the client can find the package files.
Unlike a CAP, when the site server is installed, it doesn’t become a management point by default. This is a role that you’ll assign to other site systems. Several factors might influence the placement and number of management points that you decide to implement. Generally, you choose one server to be the default management point for that site, and that management point will support all your Advanced Clients. However, you might choose to have additional management points for network load balancing or backup purposes—in case the default server is down or unavailable, especially if you have large numbers of Advanced Clients that need to be supported.
When you configure the management point role, you’ll notice reference to a SQL database. Again, since typically you’ll have one management point implemented, it will use the data in the SMS site database. However, if you do need to implement additional management points, you might choose to off-load some of the SQL Server resource requirements for the management point from the SMS site database to a replicated copy of the site database, perhaps installed on the management point itself.
Management points are installed through the SMS Administrator Console as a site system setting. To assign the management point role, follow these steps:
-
In the SMS Administrator Console, navigate to the Site Settings folder and expand it.
-
Highlight the Site Systems folder to display the list of site systems you have defined.
-
Right-click the site system you want to assign as a management point and then choose Properties from the context menu to display the Site Systems Properties dialog box.
-
Select the Management Point tab, as shown in Figure 3.34. Select the Use This Site System As A Management Point check box.

Figure 3.34: The Management Point tab of the Site System Properties window. -
From the Database drop-down list, select the Use The Site Database option if the management point should access the SMS site database for reading and writing client data. Select the Use A Different Database option and supply the requested information if the management point should access a database other than the SMS site database—for example, if the server is to be an management point for a secondary site that doesn’t have its own site database or if you have replicated the SMS site database to another SQL server for load balancing or failover.
-
Click OK, then, if prompted, click Yes, to save these settings and begin the Site Control Manager process that will set up the new management point.
If you want to remove the management point role from the site server, right- click the site server and just follow the same procedures as you did to assign an management point role to the site system; however, you should clear the Use This Site System As A Management Point check box when you’re in the Management Point tab.
As with other site systems, when you enable a new management point, you have identified a change to the site control information for the site. A new site control file will be created according to the process described in the section entitled “The Site Configuration Process Flow” earlier in this chapter. Recall that during that process, after the new site control file is generated, other components wake up and read the file to determine whether they need to perform any tasks. As with other site systems, Site Component Manager is responsible for the setup of a management point.
The SMS Agent Host (Ccmexec.exe) is loaded and started and is used to provide change and configuration management services. Two directories are created on the new management point. The folder %Systemroot%\System32\CCM is created and is the location for the agent support files. This folder acts as the “clearinghouse” for data provided to the client and received from the client.
Management Point Component Configuration
In addition to assigning the management point role to a site system, you also have the option of configuring the default settings for the management point role function. You can do this through the Management Point Component configuration properties by completing the following steps:
-
In the SMS Administrator Console, navigate to the Site Settings folder and expand it.
-
Highlight the Component Configuration folder to display the list of SMS components that you can configure.
-
Right-click the entry Management Point and choose Properties from the context menu to display the Management Point Properties dialog box, as shown in Figure 3.35. If there is to be no default management point, select the option None. If you want to name a default management point for the site, select the option Management Point and select the name of the site system that will function as the default management point. If you’d like the management point to be a Network Load Balancing (NLB) virtual cluster rather than a physical server, select the option Network Load Balancing Cluster Virtual Server and enter the cluster server’s virtual IP address.
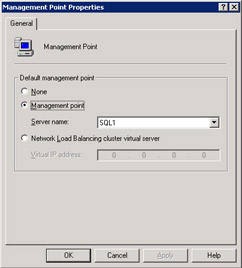
Figure 3.35: The Management Point Properties dialog box. -
Click OK to save these settings.
The site control information will then be updated to reflect your component configuration choices.
Proxy Management Points
Advanced Clients located at a secondary site and reporting to a management point at a parent primary site across a WAN link might have an effect on the available bandwidth of the WAN link between the secondary site and its parent primary site. Significant network traffic can be produced when client status and hardware or software inventory data is sent to the parent primary site. Because an Advanced Client can be assigned only to a primary site, network traffic generated by Advanced Client policy requests also reduces the available bandwidth between the two sites.
Installing a proxy management point at the secondary site can significantly reduce the effect on available network bandwidth created by Advanced Clients located within that site’s roaming boundaries or site boundaries. Advanced Clients send inventory data, software metering data, and status data to the proxy management. The proxy management point uses the site’s sender functionality to transfer the data to the parent primary site. By using the sender’s bandwidth control functionality, you can specify when the data is sent to the primary. The proxy management point also caches some Advanced Client policy information. Advanced Clients obtain this Advanced Client policy information from the proxy management point, rather than from the management point at the primary site.
Component Server
Any site system that runs the SMS Executive is considered a component server. As we’ve seen, the CAP is also considered a component server for this reason. The other type of component server that you might define in your site would support the site server by running senders. Senders are communication routines used by one site server to contact another site server in a site hierarchy to transfer information. For example, a child site will send inventory data, discovery data, status messages, and site control information to its parent through a sender. A parent site will send package information, advertisements, collections, and configuration data to its child sites through a sender.
When a sender is installed on another Windows server, the SMS Executive and all required support files for that sender are copied to the server and the server becomes a component server—a site system for that SMS site. The best example of using a component server effectively in a production environment is when a Remote Access Service (RAS) server connection is required or is available as an alternative connection mechanism between two sites. It would probably not be practical or advisable to install the SMS site server on the RAS server. The combined resource requirement would no doubt result in reduced performance. So with RAS on one server and SMS on another, you could install the RAS server with an SMS RAS sender, making it a component server for the SMS site. Outside of this scenario, the network traffic that might be generated between the site server and the component server (depending on the size and number of packages, advertisements, and so on) might counterbalance any benefit derived from having the additional sender capability. We’ll discuss senders more closely in Chapter 4.
Reporting Points
A reporting point is a site server that stores the report files used for the Web- based reporting feature in SMS 2003. Since a reporting point can communicate only with the local site database, this role can be used only within primary sites. In a large site hierarchy, you might consider placing reporting points at each site in hierarchy for access by specific users within those sites, or higher up in the hierarchy so that information about several sites can be reported on.
Reporting points are installed through the SMS Administrator Console as a site system setting. To assign the reporting point role, follow these steps:
-
In the SMS Administrator Console, navigate to the Site Settings folder and expand it.
-
Highlight the Site Systems folder to display the list of site systems you have defined.
-
Right-click the site system you want to assign as a reporting point and then choose Properties from the context menu to display the Site Systems Properties dialog box.
-
Select the Reporting Point tab, as shown in Figure 3.36. Select the Use This Site System As A Reporting Point check box. The Report Folder text box displays the name of the folder created on this site system where the report information will be stored. Recall that IIS must be installed and enabled on the site system to support the reporting point role. SMS creates the folder under \Inetpub\wwwroot beneath the site server root. The name of the folder is also used as the name of the virtual directory, as displayed in IIS. The URL text box displays the Uniform Resource Locator (URL) used to access reports as determined by the Report Folder name.
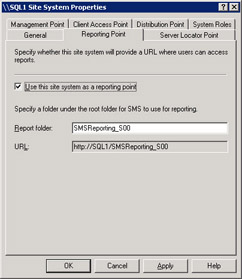
Figure 3.36: The Reporting Point tab of the Site System Properties dialog box. -
Click OK to save these settings and begin the Site Control Manager process that will set up the new Reporting Point.
If you want to remove the reporting point role from the site server, right-click the site server and just follow the same procedures as you did to assign the reporting point role to the site system; however, you should clear the Use This Site System As A Reporting Point check box when you’re in the Reporting Point tab.
As with other site systems, when you enable a new reporting point, you have identified a change to the site control information for the site. A new site control file will be created according to the process described in the section entitled “The Site Configuration Process Flow” earlier in this chapter. Recall that during that process, after the new site control file is generated, other components wake up and read the file to determine whether they need to perform any tasks. As with other site systems, Site Component Manager is responsible for the setup of a reporting point. The SMS Reporting Point Service is loaded and started, and the Report Folder is created under the IIS folder structure.
Server Locator Points
A server locator point is used to implement a client installation point for Legacy or Advanced Clients when using a logon script to initiate client installation or to provide autoassignment of Advanced Clients to a site when the Active Directory schema has not yet been extended. Like the reporting point, a server locator point communicates directly with the local site database and is in contact only with the sites beneath it in the SMS site hierarchy. Consequently, this role can’t be assigned to site systems in a secondary site. Server locator points support the client installation process by locating a CAP or management point for the client to connect to to receive component installation files.
Typically, you install the server locator point at the central site. If the server locator point creates too much load at the central SMS site database, you have the option to use a replicated SQL Server database for that site. If there are excessive client requests, causing excessive traffic on a single server locator point, you can set up multiple server locator points at the central site, but this is not generally recommended.
Server locator points are installed through the SMS Administrator Console as a site system setting. To assign the server locator point role, follow these steps:
-
In the SMS Administrator Console, navigate to the Site Settings folder and expand it.
-
Highlight the Site Systems folder to display the list of site systems you have defined.
-
Right-click the site system you want to assign as a server locator point and then choose Properties from the context menu to display the Site Systems Properties dialog box.
-
Select the Server Locator Point tab, as shown in Figure 3.37. Select the Use This Site System As A Server Locator Point check box.
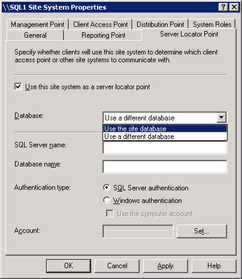
Figure 3.37: The Server Locator Point tab of the Site System Properties dialog box. -
From the Database drop-down list, select the Use The Site Database option if the server locator point should access the SMS site database for reading and writing client data. Select the Use A Different Database option and supply the requested information if the server locator point should access a database other than the SMS site database—for example, if you have replicated the SMS site database to another SQL server for load balancing or failover.
-
Click OK to save these settings and begin the Site Control Manager process that will set up the new server locator point.
If you want to remove the server locator point role from the site server, right- click the site server and just follow the same procedures as you did to assign a server locator point role to the site system; however, you should clear the Use This Site System As A Server Locator Point check box when you’re in the Server Locator Point tab.
As with other site systems, when you enable a new server locator point, you have identified a change to the site control information for the site. A new site control file will be created according to the process described in the section entitled “The Site Configuration Process Flow” earlier in this chapter. Recall that during that process, after the new site control file is generated, other components wake up and read the file to determine whether they need to perform any tasks. As with other site systems, Site Component Manager is responsible for the setup of a server locator point. The SMS Server Locator Point service is loaded and started, and a SMS_SLP support virtual directory is created under the IIS default Web site structure. This virtual directory points to \Sms\Bin\i386\ SMS_SLP.
|
| < Day Day Up > |
|
EAN: 2147483647
Pages: 178