3.1 Starting the Debugger
The debugger's job is to allow us to examine a running program's behavior so that we can pinpoint faulty code. In order to debug a program, Visual Studio .NET must attach to that program as the debugger, meaning that it takes control of the program's execution. Once attached, a debugger can stop and start any thread, and it can examine the program's state. In fact, VS.NET goes beyond simple observation and allows us to modify the state and even the flow of execution. A program can be attached to in three ways: launching the program from within Visual Studio .NET, attaching to an existing process, and just-in-time (JIT) debugging. 3.1.1 Launching to Debug The simplest way to attach Visual Studio .NET's debugger to a program is to start the program using Debug When VS.NET is debugging, you will be able to suspend the debuggee's execution either by setting breakpoints (as described later) or with Debug 3.1.2 Attaching to a Running Process You do not need to launch the program from within Visual Studio .NET in order to debug it: it is possible to attach to a program that is already running. Debug Figure 3-1. Attaching the debugger to a running process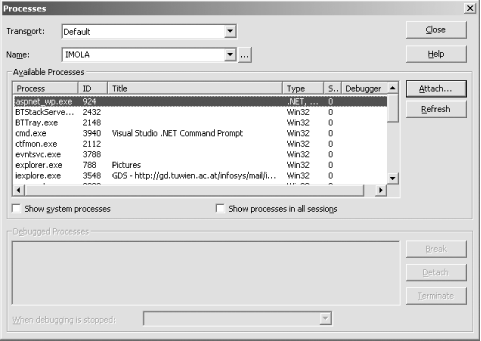 By default, this dialog will show the processes running in the interactive user 's session on the local machine. The Name field allows you to choose a different machine. (See Section 3.5.4, later in this chapter, for more information on remote debugging.) Two checkboxes allow you to display system processes and processes running in other user sessions (for multiuser systems such as Windows XP and Terminal Services), but for most applications, the default filtered list will show everything you need to see. If you select a process from the list and click the Attach... button, the dialog shown in Figure 3-2 will appear. Figure 3-2. Specifying program types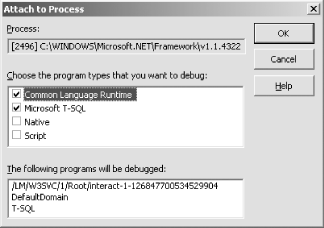 This illustrates one of Visual Studio .NET's most interesting debugging features. Not only can it debug radically different technologies such as managed .NET code and SQL Server-stored procedures (the Common Language Runtime(CLR) and Microsoft T-SQL options, respectively), it is capable of managing all of these within a single debugging session. This means that if a C# program connects to a database and executes a stored procedure, Visual Studio .NET will let you step through both the C# code and the stored procedure in the same debugging session. Visual Studio .NET supports four different "program types." These are CLR (.NET), T-SQL (SQL Server 2000 stored procedures), Native (classic Win32), and Script (COM scriptinge.g., classic ASP or client-side script in a web application). You can choose almost any combination of these whenever you attach to a process; the only limitation is that Native and Script are mutually exclusive. However, you should select only the types that you actually require. In particular, do not select Native unless you need it. Native programs are classic Win32 executables, and if you select this mode, you may not be able to detach the debugger without terminating the process. (Under Windows XP this problem will not occuryou will normally be able to detach nondestructively. But under Windows NT 4.0 or Windows 2000, unless you have installed the DbgProxy service, detaching from a native session will end the process.) Also, be aware that debugging with both native and CLR modes enabled tends to be rather slow. The bottom half of the Attach to Process dialog box shows which programs will be debugged if you proceed. This is useful because it shows which program types are currently running in your selected process. Figure 3-2 shows a typical list for the ASP.NET worker process, and we can see that it is using the .NET runtimetwo AppDomains are shown. DefaultDomain is ASP.NET's main AppDomain, but because ASP.NET isolates each web application in its own AppDomain, we can see a second, the /LM/W3SVC entry, listed here. Also note that there is a T-SQL entry in the list, which tells us that this process is connected to a SQL Server database. Compare this to Figure 3-3, which shows the same dialog for a command prompt process. The CLR, T-SQL and Script program types have all been selected, but the list of programs that will be debugged is empty, indicating that the process is not in fact using any of these program types. (You will still be allowed to attach Visual Studio .NETit will simply assume that the specified program types are not in use yet but will be at some point in the process's future.) Figure 3-3. Inappropriate program type choices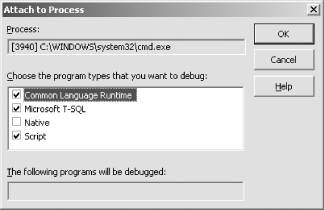 Once you have chosen the program type(s) and clicked OK, VS.NET will return to the Processes dialog. Before you close it, you have the option to configure the default behavior when stopping the debuggerthe combo box at the bottom of the window lets you choose between terminating the process and just detaching. 3.1.3 Just-in-Time DebuggingThe final way of attaching Visual Studio .NET to a process is the mechanism known as just-in-time debugging. [2] This feature of Windows is designed to allow debuggers to be attached to programs that have failed. When a program exhibits some fatally erroneous behavior, such as throwing an unhandled exception, Windows will run the JIT debugging handler specified in the registry (see the Just-in-Time Debugging Registry Settings' sidebar). On systems with Visual Studio .NET installed, this will result in the dialog shown in Figure 3-4 being displayed.
Figure 3-4. Just-in-time debugger selection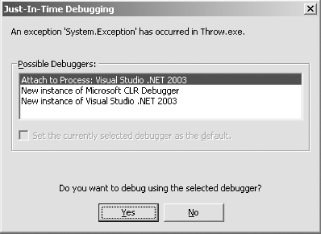 This dialog displays a list of suitable debuggers. The first choice it has given us is an instance of Visual Studio .NET that happens to be running. This can be very useful if you already have an appropriate solution loaded. (This is particularly helpful if you launched a program from within VS.NET without attaching the debugger using Debug If you choose to debug using Visual Studio .NET from the Just-in-Time Debugging dialog box shown in Figure 3-4, you will be presented with the program type selection dialog box shown in Figure 3-2, just as if you had attached to the process using the Debug With Visual Studio 2002, you can configure a machine to support remote Just-in-time debugging. You can run the following command on the machine on which you will run the target application: \Program Files\Common Files\Microsoft Shared\VS7Debug\mdm.exe /remotecfg This lets you select which machines will be given the opportunity to debug when a program crashes. You must choose machines that have Visual Studio .NET installed. However, this feature was dropped in Visual Studio 2003 as part of a drive to improve the security of remote debugging. This does not prevent you from debugging remote systems; it simply means that you must attach the debugger to the remote executable before it crashes, rather than relying on JIT debugging. 3.1.3.1 JIT debugging in Windows Forms applications.NET Windows Forms applications add an extra complication to JIT debugging. The Windows Forms event-handling loop catches all unhandled exceptions and displays its own error dialog, allowing users to either continue or quit. Neither of these options will start JIT debuggingselecting Continue causes the application to ignore the error, and Quit simply exits. This can be inconvenient for debugging, so it is possible to disable this behavior. You can enable JIT debugging in a Windows Forms application by adding an entry to the application's configuration file. (If the application is called Appname.exe , its configuration file must be in the same directory, and its name must be Appname.exe.config .) If you wish to enable JIT debugging for an application that does not currently have a configuration file, simply use the file shown in Example 3-1Chapter 3. If the application already has a configuration file, you can simply add the <system.windows.forms jitDebugging="true"/> element underneath the main <configuration> element. The presence of this element will cause Windows Forms applications to start JIT debugging just like any other application when an unhandled error occurs. If you want to enable JIT debugging for all Windows Forms applications on your development machine, you can modify your machine.config file. This file can be found in the CONFIG subdirectory of your .NET Framework installation directory, which is typically beneath %SystemRoot%\Microsoft.NET\Framework . If you search the standard machine.config file for system.windows.forms , you will find that it already has a suitable element, which has been commented out. If you uncomment the element and set its jitDebugging attribute to true (it is false by default), this will enable JIT debugging for all Windows Forms applications on the whole machine, so you will not need to create or modify individual applications' configuration files. 3.1.4 ASP.NET Debugging ASP.NET applications are special in that they don't run in their own process. Each application runs in its own AppDomain in the ASP.NET worker process. (With Internet Information Services (IIS) Version 5, the worker process is aspnet_wp.exe . On future versions of Windows, this is likely to change.) Fortunately, Visual Studio .NET knows about ASP.NET. If you create a web project, Debug All .aspx pages begin with an @Page directive. You can supply a Debug attribute for this directive, indicating whether the generated code should be compiled with debugging enabled. This should be set to true to enable debugging of the page: <%@ Page language="C#" Debug="true" %> You can also configure this on an application-wide level. If a particular page does not have the Debug attribute, ASP.NET will use the setting in the web.config file. The application debug setting is contained in the <compilation> element, underneath the <system.web> element. The configuration file in Example 3-1 enables debugging for pages that don't explicitly disable it with the Debug attribute. Example 3-1. Enabling debugging in ASP.NET applications<configuration> <system.web> <compilation debug="true"/> </system.web> </configuration> These settings apply only to code generated by ASP.NET. Visual Studio .NET web projects usually contain a certain amount of precompiled code in codebehind pages, deployed on the web server as a . dll in the application's bin directory. To enable debugging of this code, you must make sure that you build the Debug configuration of the project. (By default, new projects will build the Debug configuration.)
3.1.5 Client-Side Script DebuggingAlthough you can debug ASP.NET pages, you will find that if you attempt to debug client-side script code in an .aspx file, nothing seems to work. On the face of it, VS.NET appears to support server-side debugging for only .aspx files. However, debugging client-side script is entirely possible in VS.NET; it is just a little more involved. The problem with debugging client-side script is that the web browser does not get to see a server-side file (e.g., the .aspx file)it gets to see the response generated by that file. Since client-side script executes in the web browser, you cannot debug client-side script directly in the .aspx file. Instead, you must debug the response that the client browser is working from (i.e., the output of the .aspx page, not the .aspx page itself). In order to debug client-side script, you must first enable script debugging in Internet Explorerit is disabled by default. From Internet Explorer's Tools menu, select Internet Options, and choose the Advanced tab in the dialog that appears. This will display a list of configuration options. Find the Disable Script Debugging checkbox. Make sure that this box is not checked. Script debugging will now be enabled.
Once IE script debugging is enabled, when you debug an ASP.NET application, VS.NET will be able to show you all of the active HTML files that the browser currently has loaded. This list is shown in the Running Documents tool window, which can be opened with Debug Figure 3-5. The Running Documents window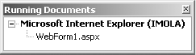 By default, Visual Studio .NET will show only documents loaded by the instance of Internet Explorer that it launched for this debug session. (If you want to see documents in other instances of IE, you can attach the debugger to those processes.) In Figure 3-5, only one document is shown, but if the web application were using frames , there would be one item for each file in the frameset. If you double-click on a file in the Running Documents window, VS.NET will display the contents of the page as Internet Explorer sees them. (This is the same text that you would see if you selected View Source in IE itself.) This will be similar to, but not quite the same as, the underlying .aspx filethe static content will be the same, but any dynamic items (e.g., runat =server tags or <% ... %> script blocks) will have been replaced with their evaluated content. But you will now be able to use debugging features described in this chapter, such as breakpoints and single-stepping , on all of the client-side script on the page. |
 Start (F5). The program will start to execute as normal, but the development environment will change its appearance somewhat. VS.NET remembers two versions of your window and toolbar layouts, one for normal editing and one for debugging. This is useful, not only because you tend to need different tool windows open when debugging, but also because it makes it easy to tell that a debug session is in progress simply by looking at the screen layout.
EAN: 2147483647
Pages: 147