F.2 Generic Settings
| Two categories of settingsGeneral and Tabsare present in all languages.
Visual Studio .NET allows you to specify these settings on a per-language basis. However, if you want to use the same settings for these two categories in all languages, you can do so using the Text Editor The General and Tabs categories contain settings for common editor services. However, some languages do not use all of these services. For example, the General setting lets you configure IntelliSense, but the Plain Text "language" (used for editing .txt files) cannot support this feature. In such cases, the relevant checkboxes will be grayed out. F.2.1 GeneralThe configuration panel for the General settings presents three groups of settings: Statement Completion, Settings, and Display. Here is a summary of the General settings:
The first group , Statement Completion, contains three IntelliSense- related settings. The first (Autolist Members) determines whether Visual Studio .NET will display a pop-up list of members in appropriate scopes. With this option enabled, a member list will automatically appear in C# and VB.NET projects if you type a variable or class name followed by a period (.). (In C++ it will appear after typing in either a period, the The second IntelliSense-related setting is Hide Advanced Members. This determines which members will be displayed on the member list. If this is enabled, certain items will be hidden when the member list is displayed. It is up to each individual language service to decide what constitutes an "advanced" member to be hidden. VB.NET is the most interesting language since it hides the most. Consider the following class definition: Public Class TestHidden Public Sub Foo( ) End Sub Private Sub Quux( ) End Sub End Class When Hide Advanced Members is turned on, the member list (see Figure F-1) shows only the Foo member function and the GetType function, which is defined by the base type ( System.Object ). If Hide Advanced Members is turned off, we will also see all of the functions that are inherited from the base class, as Figure F-2 shows. Note that in both cases, only the public members are shownthe member list will show only members that are in scope. (The private member Quux would have been visible if we had tried to display the member list from inside the TestHidden class itself.) Figure F-1. Hide Advanced Members on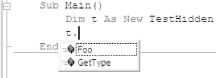 Figure F-2. Hide Advanced Members off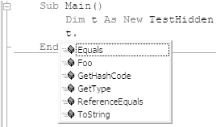 Although VB.NET makes its own decisions about which members of intrinsic types such as System.Object are advanced, we can influence its decisions with our own types. The .NET Framework Class Library defines a custom attribute called EditorBrowsable , which is defined in the System.ComponentModel namespace. We can use this to indicate that particular members of our classes are advanced. We can modify our TestHidden example to use this: Imports System.ComponentModel Public Class TestHidden <EditorBrowsable(EditorBrowsableState.Advanced)> _ Public Sub Foo( ) End Sub Private Sub Quux( ) End Sub End Class This marks the Foo method as being advanced. VB.NET will no longer display this item in member lists if the Hide Advanced Members option is selected. VB.NET and C# are the only languages that support the Hide Advanced Members settingit is grayed out for all other languages. VB.NET has it turned on by default, while in C# it is turned off by default. Even if you turn it on for C#, the behavior you get is not quite the same as for VB.NET. C# considers a member to be advanced only if it has had the relevant EditorBrowsable attribute applied, so unlike VB.NET it will not hide members of the System.Object class. Also, C# honors the EditorBrowsable attribute only on classes defined in external componentsit is ignored for classes in the same project. Hide Advanced Members can be selected even if Autolist Members is deselected. This is because even though Autolist might be turned off, the list of members of a type can still be displayed by pressing Ctrl-J or Ctrl-Space. The third IntelliSense-related setting is Parameter Information. When this option is selected, the parameter information for a particular function is automatically displayed when the function delimiter (in most cases the left parenthesis) has been typed in. The parameter information can be displayed at any time by using the Ctrl-Shift-spacebar shortcut while the cursor is inside a parameter list, regardless of whether this setting is enabled. The second group of options in the General category is under the heading Settings. It contains two settings that affect the way you see and type text. The first, Enable Virtual Space, is off by default. If you turn this setting on, you will be able to place the cursor beyond the end of the line of code you are typing on. The space between the end of the line of code and the new placement of the cursor is automatically filled in with whitespace. This is similar to Microsoft Word's click-and-type feature. The second option under Settings turns word wrap on or off. (Again, it is off by default.) When this option is enabled, any text that would appear beyond the righthand side of the text editor window is automatically placed on the next line. VS.NET does not insert line-feed characters in the text to achieve thisthis option merely changes how overly long lines are displayed. The General category's third group of options is labeled Display. (It's not entirely clear what the distinction between Settings and Display is supposed to be. Word wrap is a display feature, despite appearing in Settings, and some of the items in Display modify the editor's behavior!) The first item, Line Numbers, determines whether numbers are shown on the lefthand side of the text editor pane (between the indicator margin and the selection margin). If Enable Single-click URL Navigation is on, a single-click on a URL in the text editor will follow the URL. If disabled, you have to right-click on the URL and select Navigate to URL. (The text editor supports this behavior for any text that looks plausible as a URL, regardless of context.) The last option, Navigation Bar, determines whether a class and member navigation bar is displayed at the top of the text editor. The navigation bar is described in Chapter 2. F.2.2 TabsThe second category of text editor settings available in all languages is the Tabs category. Here is a summary of the Tabs settings:
The first setting, Indenting, controls the behavior of the editor when you press the Enter key. It can be set to None, Block, or Smart. When set to None, the text editor never indents automatically. When set to Block, the text editor indents new lines by the same amount as the preceding line. The most helpful indentation setting is Smart. This setting uses the current language service to provide context-sensitive indentation. For example, in a C# file, when you press Enter after an open brace ( { ), the language service tells the text editor to indent the new line by more than the preceding one. And when you type a closing brace, the editor (under the guidance of the C# Language Service) locates the line containing the corresponding opening brace and indents the closing brace by the same amount as the opening one. (It also reformats all of the code in between to fix its indentation if necessary.) The next pair of settings (which are under the Tabs heading) allows you to control tab sizes. The first value, Tab Size determines the number of spaces between tab stops when a tab character is used. (Remember that a tab character does not insert a fixed number of spaces; it merely advances to the next tab stop.) By default, tab stops are 4 characters apart.
The second text box in the Tabs section of the Tabs category is Indent Size. This determines the spacing that Visual Studio .NET will use when you press the Tab key or when smart indenting decides to insert a tab in some code for you. (Again, the default is 4.) This setting is entirely independent of Tab Size. Tab Size controls how tab characters will be displayed; Indent Size controls how Visual Studio .NET will format your code. (Just because your system may be configured to display tabs as 4 characters wide, you are not required to format your code in 4-character columns .) Visual Studio .NET will not necessarily insert a tab character when you press the Tab key or when it performs automatic indentation. For one thing, you may have chosen an Indent Size that is incompatible with the Tab Size. (For example, if you like to format your code with 3-space indentation, this style does not line up very well with either 4-character or 8-character tab stops.) But when use of tab characters is an option, VS.NET will insert them if you want it to.
If you choose the Insert Spaces radio button, Visual Studio .NET will never generate any tab characters. All indentation will be done entirely with spaces. This has the advantage that your files will look the same in any text editor. It has the slight disadvantage of making your files larger. The alternative is to select Keep Tabs. This will cause Visual Studio .NET to generate tab characters whenever possible. If your Indent Size setting is not an exactly multiple of your Tab Size setting, VS.NET will use tab characters when possible and fall back to spaces otherwise . For example, suppose you use 3-space indentation with 4-character tab stops. If your current indentation level is 15 columns, VS.NET will insert 3 tabs to form the first 12 columns, followed by 3 spaces to make it up to 15.
|

 All Languages folder.
 EAN: 2147483647
Pages: 147