Creating Collections
The default collections provide some basic resource groupings, but these will not always be the best way to manage your resources, especially when it comes to advertising package programs to SMS clients. Instead, you can create your own collections, grouping together your resources in as many logical units as makes sense within your SMS site or site hierarchy.
Part of creating a collection involves defining who the collection members will be using membership rules. Recall that a collection's membership rules can be either direct, a manual method that requires more maintenance, or query-based, which provides greater flexibility and less maintenance. In this section, we'll look at how to create collections with both types of membership rules.
Creating a Direct Membership Collection
To create a direct membership collection, follow these steps:
- Navigate to the Collections folder in the SMS Administrator Console.
- Right-click on the Collections folder, choose New from the context menu, and then choose Collection to display the Collection Properties window, shown in Figure 11-1.
- On the General tab, enter a descriptive name for your collection along with a descriptive comment if you like.
- Click on the Membership Rules tab, and click the Direct Membership button (the PC with the yellow star) to launch the Create Direct Membership Rule Wizard. Figure 11-2 shows the Create Direct Membership Rule Wizard welcome screen.
- Click Next to display the Search For Resources screen, shown in Figure 11-3. Select the resource class for the resource you want to add to the collection. On the Resource Class list, the User Group Resource and User Resource options will let you add members discovered by the Windows NT User Account Discovery and Windows NT User Group Discovery methods. The System Resource option relates to discovered computers. The IP Network Resource option relates to IP-addressable devices discovered through the Network Discovery method. For this example, select System Resource.
- Select the resource attribute on which you will base your membership choice. Attributes include resource name, resource ID, IP information, domain information, and so on. The attributes listed reflect the discovery data collected for that class of resource. For this example, specify Name.
- Enter the appropriate attribute value to look for when selecting members for this group. The % sign is a wildcard character. In this case, we are looking for all computers whose name begins with the letter "S."
- Click Next to display the Collection Limiting screen, shown in Figure 11-4. From this screen, you specify which existing collection to use to look for the resources you identified. You can leave the field blank if you have sufficient permissions to search the entire SMS database. Otherwise, you must enter the name of a collection that you have permissions to view.
- Click Next to display the Select Resources screen, as shown in Figure 11-5. This screen shows a list of the resources that match your membership criteria—in this case, a list of all the computer names that begin with the letter "S." Select the resources you want to include in the collection.
- Click Next to display the Completing The Create Direct Membership Rule Wizard screen, shown in Figure 11-6. You can also click the Back button to review or change your settings. Review your choices and then click Finish.
- The resources you selected will now appear on the Membership Rules tab of the Collection Properties window, as shown in Figure 11-7.
- In step 8 you specified a collection to use to look for resources you identified. On the Membership Rules tab, the Update This Collection On A Schedule check box indicates the frequency with which Collection Evaluator will browse the collection you specified to see if the resource still exists. If the resource is no longer a member of the specified collection, it will be removed from this new collection. Collection Evaluator is the SMS thread component that performs collection management tasks such as updating or refreshing collection data. By default, the collection will be updated once every two hours. Click the Schedule button to modify the collections update schedule.

Figure 11-1. The Collection Properties window.
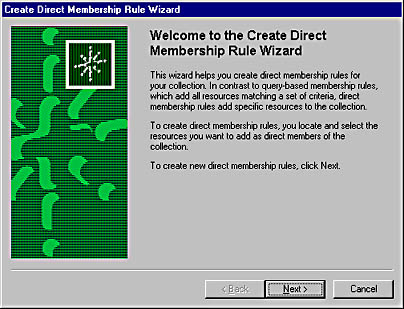
Figure 11-2. The Create Direct Membership Rule Wizard welcome screen.
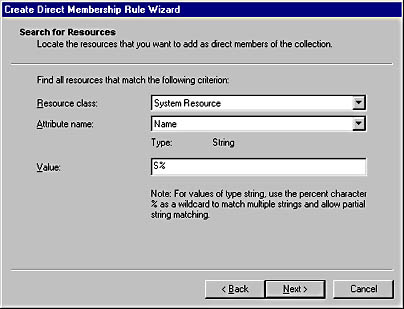
Figure 11-3. The Search For Resources screen.

Figure 11-4. The Collection Limiting screen.
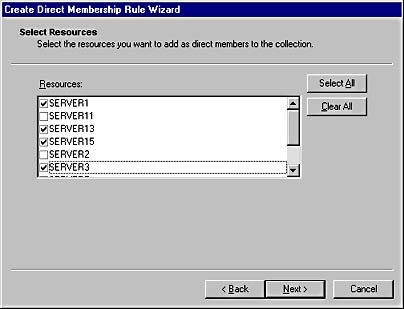
Figure 11-5. The Select Resources screen.

Figure 11-6. The Completing The Create Direct Membership Rule Wizard screen.

Figure 11-7. The Membership Rules tab of the Collection Properties window.
![]()
NOTE
The minimum update interval is every 15 minutes. If you specify an update interval of less than 15 minutes, the collections won't be updated at that interval. In addition, if you change the membership update schedule, the first evaluation will have a delay up to 15 minutes.
- Click OK to create the collection and add it to the Collections folder.
The Advertisements tab of the Collection Properties window lists all advertisements that have targeted that collection. The Security tab lets you specify who can access this collection—and collections in general—and to what extent they can administer the collections. Security will be discussed in detail in Chapter 17.
Creating a Query-Based Collection
To create a query-based collection, follow these steps:
- Navigate to the Collections folder in the SMS Administrator Console.
- Right-click on the Collections folder, choose New from the context menu, and then choose Collection to display the Collection Properties window, shown in Figure 11-1.
- On the General tab, enter a descriptive name for your collection along with a descriptive comment if you like.
- On the Membership Rules tab, click the Query Rules button (the database with the yellow star) to display the Query Rule Properties window, shown in Figure 11-8.
- On the General tab, enter a name for your query, or click Browse to choose from a list of existing SMS queries.
- Select the resource class for a set of related objects you want to add to the collection. The Systems Resource option is selected by default. In the Collection Limiting section, select Limit To Collection if you want to narrow the query to a specific collection's membership. Click Browse to select from a list of existing collections.
- Click Edit Query Statement to display the Client Query Statement Properties window, shown in Figure 11-9.
- On the General tab, you'll notice that you do not have the ability to create or modify a Query Results window. This is because the query is being used to populate a collection membership instead of displaying resource attributes.
- Select the Criteria tab, as shown in Figure 11-10, where you can define how to populate the collection.
- Click the New button (the yellow star) to display the Criterion Properties window, shown in Figure 11-11.
- Select the criterion type. The available choices are Null Value, Simple Value, Attribute Reference, Subselected Values, and List of Values. (See Chapter 15 for a description of each criterion type.)
- Click the Select button to define the attribute class and attribute on which you are basing the query.
- Select an operator and enter a value appropriate to the attribute class and attribute you defined, or click Values to make your selection from a list of values recorded in the SMS database. When you have finished, click OK.

Figure 11-8. The Query Rules Properties window.

Figure 11-9. The Client Query Statement Properties window.

Figure 11-10. The Criteria tab.

Figure 11-11. The Criterion Properties window.

CAUTION
String values require an exact value entry. If you wish to use a wildcard character, use the operator Is Like or Is Not Like, and then use the percent sign (%) like you see in Figure 11-11 or one of the other wildcard characters described in Chapter 15.
- Repeat steps 10 through 13 to add selection criteria.
![]()
NOTE
As mentioned, a collection can be mixed—that is, it can contain computers, users, and groups.
- Click OK to return to the Query Rule Properties window. Click OK again to return to the Collection Properties window.
- Click on the Membership Rules tab, shown in Figure 11-12. Select the Update This Collection On A Schedule option to define the frequency at which you want Collection Evaluator to run the query and update the collection. By default, the collection will be updated once every two hours.
- Click OK to create the collection and add it to the Collections folder.
As with direct membership collections, the Advertisements tab of the Collection Properties window lists all advertisements that have targeted that collection. The Security tab lets you specify who can access this collection—and collections in general—and to what extent they can administer the collections. Security will be discussed in detail in Chapter 16.

Figure 11-12. The Membership Rules tab.
Creating Subcollections
When a collection has one or more subcollections associated with it, any actions (such as advertisements) performed on the collection can also be performed on the subcollection. However, each subcollection is still its own collection and as such is governed by its own membership rules. Placing them as subcollections within a new collection provides a way to link different collections rather than as a method of nesting collections.
Suppose a particular business unit can be further subdivided into smaller units. Management Information Services (MIS), for example, might be divided into various support areas—say, PC Support, Network Support, and Server Support. Let's say that you create a collection for each of these groups—MIS, PC Support, Network Support, and Server Support. The last three collections could become subcollections of the MIS collection. This reclassification enables you to advertise packages to the MIS collection, which includes the members of the three subcollections. If you don't need to hit all the collections, you can opt not to when you create the advertisement. And you still have the ability to advertise to each collection directly.
To link one collection to another, thus creating a subcollection, follow these steps:
- Navigate to the Collections folder in the SMS Administrator Console and expand it.
- Right-click on the collection that you want to associate with a subcollection, choose New from the Context menu, and then choose Link To Collection to display the Browse Collection dialog box, shown in Figure 11-13.
- The Browse Collection dialog box contains a list of all the available collections. Select the collection you want to add as a subcollection—and then click OK.

Figure 11-13. The Browse Collection dialog box.
You can easily view which collections have subcollections and what those subcollections are by expanding the collection entries in the SMS Administrator Console, shown in Figure 11-14. In this example, the Scruffy Clients collection has a subcollection named Finance that itself has a subcollection named All Windows 3.1 Systems, which is one of the default collections.

TIP
Subcollections of a collection can be viewed by clicking the plus sign (+) preceding the collection name.
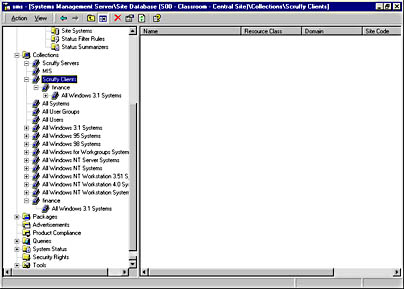
Figure 11-14. Viewing subcollections in the SMS Administrator Console.
Unlinking Subcollections
If you need to "un-link" a subcollection to reorganize your collection structure, follow these steps:
- Navigate to the Collections folder, expand it, and highlight the subcollection you want to delete.
- Right-click on the subcollection, and then choose Delete from the context menu to initiate the Delete Collection Wizard, as shown in Figure 11-15.
- Verify the subcollection name, and then click Next to display the Delete Collection Instance screen, as shown in Figure 11-16.
- Select Yes to delete this instance of the collection. Note that you will be deleting only this instance of the collection. You will not delete any other instance of the same collection that appears elsewhere in the Collections folder.
- Click Next and then click Finish. The Collections folder will be refreshed, and the subcollection will no longer be displayed or linked.
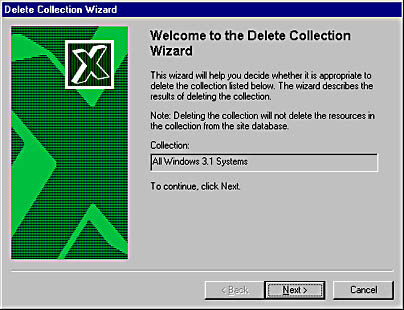
Figure 11-15. The Delete Collection Wizard welcome screen.
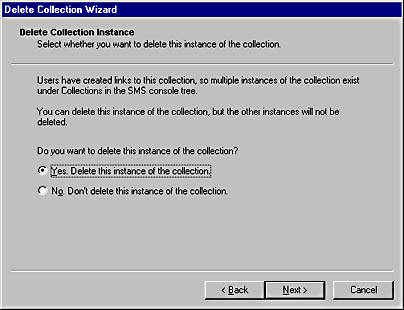
Figure 11-16. The Delete Collection Instance screen.
Now that we have created and deleted collections and subcollections, let's take a look at how we can keep them up-to-date through SMS.
EAN: 2147483647
Pages: 167