Configuring a Client for Remote Control
SMS Remote Tools enables you to deliver help desk support from your (the SMS administrator's) desktop to all supported SMS 2.0 clients. As with other SMS components, you begin with configuring the client component through the SMS Administrator Console. Keep in mind that, like other client agent settings, the Remote Tools Client Agent (also sometimes referred to as the Remote Tools Agent) settings are configured and effective on a sitewide basis.
If you enable Remote Tools for a site, the Remote Tools Client Agent is enabled and installed on all SMS clients that belong to that SMS site—with no exceptions. If you require users to give permission for an administrator to initiate a Remote Tools session, permission will be required on all SMS clients that belong to that site. This is the nature of all SMS client agents. Fortunately, the Microsoft BackOffice 4.5 Resource Kit (available through Microsoft Press) includes several utilities on its companion CD that alter how the Remote Tools Client Agent functions on different SMS clients. We'll look at these utilities in the section "Resource Kit Utilities" later in this chapter.
Let's begin our discussion of configuration by looking at the client system requirements, including network connection considerations. Then we'll look at the configuration of the Remote Tools Client Agent and the remote options.
Client System Requirements
Clients must meet the following general requirements to use Remote Tools for monitoring and control:
- The client must be installed as an SMS client. This will allow the client to receive and run the Remote Tools Client Agent.
- The Remote Tools Client Agent must be installed and started on the client computer. Each client platform uses different agents, services, or utilities to support remote functions.
- Access to the client must be allowed. The level of remote access to the client must be defined, including who has the ability to initiate a session.
- The SMS Administrator Console computer and the client must use a common protocol. This can be either the same NetBIOS protocol (NetBEUI or TCP/IP) or IPX; 32-bit Microsoft Windows clients also allow Windows Sockets over TCP/IP.
![]()
NOTE
SMS can remotely monitor and control clients that are connected to the network locally or via a WAN. SMS can also perform remote functions when an SMS administrator connects to the client's network using Remote Access Service (RAS) through a minimum 28.8-Kbps connection; however, performance degrades significantly for connections lower than 56 Kbps.
If your clients meet these requirements, you can proceed with enabling and configuring the Remote Tools Client Agent, as we'll see in the next section.
Configuring the Remote Tools Client Agent
The Remote Tools Client Agent is the only component that needs to be configured to enable remote control functionality for your site. To verify that you have installed this agent when you installed your site server, check the list of client agents in the Client Agents folder under Site Settings in the SMS Administrator Console, as shown in Figure 10-1. If you don't see the Remote Tools Client Agent listed there, rerun the SMS Setup application from the SMS 2.0 CD to add the component to your site server. (Refer to Chapter 2 for more information about the installation process.)
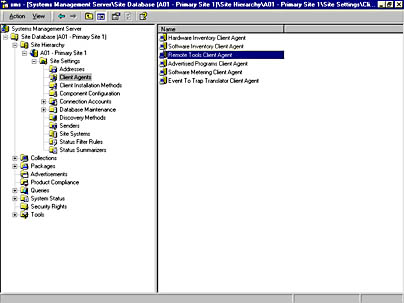
Figure 10-1. A list of client agents installed on the site server.
![]()
NOTE
If you install SMS using the Express Setup option, Remote Tools will be installed and enabled automatically. If you choose the Custom Setup option, you must choose the Remote Tools option; Custom installation does not enable Remote Tools by default.
Once the Remote Tools component has been installed, we must specify what remote features we want to enable for the clients in our site and how the Remote Tools sessions should be established. To enable and configure the Remote Tools Client Agent, follow these steps:
- In the SMS Administrator Console, navigate to the Site Settings folder and expand it, and select the Client Agents folder to display the list of client agents (Figure 10-1).
- Right-click on Remote Tools Client Agent, and choose Properties from the context menu to display the Remote Tools Client Agent Properties window, shown in Figure 10-2.
- On the General tab, select the Enable Remote Tools On Clients check box.
- In SMS 2.0, you now have the ability to "lock" your configuration of Remote Tools so that users cannot arbitrarily change your settings. If you want to enable this feature, select the Clients Cannot Change Policy Or Notification Settings check box.
- Click on the Security tab, shown in Figure 10-3. Here you create the Permitted Viewers list. This list defines which users or user groups are allowed to perform remote functions on Windows NT clients. Before a Remote Tools session can be established on a Windows NT client, the client agent will evaluate this list to determine whether the administrator initiating the session is a valid member.
- To add users or user groups to this list, click the New button (the yellow star) to display the New Viewer dialog box, and enter the name of the Windows NT user or global group.

Figure 10-2. The Remote Tools Client Agent Properties window.

Figure 10-3. The Security tab.
Notice that by default the local Administrators group—in every language supported by Windows NT—is listed under Permitted Viewers. For network performance reasons, you may want to keep this list lean and mean—in other words, include only the users or user groups that are responsible for remote support.
![]()
NOTE
If you use more than 512 characters in the Permitted Viewers list, you won't be allowed to carry out any remote control functions on Windows NT or Windows 2000 clients. The Permitted Viewers list starts and ends with a null character, and a null character appears between each entry in the list. When you count characters, remember to include these null characters.
- Click on the Policy tab, shown in Figure 10-4. This tab contains settings that define the scope of remote access and the permission level.
- Full Allows all remote functions and diagnostics to be run
- Limited Selects individual functions
- None Prohibits remote control
- If you choose Limited, click the Settings button to display the Default Limited Remote Tools Settings dialog box, shown in Figure 10-5, which contains a list of remote functions to enable or disable.
- In the Access Permission section, you can indicate whether you want the user to give permission for the Remote Tools session to be initiated. If you select Display A Message To Ask For Permission, the user will have to respond Yes or No in a pop-up message box before the session can begin. This option may be required in organizations that must comply with C2-level security guidelines.
- Click on the Notification tab, shown in Figure 10-6. On this tab, you specify how the client will be notified that a Remote Tools session has been established.
- Click on the Advanced tab, shown in Figure 10-7. This tab allows you to specify several advanced feature settings that affect the performance of remote functions.
- Remote Tools uses low-compression and high-compression methods to control the demands on network bandwidth generated during Remote Tools sessions. Using the Default Compression For Remote Control option, you can select either method for all clients to follow, or you can allow SMS to select the optimal compression method on a per-client basis. By default, the agent will negotiate for the most appropriate compression method based on the processor speed of the client.
- From the Default Remote Access Protocol drop-down list, choose the protocol for use with clients. By default, clients will use TCP/IP, but you can choose IPX or NetBIOS. If you specify NetBIOS as the default protocol, you can also set the LANA bound protocol number. Normally this will be set to 0, but if you are using multiple network cards or protocols on your client you can specify the LANA number (0 through 7) that will have the NetBIOS protocol bound to it.
- For your Windows NT clients, you can optionally enable the Install Accelerated Screen Transfer On Windows NT Clients option. Choose a driver from the Video Drivers list, a list of drivers that have been tested by Microsoft and that can run with the screen transfer "wrapper" Idisntkm.dll that SMS installs on the client when this option is enabled. The wrapper is a piece of program code that helps to speed up the screen transfer during a Remote Tools session.

Figure 10-4. The Policy tab.
Three levels of access are available:

Figure 10-5. The Default Limited Remote Tools Settings dialog box.
As you can see, all of these options are enabled by default. Each of the options you select here generates a different level of network traffic, and the first option probably generates the most traffic. Click OK to return to the Policy tab.

Figure 10-6. The Notification tab.
By default, both a visual and an audible indicator will be enabled on the client. The visual indicator can be either a taskbar status icon or a high-security icon that appears in the top-right corner of the user's desktop and cannot be hidden. You can optionally have the indicators display when no Remote Tools session is active. Audible indicator choices include playing a sound when the session begins and ends or repeatedly throughout the session (the default).

Figure 10-7. The Advanced tab.
If you select Low (RLE), SMS uses the Run Length Encoding (RLE) compression method. This setting should typically be used for clients with CPUs that are slower than a 150-MHz Pentium processor. This method works well on slower CPUs because of the lower demand on CPU cycles. It can also help resolve video transfer problems that may arise from hardware incompatibilities on the client.
If you select High (LZ), SMS uses the Lempel-Ziv (LZ) compression method. This is a math-intensive compression algorithm, and therefore it requires more intensive CPU processing. This method of compression should be configured for clients with 150-MHz Pentium processors or higher. This setting minimizes network utilization; however, it may also impact client performance during the Remote Tools session.

CAUTION
You can add drivers to this list by clicking the New button. However, the screen transfer software works only with the video drivers listed and any other drivers compatible with those listed. If you add a driver to the list, be sure to test and ensure that the Remote Tools session works properly.
- Click OK to begin the site update process.
As usual, the Remote Tools Client Agent will be installed on the SMS clients during the next update cycle on the client or when the client forces an update through the Systems Management applet in the Control Panel. At this point, an SMS administrator will be able to initiate a Remote Tools session according to the options you configured for the agent.
CAUTION
If you make changes to any of the options on the Advanced tab of the Remote Tools Client Agent Properties window after the Remote Control Client Agent has been installed on the clients, the clients will not receive the new settings. In this case, you could uninstall the agent by disabling it at the site server, updating the clients, and then reenabling the agent so that the clients can get the new settings.
Remote Tools Client Agent Installation Process Flow
Until the Remote Tools Client Agent is enabled for a site, no Remote Tools client components are installed on the clients in that site. If the Remote Tools Client Agent is enabled for a site, the client components are installed on each client in the site at the next client maintenance update cycle (every 23 hours) or when an update is forced using the Systems Management applet in Control Panel
When either of these update events occurs, the client executes either Remctrl.exe (on 32-bit clients) or Remc16.exe (on 16-bit clients). These programs install the Remote Tools Client Agent and its support files, including 32-bit or 16-bit versions of Remote Control support (Wuser32 or Wuser), the File Transfer Slave Agent (Wslave32 or Wslave16), and Remote Chat support (Wchat32 or Wchat16). All in all, about 1.8 MB of disk space will be required on the client, and a corresponding amount of network traffic will be generated.
Depending on the client platform, the Remote Tools Client Agent is installed and started. On Windows NT and Windows 2000 clients, Wuser32 is installed as a service, the appropriate registry keys are created and updated, and Launch32 starts Wuser32. Additionally, two other services are loaded to support virtual keyboard and mouse devices—KBStuff.sys and RCHelp.sys. On Windows 95 and Windows 98 clients, Wuser32 is installed as a client service (a pseudo-service), the appropriate registry keys are created and updated, and Clisvc95.exe starts Wuser32. On Windows 3.x clients, Wuser is installed as a client service, SMSrc16.ini is created and updated, Vuser.386 is loaded into System.ini, and Launch16.exe starts Wuser. SMSrc16.ini acts as an initialization file for storing Remote Tools properties since Windows 3.x clients do not have a registry.
The Remote Control application contains two programs, Hardware Munger and Security Munger. A munger basically reconciles configuration settings relating to network interface cards (NICs) and protocols on the client with settings from multiple sites that the client may belong to. The Hardware Munger runs once at installation or when a Repair Installation procedure is run through the Systems Management applet in Control Panel. The Hardware Munger is responsible for determining the default protocol to use for Remote Tools sessions, the compression type, and video acceleration. If different compression, protocol, or acceleration configurations exist on the multiple sites to which the client belongs, the Hardware Munger is also responsible for reconciling those settings. For example, if the client belongs to three sites with two sites identifying TCP/IP as the default protocol and the other using IPX, TCP/IP will win by majority. If there is no clear winner, the Hardware Munger favors TCP/IP, then NetBIOS, then IPX.
The Security Munger runs whenever a change is made to the SMS-related registry keys on the client. It updates the Remote Tools Client Agent settings on the client, and if the client belongs to multiple sites, it reconciles remote agent settings from multiple SMS sites. In general, the Security Munger will always reconcile disparate settings in favor of the most restrictive or most secure setting. For example, if the client belongs to three sites and one site requires user permission while the other sites do not, the client will be set to require user permission before a Remote Tools session can occur.

TIP
For more information about mungers and other processes related to Remote Tools, refer to Chapter 9 of the Microsoft Systems Management Server 2.0 Resource Guide (part of the Microsoft BackOffice 4.5 Resource Kit).
Each step in the installation process is recorded on the client in the MS\SMS\Clicomp\RemCtrl\Install.log file as well as in the MS\SMS\Logs\Remctrl.log, as shown in Figures 10-8 and 10-9. Notice in Figure 10-9 the notation regarding the initialization of the Hardware Munger (Rchwcfg.exe) process.
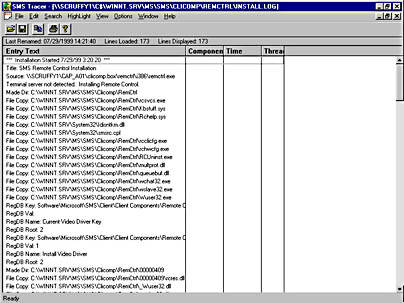
Figure 10-8. Sample Install.log file, showing the installation process for Remote Tools.
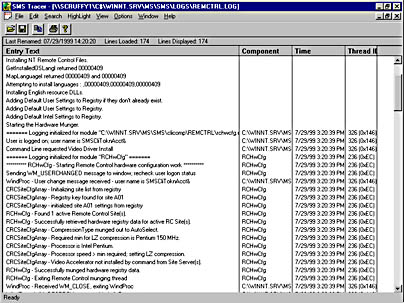
Figure 10-9. Sample Remctrl.log file.
Setting Remote Options at the Client System
If the SMS administrator does not enable the option Clients Cannot Change Policy Or Notification Settings on the General tab of the Remote Tools Client Agent Properties window, the user at the client computer will be able to choose some site settings for the Remote Tools session. For example, the user can specify which remote functions to enable, whether permission for the Remote Tools session must be granted first, and how the Remote Tools session will be announced on the client system. The user can modify the remote control options on the client from the Remote Control applet in Control Panel, which is added when the Remote Tools Client Agent is installed, as shown in Figure 10-10. The client's policy settings will take precedence over the site's default settings. You'll have to determine whether allowing the user such latitude is practical or desirable.
To configure the Remote Tools options, follow these steps:
- From the client's Control Panel, double-click on the Remote Control applet to display the Remote Control Properties window, shown in Figure 10-11.
- To make a change, clear the Use Administrator Settings check box at the bottom of either tab, and configure the policy and notification settings as described in the previous section.
- Click the Show Status button on the General tab to display the Remote Control Status dialog box, shown in Figure 10-12, which contains connection information regarding the agent. This information will include the IP address and name of the client, the level of compression and acceleration used, and whether a session is currently active. From this screen, the user can also click Close Session to terminate the session. Users running Windows 3.x will see a different Remote Control Status dialog box with similar information provided.
- Click OK to save your settings.
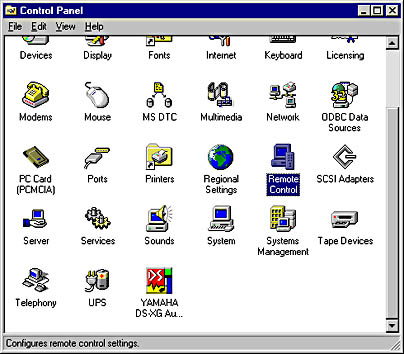
Figure 10-10. The Remote Control applet added to the client's Control Panel.
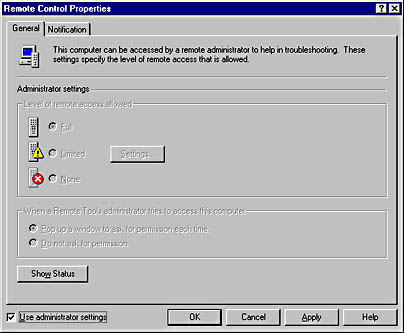
Figure 10-11. The Remote Control Properties window.
The settings on the General and Notification tabs will reflect those configured in the SMS Administrator Console.

Figure 10-12. The Remote Control Status dialog box.
If the Show High-Security Indicator On Desktop visual indicator notification is enabled, users can display the same screen by double-clicking on the face of the indicator.
When the Remote Tools Client Agent has been correctly configured and installed on your SMS clients, you should be able to establish remote control sessions. However, one of the client requirements mentioned earlier was that the client and the SMS Administrator Console computer both use the same protocol. This requirement is not always as clear cut as we might think, as we'll see in the next section.
EAN: 2147483647
Pages: 167
- Step 2.1 Use the OpenSSH Tool Suite to Replace Clear-Text Programs
- Step 3.2 Use PuTTY / plink as a Command Line Replacement for telnet / rlogin
- Step 4.5 How to use OpenSSH Passphrase Agents
- Step 4.7 Using Public Key Authentication for Automated File Transfers
- Step 6.2 Using Port Forwarding Within PuTTY to Read Your E-mail Securely