Defining Parent-Child Relationships
Parent sites and child sites are defined by their relationship within an SMS site hierarchy. We've already explored the related terms and concepts in Chapter 1. Let's review these terms and then examine them in more detail. A parent site is any site with at least one child site defined; the parent site has the ability to administer any child sites below it in the SMS hierarchy. A child site is any SMS site that has a parent defined.
An SMS primary site has three main distinguishing characteristics:
- It is an SMS site that has access to a Microsoft SQL Server database.
- It can be directly administered through the SMS Administrator Console as well as by any SMS sites above it in the site hierarchy. A primary site can also administer any child sites below it in the site hierarchy.
- It can be a child of other primary sites, and it can have child sites of its own.
The requirement that a primary site have access to a SQL Server database may translate into an additional investment in hardware and software for each SMS site and/or site server. On the other hand, because a primary site can be both a parent site and a child site, it is relatively easy to restructure your site hierarchy if all your sites are primary sites, as we will see in the section "Implementing a Parent-Child Relationship Between Primary Sites" later in this chapter.
An SMS secondary site is also distinguished by three main characteristics:
- It does not have access to a SQL Server database.
- It is always a child of a primary site and is administered solely through its parent, or through another primary site above it in the SMS site hierarchy.
- It cannot have child sites of its own.
Because a secondary site does not require access to a SQL Server database, it might not command the same investment in hardware and software as a primary site. However, a secondary site can be administered only through its parent site or through another primary site above it in the site hierarchy. If an SMS administrator on the same local subnet as the secondary site wants to administer the site, that SMS administrator will first need to connect to the site database for the secondary site's parent site. If the SQL database for the parent site is accessed across a WAN link, response may be slow or inefficient. On the other hand, if there is no local SMS administrator available the secondary site can be rather easily managed by a remote SMS administrator in the same manner.

CAUTION
To switch primary and secondary site roles, you must first uninstall and then reinstall SMS.
A central site is an SMS primary site that resides at the top of the SMS hierarchy. Database information rolls from child to parent and is collected ultimately at the central site's SMS database. A central site can administer any site below it in the SMS hierarchy and can send information down to its child sites.
Figure 4-1 shows a typical SMS site hierarchy model. In this site hierarchy, site A01 is the central site. All information rolls up to this site. Sites A02, A03, and A04 are primary sites, since they have access to a SQL database for SMS. Site A05 is a child site to site A03; it is also a secondary site, since it does not have access to a SQL database for SMS.
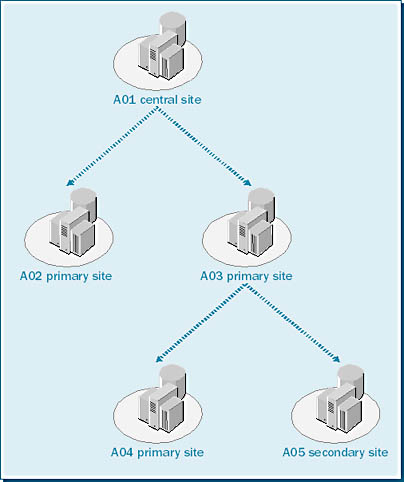
Figure 4-1. A typical SMS site hierarchy.
Child sites send inventory data, discovery data, site control data, and status messages to their immediate parent sites. A child site never sends information to its "grandparent" site. Parent sites, in turn, send information about collections, package definitions, advertisements, and site control files to their child sites. Although child sites send data only to their immediate parent, a parent site can send information to any child below it in the SMS site hierarchy, provided it has an address for that site.
Because child sites send inventory data to their parent sites, database storage space becomes a greater concern at the parent sites at each successive layer in the hierarchy. In the hierarchy shown in Figure 4-1, site A04 reports its inventory data to site A03. Site A03's database needs to be large enough to accommodate its own information plus the information coming from site A04. Similarly, site A03 reports its inventory data to site A01. Site A01's database therefore needs to be large enough to accommodate its own information plus that of both sites A03 and A04.

TIP
Try to keep your site hierarchy as flat as possible. A flatter hierarchy will require information to flow through fewer layers (sites) before reaching the central site. Child site information will be reported to the central site more quickly and efficiently. In addition, the flatter the hierarchy, the less concern you will have about database space requirements at parent sites at each level of the hierarchy.
Installing a Secondary Site
In Chapter 2, you learned how to install an SMS 2.0 primary site. In this section, we'll explore the process of installing an SMS 2.0 secondary site. In earlier versions of SMS, the secondary site was created as a property of a parent primary site through the Site Properties window of the SMS Administrator window. The SMS 2.0 secondary site should also be considered a property of a primary site. It can be a child only of a specific primary site, and it is managed primarily through that primary site or through any site above it in the site hierarchy.
As in earlier versions of SMS, an SMS 2.0 secondary site installation can be initiated through the SMS Administrator Console. However, in SMS 2.0, a secondary site can also be installed directly from the SMS 2.0 CD. The Setup program gives you the option of installing a secondary site. You might choose this option if you need to install the secondary site but do not yet have a WAN connection available to the primary site, or if the existing WAN connection is "network traffic challenged" and you want to avoid the additional traffic involved in performing the installation from the primary site server. Also, when you install a secondary site from the CD, you will be able to choose which SMS components you want to install on the secondary site server, much like the Custom installation we reviewed in Chapter 2. When you install the secondary site from the parent site, all SMS components are installed on the secondary site server.
Installing the Secondary Site from Its Parent Primary Site
Follow these steps to install an SMS 2.0 secondary site server from a primary site:
- In the SMS Administrator Console, navigate to the site entry folder and right-click on it, choose New from the context menu, and then choose Secondary Site. The Welcome To The Create Secondary Site Wizard screen will appear, shown in Figure 4-2.
- Click Next to display the Site Identity screen, shown in Figure 4-3. Enter a three-character site code, a descriptive name for the site, and optionally a descriptive comment.
- Click Next to display the Site Server screen, shown in Figure 4-4. Enter the name of the domain in which the secondary site server is located, the server name, the processor platform (Intel or Alpha), and the NTFS installation directory (be sure that you reference an NTFS directory).
- Click Next to display the Installation Source Files screen, shown in Figure 4-5. This screen lets you specify where the source files for installing the secondary site reside. If you select the Transfer Installation Source Files From Parent Site Server check box, Setup will obtain the installation files from the primary site server and transfer them across the network to the target secondary site. This option will, of course, generate a fair amount of network traffic. If you select the Installation Source Files Are On A CD-ROM At Secondary Site Server check box, Setup will look for the installation files on the SMS CD on the local (secondary site) server. This option assumes, of course, that you have inserted the SMS 2.0 CD in the CD-ROM on the target secondary site server.
- Click Next to display the SMS Service Account screen, shown in Figure 4-6. Enter the name of the SMS Service account (which you have already created) that the secondary site server will use, and confirm the password.
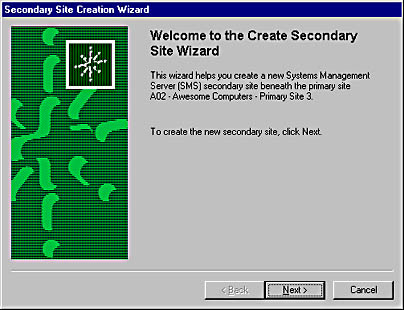
Figure 4-2. The Welcome To The Create Secondary Site Wizard screen.
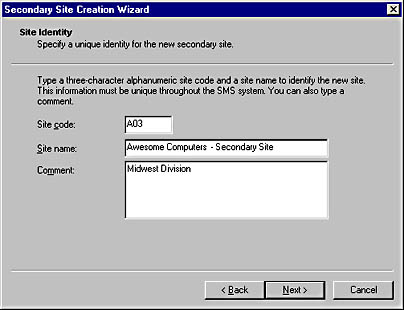
Figure 4-3. The Site Identity screen.
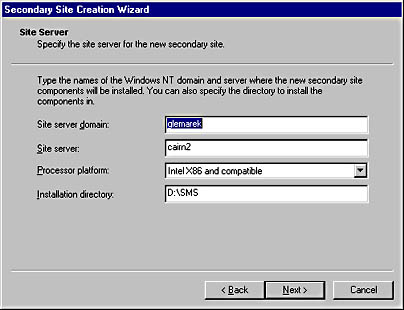
Figure 4-4. The Site Server screen.
CAUTION
The SMS Service account you specify during the installation of the SMS 2.0 secondary site must already have been created for the target server, as we discussed in Chapter 3. Be sure to make the account a member of the Domain Admins global group in the secondary site's Windows NT domain. Also be sure that the account is a member of the local Administrators group on the secondary site server itself—either explicitly or by virtue of its being a member of the Domain Admins global group—and that it has the Log On As A Service user right on the secondary site server. If any of these prerequisites is not met, the installation process will fail—miserably!
- Click Next to display the Addresses To Secondary Site screen, shown in Figure 4-7. If you have already created one or more addresses to the target secondary site—for example, using Standard Sender (through LAN or WAN connections) or Asynchronous RAS Sender (through a dial-up connection)—these will be listed in the Addresses To list. Select the No option and proceed to step 9. If you have not already created an address to the secondary site, or if you want to create a new address, select the Yes option.
- If you chose Yes in the preceding step, clicking Next will take you to the New Address To Secondary Site screen, shown in Figure 4-8. Here you must select a sender address type, confirm the secondary site server name, and identify the name of the account on the secondary site server that you want the primary site to use when connecting to the secondary site. This account will generally be the SMS Service account, but it can be any account that has at least Change permission for the SMS_SITE share. Once again, this account must have been created before you begin the secondary site installation.
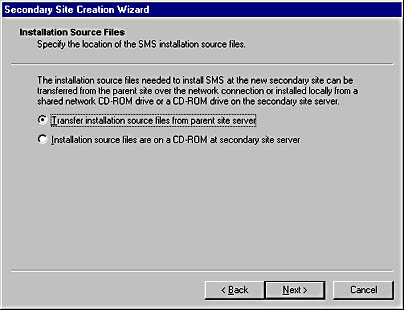
Figure 4-5. The Installation Source Files screen.
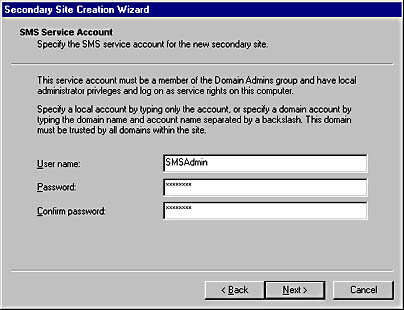
Figure 4-6. The SMS Service Account screen.
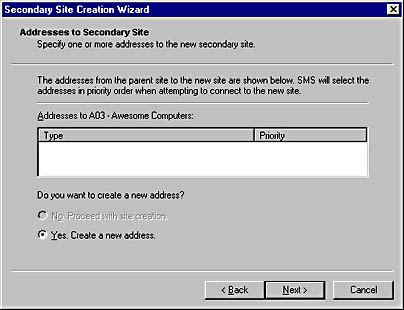
Figure 4-7. The Addresses To Secondary Site screen.

Figure 4-8. The New Address To Secondary Site screen.
![]()
NOTE
When you create an address using Setup, you will have only the options Standard Sender Address and Asynchronous RAS Sender Address on this screen. If you choose to use a RAS sender, RAS must be installed on the server you will use for the secondary site server or on another server accessible to the proposed secondary site server. If you need any other sender type, you must create the address through the SMS Administrator Console before beginning the secondary site installation process.
- Click Next to display the New Address To Parent Site screen, shown in Figure 4-9. Specify a sender address type, confirm the primary site server name, and identify the name of the account on the primary site server that you want the secondary site to use when connecting to the primary site. This account will generally be the SMS Service account, but it can be any account that has at least Change permission for the SMS_SITE share on the primary site server. Once again, this account must have been created before you begin the secondary site installation.
- Click Next to display the Completing The Create Secondary Site Wizard screen. Review your selections in the New Secondary Site Characteristics section, and then click Finish to begin the installation process. You can also click Back to return to previous screens to make changes.

Figure 4-9. The New Address To Parent Site screen.
Installing the Secondary Site Locally from the SMS CD
Follow these steps to install an SMS 2.0 secondary site server from the SMS CD:
- Begin Setup from the SMS CD. You will see the Systems Management Server Setup Wizard welcome screen, as you did when you were installing the primary site.
- Click Next until the Setup Options screen is displayed, shown in Figure 4-10. Select the Install An SMS Secondary Site option.
- Click Next to display the Product Registration screen, shown in Figure 4-11, and enter the name, organization, and CD key information.
- Click Next to display the SMS Site Information screen, shown in Figure 4-12. Enter the three-character site code you will assign to the secondary site server, a descriptive name for the site, and the name of the Windows NT domain in which the secondary site server is located.
- Click Next to display the SMS Service Account Information screen, shown in Figure 4-13. Enter the name of the SMS Service account (which you have already created) that the secondary site server will use, and enter and confirm the password. If you haven't created a service account, either use the default SMSService account or enter an account name and password.
- Click Next to display the SMS Server Platform screen, shown in Figure 4-14. Select an alternate platform file support if your secondary site will support a mixed platform environment.
- Click Next to display the Setup Installation Options screen, shown in Figure 4-15. Select the SMS 2.0 options that you want to enable on the secondary site server. You can also change the directories in which the components are installed on your site server.

Figure 4-10. The Setup Options screen.
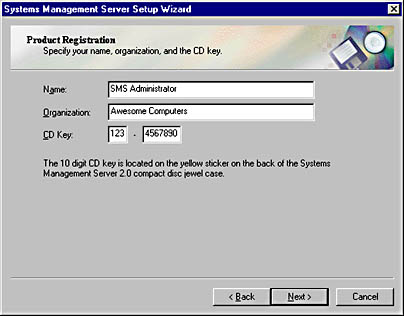
Figure 4-11. The Product Registration screen.
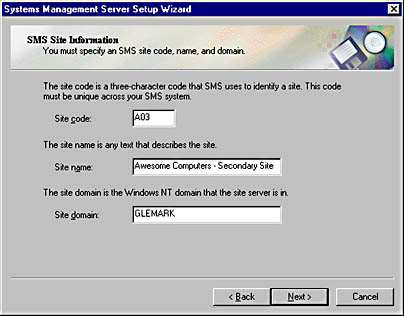
Figure 4-12. The SMS Site Information screen.
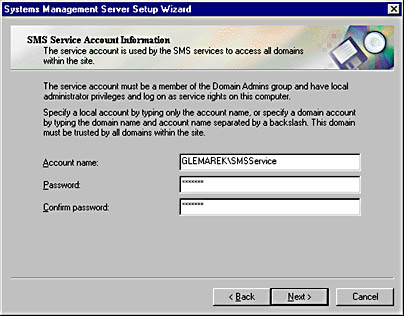
Figure 4-13. The SMS Service Account screen.
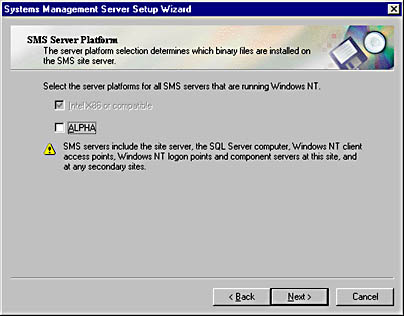
Figure 4-14. The SMS Server Platform screen.
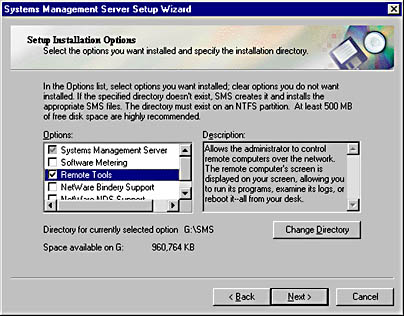
Figure 4-15. The Setup Installation Options screen.
![]()
NOTE
When installing SMS from the CD, you can select which SMS options you want to install, much like a Custom installation for a primary site server. Notice, however, that only those options that do not require access to a SQL SMS database or that are applicable to the SMS Administrator Console are listed as valid options. Missing from the list are the SMS Administrator Console, Crystal Info, Software Metering Console, SMS Installer, Network Monitor, Package Automation Scripts, and Product Compliance Database.
- Click Next to display the Parent Site Information/Identification screen, shown in Figure 4-16. Enter the site code and server name of the parent primary site, and select the network connection type that the secondary site will use to connect to that parent site.
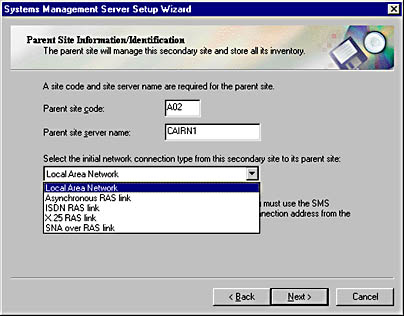
Figure 4-16. The Parent Site Information/Identification screen.
CAUTION
You will still need to create a valid address at the primary site server that identifies connection parameters that allow the primary site to connect back to the secondary site server. Address creation will be discussed in the section "Creating an Address" later in this chapter.
- Click Next to display the Connection Account Information screen, shown in Figure 4-17. Here you must enter the name and password of the account that the secondary site server will use to connect to the parent site. This account will generally be the SMS Service account, but it can be any account that has at least Change permissions for the SMS_SITE share on the primary site server. Once again, this account must have been created before you begin the secondary site installation.
- Click Next to display the Completing The Systems Management Server Setup Wizard screen, review your selections, and then click Finish to begin the installation process. Again, you can click the Back button from this screen or any previous screen to go back and modify your entries. As with the primary site installation, if the service account has not been created ahead of time, Setup can create an account for you. Setup will display a dialog box prompting you to do so; choose Yes.
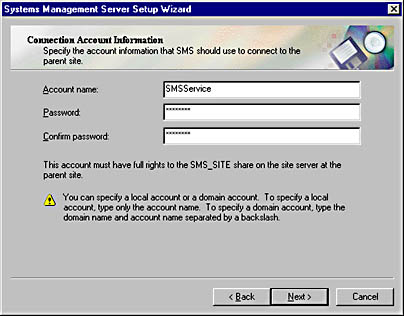
Figure 4-17. The Connection Account Information screen.

PLANNING
To upgrade your secondary site server to SMS 2.0 Service Pack 1, first upgrade its parent primary site. When you right-click on the secondary site folder in the SMS Administrator Console for the primary site, the context menu will appear. Choose All Tasks from the context menu, and then choose Upgrade Site. The Upgrade Secondary Site Wizard will walk you through the upgrade process.
The Secondary Site Installation Process Flow
The process of installing a secondary site from the SMS CD is relatively uninteresting. Setup simply creates the subdirectory structure, loads services and components as necessary, and connects to the parent site to complete the parent-child relationship. This process is remarkably similar to the primary site server installation. However, installing a secondary site from a primary site server involves SMS primary site server components, network traffic, and installation routines installed and executed on the secondary site server. This section provides a basic overview of that process.
When you initiate the installation of a secondary site through the SMS Administrator Console, you are in effect making a change to the primary site's properties, and the site configuration process flow described in Chapter 3 is initiated. Hierarchy Manager wakes up and queries the sites table and site control file in the SMS SQL database. From this information, it determines that a secondary site installation process needs to be initiated and generates a request to do so in Scheduler's inbox (Schedule.box). Scheduler, in turn, creates the package and instruction files that support the installation and that need to be sent to the secondary site server and creates a send request file for the sender that will connect to the secondary site server. The sender will be the same connection mechanism you chose when you initiated the setup process.
The sender connects to and copies the package and instruction files to the secondary site server and loads a bootstrap service, which creates the SMS directory structure, starts the setup process, and loads and starts SMS Site Component Manager. Site Component Manager completes the installation and configuration of SMS components, loads and starts the SMS Executive service, and generates a new site control file. Finally the connection back to the parent site is configured, and a minijob is created by SMS Replication Manager to send the new secondary server site control information back to the parent site via Scheduler and sender at the secondary site.
You can follow the flow of this process by monitoring the status messages and log files (if enabled) on the primary site server for Hierarchy Manager, Site Control Manager, Discovery Data Manager, Scheduler, and the appropriate sender, such as SMS Standard Sender.
Differences Between Primary and Secondary Sites
The SMS 2.0 secondary site server is installed much like the SMS 2.0 primary site server. Setup builds the SMS and CAP_sitecode directory structures (where sitecode represents the three-character site code of the secondary site), including the component support files and inboxes, and installs the secondary site server as an SMS client. Setup installs the secondary site as a site system with the client access point (CAP) and distribution point roles assigned by default, and does not enable any discovery or installation methods or client agents until the SMS administrator does so through the SMS Administrator Console. The SMS Executive, SMS Site Component Manager, SMS Client Service, and Windows Management services are loaded and started, and the SMS, Network Access Layer (NAL), Web-Based Enterprise Management (WBEM), and SMS service keys are added to the Windows NT server registry. The same shares are created on the secondary site server as on the primary site server.
However, the secondary site server is fully administered through a parent site, as shown in Figure 4-18. Thus, no Systems Management Server program group is created, and no SMS Administrator Console is installed. The SMS SQL Monitor service is not installed, nor are any references to SQL Server or SQL Server triggers placed in the Windows NT server registry. Also missing from the SMS directory structure are folders and/or files that reference SMS components, and options that are not applicable to the secondary site such as the product compliance database.
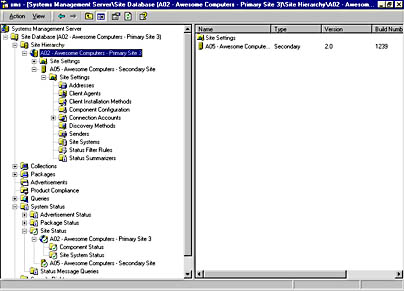
Figure 4-18. The SMS Administrator Console, showing the secondary site.
Because the secondary site is administered through its parent site, site property changes will take place across the network, generating some network traffic. This network traffic generally includes writing the change to the site control file on the secondary site server or writing a file to a component inbox on the secondary site server. The secondary site server will experience performance similar to the primary site server, and you should plan your hardware investment for a secondary site server in much the same way as you would for a primary site server. Since you do not have the added overhead of SQL Server database access, the resource requirements for the secondary site server will not be as high as for a primary site server. Nevertheless, you will sell yourself, your company, and the secondary site short if you do not include the same planning and testing strategies when implementing the secondary site as you do when implementing a primary site.
Implementing a Parent-Child Relationship Between Primary Sites
When you install an SMS 2.0 secondary site, it becomes a child of the primary site it is installed from, and voilà!, you have a parent-child relationship. As we've seen, however, primary sites can also enter into parent-child relationships. Two main requirements must be met to successfully implement a parent-child relationship between two primary sites: each site must have an address to the other site, and the child must identify its parent.
Creating an Address
An address in SMS 2.0 is yet another site setting—that is, a property of the site. A site server needs to know which other site servers it needs to communicate with—for sending package information, inventory data, status messages, and site control information—and how to establish that communication.
The parent and the child need each other's address. The child sends inventory data, status messages, discovery data, and site control information to its immediate parent. The parent site sends package, collection, advertisement, and site control information to its child. A parent site can also send this information to any other site below it in the hierarchy. It does so by routing the information through its child sites, or by configuring an address directly to the other site.
This flow of information is illustrated in Figure 4-19. Sites A04 and A05 will report data directly to their parent, site A03. Site A03 will, in turn, report its data (which includes the data from sites A04 and A05) directly to its parent, central site A01, as will site A02. Sites A04 and A05 need an address to site A03, and sites A02 and A03 need an address to site A01. Similarly, site A01 needs an address to sites A02 and A03, and site A03 needs an address to sites A04 and A05. Site A01 can administer any site below it in the hierarchy. It can send package and advertisement information to sites A04 and A05 by routing that information through site A03, for which it has an address. However, if the SMS administrator configures an address in site A01 for site A04, site A01 could send information directly to site A04.
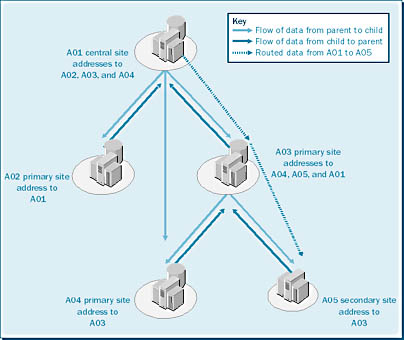
Figure 4-19. Information flow in a site hierarchy.
An SMS 2.0 site delivers information to another site by connecting to that site using a communications mechanism called a sender. The five available senders are Standard Sender (regular LAN/WAN connection), Asynchronous RAS Sender, ISDN RAS Sender, X.25 RAS Sender, and SNA RAS Sender. These senders, along with a sixth sender named Courier Sender, will be discussed in detail in the section "Communicating Through Senders" later in this chapter.
These senders connect to a default share on the target site named SMS_SITE. This share references the SMS\Inboxes\Despoolr.box\Receive directory and is created automatically during the installation of a primary or secondary site server. The SMS administrator must identify a connection account that has at least Change permission for this share. That could, of course, be the SMS Service account, but it doesn't have to be. Using this account to access the target site server share, the sender copies the data in question to the target site, keeping track of its progress. When it has finished, the sender disconnects from the target site.
TIP
Since the SMS Service account is a domain administrator as well, it is not the most secure account to use. The more secure approach would be to create a new account (just a regular user), password-protect it, and give it Change permission for the SMS_SITE share.
Creating an Address to Another Site
To create an address to another site, follow these steps:
- In the SMS Administrator Console, navigate to the Site Settings folder and expand it.
- Right-click on the Addresses folder, and choose New from the context menu. A list of sender address types is displayed, as shown in Figure 4-20.
- Choose the sender address type you need to display its Properties window. Fill in the General tab in the appropriate Properties window as follows:
- In the Standard Sender Address Properties window, shown in Figure 4-21, enter the three-character site code for the target site. In the Destination Access section, enter the NetBIOS name of the target site's site server and the server's domain. Click the Set button to specify the name and password of the account on the target site that has at least Change permission for the SMS_SITE share on the target site.
- In the Asynchronous RAS Sender Address Properties window, shown in Figure 4-22, enter the three-character site code for the target site. In the RAS Access section, enter the RAS phone book entry that references dial-up information for accessing the target site. Click the Set button to specify the dial-up access account and phone number to be used when dialing in to the target site. In the Destination Access section, enter the NetBIOS name of the target site's site server and the domain of which it is a member. Click the Set button to specify the name and password of the account on the target site that has at least Change permission for the SMS_SITE share on the target site.
- In the ISDN RAS Sender Address Properties window, shown in Figure 4-23, enter the three-character site code for the target site. In the RAS Access section, enter the RAS phone book entry that references dial-up information for accessing the target site. Click the Set button to specify the dial-up access account and phone number to be used when dialing in to the target site. In the Destination Access section, enter the NetBIOS name of the target site's site server and the domain of which it is a member. Click the Set button to specify the name and password of the account on the target site that has at least Change permission for the SMS_SITE share on the target site.
- In the X.25 RAS Sender Address Properties window, shown in Figure 4-24, enter the three-character site code for the target site. In the RAS Access section, enter the RAS phone book entry that references dial-up information for accessing the target site. Click the Set button to specify the dial-up access account and phone number to be used when dialing in to the target site. In the Destination Access section, enter the NetBIOS name of the target site's site server and the domain of which it is a member. Click the Set button to specify the name and password of the account on the target site that has at least Change permission for the SMS_SITE share on the target site.
- In the SNA RAS Sender Address Properties window, shown in Figure 4-25, enter the three-character site code for the target site. In the RAS Access section, enter the RAS phone book entry that references dial-up information for accessing the target site. Click the Set button to specify the dial-up access account and phone number to be used when dialing in to the target site. In the Destination Access section, enter the NetBIOS name of the target site's site server and the domain of which it is a member. Click the Set button to specify the name and password of the account on the target site that has at least Change permission for the SMS_SITE share on the target site.
- For details on how to create a Courier Sender address, refer to the section "Courier Sender" later in this chapter.
- Select the Schedule tab, shown in Figure 4-26. As you can see, by default the sender is available for all priority send requests at all times. Select the time period you want to modify by highlighting it using the mouse. In the Availability list, select the appropriate option: Open For All Priorities, Allow Medium And High, Allow High Only, or Closed. The priority of a send request such as a package is set when the package is created. Choose Closed for periods when you do not want the sender to send anything, such as during regular backup times. If there are multiple addresses to a target site, SMS will automatically choose the next sender in order of priority (based on the Relative Address Priority setting on the General tab) if the current sender is unavailable for some reason. Select the Unavailable To Substitute For Inoperative Addresses check box to prevent this sender from being used as an alternative sender.
- Select the Rate Limits tab, shown in Figure 4-27. Notice that by default SMS can use as much bandwidth as it wants when transferring data to the target site. Select the Limited To Specified Maximum Transfer Rates By Hour option and highlight the period of time you want to modify using the mouse. In the Rate Limit For Selected Time Period section, select a preferred bandwidth percentage from the drop-down list.
- Click OK to create the address.
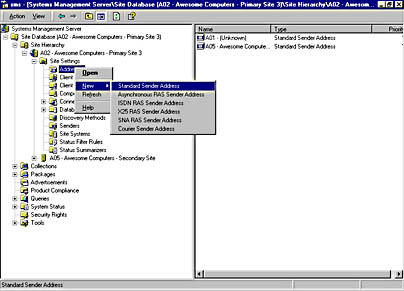
Figure 4-20. Displaying a list of sender address types.
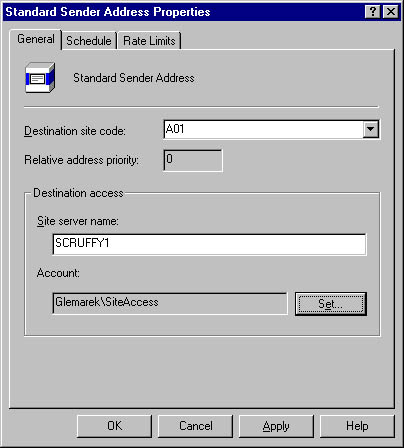
Figure 4-21. The Standard Sender Address Properties window.
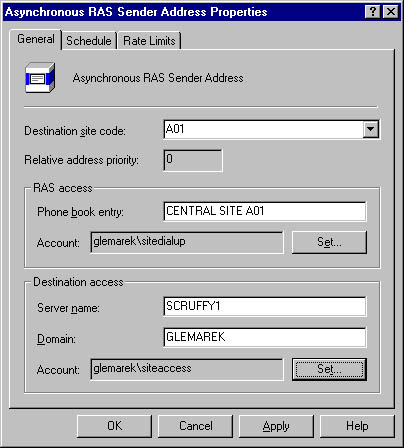
Figure 4-22. The Asynchronous RAS Sender Address Properties window.
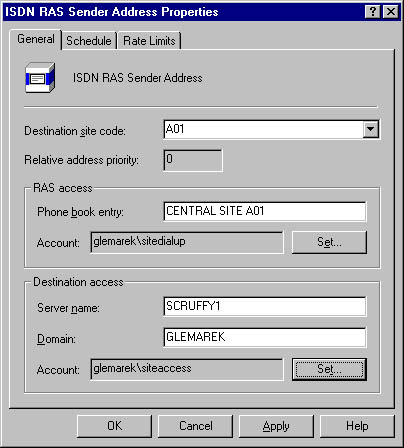
Figure 4-23. The ISDN RAS Sender Address Properties window.
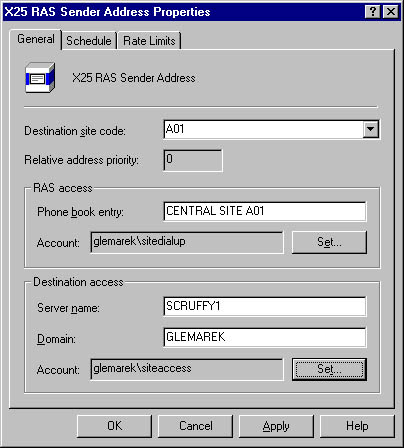
Figure 4-24. The X.25 RAS Sender Address Properties window.

Figure 4-25. The SNA RAS Sender Address Properties window.
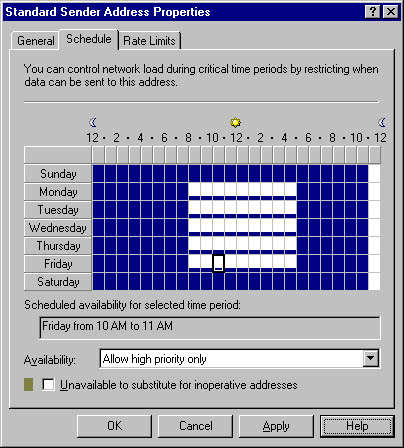
Figure 4-26. The Schedule tab of the Standard Sender Address Properties window.
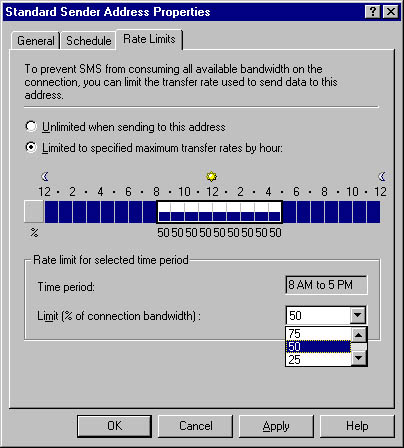
Figure 4-27. The Rate Limits tab of the Standard Sender Address Properties window.
If multiple addresses exist for a target site, the order of priority in which SMS will use them to connect to the target site is the order in which the addresses were created. This is known as the relative address priority—that is, the priority of one address relative to another. You can change the relative priority of an address by right-clicking on one of the addresses in the Address window of the SMS Administrator Console and choosing either Increment Priority or Decrement Priority from the context menu.
Multiple addresses to the same target site provide SMS with alternative ways of connecting to a site and transferring data if one sender is busy or unavailable. This flexibility can improve performance in the sending process, but with one caveat. Only one sender of each type can be installed on the same site server. For example, you cannot install two Standard Senders on the same site server, but you can install the Standard Sender once on as many component site systems as you want.
![]()
REAL WORLD Alternative Senders to a Target SiteA more likely scenario is this: You will use Standard Sender on your site server to connect to a target site. Another server in the domain is already being used as a RAS server. A RAS server also exists in the target site server's domain. To provide an alternative means of connecting to the target site and transferring data, you install SMS Asynchronous RAS Sender on the RAS server and create an Asynchronous Sender Address to the target site. Now SMS can use Standard Sender, Asynchronous RAS Sender, or both to connect to the target site and transfer data.
You will want to closely monitor the traffic generated between the site server and the RAS server—which, in this case, is functioning as a component server for the SMS site. Assuming that both servers are on the same subnet, the traffic should not be significant. Nevertheless, you don't want to find yourself in a situation where the benefit you gain in improved sending performance to the target site is negated by excess traffic or denigrated network performance between the site server and the RAS server.
Identifying the Parent Site
Before you identify a site's parent, you must have created an address to that parent site. The child site will use that address to connect to the parent and transfer its site control information—including the fact that the parent now has a new child site. You can then set the parent site by following these steps:
- In the SMS Administrator Console, navigate to the site entry and choose Properties from the context menu.
- The Site Properties window will appear, as shown in Figure 4-28. On the General tab, click the Set Parent Site button.
- In the Set Parent Site dialog box, shown in Figure 4-29, select the Report To Parent Site option, enter the three-character site code of the parent site, and click OK to return to the Site Properties window.
- Click OK again to set the parent site, which starts the site configuration process.
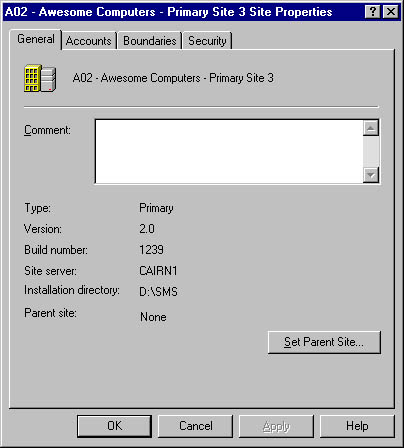
Figure 4-28. The General tab of the Site Properties window.
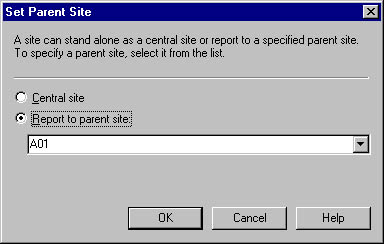
Figure 4-29. The Set Parent Site dialog box.
The site configuration process includes not only updating the child site's database with the new parent site information, but also sending data to the parent site and updating the parent site's database and site control information. This process should not take more than a few minutes, but factors such as the resource capabilities of both the child and parent sites, available bandwidth, and other database activity will affect the length of time it takes for the parent-child relationship to be established and "recognized" by both parent and child. When you first create the address entry for the parent or the child, the site entry should include the site code and should indicate that the site name is unknown. After the relationship has been established and site control data has been transferred, this information will be updated to reflect the actual site name of the addressed site.
You can follow the flow of the site configuration process and the transfer of information that takes place by monitoring the status messages that the SMS components record at each point in the process. A detailed explanation of how to view status messages can be found in Chapter 3. Table 4-1 lists the SMS components and the status messages that relate to this process.
Table 4-1. Status messages generated during the establishment of a parent-child relationship
| SMS Component | Status Message Codes | Description |
|---|---|---|
| Discovery Data Manager | 2603, 2607 | Transferring discovery data to the parent site |
| 2611, 2634 | Updating child discovery data (at the parent site) | |
| Inventory Data Loader | 2708, 2709, 2711, 2713 | Transferring inventory data to the parent site |
| Replication Manager | 4000 | Creating jobs to send data to parent site |
| Hierarchy Manager | 3306, 3307 | Processing site control files (at the parent site) |
You can also monitor the log files associated with the appropriate SMS components for information regarding the flow of this process if you have enabled logging. These log files can be found in the directory SMS\Logs and would include Hman.log (Hierarchy Manager), Sched.log (Scheduler), Sender.log (Sender), Ddm.log (Discovery Data Manager), and Replmgr.log (Replication Manager), depending on which components you have enabled logging for.
These log files are text-based and can be viewed using a text editor such as Notepad. They can also be viewed using the SMS Trace utility, which is included on the SMS 2.0 CD. Refer to Chapter 5 for details regarding how to use SMS Trace.
EAN: 2147483647
Pages: 167