SQL Server Components
In this section, we'll review some basic terminology and see how it relates to the SMS database. Every entity we call a database actually consists of two components: the database and its transaction log. The database is a collection of data records, object tables, and indexes organized in a specific structure designed to facilitate the displaying, sorting, updating, and analysis of the information it contains. The transaction log is used to record each action performed on the database, such as adding a new record or updating or deleting an existing record.
In SQL Server 6.5, databases and their corresponding transaction logs are created and maintained in devices. A SQL device is a placeholder, or predefined storage space, for the database and for its transaction log. SMS requires separate devices for the SMS database and for the transaction log. If SQL Server is installed on the same computer as the SMS 2.0 site server, SMS can create the database and log devices for you during its setup. If not, you must create the database and log devices before you install SMS 2.0. This requirement applies to the software metering data and transaction log devices as well.
SQL Server 7.0, on the other hand, does not require the creation of devices for the database and log files. Instead, the database and transaction logs are each maintained in their own files. Again, if SQL Server is installed on the same computer as SMS 2.0, SMS 2.0 can create the database and log files for you during its setup. If not, you will need to create the files in advance. This requirement too applies to the software metering data and transaction log devices.
![]()
NOTE
If you install SMS using the Express Setup option, SMS will use the names SMSDATA and SMSLOG for the SMS database and log devices and LIC_DATA and LIC_LOG for the software metering database and log devices. If you use the Custom Setup option and SQL Server is installed on the same server, SMS will use the names SMSDATA_sitecode, SMSLOG_sitecode, LIC_DATA_sitecode, and LIC_LOG_sitecode to identify these devices.
If you install SMS 2.0 on the same computer as SQL Server, SMS 2.0 will not only create the devices for you, but it will also tune SQL Server for use with SMS 2.0. This feature does not, of course, relieve you of all responsibility in the maintenance of the SQL server, but it does ease some of the setup concerns regarding SQL Server, especially if you've had little experience with it.
If SQL Server is not already installed on the proposed site server, the SMS 2.0 installation process will prompt you for the SQL Server 6.5 or 7.0 source files and install a dedicated SQL Server database for itself. In the case of SQL Server 6.5, the installation will also automatically apply SQL Server Service Pack 4. This process is outlined in Chapter 2.
Most of the actions you will need to perform on the SQL server can be accomplished through the SQL Server Enterprise Manager. Through this utility, you can create databases and transaction logs, set security, back up and restore the database, perform routine database maintenance tasks, and optimize SQL Server parameters for the SMS database. Enterprise Manager for SQL Server 6.5 and Enterprise Manager for SQL Server 7.0 use different interfaces, and the procedures for performing these tasks are somewhat different for each interface. Let's explore the process of creating devices in each SQL Server version.
Creating a Device in SQL Server 6.5
The Enterprise Manager for SQL Server 6.5, shown in Figure 18-1, groups its managed objects into four main categories:
- Database devices
- Backup devices
- Databases
- Logins (accounts)
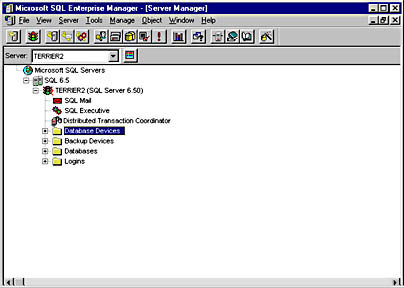
Figure 18-1. SQL Server 6.5 Enterprise Manager.
To create a new device, follow these steps:
- In Enterprise Manager, choose Database Devices from the Manage menu to display the Manage Database Devices window, shown in Figure 18-2.
- Click the New Device button (the disk drive with the yellow star) on the toolbar to display the New Database Device dialog box, shown in Figure 18-3. (Alternatively, in Enterprise Manager, navigate to the Database Devices folder, right-click on it, and choose New Device from the context menu to display the same dialog box, shown in Figure 18-3.)
- Enter a name for the device, such as SMSDATA_xxx, where xxx represents the site code of your new site. Specify the drive and path where the device will be created and stored, as well as the size of the database. The Available Storage Space graph will show how much space you have allocated and how much is left on the specified drive.
- Click Create Now to generate the device. If SQL Server successfully created a device, it will display a message to that effect. Click OK.
- Repeat steps 1 through 4 to create the corresponding transaction log device.
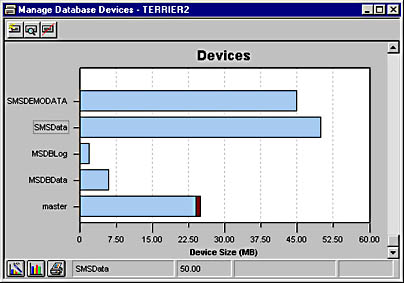
Figure 18-2. The Manage Database Devices window.
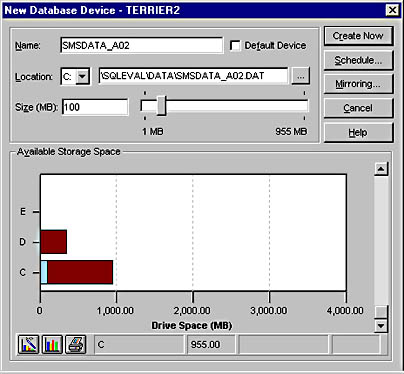
Figure 18-3. The New Database Device dialog box.
As shown in Figure 18-4, two new devices now appear but are currently empty. (The dark bars indicate that the device is empty.)The database itself, with its tables, views, objects, and so on, will be created by SMS during its setup. The entries for SMSDATA and SMSLOG visible (the light bars) in Figure 18-4 indicate that these devices contain databases.
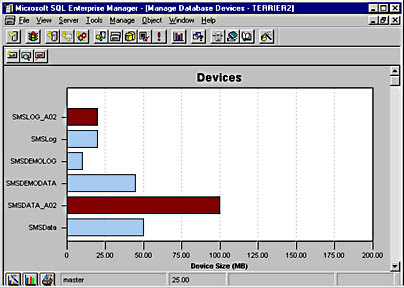
Figure 18-4. Used and unused data and log devices.
Creating a Device in SQL Server 7.0
The SQL Server 7.0 Enterprise Manager, shown in Figure 18-5, is a Microsoft Management Console (MMC) snap-in. It groups its managed objects into five main categories:
- Databases
- Data transformation services
- Management
- Security
- Support services
SQL Server 7.0 does not require the creation of separate devices before the database can be generated. Instead, it requires the creation of database files that will contain both the actual database objects and the transaction log data. Follow these steps to create a SQL Server 7.0 database file:
- In Enterprise Manager, navigate to the Databases folder, right-click on it, and choose New Database from the context menu to display the Database Properties window, shown in Figure 18-6.
- On the General tab, enter a name for the database, such as SMS_xxx, where xxx represents the site code for your new site.
- The database file name will appear as SMS_xxx_Data in the Database Files list. You can click the Browse button (found in the Location column) to display the Locate Database File window where you can modify the location of the file. You can also change the initial size through this entry.
- In the File Properties section, the Automatically Grow File option is enabled by default. This option ensures that SQL Server monitors the size of your database and expands it as necessary according to the File Growth parameter you specify. You can also allow the growth to be unrestricted or set a maximum size.
- Click on the Transaction Log tab, shown in Figure 18-7, and configure the same parameters for the transaction log. The transaction log file will be named SMS_xxx_Log.
- Click OK to create the files.
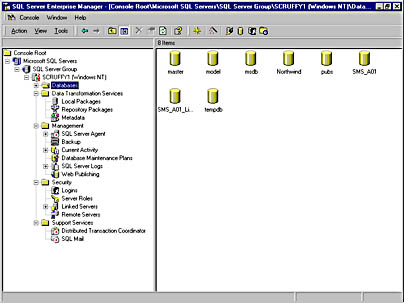
Figure 18-5. SQL Server 7.0 Enterprise Manager.
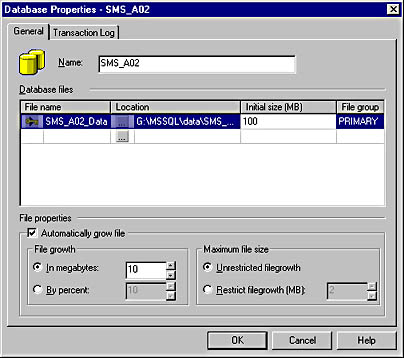
Figure 18-6. The Database Properties window.
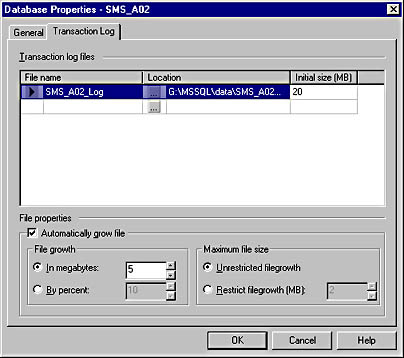
Figure 18-7. The Transaction Log tab.
SQL Server 7.0 considers the database and transaction log files combined as representing the database and displays a single database entry, rather than listing individual devices as is done in SQL Server 6.5.
EAN: 2147483647
Pages: 167