Using the Software Metering Tool
The Software Metering tool provides both viewing and configuration options for the applications you are tracking. You can view usage data, set restrictions and licenses, and generate simple usage reports. To access the Software Metering tool, follow these steps:
- In the SMS Administrator Console, navigate to the Tools folder and expand it.
- Right-click on Software Metering, choose All Tasks from the context menu, and then choose Start Software Metering to display the Software Metering tool, shown in Figure 14-16.
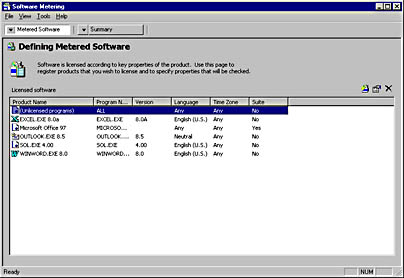
Figure 14-16. The Software Metering tool.
Tracking Usage
As shown in Figure 14-16, the Software Metering tool opens to the Metered Software view by default. In this window, you will see a list of all the applications you have registered and for which you have set specific license data, restrictions, or other properties. The Summary view window contains two tabs for displaying usage data: Unlicensed and Licensed. The Unlicensed tab, shown in Figure 1417, displays all applications that have been metered from your SMS clients. By default, the Software Metering Client Agent records and forwards usage information for every executable run on the client with the exception of those listed in the Excluded Programs list. The information recorded and displayed here includes the name, version, and language of the program that was executed; the user that executed the program; the name of the computer on which the program was executed; when the program was started; and how long the program ran. Each instance of each program running on each SMS client will be reported, including, of course, any instance of any executable called by another application. Consequently, this list can quickly become quite large.
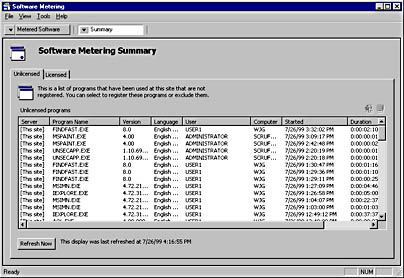
Figure 14-17. The Unlicensed tab.
The amount of data recorded here can be controlled in several ways. Recall that the Data Summarization tab of the Software Metering Component Properties window lets you define rules for summarizing this usage information. Following your criteria, the SMS License Service summarizes usage data by condensing multiple references to a program's usage in a single general record of use for that product. Recall the Solitaire example cited previously. If five clients each run two instances of Solitaire for five days, 50 records of usage for Solitaire will have been reported. Data summarization can condense this information to one record per program per day, per week, and so on.
Another way to control the amount of usage data that is monitored and recorded is to exclude programs you don't want to monitor. For example, you might not want to know or even care whether a user runs the Calculator tool or what executables were called by a program when the user ran a spell-check. These types of programs can—and should—be excluded from tracking by the Software Metering Client Agent.
The Software Metering tool is configured with a default Excluded Programs list. This list includes most of the SMS client agent executables, some Windows NT operating system program files and .DLLs and some programs such as Notepad, Program Manager, and Microsoft Management Console (MMC). To view the Excluded Programs list (shown in Figure 14-18), choose Excluded Programs from the Tools menu in the Software Metering window.
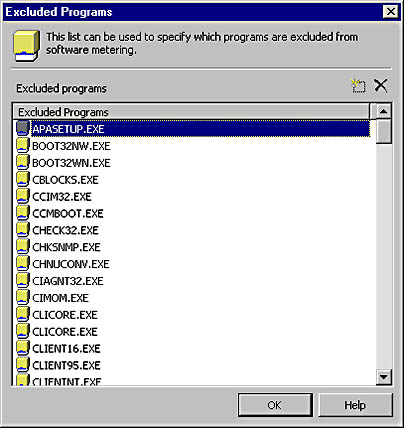
Figure 14-18. The Excluded Programs list.
There are two ways to add programs to the Excluded Programs list. The first is to find the programs you want to exclude in the Unlicensed Programs list on the Unlicensed tab. Right-click on a program and choose Exclude from the context menu, or select the program and click the Exclude button (the one that looks like a software box with a bag over it). This will add the program to the Excluded Programs list. However, you will need to let the Software Metering Client Agent monitor and record all the programs you want to exclude at least once before you can exclude them in this fashion because the Unlicensed Programs list is created as the Software Metering Client Agent reports application usage. An application will not appear in the list until it has been reported by the client agent at least once.
Another way to exclude programs is through the Excluded Program list itself. To use this technique, follow these steps:
- Start the Software Metering tool from the SMS Administrator Console.
- Select Excluded Programs from the Tools menu to display the Excluded Programs list (shown in Figure 14-18).
- Click the New button to display the New Excluded Program dialog box, shown in Figure 14-19.
- Enter the name of the program you want to add to the list, or click the Browse button to browse for the program name. Then click OK.
- Click OK again to update the Excluded Program list.
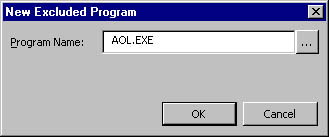
Figure 14-19. The New Excluded Program dialog box.
The updated Excluded Programs list is copied to the software metering server by the License Metering process thread on the site server. At the next component polling cycle for the Software Metering Client Agent, the updated Excluded Programs list is downloaded to the SMS client. From this point forward, the client agent will ignore any instance of the excluded programs that are run on the client.
Registering, Restricting, and Licensing Programs
Beyond simply tracking application usage on your clients, you may want to establish other usage policies and restrictions. This process involves registering a program and configuring more specific usage policies for that program. You can accomplish this task in several ways using the Software Metering tool.
The first method is to find the programs you want to register in the Unlicensed Programs list on the Unlicensed tab. Right-click on the program, and choose Register from the context menu, or click the Register button (the yellow star on a software box). The New Product dialog box will appear, as shown in Figure 14-20. Notice that some product and file details are already filled in. Most of these were derived from header information contained in the executable file. Make any modifications you want to these fields. The purchase date will always be the date on which you registered the product.

Figure 14-20. The New Product dialog box.
In particular, be sure to enter the number of licenses available for this product. This number will be used to grant or deny licenses to your SMS clients running the Software Metering Client Agent if you also enable the Enforce The License Limits For This Product option. If you do not select that option, the license number will be strictly informational.
As with excluding programs through the Unlicensed tab, you will need to let the Software Metering Client Agent monitor and record all the programs that you want to register at least once before you can register them in this fashion.
The other method of registering programs is accomplished through the Metered Software view window of the Software Metering tool.
- Start the Software Metering tool from the SMS Administrator Console.
- In the Metered Software view window, click the New button (the yellow star on a software box) to display the Add Product dialog box, shown in Figure 14-21.
- Select Create New and then click OK to display the New Product dialog box, shown in Figure 14-20. Enter the product details, including the product name, the serial number, and the purchase date. Enter the number of licenses and select Enforce The License Limits For This Product if you intend to track license usage for this program.
- Enter the file details, including the program name, version, and language. If the product is a suite parent (discussed in detail in the section "Registering Product Suites" later in this chapter), select This Product Is A Suite Parent. Click the Browse button to browse for the program file. If you select a program file using this method, product and file details will be filled in to the extent that they can be read from the header information of the program file.
- Adjust the Time Zone as necessary, and then click OK to complete the registration.
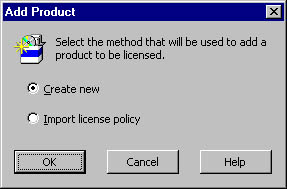
Figure 14-21. The Add Product dialog box
Policies and ProfilesOccasionally, software developers include a license policy or profile generated as a Management Information Format (MIF) file during the setup of the application. These files usually include product and file details and the number of licenses granted. If the product you are registering includes such a file, you can use it to fill in the New Product dialog box.
To do so, copy the policy or profile file to the SMS\Inboxes\License.box\Local<r>Miflp folder on the site server. In the Metered Software view window, click the New button to display the Add Product dialog box. Choose Import License Policy and then click OK to display the Import License Policy dialog box. Select the product from the list and click Import. Alternatively, you can click the New button and then choose Create New. In the New Product dialog box (shown in Figure 1420), click the Load Profile button to display the Load Profile dialog box. Select the profile from the list, and click Load Profile to return to the New Product dialog box. The New Product dialog box will reflect the product, file, and license entries contained in the policy or profile.
Registering Product Suites
You have no doubt noticed in the New Product dialog box the This Product Is A Suite Parent option. Product suites consist of two or more applications that are functionally related or that work together. Microsoft Office and Lotus Smart Suite are examples of product suites. For example, Microsoft Office represents the suite parent, and Microsoft Word, Microsoft Excel, Microsoft PowerPoint, and so on, represent the applications that belong to Microsoft Office. You can register suites by first registering each application that belongs to the suite and then registering the suite and adding the individual applications to the suite.
Licenses obtained for suite products apply to the members of the suite. For example, if you purchase 50 Microsoft Office Professional licenses, they apply equally to Word, Excel, PowerPoint, and Microsoft Access—all members of the suite. When you register the individual applications within the suite, set the number of licenses to 0.
![]()
NOTE
If you obtained extra licenses for any member of the suite, specify the number of extra licenses when you register that member. For example, if you have 50 Microsoft Office Professional licenses and you then purchased 10 extra Access licenses, set the number of licenses for Access to 10 when you register it.
Register the suite parent as you would any other new product through the Metered Software view window as outlined earlier. The product name entered in the New Product dialog box should reflect the suite name—for example, Microsoft Office 97—as shown in Figure 14-22. Enter any additional details you want except the version number, and select the option This Product Is A Suite Parent. Be sure to enter the number of licenses available for the suite members.
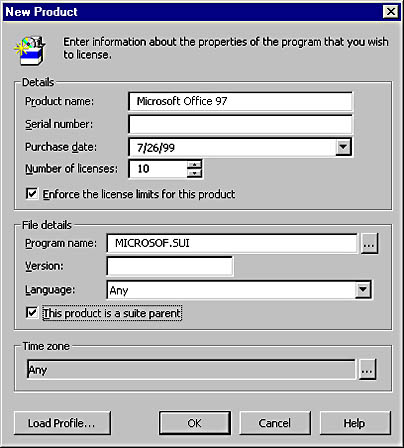
Figure 14-22. Defining a suite parent in the New Product dialog box.
To add the individual programs to the suite parent, follow these steps:
- Select the suite entry from the Licensed Software list in the Metered Software view window. Right-click on the entry and choose Properties from the context menu to display the Program Properties window, shown in Figure 14-23.
- On the Identification tab, click Suite Membership to display the Suite Membership dialog box, shown in Figure 14-24. Select each program in the Available Resources list that should be a member of the suite, and click the Add button to add it to the Members list.
- Click OK, and then click OK again to add the programs to the suite parent.
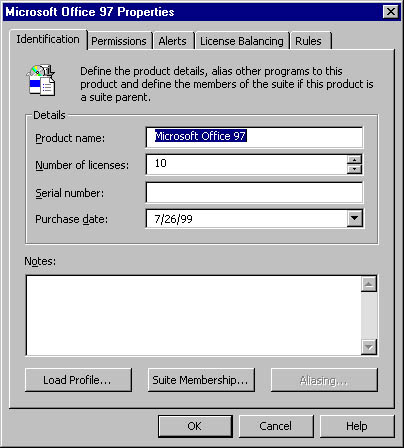
Figure 14-23. The Program Properties window.
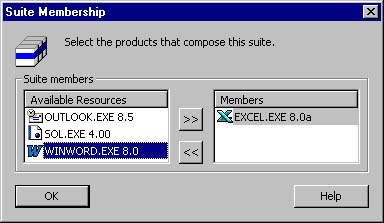
Figure 14-24. The Suite Membership dialog box.
Modifying Registered Product Properties
Once a product has been registered, you can set additional policies and restrictions on it by modifying its properties. To do so, follow these steps:
- In the Metered Software view window, select the program whose properties you want to configure from the Licensed Software list.
- Right-click on the entry, and then choose Properties from the context menu to display the Program Properties window, shown in Figure 14-25.
- The Identification tab displays the product details you entered when you registered the program. You can modify these as necessary. The Number Of Licenses setting represents the number of licenses that are currently available at the site server and have not yet been distributed, or balanced, to the software metering servers. Once all available licenses have been balanced, this value will be 0. If you have purchased additional licenses, enter the number of licenses here.
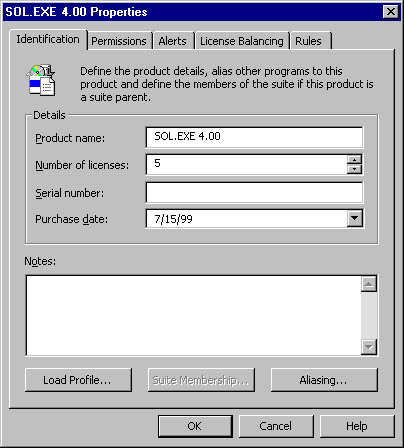
Figure 14-25. The Identification tab of the Program Properties window.
![]()
NOTE
You can only increase the number of licenses using the technique described above. If you need to decrease the number of licenses, you must first delete the registered program, wait for the site server to update the software metering servers, and then reregister the program with the new (lower) number of licenses.
- Click on the Permissions tab, shown in Figure 14-26. Here you can set two types of restrictions on the application: you can identify which users and computers can access the program and specify which times of day the application can be run.
- Specifying users and computers is much like configuring an ACL in Windows NT. Anyone you explicitly identify in the Has Access list will be able to run the program. To give a specific user or computer access to the program, select it from the Available Resources list and click the Add button to add it to the Has Access list. Be sure to remove the entry ANY from the Has Access list, as this acts much like the Everyone group in Windows NT. The list of users and computers is generated through a Tools menu option in the Software Metering tool and is discussed in the section "Resource Manager" later in this chapter.
- To disallow access at specific times of the day, highlight the range or ranges of time when the program cannot be run in the Access Times section, and then click OK.
- Click on the Alerts tab, shown in Figure 14-27. These settings allow you to define events that will generate system messages as well as define how computer inactivity is managed.
- In the Alert Events section, select the event option for which you want an alert generated. If you select Low Licenses, you can also specify the threshold number of licenses that must be reached before the alert is generated.
- In the Computer Inactivity section, you can enable monitoring for inactivity by selecting Enable Inactivity Monitoring. Enter the number of minutes of inactivity (lack of mouse or keyboard movement) that must be detected before an action is performed, and then select one or more actions. If you select Generate Event, an event will be written to the Application log in the Windows NT Event Viewer of the computer in question. If you select Show Warning Dialog, the Software Metering Client Agent will display the warning message you defined on the Inactivity tab of the Software Metering Client Agent Properties window. If you select Shut Down Application, you can optionally define a grace period during which the user can save data files before the application is shut down.
- Click on the License Balancing tab, shown in Figure 14-28. Here you can specify license balancing percentages within the site and among sites.
- The Minimum Percent Of Free Licenses Held At Software Metering Servers setting in the Local License Balancing section represents the minimum number of peak usage licenses to keep at the software metering server. If the number of licenses falls below this threshold, the license balancing process will attempt to locate available licenses in other sites.
- The Minimum Percent Of Licenses Held At Software Metering Servers setting represents the minimum percentage of free and used licenses that should be maintained by the software metering server at all times. If the site server is balancing licenses, it will not take licenses from a software metering server if it will breach this threshold.
- The Minimum Percent Of Free Licenses Held At The Site Server setting in the Inter-Site License Balancing section indicates that you want at least that percentage of licenses kept available at the site server to distribute to software metering servers should they require additional licenses. When the percentage of free licenses falls below this threshold, the site server will attempt to obtain available licenses from other software metering servers through its load balancing process.
- By default, license restrictions will not be enforced until SMS has determined how licenses are being used at each software metering server. License usage is monitored for seven days, after which licenses are reapportioned—that is, balanced—according to usage statistics. License restrictions are then enforced on the clients. If you want to begin enforcing license restrictions immediately, especially if you have only one software metering server, clear the Do Not Enforce License Limits For This Product Until A Trend Has Been Calculated check box.
- To configure additional policy options, click on the Rules tab, shown in Figure 14-29.
- If the program you have selected is a member of a suite, the options in the Offline Metering section are activated. These options define how data will be collected and reported for individual programs that are also members of a suite while in offline mode. You can specify that offline data should be reintegrated using the individual product's license data by selecting Reintegrate As Standalone or using the suite parent's license data by selecting Reintegrate As Suite.
- The Enable Concurrent Licensing Of This Product option allows the simultaneous use of one product on one computer using one license. When this is selected (by default), you can also select Multiple Instances Count As One, which means that a single license allows the user to run multiple instances of the product. For example, if you are licensing Calculator, you can initiate several instances of it but use only one license and track all instances as one.
- The Allow License Extensions option allows for licenses that permit the program to be run on more than one computer using the same license—for example, programs that can be installed legally on both a business and home computer.
- If the program is an evaluation copy of software, or if for some other reason the license period is short, select License Expires and enter an expiration date.
- If you intend to grant and deny licenses through the software metering server based on the license rules you configured, select the Enforce The License Limits For This Product check box.
- In the License Check-Out Options section, you can enable your user to check out a license for this product for a specified maximum period of time (from 1 to 365 days). After the maximum number of days is reached, the license is revoked and returned to the available pool of licenses. The Warn User value indicates the number of days before the license will expire that the Software Metering Client Agent will begin to warn the user that the license will expire. The message displayed to the user is the message you configured on the Checked-Out tab of the Software Metering Client Agent Properties window.
- Click OK to save the program configuration.
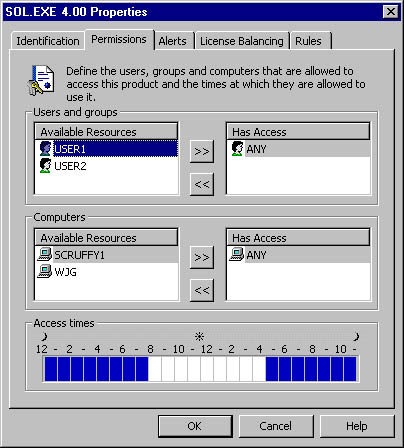
Figure 14-26. The Permissions tab.

Figure 14-27. The Alerts tab.

Figure 14-28. The License Balancing tab.
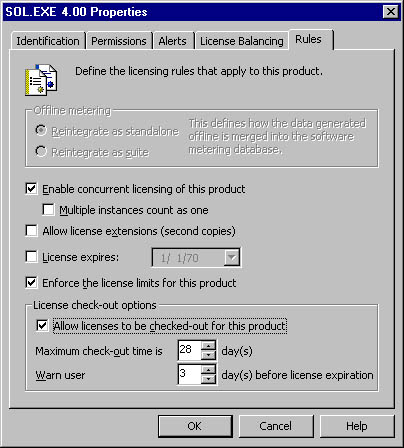
Figure 14-29. The Rules tab.
This configuration data will be forwarded to the software metering server and will be updated for the client by the Software Metering Client Agent at its next configuration polling interval.
Aliasing Registered Programs
On the Identification tab of the registered program's Properties window, you might recall seeing a button labeled Aliasing. In software metering, aliasing a program enables you to identify one or more programs to be monitored as another registered program.
The following example of aliasing is adapted from the Systems Management Server Administrator's Guide. The Software Metering Client Agent for Windows 95 and Windows 98 clients is named Liccli95.exe; for Windows NT clients, it is named Licclint.exe. If client agents are monitored separately, they are tracked by their filenames. However, both of these client agents are 32-bit agents. You could register one of those programs—say, Licclint.exe—as "32-bit Software Metering Client", and then alias Liccli95.exe. When Liccli95.exe or Licclint.exe is started, a license for "32-bit Software Metering Client" is used. To alias a program, follow these steps:
- Open the Properties window for the program you just registered.
- On the Identification tab, click the Aliasing button to display the Aliasing dialog box, shown in Figure 14-30.
- Click the New button to display the Add A New Alias dialog box, shown in Figure 14-31.
- Enter the program name for the program you want to alias or click the Browse button. Specify version, language, and time zone information if necessary, and then click OK.
- Click OK again to save the alias.
- Click OK to close the registered program's Properties window.
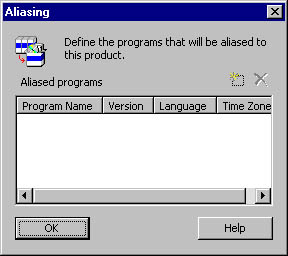
Figure 14-30. The Aliasing dialog box.
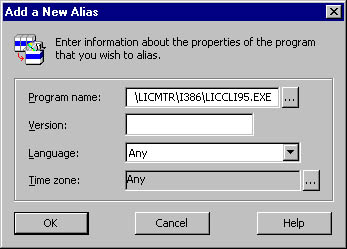
Figure 14-31. The Add A New Alias dialog box.
Now when either program is run, it will be monitored and recorded under a single alias—the registered program you created. This alias can help facilitate your analysis of programs that are run.
![]()
REAL WORLD Restricting Unlicensed SoftwareAs mentioned, any application that you have not either registered or excluded using the Software Metering tool will be tracked by the Software Metering Client Agent. Usage data for these applications is displayed on the Unlicensed tab in the Summary view window of the Software Metering tool. Unlicensed programs of this type can also be restricted. Notice that the Licensed Software list in the Metered Software view window contains an Unlicensed Programs entry, as shown in Figure 14-15.
Right-click on Unlicensed Programs and choose Properties from the context menu to display the same Program Properties window you see for any other registered program, where you can set user and computer restrictions, time restrictions, alerts, and concurrent license options. You cannot set any policies that deal with licenses or license balancing, however, as those can be set only for registered programs.
Also, all the options that you configure here will apply to all unlicensed programs. Unless you have been meticulous about the programs you have registered and excluded, restricting the unlicensed software may not always be practical. However, if you have been scrupulous, you could use this feature of the Software Metering tool to intentionally set restrictions on or lock out specific programs that have not been explicitly excluded or registered.
Consider the following example: If your organization maintains desktop standards that do not allow users to install their own software, you would register all the standard programs that are supported by your organization and exclude the little applets like Clock and Calculator. Perhaps you have purposely removed the Games folder from the Accessories folder because it is not a company standard. Theoretically, the only programs that should now appear in the Unlicensed Programs list are nonstandard programs—those that are unsupported or that shouldn't run on clients' workstations.
You could then set a global restriction for all these unlicensed and therefore nonstandard or unsupported programs such that they should not be run at all at any time. This would effectively prevent a user from being able to run these kinds of applications.
Resource Manager
One of the program property restrictions you can set is which users and computers can explicitly run a particular registered program. The users and computers that can be added to this list are configured using the Software Metering tool's Resource Manager. Resource Manager also lets you identify a callback priority for each user. By default, callbacks are granted on a first come, first served basis. Let's say that user A is denied a license and requests a callback. User B tries to run the same program next, is also denied a license, and requests a callback. When a license becomes available, user A will receive the first callback. User B will receive the next callback, and so on.
The default callback priority is 5, with 1 the lowest priority and 9 the highest. Revisiting the same scenario, let's set the callback priority for user B to 7. In this case, user A is denied a license and requests a callback. User B tries to run the same program next, is also denied a license, and requests a callback. When a license becomes available, user B will receive the first callback because user B's callback priority is higher than user A's. Similarly, the user with the next highest callback priority will receive the next callback, and so on.
You configure Resource Manager in the following manner:
- From the Software Metering window, choose Resource Manager from the Tools menu to display the Resource Manager window, shown in Figure 14-32.
- On the Users tab, you can create a list of users that you can reference when setting access permission for a registered program. To add a user, click the New button to display the Add New User dialog box, shown in Figure 14-33.
- Enter the Windows NT user name in the User Name text box. Enter the Callback Priority, if necessary, for this user, and then click OK.
- Click on the Groups tab, shown in Figure 14-34. Here you can create a list of groups that you can reference when setting access permission for a registered program.
- Click the New button to display the Add New Group dialog box, shown in Figure 14-35.
- Enter the Windows NT group name in the Group Name text box, and then click OK.
- Click on the Computers tab, shown in Figure 14-36. Here you can create a list of computers that you can reference when setting access permission for a registered program. By default, all your SMS client computers will be listed here.
- Click the New button to display the Add New Computer dialog box, shown in Figure 14-37.
- Enter the Windows NT computer name in the Computer Name text box. Then click OK.
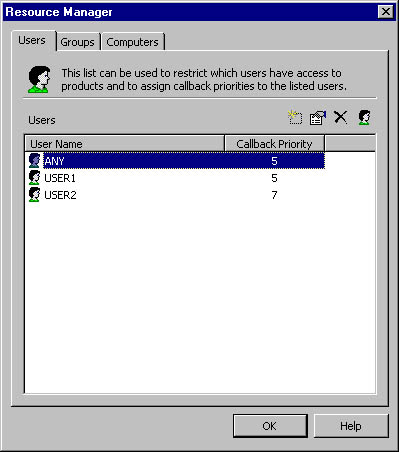
Figure 14-32. The Resource Manager window.

Figure 14-33. The Add New User dialog box.
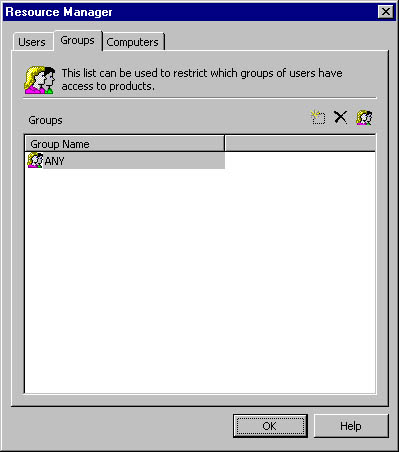
Figure 14-34. The Groups tab.
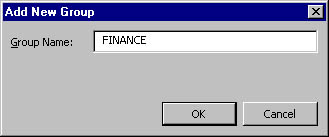
Figure 14-35. The Add New Group dialog box.
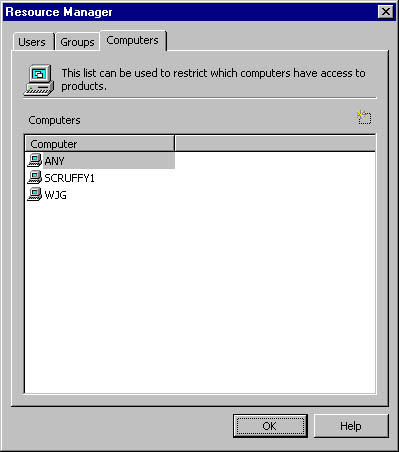
Figure 14-36. The Computers tab.
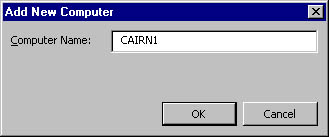
Figure 14-37. The Add New Computer dialog box.
![]()
NOTE
Although the steps for adding a new group have been included here for completeness, the Software Metering tool, even with SMS 2.0 Service Pack 1 applied, does not recognize groups. The Software Metering tool cannot validate access based on group resources; it can validate access only based on users or computers.
EAN: 2147483647
Pages: 167