Timeline Navigating
| [ LiB ] |
Timeline Navigating
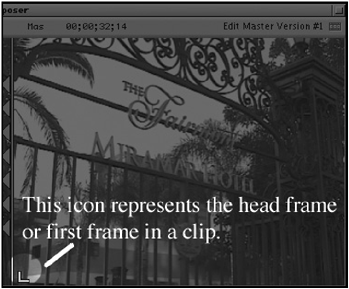
Moving around and through the Timeline is as easy as dragging the Position Indicator left and right but there are also several ways to navigate through the Timeline. These methods , as you'll see, will greatly improve how you navigate and view items in the Timeline. While you're editing, there will be several occasions where you'll need to park on an edit point or transition. To move quickly to an edit point, use the A and S keys. The A key navigates to a previous edit point and the S key jumps to the next edit point. Whichever tracks are selected dictates which edit point the Position Indicator moves to. You'll always know when you're at the head frame of an edit by the small indicator in the record monitor (see Figure 5.1).
Figure 5.1. A small bracket in the lower-left corner indicates that you are on the first frame of a clip.

The problem with this method is, because it's track sensitive, you're always turning tracks on and off to navigate to the edit point you want. A better method of navigating is to use the Control key (Windows) or the Command key (Macintosh OS). Hold down one of these keys and click through the Timeline. You'll notice that the Position Indicator jumps to edit points regardless of which tracks are selected. This is a great way to quickly set IN points.
You can also snap to the last frame of a clip in the Timeline regardless of which tracks are turned on or off. Press the Command and Option keys (Macintosh OS) or the Control and Alt keys (Windows) and click in the Timeline to jump to the tail frame. The record monitor will display a small icon in the lower-right corner indicating that you are indeed on the last frame. This is a great method of quickly adding an OUT point.
As you drag the Position Indicator through the Timeline, you'll notice that it skips through much of the material. If you want to scroll through every frame in the Timeline, click in the Timeline then hold down the Alt key (Windows) or the Option key (Macintosh OS) as you drag the Position Indicator. You'll notice that your cursor moves ahead of the Position Indicator yet every frame is displayed in the record monitor.
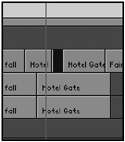
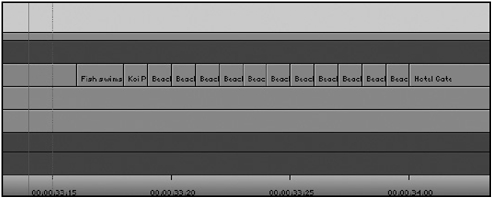
As your sequence grows, there will be times where the edits in the Timeline appear as small areas of black. These areas contain several edits and Avid Xpress Pro simply displays them the only way it can. To get a closer view of anywhere in your Timeline, use the Scale Bar located at the bottom of the Timeline. This tool allows you to zoom in and out of the Timeline. To use the Scale Bar, click and drag the button left and right. Notice that the circled area looks like an area of black (see Figure 5.2). But, if you zoom in, you can see it's really a series of very quick edits (see Figure 5.3).
Figure 5.2. A series of short edits displays as a black area.

Figure 5.3. When zoomed in, the Timeline displays the edits.

You'll also notice that the Position Indicator becomes two lines when you zoom in. The space between the two lines indicates the size of one frame. Another method of zooming in to the Timeline uses the Focus button. This button is in the Timeline next to the Timeline's Fast Menu. If you click on the button once, you'll zoom into the Timeline. If press the Focus button again, you'll zoom back out. You cannot determine how much you can zoom in when using this method.
| [ LiB ] |