Three Methods of Capturing Footage
| [ LiB ] |
Three Methods of Capturing Footage
Avid Xpress Pro allows you to capture material three ways. One way is not necessarily better than the next . Each method can be called for in different situations.
Capturing On-the-Fly
The first method, and easiest , is to capture your footage using capture on-the-fly. Do not use this method if your start and end times need to be precise. Using the deck controls in the Capture tool, cue your tape to a point prior to the shot you want to record (see Figure 2.8).
Figure 2.8. This area of the Capture tool (located in the lower left) controls your deck or camera.
![]()
It is always important to record more footage than what you'll actually use. These "handles," or extra frames of footage, will provide you with enough footage to trim edits and add dissolves , which will be covered in later chapters. Click the Play button. When your deck or VTR starts rolling, click the large Record button in the first section of the Capture tool. The box next to this button will begin to flash, indicating that you are recording.
During recording, a dialog box will indicate that annotate is available. Annotate allows you to attach a name and comment to the clip that is being captured. Start typing a name on the keyboard and the name column becomes active. Pressing the tab key activates the comment column, thus allowing you to add a comment to your clip (see Figure 2.9).
Figure 2.9. When recording material, you can add comments.

When you've reached the end of the media you want recorded, click the large Record button or press the Esc key. You'll now have a new clip in your bin. If you did not name the clip, you can do so now.
Not the right shot? If you decide that this was not the shot you want to record, simply click the trash icon while you're recording. Recording will stop and a dialog box will open asking if you want to discard the video you captured up to this point. If you choose Discard, no media will be saved to your hard drive.
If you decide to use this method of recording, make sure no IN or OUT points are marked in the deck control area.
Capturing From IN to OUT Points
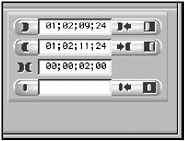
If you want to record your footage with accurate starting and ending points, you'll want to use the second method of capturing, capturing from IN to OUT. First find the frame you want to start recording at and mark this as your IN point (see Figure 2.10). To mark an IN point, click on the Mark IN button in the Capture tool. Once you click this button, the starting timecode of the clip will appear in the display next to the button.
Figure 2.10. First mark an IN point.

Using the deck controls, scan forward to find the end frame you want to capture and mark an OUT point. The OUT point button is located directly beneath the IN point button. You'll notice underneath your logged OUT point the total duration of the clip. In this example it's 2:00 seconds long (see Figure 2.11).
Figure 2.11. Once you mark an IN and OUT point, Avid Xpress Pro automatically calculates the duration.
So far you have simply logged the tape. You have not captured any media. Click on the large Record button in the upper-left corner of the Capture tool. The Capture tool will automatically rewind your tape to a point prior to the logged marked IN point. The tape will then begin to play forward and start recording at the frame you marked as the IN point. When the deck reaches the marked OUT point, Avid Xpress Pro will stop capturing. As with recording on-the-fly, you can type a name for the clip when the Record button starts flashing. If you've logged your tape or know the starting and ending timecodes, you can type them directly into the IN and OUT boxes next to the IN and OUT points. These are the same boxes that display your start and end times.
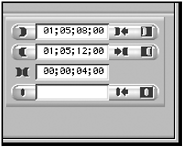
If you want the duration of your clip to be a set time, set an IN point and type in the duration of the clip in the duration box next to the two Mark IN and Mark OUT icons. The example shown in Figure 2.12 marks the IN point and uses a value of 4 seconds. Avid Xpress Pro automatically marked where the OUT point is.
Figure 2.12. You can type in a duration and Avid Xpress Pro will calculate the OUT point.
Batch Capturing
The third method of recording is batch capture. Unlike the other methods of recording, batch capturing allows you to log master clips first and then capture the associated media files. The other two methods of capturing require you to capture material as the deck plays. Batch capturing allows you to scan through a tape, mark all the IN and OUT points you want, and then capture the material. Remember, a media file or clip is simply a pointer to media file. By batch capturing, you create only the clips, and then later you capture the media files. This is the same method you use to re-record a show that was deleted.
Before you record any material, you'll need to log your footage. Logging your footage allows you to mark an IN point and an OUT point around each clip you want to capture from a tape. Click on the capture/log button to switch from the capturing mode to the logging mode (see Figure 2.13). The icon will change from a hard drive to a pencil.
Figure 2.13. The capture/log mode button.

Select the tracks that you want to log (V1, A1,A2, and so on). Search the tape to find where you want to start logging. Remember to cue the tape up to a point earlier than where you want the actual edit to begin. This is called preroll, which is needed for any trimming functions or if you plan on adding any effects. Mark an IN point by either clicking on the Mark IN button that replaced the Record button or by marking an IN point in the deck controls area.
After you mark your IN point, you'll notice that the icon in the upper-left corner turns to a pencil with a Mark OUT icon (see Figure 2.14). Don't click on this icon yet.
Figure 2.14. Once you log an IN point, the logging icon changes.

The system now needs an OUT point to complete the logging process. Scan forward on the tape and find the point where you want the capturing process to end. Again, remember to go slightly past the actual point where you want the clip to end. Log this point as your OUT point by clicking on the Log/OUT Point button in the upper-left corner of the Capture tool or by clicking the OUT point next to the deck controlling area. A clip will appear in your target bin but there will not be any media associated with the clip. In the Frame view, the clip has the words Media Offline inside of it. You can also let the tape play and as it plays continuously mark IN and OUT points. Each time you log an OUT point a new clip will appear in your target bin. Continue to mark IN and OUT points until you've logged all the shots on the tape.
After you're done logging, it's time to record your media to a hard drive. Highlight the bin where the clips reside. Select all the clips by either holding down the Shift key and clicking on each clip (Mac OS) or by Ctrl-clicking the clips (Windows). You can also highlight all the clips by pressing Command+A (Mac OS) or Ctrl+A (Windows). Next, choose Batch Capture from the Bin menu. The Batch Capture dialog box will appear (see Figure 2.15).
Figure 2.15. The Batch Capture dialog box shows how many clips have been selected.
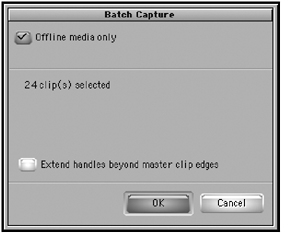
If the bin already contains clips that have been captured, there is no need to re-capture them. Select the Offline media only check box and the system will only capture the clips that are offline. Click the OK button and the system will rewind your tape to the first clip's timecode. Your VTR or camera will then roll forward and capture the clips in order of their starting timecodes.
When all the clips have been captured, the system will display a window indicating that all the clips have been captured. If there are any problems recording a clip, the following dialog box will appear (see Figure 2.16).
Figure 2.16. A dialog box will appear if the system has any issues when recording.
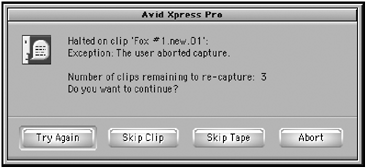
Your options are to try again, skip the clip that created the problem, skip the entire tape, or abort the recording process. If you logged clips from several tapes, the system will capture all the clips off one tape and prompt you to load any additional tapes.
| [ LiB ] |