Security Tools
| Windows Server 2003 doesn't introduce a lot in the way of new security tools. It does, however, introduce some minor improvements in its tools and includes many helpful tools that are available as add-ons for Windows 2000. For this one section of the book, we're going to veer slightly off our regular course. In general, we're not using this book to explain things that exist in Windows 2000; instead we're saving space to cover just what's new and changed in Windows Server 2003. However, Microsoft's user surveys ”and our personal experience ”indicates that most administrators have never used many of Windows 2000's security tools. For that reason, we're going to approach the major tools from scratch, showing you how they work and explaining their effects on Windows Server 2003's overall security picture. If you're already familiar with these tools, feel free to skim through the next few sections looking for the bits that have changed.
Security Configuration ManagerYou'll see that the Windows Server 2003 documentation refers to the Security Configuration Manager toolset. The phrase itself is a bit misleading because there's no one tool actually named "Security Configuration Manager." Instead, Windows Server 2003 includes a group of related tools ”Security Templates, Security Configuration and Analysis, and so forth ”that provide security-specific functionality. Windows Server 2003's primary security tools include
Windows Server 2003 includes another tool we especially like, called Hfnetchk.exe (which stands for HotFix NETwork CHecKer). Hfnetchk.exe is designed to analyze Windows computers and let you know whether they're missing any recent security updates. We cover this tool later in this chapter, in the section "Hfnetchk.exe." Security Templates, Configuration, and AnalysisConfiguring Windows Server 2003's security features requires a lot of attention to detail. One of the biggest problems, therefore, is in consistently applying a detailed security configuration across an enterprise. After all, manually configuring a company's computers is time-consuming , not to mention error-prone . To help consistently apply complex security configurations, Windows 2000 introduced the concept of security templates, and Windows Server 2003 makes great use of templates to enable consistent enterprise-wide security. The idea behind a security template is straightforward: Bundle a bunch of security settings into a single file, and then apply that file to multiple computers. In effect, the template is like a security checklist, forcing computers to configure themselves according to a standard you've created. The best ”and worst ”part about security templates is that they are cumulative , which means they can build on one another. For example, you might apply template A to configure your company's baseline security settings and then apply template B to configure department-specific security settings that build on the company's baseline. This flexibility makes it easier to manage enterprise security with a relatively small number of templates, but it can also make troubleshooting configuration problems a real nightmare because you have to figure out which templates apply each setting.
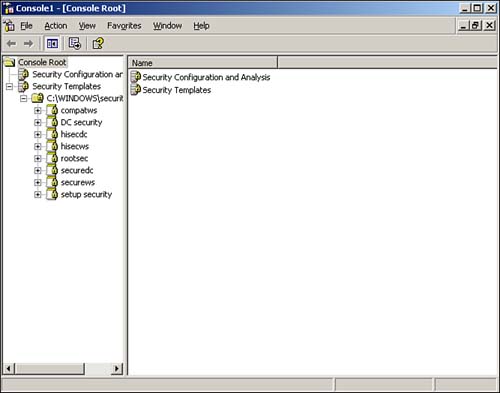
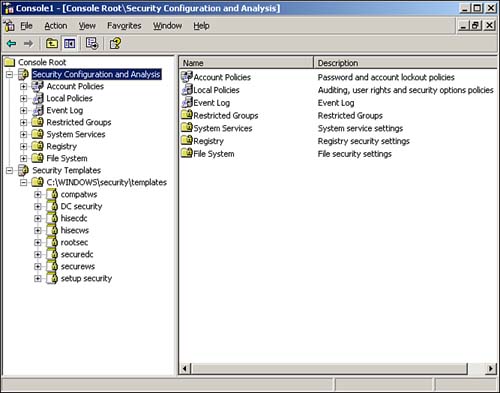
To make things easier, Windows Server 2003 offers two MMC snap-ins dedicated to security templates: The Security Templates snap-in and the Security Configuration and Analysis snap-in. Windows Server 2003 doesn't come with a preconfigured console for the snap-ins, so you must open the MMC and add them yourself. We like to add both snap-ins to the same console because they're so closely related. Figure 4.1 shows them in use. Figure 4.1. Save your custom console for easier use in the future. Security Templates Snap-inThe Security Templates snap-in is the best place to start. The snap-in starts with a list of the templates that are included with Windows Server 2003:
We don't recommend trying to memorize what these templates do. Instead, consult the Windows Server 2003 documentation for details. You should know, however, that each template configures settings in seven areas:
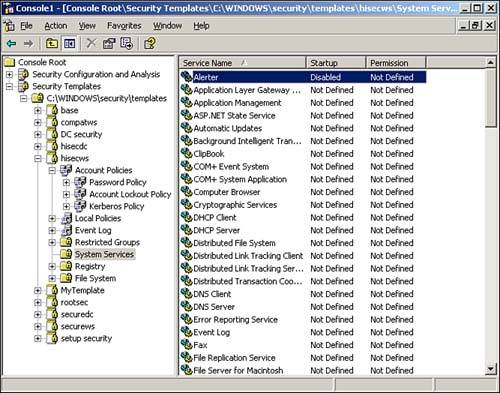
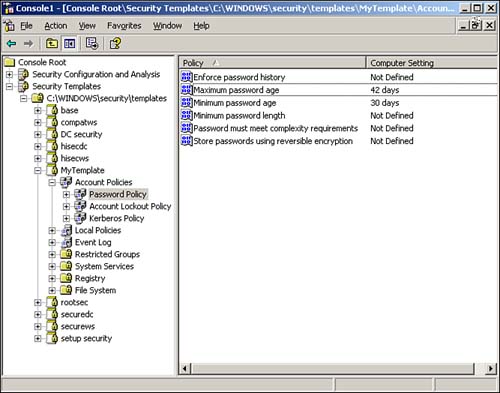
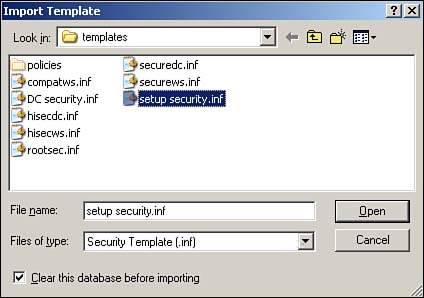
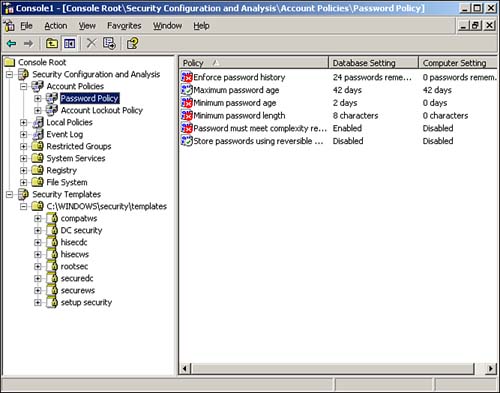
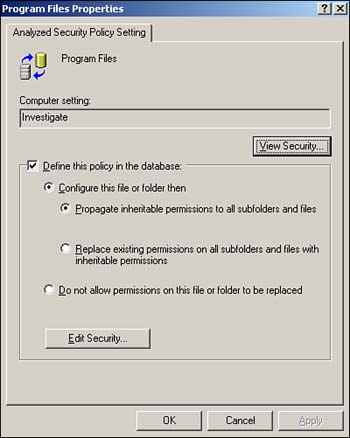
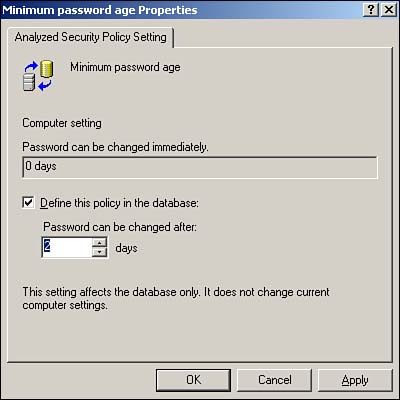
As you can see, the list of things you can configure within a security template is quite comprehensive. You can even modify the settings in any of the built-in templates (although we recommend you make a backup copy first, in case you want to revert to the original settings later). Simply double-click any setting to open a dialog box that enables you to change it. Figure 4.2 shows the result of a change to the Hisecws template. Notice how the setting for the Alerter service has been changed to Disabled. Figure 4.2. To save your changes, right-click the template name and select Save from the pop-up menu. Figure 4.2 also illustrates an important security template concept: Definition . Notice in the figure that all services except Alerter are set to Not Defined. This setting means the template doesn't actually contain a setting and that applying the template to a computer will not change that particular setting on the computer. If you see something configured as Not Defined in a security template, you know that the template will have no effect on that setting when the template is applied. If you don't want to start with one of the default templates, you can create your own from scratch. Simply right-click a templates folder, such as C:\WINDOWS\security\templates and select New Template from the pop-up menu. You'll be asked to provide a name and location for your new template, and then you'll be able to modify its settings, as shown in Figure 4.3. All new templates start out with all their settings undefined, allowing you to customize the template to contain exactly the security settings you want. Figure 4.3. Creating your own templates provides maximum security flexibility. After you've created the templates you need, you can deploy them. We'll discuss that next. Security Configuration and AnalysisWorking with templates can be difficult. Although you can use the Security Templates snap-in to see what's in a template, knowing what effect the template will have on a computer is sometimes difficult. The Security Configuration and Analysis (SCA) snap-in is designed to do just that: Show you what effect any given template will have. The SCA works with a security database and can create, open, and manage multiple databases so that you can manage different security configurations. A security database contains all the settings you want to apply to a computer. SCA includes an import function, so you can import security templates into the database. Figure 4.4 shows the import dialog box, which has a check box in the lower-left corner labeled Clear This Database Before Importing. When this check box is cleared, the import process adds a new security template to the database, layering it on top of whatever's already in there ”exactly how security templates work when applied to a computer. When you select the check box, however, the import process first clears the database, starting with a clean configuration. Select the check box when you're ready to begin working with a new database or if you want to wipe out the work you've done so far and start over. Figure 4.4. You can import multiple security templates into a single security database. For example, suppose you start with a blank database and import a security template named Template1. Then, you import a second template, named Template2, and you leave the check box cleared. The database will now contain all the settings in both Template1 and Template2. If the two templates contain any conflicting settings, the ones in Template2 will be effective. If, on the other hand, you had selected the check box when importing Template2, the database would contain only the settings in Template2. Everything from Template1 would have been cleared out prior to the import. After you've imported one or more security templates into a database, you can analyze the database against the computer. The analyze process compares the settings in the database to the active configuration of the current computer, without actually applying those settings. The result, shown in Figure 4.5, enables you to easily see exactly what effect the database's settings will have. Figure 4.6 shows additional analysis details. Notice how SCA uses icons to highlight settings in the database that don't match the computer's current configuration. Were you to actually apply the template to the computer, those settings would be changed. Settings that aren't defined in the database, or settings that are defined in the template and currently configured on the computer, aren't called out with a special icon. Figure 4.5. Analyzing lets you easily see the effect that one or more security templates will have on a standard computer configuration. Figure 4.6. Special icons call your attention to differences between the security database and the current configuration. You can also make changes to the security database manually, without the use of a template. The process is similar to modifying a security template: Simply double-click the setting you want to change. Different types of settings present different dialog boxes. For example, Figure 4.7 shows what a file security setting looks like, whereas Figure 4.8 shows a password policy setting. You can remove a setting from the database by clearing the check box that defines the policy in the security database. Figure 4.7. Use a security database to specify file permissions. Figure 4.8. Use a security database to specify a password policy setting. After you've configured your security database exactly the way you want it ”either by importing the desired security templates or by manually configuring the database ”you have two options for deploying the settings. The easiest is to simply apply the database directly to the computer by right-clicking the SCA snap-in and selecting Configure from the pop-up menu. Doing so applies the current database to the local computer's active configuration, making the two match. You can also export the database into a security template, which is a bit easier to deploy automatically throughout your enterprise.
Perhaps the easiest way to deploy security settings in an Active Directory domain is by using Group Policy. With Group Policy, you can create a new Group Policy object (GPO); import a security template (either one of the included templates or one you created); and link the GPO to a site, an OU, or a domain. All computers contained in that site, OU, or domain will receive the new security settings within an hour or so. Keep in mind that the standard order of group policy application applies: Site policies first, followed by domain policies, and then OUs.
Hfnetchk.exeHfnetchk.exe is a free download from Microsoft's Web site (www.Microsoft.com/download). Hfnetchk was actually developed by an outside firm, Shavlik (www.shavlik.com), and licensed to Microsoft; you can purchase a more fully functional version directly from Shavlik. The commercial version of the tool includes a complete graphical user interface; Microsoft's free version is strictly a command-line tool. Both of them, however, work similarly.
Hfnetchk is driven by an XML-based security database, which the tool can download directly from Microsoft. This database describes the latest security updates (formerly known as security hotfixes ) available from Microsoft, including service packs . The database also describes the specific changes each security update makes to the operating system, especially to files and Registry keys. These descriptions enable Hfnetchk to analyze your computer and determine exactly which security updates have, or have not, been correctly applied. Hfnetchk produces a comprehensive report that tells you exactly which updates you should obtain and apply. Most importantly, it can run across a network, analyzing remote computers to which you have administrative permissions. Hfnetchk is a useful tool to have in your security arsenal, and it's a tool you should run on a regular basis, especially against security-critical servers such as firewalls and domain controllers. Keep in mind, however, that Hfnetchk is primarily a reactive tool, which means it can alert you only to existing security problems. An enterprise-wide deployment of a more proactive solution, such as Software Update Services (SUS), can ensure that your computers always have the latest security updates applied. You can then use Hfnetchk in more of an auditing role to ensure that SUS is working properly and that security updates are, in fact, being applied as intended. |
EAN: 2147483647
Pages: 136