Hack24.Create a CUPS Print Server
Hack 24. Create a CUPS Print Server
Let printers announce themselves and create a flexible, modern printing environment by setting up CUPS. Today's printers are typically high-quality laser or inkjet printers, often capable of color printing and near-photographic quality. The original Unix printing system, known as lpd (Line Printer Daemon) was designed to queue and print jobs that were intended for huge, text-only line printers. As more sophisticated printers were developed that were capable of higher-quality printouts (such as the original x9700, Canon-CX, and Imagen-300 laser printers), the original lpd print system continued to be used, but it required that the jobs you were printing be preprocessed so that they contained the special commands the printer used internally to produce higher-quality printouts. This quickly became tedious, because it meant that users had to know which printers they wanted to print to and required use of the appropriate preformatting commands. Eventually, the lpd system was updated and a similar printing system known as lp was developed. lp encapsulated the knowledge about the formats required by specific printers, implementing the necessary preformatting commands into filters (also known as print drivers) that automatically formatted files as required by the target printers. The evolution of multiple printing systems for Unix systems was not without pitfalls: it led to incompatibilities between the different print systems, required recompilation of the filters for specific printers for multiple Unix systems (if you could get the source code at all), and so on. Eventually, a company known as Easy Software Products began developing a more generalized printing system for Unix, Linux, and other Unix-like systems, called the Common Unix Printing System (CUPS). The original version of CUPS used the standard networked LDP protocol, but it quickly switched to using a new standard, the Internet Printing Protocol (IPP), which non-Unix/Linux systems such as Windows can use to print to CUPS printers. Easy Software Products also had the foresight to make the CUPS source code freely available under the GPL so that it could be compiled for multiple operating systems and thus become a true, cross-system standard popularized by zillions of users and sysadmins. This strategy has workedtoday, CUPS is used by every major Linux distribution and most other Unix-like systems. Almost every Linux system provides its own administrative tool for print system and printer configuration: SUSE provides YaST; Red Hat and Fedora Core distributions use printconf-gui; and so on. Printer configuration would therefore still be a sysadmin nightmare if not for the fact that the CUPS print daemon provides a built-in administrative tool that is easily accessed through any web browser via port 631. This provides a standard interface for CUPS configuration (though you're still welcome to use your Linux distribution's administrative printer configuration tools, if you insist). This hack focuses on the standard CUPS interface and web-based configuration. 3.6.1. Defining a New Printer in CUPSTo define a new printer on any Linux system using the CUPS administrative interface, you must first make sure that the CUPS daemon, cupsd, is running on your system. You can do this using the ps command, as shown in the following example: $ ps alxww | grep cupsd 5 4 6923 1 16 0 24540 1452 - Ss ? 0:00 /usr/sbin/cupsd 0 1000 13304 31053 17 0 536 112 - R+ pts/13 0:00 grep -i cupsd If it isn't shown in the process listing, you can start it as the root user or via sudo, as in the following example: # /etc/init.d/cups start You should see an OK message once the system starts the CUPS daemon. Next, open your favorite web browser and connect to the network address http://127.0.0.1:631. The odd port number comes from its roots as an IPP print server (the default port for IPP is 631). The screen shown in Figure 3-1 will display. When you see this screen, click the Do Administration Tasks link. An authentication dialog will display, into which you enter the name and password of a user who is authorized to do printer configuration on your system.
Figure 3-1. The web-based CUPS administrative interface Once you successfully enter an authorized user's name and password, the screen shown in Figure 3-2 will display. Figure 3-2. The main CUPS admin screen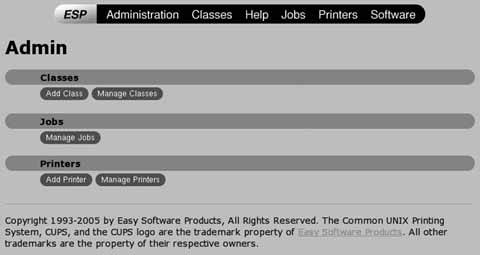 Click Add Printer to display the screen shown in Figure 3-3, where you can begin configuring your printer. (You can also get to this screen by selecting the Printers item from any CUPS page header and clicking the Add Printer button, but I think of this as an administrative action and therefore usually get there from the Admin page.) This hack focuses on configuring a local (physically attached) printer. "Configure Linux Connections to Remote CUPS Printers" [Hack #25] provides information on configuring a remote printer is provided in. Figure 3-3. The initial printer definition screen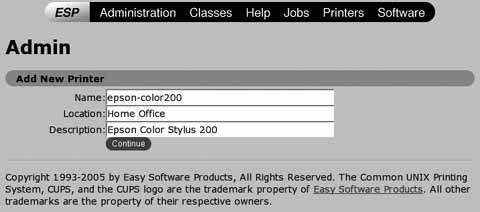 Enter a memorable short name for the printer in the Name field (most commonly without spaces), enter a summary of the printer's location in the Location field, and enter a short description of the printer in the Description field. The latter two are simply text strings, but putting meaningful values in these fields will help you remember which printer is which if your print server supports multiple printers. Click Continue to proceed. The screen shown in Figure 3-4 will display. Figure 3-4. Selecting how your printer is attached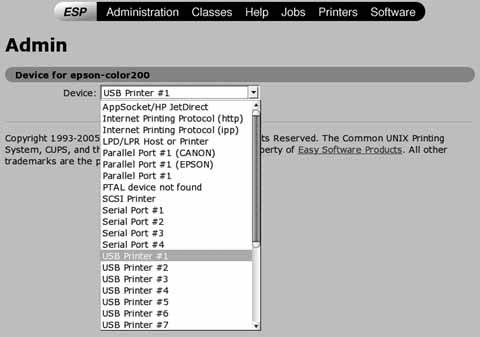 Select the device to which your printer is attached from the drop-down list shown in Figure 3-4. As you can see, some Linux distributions auto-identify the printers attached to various ports when they perform hardware detection (this example screen was captured on a SUSE Linux system). After selecting the interface to which your printer is attached, click Continue. The screen shown in Figure 3-5 will display. Figure 3-5. Selecting your printer's manufacturer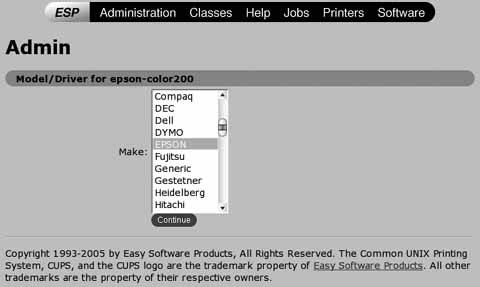 Select the manufacturer of your printer from the drop-down list in Figure 3-5. If the manufacturer of your printer isn't explicitly listed, your printer probably emulates a printer from some other manufacturer. (Printers that emulate various Hewlett-Packard printers are quite common. Any printer that supports PCLHP's Printer Control Languagecan emulate some sort of HP printer.)
Click Continue to proceed. A screen like the one shown in Figure 3-6 will display, listing all of the printers that are available from the selected manufacturer. Figure 3-6. Selecting a specific print driver Select your printer (or an equivalent) from this list. It's important to select your printer exactly if possible, to best take advantage of the printer's capabilities. Click Continue to proceed. You'll see a summary screen telling you that the printer has been set up, which includes creating the right print queues and configuration entries that are used internally by CUPS. 3.6.2. Testing CUPS PrintingOnce you've set up a new printer, the first thing you'll want to do is test printing to it, not just to ensure that it is correctly configured in terms of ports and drivers, but also to check the default quality level for the printer. To do this, click the Printers entry in the heading of any CUPS administrative web page. A screen like the one shown in Figure 3-7 will display. Click the Print Test Page button. You should see your printer's activity light come on, and the printer should begin to print a CUPS test page. If the activity light doesn't come on, click the Jobs entry in the web page to display a page showing the status of the test print job. If this page shows that the job has completed, your printer is not configured correctly. The most common problems are that the printer isn't connected to the port that you selected in Figure 3-4, or that you've selected the wrong print driver. You can review and modify your current settings by clicking the Modify Printer button on the Printers page, which walks you through the steps described in the previous section using your current settings as defaults. Figure 3-7. Summary information about your printer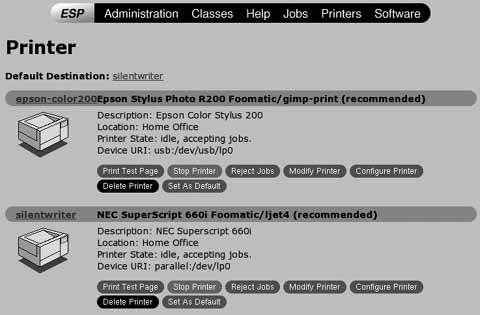 3.6.3. Fine-Tuning Printer Configuration in CUPSAfter you've successfully configured a printer and printed a test page, you may want to fine-tune your printer's print capabilities. To do this, click the Printers entry in the heading of any CUPS administrative web page, and click the Configure button. A screen like the one shown in Figure 3-8 will display. The contents of this page will depend on the capabilities of your printer and the driver that you selected, but they will enable you to do things like fine-tune color settings (in the Adjustment section), select a higher default printing resolution (using the General section's Printout Mode setting), and so on. 3.6.4. Enabling Remote Printing on the CUPS ServerDepending how CUPS is preconfigured on your Linux distribution, you may need to add your remote hosts (or your entire network) to the list of acceptable locations in the CUPS daemon's configuration file, /etc/cups/cupsd.conf. The list of valid locations for incoming print jobs is stored inside the <Location />… </Location> stanza. On most systems, this looks like the following: <Location /> Order Deny,Allow Deny From All Allow From 127.0.0.1 </Location> Figure 3-8. The printer-specific configuration screen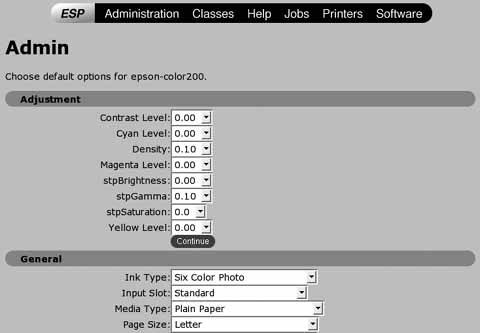 This configuration file entry supports printing to the CUPS server from the host on which the print server is running. To change the entry so that all hosts on the local network can print, add a line so the stanza now looks like this: <Location /> Order Deny,Allow Deny From All Allow From 127.0.0.1 Allow From 192.168.6.* </Location> This stanza now enables printing from the local host and from all printers on the specified subnet (in this case, 192.168.6). 3.6.5. Troubleshooting CUPS PrintingCUPS print servers maintain three logfiles (stored in the directory /var/log/cups) that provide some information about attempts to access or use them:
Of these, the access_log and error_log files are the most useful for diagnostic purposes. Examining the end of these files after attempting to print but not receiving any output usually shows meaningful error messages. For example, if you forgot to update the MIME files and are trying to print to a CUPS printer from Windows, you may see messages like the following: E [05/Sep/2005:17:55:49 -0400] get_job_attrs: job #0 doesn't exist! E [05/Sep/2005:17:55:49 -0400] print_job: Unsupported format 'application/ octet-stream'! I [05/Sep/2005:17:55:49 -0400] Hint: Do you have the raw file printing rules enabled? It doesn't get much more helpful than this in terms of identifying the problem and suggesting a fix.
3.6.6. SummaryCUPS provides a central system for printing to modern printers on Linux and many other operating systems. Its combination of support for standards, consistency across platforms, and a common, web-based administrative interface makes it a powerful, usable package. As we'll see in the next few hacks, it's easy to configure printing to CUPS print servers from remote Linux, Windows, and Macintosh systems. 3.6.7. See Also
|

EAN: 2147483647
Pages: 162
- Challenging the Unpredictable: Changeable Order Management Systems
- Enterprise Application Integration: New Solutions for a Solved Problem or a Challenging Research Field?
- Context Management of ERP Processes in Virtual Communities
- Data Mining for Business Process Reengineering
- Relevance and Micro-Relevance for the Professional as Determinants of IT-Diffusion and IT-Use in Healthcare