Web Layer
We are finally getting closer to the part of the application that the end user will see and interact with. The technology used for this layer is Spring's MVC Framework. One important feature of this MVC Framework is the lack of dependency between the controllers and the views. You could switch view technology without having to modify your controllers.
Flow Through the Application
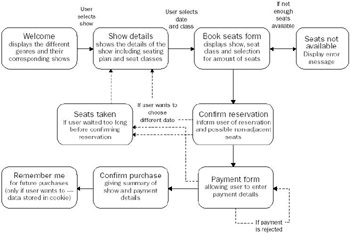
As discussed previously, the sample application is based on the sample application from Expert One-on-One J2EE Design and Development. We'll implement the presentation layer using Spring MVC, but before we begin, let's first revisit the flow through the actual application, when looking at it from a client's perspective as shown in Figure 15-6.

Figure 15-6
-
The user enters the main page and is presented with a list of drop-down boxes, containing shows. The shows are all grouped with the genre they belong to.
-
After the user has selected a show, she will be presented with a range of dates for which seats are available. The calendar shows the dates, as well the seat classes for which seats are still available.
-
After selecting a seat class and a date, a form is displayed containing information about the price of each seat. The user can choose a number of seats here.
-
If the number of seats chosen is available, the user will skip to the next step.
-
If not enough seats are available, an error message will be displayed, after which the user will go back to Step 2
-
-
The next screen displays a confirmation about the reservation. If the seats are not adjacent, the user will be informed.
-
After the user indicates she wishes to purchase the tickets, a check is performed as to whether or not another user has reserved the seats in the meantime. (Seats are automatically reserved for five minutes for each user, so if a user waits for longer than that, there is a possibility that somebody else may take her seats.) The next screen displays a form where the user can fill in her personal details and payment information (credit card info). The personal data of the user is automatically filled in if during a previous purchase the user chose to store that information in a cookie on her local computer.
-
A successful payment request (with the credit card data entered by the user) results in a confirmation screen being displayed where the user can optionally choose to fill in a password to store the personal data on her computer using a cookie.
Configuring the Application via web.xml
The web application will, upon startup, use information provided in the standard J2EE web.xml file for the initial configuration. In this file we specify the context location for the application contexts used by this web application.
We also specify the class that will be used to load these application contexts. In a server that follows the initialization order specified in the Servlet 2.4 specification, you can safely use a ContextLoader Listener. More and more application servers do adhere to this new specification. For older servers, you might have to substitute this listener with a servlet loaded as the first one on startup. In that case you would use a ContextLoaderServlet.
Another important configuration item is the declaration of the dispatcher servlet. We are using a standard DispatcherServlet here. See Chapter 12 for more information regarding these startup options.
<?xml version="1.0" encoding="ISO-8859-1"?> <!DOCTYPE web-app PUBLIC "-//Sun Microsystems, Inc.//DTD Web Application 2.3//EN" "http://java.sun.com/dtd/web-app_2_3.dtd"> <web-app> <context-param> <param-name>contextConfigLocations</param-name> <param-value> /WEB-INF/dataAccessContext-local.xml /WEB-INF/applicationContext.xml </param-value> </context-param> <listener> <listener-class> org.springframework.web.context.ContextLoaderListener </listener-class> </listener> <servlet> <servlet-name>ticket</servlet-name> <servlet-class> org.springframework.web.servlet.DispatcherServlet </servlet-class> <load-on-startup>1</load-on-startup> </servlet> <servlet-mapping> <servlet-name>ticket</servlet-name> <url-pattern>*.html</url-pattern> </servlet-mapping> <welcome-file-list> <welcome-file>listShows.html</welcome-file> </welcome-file-list> </web-app>
This bootstraps the Spring container, and ensures that no application objects are required to load a Spring context or explicitly look up other objects. Instead, Dependency Injection is applied to all application code.
Web Controllers
The ticket-servlet.xml file contains the URL-to-servlet mappings that the dispatcher servlet needs. This is expressed as a regular bean definition using the name attribute to define the URL such as/listShows.html. This URL is mapped via the class attribute in this case specifying org.springframework.samples.ticket.web.ListShowsController as the controller class. We include only the relevant parts of this file here to show how these options are defined. In addition to the controller, we also specify the view resolver class — in our case this is a JSTL resolver to be used with our JSPs. Please refer to Chapter 12 for more detailed discussion.
<?xml version="1.0" encoding="UTF-8"?> <!DOCTYPE beans PUBLIC "-//SPRING//DTD BEAN//EN" "http://www.springframework.org/dtd/spring-beans.dtd"> <beans> <bean name="/listShows.html" > <property name="eventsCalendar"><ref bean="eventsCalendar"/></property> </bean> <bean name="/displayShow.html" ... </bean> <bean name="/reserveSeats.html" ... </bean> ... <bean > <property name="prefix"><value>/WEB-INF/jsp/</value></property> <property name="suffix"><value>.jsp</value></property> <property name="viewClass"> <value>org.springframework.web.servlet.view.JstlView</value> </property> </bean> ... </beans>
The graphic in Figure 15-7 shows the relationships between the three main controllers and the classes in the service layer that they refer to. Each controller is represented by the URL that it is mapped to.

Figure 15-7
We will end the exploration of the controllers by briefly looking at the ListShowsController. The logic is very simple: Retrieve the data for the current genres from the eventsCalendar service and then pass this on in the form of a ModelAndView. All dependencies have already been configured via Dependency Injection and most of the request/response code is part of the AbstractController, so there is very little code in this servlet class.
public class ListShowsController extends AbstractController { /** the eventscalendar to use */ private EventsCalendar eventsCalendar; protected ModelAndView handleRequestInternal( HttpServletRequest httpServletRequest, HttpServletResponse httpServletResponse) { Collection genres = eventsCalendar.getCurrentGenres(); logger.debug("Genres: " + genres.size()); ModelAndView mav = new ModelAndView("showlist", "genres", genres); return mav; } public void setEventsCalendar(EventsCalendar eventsCalendar) { this.eventsCalendar = eventsCalendar; } }
View Technology
We have chosen to implement the views as JSPs, as this is the technology that most of our readers are familiar with. We could just as easily have implemented the views using a templating solution such as Velocity or FreeMarker.
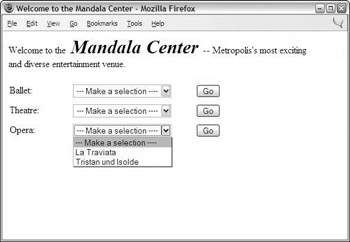
We are not going to look at each individual screen in the application, but we will take a closer look at one screen to highlight some of the features we have taken advantage of: the welcome screen.
This screen (see Figure 15-8) has a very simple layout. A drop-down box for each genre that has shows with some performances is presented together with a button to initiate a transition to the next screen for the selected show.

Figure 15-8
The following code example shows the JSP used to generate this screen. There are very few decorative features included because we recommend using a separate decorator layer for this. SiteMesh and Tiles are excellent choices here. We are using JSTL 1.1 syntax to provide better compatibility with the variety of application servers that you might want to try to deploy this application on. We strongly recommend using JSTL if you are using JSP.
<%@ taglib prefix="c" uri="http://java.sun.com/jstl/core" %> Welcome to the <font size="+2">Mandala Center</font> -- Metropolis’ most existing <table border="0"> <c:forEach items="${genres}" var="genre"> <c:if test="${not empty genre.shows}"> <tr> <td><c:out value="${genre.name}"/>: </td> <td> <form action="<c:url value="/displayShow.html"/>" method="post"> <select style="width: 150px;" name="showId"> <c:forEach items="${genre.shows}" var="show"> <option value="<c:out value="${show.id}"/>"> <c:out value="${show.name}"/> </option> </c:forEach> </select> <input type="submit" value="Go"/> </form> </td> </p> </c:if> </c:forEach> EAN: 2147483647
Pages: 188