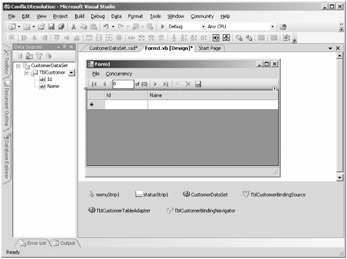
The application can now be run, but without any synchronization of the disconnected CustomerDataSet with the database server. The following step adds synchronization to your code.
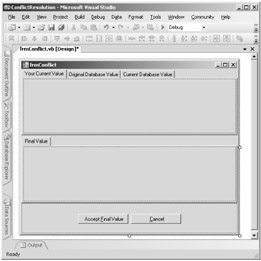
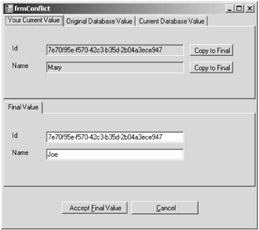
The primary purpose of the conflict resolution screen is to allow you to select the final data values when a concurrency error occurs. It displays your current values, the original database values, and the current database values. The screen is somewhat generic, and you will probably want to tweak it to suit your needs. For reference, the form that you create is shown in Figure 5-8.
-
Add a new form to your project called frmConflict.vb or frmConflict.cs.
-
Add a Panel control to the form, and set its Dock property to Bottom.
-
Add two Button controls to the Panel control. Assign the Name properties, btnAccept and btnCancel, and set their Text property to "Accept Final Value" and "Cancel". Set the Anchor property on both buttons to Top.
-
Add a SplitContainer control to the form. Set its Dock property to Fill, and set its Orientation property to Horizontal.
-
Add a TabControl to the top of the SplitContainer. Create three tab pages, with the Name property set to tabCurrent, tabOriginal, and tabCurrentDb. Set the Text property to Your Current Value, Original Database Value, and Current Database Value.
-
Add a TabControl to the bottom of the SplitContainer. Create a single tab page, with the Name property set to tabFinal. Set the Text property to Final Value.
-
The conflict resolution screen is created by passing two DataRow objects into a new constructor. The first DataRow object contains your current data values in the Current DataRowVersion and the original database data values in the Original DataRowVersion.
The second DataRow object initially contains the current database data value in the Original and Current DataRowVersion. The Current DataRowVersion will contain the final result of your conflict resolution. These DataRow objects are stored in properties. Here is the code to accomplish this.
Visual Basic
Public Sub New(ByVal currentDataRow As DataRow, _ ByVal currentDatabaseDataRow As DataRow) MyBase.New() InitializeComponent() Me.CurrentDataRow = currentDataRow FinalDatabaseDataRow = currentDatabaseDataRow End Sub Public Property FinalDatabaseDataRow() As DataRow Get Return m_finalDatabaseDataRow End Get Set(ByVal value As DataRow) m_finalDatabaseDataRow = value End Set End Property Private m_finalDatabaseDataRow As DataRow = Nothing Public Property CurrentDataRow() As DataRow Get Return m_currentDataRow End Get Set(ByVal value As DataRow) m_currentDataRow = value End Set End Property Private m_currentDataRow As DataRow = Nothing
C#
public frmConflict(DataRow currentDataRow, DataRow currentDatabaseDataRow) { InitializeComponent(); CurrentDataRow = currentDataRow; FinalDatabaseDataRow = currentDatabaseDataRow; } public DataRow FinalDatabaseDataRow { get { return m_finalDatabaseDataRow; } set { m_finalDatabaseDataRow = value; } } private DataRow m_finalDatabaseDataRow = null; public DataRow CurrentDataRow { get { return m_currentDataRow; } set { m_currentDataRow = value; } } private DataRow m_currentDataRow = null; -
Create the PopulateTab and CopyToFinal methods. For each column in the DataRow object, the PopulateTab populates a tab page with a Label that shows the column name, a TextBox that shows the value of the column based on the DataRowVersion, and a Button that lets you copy the selected value to the final value by executing the CopyToFinal method. Here is the code for these two methods.
Visual Basic
Public Sub PopulateTab(ByVal tab As TabPage, ByVal dataRow As DataRow, _ ByVal dataRowVersion As DataRowVersion, ByVal m_ReadOnly As Boolean) Const verticalSpacing As Integer = 30 Const labelWidth As Integer = 50 Const horizontalSpacing As Integer = 10 Const buttonWidth As Integer = 100 Const buttonHeight As Integer = 20 For col As Integer = 0 To dataRow.ItemArray.Length - 1 Dim val As Object = dataRow(col, dataRowVersion) Dim label As New Label() tab.Controls.Add(label) label.Text = dataRow.Table.Columns(col).ColumnName label.Top = (col + 1) * verticalSpacing label.Left = horizontalSpacing label.Width = labelWidth label.Visible = True Dim textBox As New TextBox() tab.Controls.Add(textBox) textBox.Text = val.ToString() textBox.Top = (col + 1) * verticalSpacing textBox.Left = (horizontalSpacing * 2) + labelWidth textBox.Width = tab.Width textBox.Left _ - buttonWidth - (horizontalSpacing * 2) textBox.Name = tab.Name + label.Text textBox.ReadOnly = m_ReadOnly textBox.Visible = True textBox.Anchor = AnchorStyles.Left _ Or AnchorStyles.Top Or AnchorStyles.Right If (tab.Name = "tabFinal") Then Continue For Dim btn As New Button() tab.Controls.Add(btn) btn.Text = "Copy to Final" btn.Left = textBox.Left + textBox.Width _ + horizontalSpacing btn.Top = (col + 1) * verticalSpacing btn.Height = buttonHeight btn.Visible = True btn.Anchor = AnchorStyles.Top OR AnchorStyles.Right AddHandler btn.Click, AddressOf CopyToFinal Dim propertyBag As New ArrayList() propertyBag.Add(dataRow.Table.Columns(col)) propertyBag.Add(textBox) btn.Tag = propertyBag Next End Sub Private Sub CopyToFinal(ByVal sender As Object, ByVal e As EventArgs) Dim btn As Button = CType(sender, Button) Dim propertyBag As ArrayList = CType(btn.Tag, ArrayList) Dim dc As DataColumn = CType(propertyBag(0), DataColumn) Dim textBox As TextBox = CType(propertyBag(1), TextBox) tabFinal.Controls(tabFinal.Name + dc.ColumnName).Text = textBox.Text End Sub
 |
 |
C#
public void PopulateTab(TabPage tab, DataRow dataRow, DataRowVersion dataRowVersion, bool readOnly) { const int verticalSpacing = 30; const int labelWidth = 50; const int horizontalSpacing = 10; const int buttonWidth = 100; const int buttonHeight = 20; for (int col = 0; col < dataRow.ItemArray.Length; col++) { object val = dataRow[col, dataRowVersion]; Label label = new Label(); tab.Controls.Add(label); label.Text = dataRow.Table.Columns[col].ColumnName; label.Top = (col + 1) * verticalSpacing; label.Left = horizontalSpacing; label.Width = labelWidth; label.Visible = true; TextBox textBox = new TextBox(); tab.Controls.Add(textBox); textBox.Text = val.ToString(); textBox.Top = (col + 1) * verticalSpacing; textBox.Left = (horizontalSpacing * 2) + labelWidth; textBox.Width = tab.Width - textBox.Left - buttonWidth - (horizontalSpacing * 2); textBox.Name = tab.Name + label.Text; textBox.ReadOnly = readOnly; textBox.Visible = true; textBox.Anchor = AnchorStyles.Left | AnchorStyles.Top | AnchorStyles.Right; if (tab.Name == "tabFinal") continue; Button btn = new Button(); tab.Controls.Add(btn); btn.Text = "Copy to Final"; btn.Left = textBox.Left + textBox.Width + horizontalSpacing; btn.Top = (col + 1) * verticalSpacing; btn.Height = buttonHeight; btn.Visible = true; btn.Anchor = AnchorStyles.Top | AnchorStyles.Right; btn.Click += new EventHandler(CopyToFinal); ArrayList propertyBag = new ArrayList(); propertyBag.Add(dataRow.Table.Columns[col]); propertyBag.Add(textBox); btn.Tag = propertyBag; } }  |
-
Add code to call the PopulateTab method for each tab page when the form is loaded. The code is as follows.
Visual Basic
Private Sub frmConflict_Load( ByVal sender As System.Object, _ ByVal e As System.EventArgs) Handles MyBase.Load PopulateTab(tabCurrent, CurrentDataRow, _ DataRowVersion.Current, true) PopulateTab(tabOriginal, CurrentDataRow, _ DataRowVersion.Original, true) PopulateTab(tabCurrentDb, FinalDatabaseDataRow, _ DataRowVersion.Original, true) PopulateTab(tabFinal, FinalDatabaseDataRow, _ DataRowVersion.Current, false) End Sub
C#
private void frmConflict_Load(object sender, EventArgs e) { PopulateTab(tabCurrent, CurrentDataRow, DataRowVersion.Current, true); PopulateTab(tabOriginal, CurrentDataRow, DataRowVersion.Original, true); PopulateTab(tabCurrentDb, FinalDatabaseDataRow, DataRowVersion.Original, true); PopulateTab(tabFinal, FinalDatabaseDataRow, DataRowVersion.Current, false); } -
Add code to collect the final data values from the TextBox objects in tabFinal and place the values into the FinalDatabaseRow, which will be retrieved by the calling form. This code will be placed into the Click event handler of btnAccept as follows.
Visual Basic
Private Sub btnAccept_Click(ByVal sender As System.Object, _ ByVal e As System.EventArgs) Handles btnAccept.Click for each dc as DataColumn in FinalDatabaseDataRow.Table.Columns FinalDatabaseDataRow(dc) = _ tabFinal.Controls(tabFinal.Name + dc.ColumnName).Text next End Sub
C#
private void btnAccept_Click(object sender, EventArgs e) { foreach (DataColumn dc in FinalDatabaseDataRow.Table.Columns) { FinalDatabaseDataRow[dc] = tabFinal.Controls[tabFinal.Name + dc.ColumnName].Text; } } -
The final step is to configure the buttons. Set the DialogResult of btnAccept to OK, and set the DialogResult of btnCancel to Cancel. On the form's property screen, set the Accept-Button property to btnAccept and set the CancelButton property to btnCancel.
When it's time to test the conflict resolution screen, you must have two instances of the application running. When each instance starts, it loads a copy of the data from the database. If changes are made in both instances, the first instance that synchronizes with the database will succeed and the second instance will fail for each DataRow object that was also updated by the first instance.
Follow these steps to create and resolve concurrency errors.
-
Start two instances of the application. (Navigate to the ConflictResolution.exe file and double-click it twice, or right-click the project in the Solution Explorer window and choose Debug | Start New Instance twice.) You will see the contents of the TblCustomer table.
-
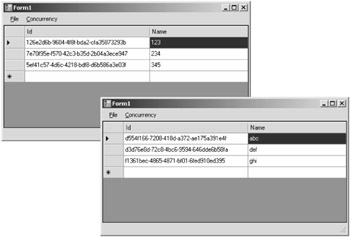
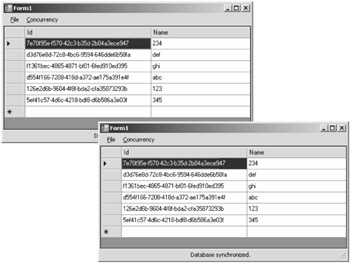
The first time the application is executed there is no data, so add data to both instances, as shown in Figure 5-9.
-
Synchronize with the database. When the first instance is synchronized, the only noticeable change is that the status bar displays a message indicating that the data is synchronized. When the second instance is synchronized, the same message is displayed, but the grid displays the data that was input into the first instance. Notice that both instances can synchronize with the new data because there are no conflicts. If the first instance is synchronized again, it will contain the data from the second instance, as shown in Figure 5-10.
-
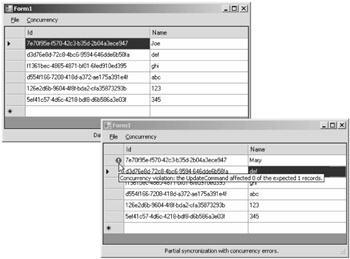
Make changes to the same name in both instances. For example, you can change the name 234 to Joe in one instance and to Mary in the other instance. Synchronize the instance with Joe as the name, and the synchronization will succeed. Next, synchronize the instance with Mary as the name; a concurrency error occurs because the data in the database was changed between the time this instance was previously synchronized and this attempt to synchronize. The grid displays the error, as shown in Figure 5-11.
-
Finally, test the conflict resolution screen. Click the Resolve Concurrency Errors menu item to launch the conflict resolution screen, as shown in Figure 5-12. The tab pages are populated with data. Move between the tab pages to see the current disconnected data values, the original database values, and the current database values. Note that the final data values are displayed at the bottom, and notice the button beside each TextBox that allows you to copy the value in the TextBox into the final data value.
The conflict resolution screen was designed to let you generically resolve conflicts from concurrency errors. Most of the code can be reused in your application, but you might want to make some changes to make the screen more appealing to your users and to further encapsulate your code. Here are some changes to consider.
