Configuring Mail Clients
Configuring Mail Clients
Most people use graphical e-mail clients, such as Evolution and Netscape. However, text-based e-mail clients are still popular in the worlds of Linux and Unix. Just as experienced Linux administrators prefer to work from the command-line interface, they often prefer to work with e-mail clients in text mode. While graphical e-mail can be pretty, a graphical e-mail to a large group of users can easily consume the capacity of many e-mail servers.
You may also need to help users configure their own e-mail clients; this should be an easier process.
Text-Based Clients
By default, you can use the mail program to send and receive e-mail. People who are newer to computers tend to use graphical e-mail clients. However, many users, especially in university and scientific settings, still use text-based e-mail clients. Perhaps the two most common text-based clients are pine and elm . Although Red Hat plans to delete it from a future release, pine (Program for Internet News and E-mail) is the more user -friendly of the text-based clients; therefore, it is what I cover here.
The pine client may not be installed on your installation of Red Hat Linux. It is easy to install from the pine-* RPM. Starting this e-mail client is easy with the pine command. Unfortunately, Red Hat has deprecated pine , which means you may need to convert to a different e-mail client in future versions of Red Hat Linux. Graphical e-mail clients are described in the next section; one good alternative text-based e-mail client is mutt .
The first time you run pine , you ll see an introduction followed by the main menu displayed in Figure 26.1. Examine the commands in the main part of the screen (?, C, I, L, A, S, and Q) as well as the command options at the bottom of the screen (?, P, R, O, >, N, and K).
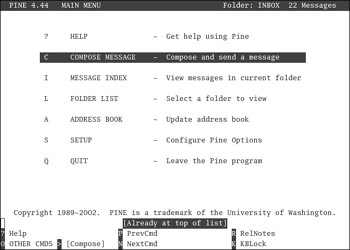
Figure 26.1: The pine main menu
| Note | The pine command menu is one place in Linux where case does not matter; for example, P works as well as p . |
As you can see, you can type C to start an e-mail message, I to view current messages, L to list current folders, and more. But the first step is to set up pine to read your e-mail. Type the S command. You ll see the Setup screen. Next, type C to begin basic configuration. You ll see a screen similar to Figure 26.2.
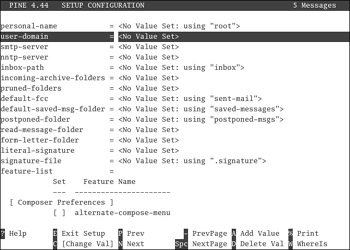
Figure 26.2: Basic pine configuration
While the pine setup section includes a large number of configuration options, you ll need to set three things to start receiving your e-mail. These tips assume that your e-mail address is abcd@example .com and the incoming e-mail server is mail.example.com . Substitute according to your needs.
-
Set the personal- name to what you want your e-mail recipients to see.
-
Add the domain name associated with your e-mail address to user-domain . For example, if your e-mail address is abcd@example.com , add example.com to the user-domain field.
-
Set the inbox- path . Based on this example, if mail.example.com is a POP3 server, enter {mail.example.com/pop3/user=abcd}INBOX . If it s an IMAP4 server, enter {mail.example .com/user=abcd} .
Tip Some e-mail servers have special requirements. For example, some domains require the full e-mail address, such as abcd@example.com , as the username in the inbox-path . They may also require a different domain name for the incoming mail server, the user-domain . If in doubt, consult your e-mail provider for details.
If you use an external SMTP server, such as the one associated with your ISP, you can also enter it here. Press the Page Down key a few times. Take a look at the rich variety of options available for pine .
| Note | Before version 4.x, pine could not handle POP3 e-mail. |
When you re through making changes, type E to exit the Setup Configuration screen. Assuming you re satisfied with the changes, type Y to confirm when prompted; you ll be taken back to the main menu shown in Figure 26.1. In the main menu, type L , highlight INBOX, and press Enter. The first time you do this, you should be prompted for your e-mail password.
Next, pine will go to your e-mail server, get your latest messages, and show them to you in a message index similar to Figure 26.3 (I ve masked the identity of my e- mails ). From here, everything is fairly intuitive, and you can use the command options shown at the bottom of the screen. To read a message, highlight it and press Enter.

Figure 26.3: The pine message index
Creating a new message is easy. Return to the main menu as shown in Figure 26.1; then type C to start composing a new message. If you ve ever used e-mail before, the format shown in Figure 26.4 should be quite familiar. The commands at the bottom are Control characters ; for example, when you re done with a message, the Ctrl+X command sends your message (after you type Y to confirm). If you ve configured an SMTP server or your sendmail service is working, pine should send your message automatically.
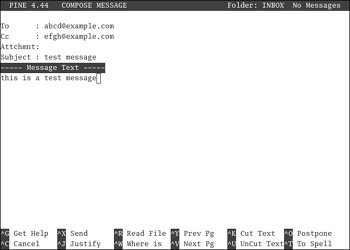
Figure 26.4: Creating pine e-mail
Graphical Clients
Three basic graphical e-mail clients are available in Linux: Evolution, Mozilla Mail, and KMail. We discussed the basic operation of these clients in Part IV. In this section, we ll look at the configuration windows for these clients.
For any e-mail client, the configuration requirements are the same. As you may have done with the pine text e-mail client, you ll need at least the information described in Table 26.2.
| Data | Description |
|---|---|
| Name | The name you want other users to see |
| Domain Name | The information after the @ in your e-mail address |
| Inbox Server | The FQDN of your incoming e-mail server; sometimes listed as Host or Server Name |
| Username | Your username or login on the e-mail server; normally just the part before the @ in your e-mail address |
Configuring Evolution
If you re using Evolution, which we introduced in Chapter 18 , open it in your favorite GUI. From the menu bar, click Tools ˜ Settings. This opens an Evolution Settings window shown in Figure 26.5.

Figure 26.5: Evolution Settings
In the left-hand pane, scroll up until you can click the Mail Accounts icon; then click Add to create a new account, or highlight an existing account and click Edit. This should bring you to the Evolution Account Editor. Enter your basic account information on the Identity tab, and then click the Receiving Mail tab shown in Figure 26.6. Select a Server Type if required, enter the FQDN for your inbound e-mail server in the Host text box, and enter your username on that server in the Username text box.
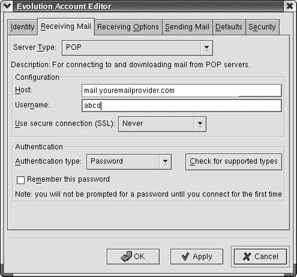
Figure 26.6: Configuring an Evolution e-mail account
Configuring KMail
If you re using KMail, which we looked at in Chapter 17 , open it in your favorite GUI. From the menu bar, click Settings ˜ Configure KMail. In the Configure window that appears (see Figure 26.7), click Network in the left-hand pane, then click on the Receiving tab. Click Add to create a new account and select an account type (local, POP3, IMAP, or Maildir). Alternatively, highlight an existing account and click Modify.
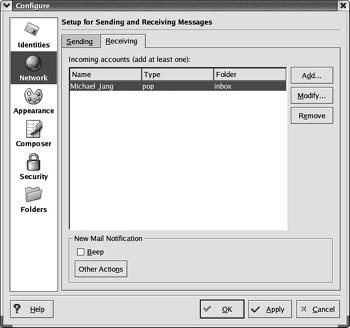
Figure 26.7: Configuring KMail
This will bring you to an Add Account - KMail or a Modify Account - KMail window. The only difference between the two windows is in the title. An example is shown in Figure 26.8. Enter the name you want others to see when they receive your e-mail and specify a password if desired. Next, enter the FQDN for your inbound e-mail server in the Host text box, and type your username on that server in the Login text box.
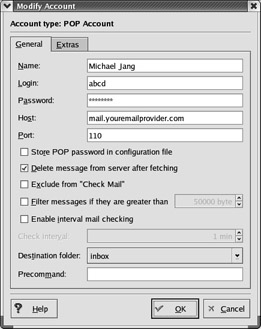
Figure 26.8: Modifying a KMail e-mail account
Configuring Mozilla Mail
If you re using Mozilla Mail, you may notice striking similarities to the Netscape 6. x mail client. This is possible, since Netscape now uses a GPL-style license (see the note). Open Mozilla Mail in your favorite GUI. From the menu bar, click Edit ˜ Mail & Newsgroups Account Settings. The Mail & Newsgroups Account Settings window should appear. If you haven t created an e-mail account before, you ll have to go through the Mozilla Mail Account Wizard first.
In the Mail & Newsgroups Account Settings window, highlight the name of your account; you can enter identity information here. Next, highlight Server Settings, as shown in Figure 26.9. You should see the name of your incoming e-mail server in the Server Name text box. For more information on Mozilla Mail, see Chapter 16 .
| Note | Not everyone in the open source/FSF community is happy with the Netscape license. For a sample of the reasons, read www.gnu.org/philosophy/netscape-npl.html . |
EAN: 2147483647
Pages: 220