Red Hats Printer Tool
Red Hat s Printer Tool
Because the commands associated with /etc/cups/cupsd.conf and /etc/printcap is so obscure, the more popular option for configuring CUPS or LPD printers is a graphical tool. Red Hat s tool is based on redhat-config-printer (and redhat-config-printer-gui ) available through the RPM of the same name . You can run this command from a text or a GUI command-line console. While the look and feel are different (see Figures 25.20 and 25.21), the information is the same.
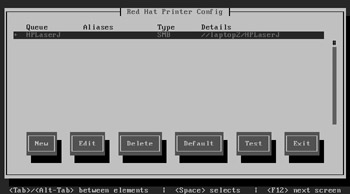
Figure 25.20: redhat- config-printer , command-line version
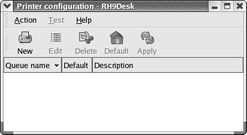
Figure 25.21: redhat- config-printer , GUI version
| Tip | The print system configured by redhat-config-printer is based on the active print daemon, which can be changed through the redhat-switch-printer utility. |
It s easy to use redhat-config-printer to set up a new printer. The following steps are based on the GUI version of this tool, which starts in a Printer Configuration window:
-
Click New; when you see the Add A New Print Queue dialog box, click Forward to continue.
-
In the Queue Name dialog box, enter a short name for your printer and a description, similar to what is shown in Figure 25.22. When you re ready, click Forward to continue.
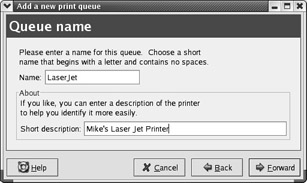
Figure 25.22: Adding a printer queue -
In the Queue Type dialog box, you ll see available printer ports, similar to what s shown in Figure 25.23. For example, /dev/lp0 corresponds to the first parallel port. If you re configuring a local printer, select the available port of your choice and then click Forward. If that does not meet your needs, try one of the following alternatives:
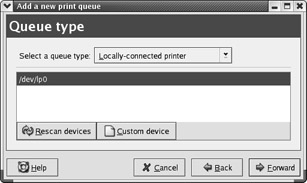
Figure 25.23: Selecting a queue type-
If you don t see your port, first try the Rescan Devices option.
-
If that does not work, you can click Custom Device and enter the device associated with your printer port.
-
If you want to select a network printer, click the Select A Queue Type drop-down text box. Available choices are listed in Table 25.18.
Table 25.18: Network Queue Types Type
Description
Networked CUPS (IPP)
For printers on a remote CUPS server; requires the server host or domain name and IPP path .
Networked Unix (LPD)
For printers on a remote LPD server; requires the server host or domain name as well as the name of the remote queue.
Networked Windows (SMB)
For printers on a remote Microsoft Windows print server; should detect shared printers automatically.
Networked Novell (NCP)
For printers on a remote Novell print server; requires the server host or domain name, the queue name, and the authorized username and password.
Networked JetDirect
For printers on a remote JetDirect print server that s directly connected to the network; requires the name of the JetDirect printer.
-
-
In the Printer Model dialog box, select the make and manufacturer for your printer. Select the driver best suited to your printer, using these guidelines, and then click Forward to continue:
-
Some printers work with the PostScript print driver; printers that process raw print data can use the Raw Print Queue driver; generic drivers are also available for text and various dot-matrix printers.
-
To select a specific model, click on the Generic (Click To Select Manufacturer) text box; a series of manufacturers are shown, similar to Figure 25.24. Once you make your selection, you ll be able to select a print model that most closely matches your printer.
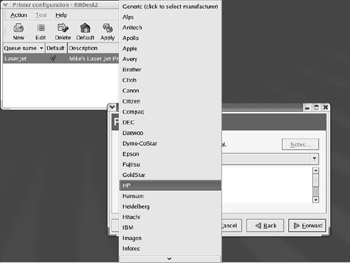
Figure 25.24: Selecting a printer manufacturer
-
-
You ll now see the Finish, And Create The New Print Queue dialog box. It will include a summary of your selections, similar to Figure 25.25. If you re satisfied with your selections, click Apply.
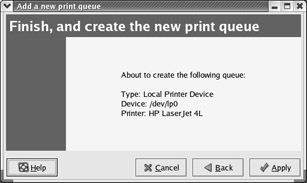
Figure 25.25: Print configuration summary -
You re given an opportunity to print a test page. It s a good idea; if you re connected to your printer, click Yes.
You re taken back to the Printer Configuration dialog box. You should now see an entry for your new printer. You can edit the settings; simply highlight the printer and click Edit. This opens the Edit A Print Queue dialog box for the printer that you just configured. The five tabs in this dialog box are summarized in Table 25.19.
| Tab | Description |
|---|---|
| Queue Name | Lets you specify the name of the print queue |
| Queue Type | Allows you to revise the device, even to a networked printer |
| Queue Options | Lets you configure basic settings for banner pages, margins, and the filter |
| Printer Driver | Lets you change the driver |
| Driver Options | Allows you to specify more driver settings |
Before leaving redhat-config-printer , be sure to click Apply. This action writes your changes to /etc/cups/cupsd.conf for CUPS or /etc/printcap for LPD and then restarts the appropriate print daemon.
EAN: 2147483647
Pages: 220