Section 4.1. Fundamentals of APT
4.1. Fundamentals of APTThere are many different commands associated with apt. You reviewed a couple of these commands in Chapter 1. While you can do a lot with apt-cache and apt-get, there are more commands and capabilities. You should know how to find the best mirrors for your distribution, as well as how to include them in your apt configuration. When you learn how to use various apt commands, you'll learn to appreciate the capabilities of related "all-in-one" tools, including aptitude and the Synaptic Package Manager. If you find apt to your liking, you may need to install it on your chosen distribution. The same apt tools are available for both Debian- and RPM-based distributions. 4.1.1. Installing apt on a Debian-Based DistributionThere are several packages associated with apt. Not all are installed by default. If you want to take full advantage of the apt system, you'll want to install as many apt-related packages as is practical. To find available apt packages on my Debian system, I ran the following command: apt-cache search apt When I ran this command, I got a list of 384 packages. That's too much! As you search through this list, you might realize that it includes unrelated packages, such as raptor-utils, because the "apt" string is in its name or description. So you should use a more discriminating search. Without getting too fancy, I find available apt-related packages with the following two commands, where I've added a space before and after the search term (in quotes): apt-cache search "apt" apt-cache search "apt" Because apt-cache is part of the apt package, this of course assumes that you have previously installed apt on your Linux system. These searches reveal a substantial number of packages related to apt. (When you install these packages, the apt system also installs dependencies.) Some of these packages may be redundant, because they provide different ways of doing the same thing. You don't need to install every apt-related package. I've described some of the apt packages I consider important in Table 4-1.
Note The list shown in Table 4-1 is far from complete. It omits packages that are installed as dependencies to those listed here. It also leaves out other packages with tools that you may prefer. This list and chapter encompass just one formula for patch management. 4.1.2. Installing apt on a RPM-Based DistributionThere are a number of RPM-based distributions that can or do use apt as the primary patch management tool. We'll discuss this in more detail in Chapter 5, "Configuring apt for RPM Distributions." 4.1.3. Configuring apt on Your ComputerAs discussed in Chapter 1, the key to apt as a patch management tool is the repositories that you select and include in your apt configuration file, /etc/apt/sources.list. In that chapter, you used the Debian mirror list at www.debian.org/mirror/list to add appropriate sites for your computer and physical location. Before you configure /etc/apt/sources.list, you should know the different repository categories for your distribution. Debian and other related distributions (e.g. Knoppix, Ubuntu) use different names. You can use the netselect tool to help find the repository mirror best suited to your location. Basic Repository CategoriesThere are repositories associated with the three current Debian distributions. All three are in use, so you may need to create repositories for each. The three current Debian distributions known are listed here:
Note While the previous stable version of Debian, known as Woody, is still commonly used, the version before that, known as Potato, is pretty much obsolete. Many mirrors no longer include Potato packages in their repositories. As of this writing, I use Debian Sarge on my primary laptop computer. I used it even while it was "unstable" and have never had a major problem with associated packages. There are three subcategories associated with each repository, as described in Table 4-2.
Some sources.list options are distribution-specific. For example, Ubuntu Linux (www.ubuntu.com) includes universe and multiverse repositories that correspond loosely to the Debian unstable and contrib / non-free repositories. Because the actual contents of these repositories vary, they are far from exact mirrors. While many Linux users in principle prefer to use free software packages, this may not always be possible on your network. A lot of important Linux compatible software is released under fairly restrictive licenses, such as some versions of Java and RealPlayer. Repository Selection ToolsThere are two basic reasons to select a repository. One is for updates, while the other is for mirroring onto your network. If you're looking for update servers for your /etc/apt/sources.list file, it's in your interest to select more than one repository. If one goes down, you can still get the updates you need. On the other hand, if you're looking for a mirror, you may want to find one that supports rsync access. Some searching and trial and error may be required. Depending on your situation, you can use the netselect or netselect-apt commands to find the repository or repositories best suited to your needs. If you know that there are only a small number of suitable repositories, try netselect. For example, if you're in the middle of the U.S. Silicon Valley, you might have noticed that the Debian repositories at the University of California at Berkeley (linux.csua.berkeley.edu) and the University of California at Santa Cruz (sluglug.ucsc.edu) are fairly close. Assuming the bandwidth and demand on both servers is approximately the same (it is up to you to check), you can find the one best suited for your system with the following command: netselect -vv linux.csua.berkeley.edu sluglug.ucsc.edu With the -vv switch, you can get measurable results that can help you make a judgment. One possible result is shown here: linux.csua.berkeley.edu 34 ms 13 hops 100% ok (10/10) [ 87] sluglug.ucsc.edu 38 ms 14 hops 100% ok (10/10) [ 82] This output lists results in the following order: URL, transmission time, number of hops, percentage and number of successfully transmitted packets, and an overall score based on the transmission time and number of hops. In this case, the scores are close; the results may vary slightly if you repeat this command. Unfortunately, you can't rely on these tools alone. While distance from a mirror is important, capacity is also an issue. For example, it may be better to connect to a more distant mirror if it has a higher-capacity Internet connection. It may be better to connect to a mirror associated with wealthier sponsorsmulti-gigabyte downloads from many thousands of users can be rather expensive. For that reason, Debian strongly discourages downloads direct from the repositories that it owns. sources.list ResultsBased on the information so far in this section, you can now customize your /etc/apt/sources.list file with the mirrors best suited for your Debian system. In Chapter 1, you read about adding the following mirrors to this file: deb ftp://debian.oregonstate.edu/debian/ stable main deb-src ftp://debian.oregonstate.edu/debian/ stable main As you now know, the stable distribution is associated with Debian Sarge. The main repository includes only a part of the available packages for this distribution. If you want all Sarge-associated repositories, access the contrib and non-free repositories, as follows: deb ftp://debian.oregonstate.edu/debian/ stable main contrib non-free deb-src ftp://debian.oregonstate.edu/debian/ stable main contrib non- free I've selected additional repositories for my Debian computer, just in case the Oregon State repository goes down. But if you're in the Silicon Valley, you probably do not want to connect to a repository all the way in Oregon. Based on the mirrors described earlier, you might add the following lines to your sources.list file: deb ftp://linux.csua.berkeley.edu/debian/ stable main contrib non-free deb-src ftp://linux.csua.berkeley.edu/debian/ stable main contrib non- free deb ftp://sluglug.ucsc.edu/debian/ stable main contrib non-free deb-src ftp://sluglug.ucsc.edu/debian/ stable main contrib non-free We'll show you how to use different commands to download a Debian repository for your network later in this chapter. You can point your /etc/apt/sources.list to a repository on your local network. After you create your own repository using one of the methods described later in this chapter, you can point clients on your local network to that repository. For example, based on the current version of Debian's apache2, Web server files can be stored in the /var/www/apache2-default/ directory. Therefore, if I have a repository on my local web.example.com computer's pub/ subdirectory, I could add the following line to my sources.list file: deb http://web.example.com/pub/ testing main contrib non-free You can even use locally available sources; for example, if the source is mounted on a shared /var/debian NFS directory, you could use the following line in your sources.list file: deb file:/var/debian/ testing main contrib non-free In either case, be careful. Before configuring a locally cached repository on your clients, test it. Back up any clients before testing that repository. 4.1.4. The Basic apt CommandsBefore using apt, you should learn more about the basic commands than you may have read about in Chapter 1. This section is far from comprehensive. An excellent place to start is the APT HOWTO, available online from www.debian.org/doc/manuals/apt-howto/index.en.html. One key command is aptitude. While I described apt-get in Chapter 1, aptitude is in many ways an enhanced version of this command. If you're familiar with apt-get, you can use most of the same options with aptitude. What you use or prefer depends on you. apt-get and aptitudeNot all Debian-style distributions include aptitude. But for all commands in this section, you can substitute aptitude for apt-get. In fact, you may want to try both versions to see which you prefer. As described in Chapter 1, the basic command that you can use to install the package of your choice is apt-get install packagename But what you get might not be up to date. To keep your databases up to date, download the Packages.gz file, which includes the latest package information from each repository. You don't have to download the file directly. You can update your databases with the help of this file by using the following command: apt-get update Note Sometimes you may see an error in the output from apt-get update. Don't panic. Run the command again. Sometimes the updates that you download the first time fix problems that allow you to complete the update the second time you run that command. As a systems administrator, you might want to remove some packages on occasion. For example, if you don't want users recompiling their kernels, you could run the following command: apt-get remove kernel-source If you want to keep your system up to date, you'll want to become familiar with the following command (the -u switch doesn't work with aptitude): apt-get -u dselect-upgrade This is an important command. The -u switch forces apt-get to tell you what is planned for the upgrade. The dselect-upgrade option includes recommended options for packages that are downloaded and installed. This switch is not available for aptitude; the aptitude upgrade mode works just as well. When you download packages with apt, they're download as .deb packages to the /var/cache/apt/archives directory. As you install and patch your system, the space used by this directory can build into the gigabytes. You should keep this directory clean on a periodic basis. If you just want to purge packages that are now obsolete, you could run the following command: apt-get autoclean If you have obsolete packages in your archives, you'll see a series of messages listing the files that are now deleted, such as Del acroread 5.10-0.2 [9171kB] If you're really pressed for space, and do not want a patch management repository on this computer, you could run the following command: apt-get clean Just remember, this command deletes all files in what you could potentially use as a local patch management repository. (For that reason, if you create a mirror, you may want to use a different directory.) apt-cdromIf you've downloaded the CDs associated with your distribution, you can use those as sources for your updates. For example, if you've inserted a Debian CD, all you need to do is run the apt-cdrom add command. But that's not too helpful, as there are more than a dozen CDs associated with Debian Linux. However, if you've mounted a CD ISO file on a specific directory, such as /mnt/inst1, you could use that information; the -d allows you to specify the mount point: apt-cdrom -d /mnt/inst1 add apt-fileIf you want to search for a file within an uninstalled package, the apt-file command can help. Before you run this command, make sure that your databases are up to date. You can do so with the apt-file update command. Naturally, with the right switches, you can search through and list the files associated with a specific package. As an example, assume that you're looking for the package associated with the OpenOffice.org Writer. You've heard that it starts with the oowriter script. To find the associated package, run the following command: apt-file search oowriter The more information you have, the more closely you can find the appropriate package. In this case, you might search using the full path to oowriter: apt-file search /usr/bin/oowriter Alternatively, you can list the files associated with an uninstalled package. For example, if you were interested in the files associated with the lokkit firewall configuration package (developed by Red Hat and adapted for Debian), you could run the following command: apt-file list lokkit apt-ftparchive / dpkg-scanpackagesTo mirror a repository is not enough. You need a package index to allow apt to search through your repository. If you've mirrored a true Debian mirror, you may already have the package index in the repository. Normally, packages are indexed in the Packages.gz file. You can use either the apt-ftparcive or the dpkg-scanpackages command to generate your own Packages.gz file. You should also set up a configuration file. After you have a proper configuration file, you can configure a package index with the following command: apt-ftparchive generate config.file The commands required to create an appropriate apt-ftparchive configuration file are beyond the scope of this book. For more information, search online for apt-ftparchive.conf; several developers have documented their own examples in this file. Alternatively, you can create your own Packages.gz file. Navigate to the directory with your download packages. For example, if you wanted to create an archive of data for the packages you've downloaded to update your system, run the following commands: cd /var/cache/apt/archives dpkg-scanpackages . /dev/null | gzip -9c > Packages.gz Now you can copy or move these files to an appropriate directory on your Web server and then use them to update other similarly configured systems on your network. apt-howtoIf you want to refer to the APT HOWTO, and have installed the associated package, all you need to do is run the apt-howto command to call up this document in the default browser for your system. apt-listbugsIf you want to check a package that you're interested in installing for bugs, you can do so with the apt-listbugs command. For example, if you want to check for bugs on the current apache2 package, run the following command: apt-listbugs list apache2 4.1.5. The aptitude SystemThe aptitude command provides a low-level graphical front-end to various apt and aptitude commands. A key advantage is the high-level view it supports of what you have and can do. For example, the aptitude interface provides a list of the packages that you have installed, can upgrade, and may want to remove because they're obsolete. When you start aptitude, you'll see a screen similar to Figure 4-1. Figure 4-1. The aptitude menu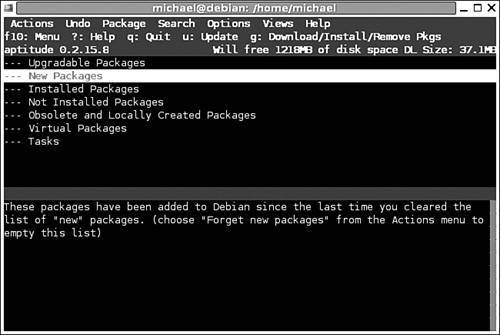 First, we'll review how the aptitude menu is organized, and then you'll see how you can use commands in this menu to keep your system up to date. For detailed information on aptitude, see the associated user's manual, available as part of the aptitude-doc-en package or online from http://doc2.inf.elte.hu/doc/aptitude/html/en/. Some trial and error may be required. After you configure aptitude and make package selections, you may get errors, or you may need to make changes. But if you work out the kinks on your own computer, you can more reliably automate the patch management process on other similar computers on your network. Be careful. In some cases, aptitude may remove packages that you wanted to keep. When I first ran aptitude on my laptop, it deleted the basic configuration package for my PCMCIA card. Fortunately, I had a current backup. Be careful to read through the list of packages that would otherwise be removed. Note If you use aptitude's feature that removes "unused" packages, be careful. Back up your system. If you lose some features you consider essential, you'll be glad that you took the time to update your backup. Running AptitudeAs it's a great way to administer remote systems, you'll want to learn to navigate around aptitude. By default, you can use your cursor to move between the aforementioned categories. Highlight the category of your choice, and press Enter. Check out the different categories. As shown in Figure 4-2, you can find out more about each package. Figure 4-2. Detailed information in Aptitude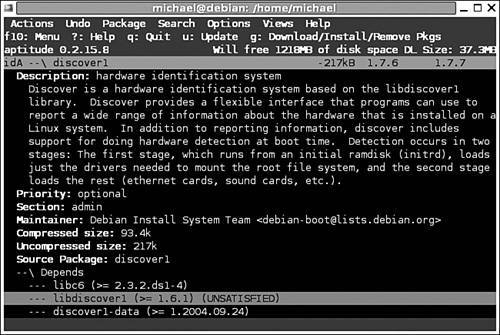 The first three letters of the description can tell you a lot. As shown in Figure 4-2, the letters associated with the discover1 package are idA. The first letter is the current state. The second letter, if present, specifies the action that Aptitude will take. The third letter, A, is shown when the package was automatically installed, such as to satisfy a dependency. The options for the first letter are shown in Table 4-3.
The options for the second letter, the action flag, are shown in Table 4-4.
If you have problems getting back to the original display, press q. If you want to study the options available through the menu bar, press F10 and use your cursor. As you can see, there are a number of shortcut keys. Some are shown in Figure 4-1; they include F10, ?, q, u, and g. When you press ?, you can go through a number of other shortcut commands that can help you navigate or specify how to manage the packages of your choice. Note You could use your cursor and mouse if you have Aptitude open in the GUI. However, you may need to manage systems remotely and may not have access to a GUI, so you need to know how to use the Aptitude switches and command options. Aptitude Menu OrganizationAs you can see from Figure 4-1, Aptitude organizes packages into seven different categories. (It's a bit different from the figure. The Virtual Packages category includes no real packages, and if there are security updates pending, there will be another category by this name.) Under each category, you can select the packages of your choice to upgrade, install, or remove:
Under the first four categories, packages are organized into several different groups. Debian specifies 36 different groups at packages.debian.org/unstable/. One critical skill with Aptitude is the search for a specific package. The forward slash key (/) opens the "Search for" text box. You can search for the package of your choice. Configuring Aptitude Patch ManagementThere are two basic menus where you can configure how Aptitude manages updates. To see how aptitude manages dependencies, navigate to the Options menu and select Dependency Handling. You'll see five configuration options:
This list may not match what you see. As Aptitude has evolved, the ways you can use it to implement patch management have changed. Also important are the miscellaneous options. To review them, navigate to the Options menu and select Miscellaneous, which opens the menu shown in Figure 4-3. The options are described in the following list. Figure 4-3. You can specify how Aptitude updates your system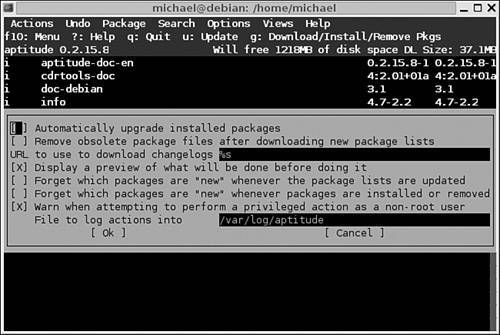
Patch Management with AptitudeNow that you've learned about Aptitude, you can use it to keep your system up to date. Before you start, you'll want an upto-date package database. To do so, run the Actions -> Update menu or press u. You're prompted for the root password. You'll see a series of messages as your system connects to the repositories listed in your /etc/apt/sources.list. If there are errors or problems with a connection, you may need to repeat the process. With a little luck, you won't have errors the second time through. Before you let aptitude do its thing, you should review what it will do. Make sure that the Miscellaneous options enable Aptitude to "Display a preview of what will be done before doing it." As described in the previous section, this should be supported by the default configuration. Then, when you press g to run the Download/Install/Remove Pkgs command, it will open a list similar to that shown in Figure 4-4. You can now review what aptitude will do to your system, in a variety of categories: Figure 4-4. What Aptitude will do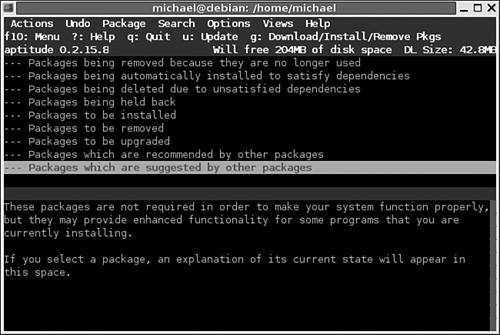
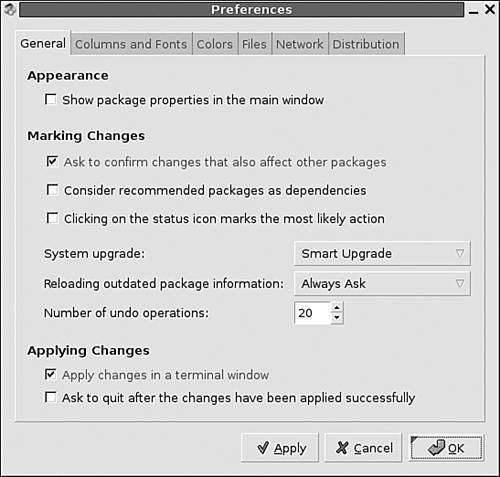
Making Changes with AptitudeIf you want to make changes to this list, you can use the options under the Package Menu. You can change the status of each package, which corresponds to the second letter in the code. For more information on the current status, see Table 4-4. After you make your changes, run the update (u) command. Not only will it update the package status relative to your configured mirrors, it updates the packages in the noted categories. For example, if you choose to install a package, it will be added either to the "Packages to be installed" or the "Packages to be upgraded" lists. When you're satisfied with the result, you can press g to run the Download/Install/Remove Pkgs command again. Only after you execute this command a second time does the local computer connect to the mirrors listed in /etc/apt/sources.list and perform the actions which you've just reviewed. Figure 4-5. Aptitude at work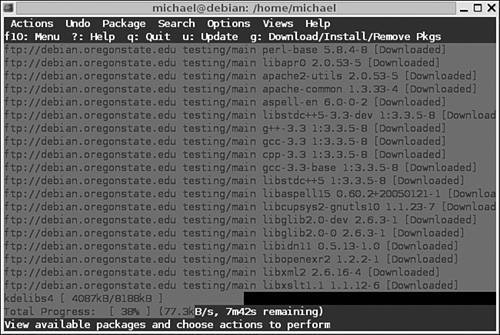 When Aptitude finishes downloading packages, you're prompted to continue or cancel. By default, packages are downloaded to /var/cache/apt/archives. If you cancel, the packages are still stored there. If you continue, Aptitude exits from its graphical menu and then installs those downloaded packages. If there are problems, you may have to make some choices; one example on my computer is shown in Figure 4-6. Figure 4-6. Aptitude installing, updating, and more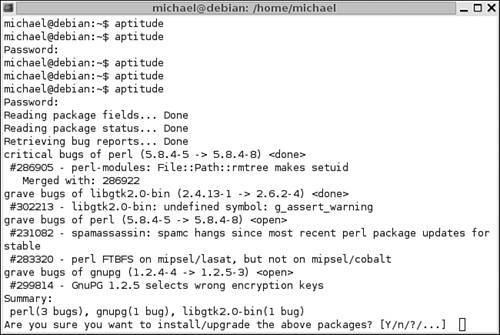 Remember, Aptitude might be installing hundreds of megabytes of data. That takes time. Note When you run aptitude, be careful. When I ran aptitude, I wasn't too careful about the list of packages that were to be uninstalled. As a result, aptitude removed the OpenOffice.org writer package while I worked on this chapter. The results were disconcerting. 4.1.6. Running the Synaptic Package ManagerIf you really prefer a fully GUI package manager, Debian provides the Synaptic Package Manager. As you can see in Figure 4-7, Synaptic includes many of the same options available for aptitude. While the descriptions may vary, the effect is the same. Figure 4-7. The Synaptic Package Manager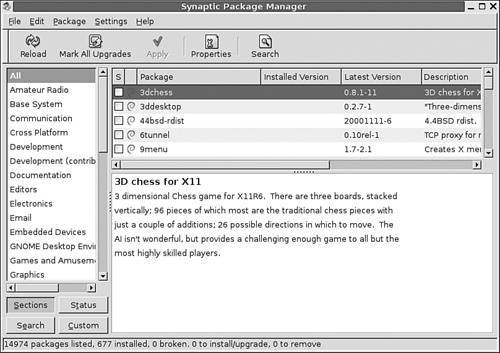 Note This section is based on Synaptic version 0.56. More information is available from www.nongnu.org/synaptic/. Remember, most every Linux graphical tool is a front-end to one or more commands. Therefore, most of what you see in this section should be familiar. Different perspectives can help you gain insight into the options available for the apt commands. Because GUI applications are more familiar to most users, we won't go into the same details on how to navigate through Synaptic. However, we will show you how you might configure Synaptic to keep your system up to date. Note You can also use a GUI to administer a remote computer with synaptic. All you need is the Secure Shell daemon (SSH). With current versions of SSH, all you need to do is log in to the remote computer with the right switch. For example, if the remote computer is debian1.example.com, the following commands should allow you to use the Synaptic Package Manager to configure updates to the remote computer. ssh -X root@debian1.example.com synaptic Keeping Synaptic UpdatedAs with aptitude, it's important to keep the apt configuration database up to date. It's quite simple with Synaptic; the Reload button (or Edit -> Reload Package Information) downloads the latest package lists from your selected repositories. Configuring SynapticSynaptic allows you to customize how you mark your upgrades. With the dist-upgrade switch associated with the apt-get command, Synaptic supports smart upgrades, which attempt to resolve conflicts and fulfill all dependencies. Press the Mark All Upgrades button. If you haven't already done so, you can choose between Default and Smart Upgrade. Alternatively, you can configure the upgrade mode; click Settings -> Preferences, and select your preferred option from the System Upgrade drop-down box. The Synaptic Preference dialog box is shown in Figure 4-8. As you can see, this version includes six tabs. Columns and Fonts as well as Colors do not affect the functionality of Synaptic, and are therefore not covered in this book. Figure 4-8. Synaptic Preferences Synaptic Preferences, as shown in Figure 4-8, are significant. They include
Under the Files tab, you can configure the cache and the Synaptic log files. Under the Temporary Files area, you can manage the cached packages in the /var/cache/apt/archives directory:
There's also a button that deletes the files in the cache. There are also options with respect to the history files. As Synaptic requires, the root user account, synaptic history, and configuration files are stored in the /root/.synaptic directory. You can keep all Synaptic history or delete history files older than the number of days you select. Under the Network tab, you can configure a connection through any Proxy Server which might govern your network's connection to the Internet. The Distribution tab is important. It governs package upgrade behavior. The three options are
After you've made your preferred changes, click OK to return to the main Synaptic screen. Selecting PackagesIn the main Synaptic screen, click the Status button. In the left pane, you'll see packages divided into six different categories. When you configure certain packages, you may see a seventh category:
Take a package on the list. Highlight it. Right-click it. It opens a shortcut menu similar to that shown in Figure 4-9. Figure 4-9. Synaptic Package options As you can see, there are a number of things that you can do with the currently installed apache2-common package. Inactive options won't work; you can't install or reinstall an upgradeable package. You can highlight some or all packages in a category. The options are straightforward:
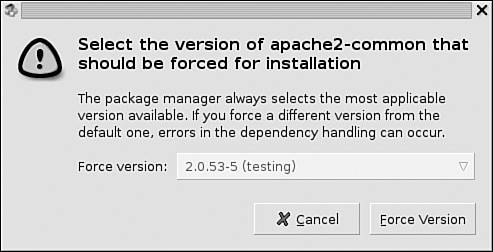
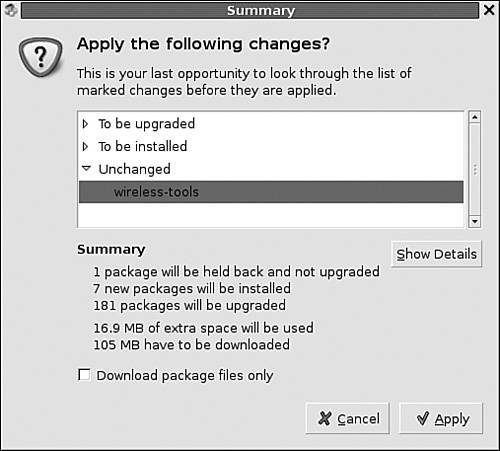
If you absolutely want to prevent upgrades of a certain package, highlight it. Run the Package -> Lock Version command to lock the package at the current version level. Alternatively, you can force Synaptic to install or upgrade a specific package to a version available on one of your configured mirrors. For example, if you know a certain version of the apache2-common package, highlight it and press Ctrl+E. You'll see a window similar to Figure 4-10, where you can select the version you want to force with the Force Version drop-down box. Figure 4-10. Forcing a Synaptic Package version Making ChangesTake your time as you work with packages in Synaptic. If you choose to use one of the upgrade options described earlier, analyze the Installed (upgradeable) options carefully! If you upgrade a service, anything you've customized for that service may be at risk. If you're allowing Synaptic to delete "unused" packages, analyze that list carefully as well. When you're ready, press Ctrl+P. This action opens a window that summarizes the actions to be taken. It includes packages to be upgraded, installed, or removed. If you've made changes to the list of packages to be upgraded or removed, those changes will be added to an Unchanged category. One example of this window is shown in Figure 4-11. Figure 4-11. Reviewing planned changes If you find an error in your review, this is your last chance to cancel the process. Don't be afraid to go back and review the lists of packages again. When you're ready, press Apply. This starts the process where Synaptic downloads the associated packages. Depending on the megabytes of files you've selected and the speed of your Internet connection, this process may take some time. When the packages are downloaded, you'll see terminal output. You may be asked some configuration questions associated with specific services during this process. If you're trying to install some problematic packages, find out during this process. For example, Figure 4-12 illustrates some problems with the upgrade. At this point, you can accept the problems and install the packages as they are, or refuse the installation, and return to Synaptic. Figure 4-12. Upgrade problems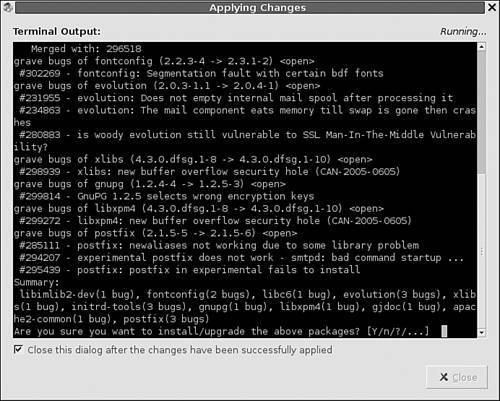 Based on the errors shown, I've either unchecked the installation of related new packages or locked the version of existing packages to avoid upgrades. Sometimes, new packages or upgrades can have bugs. Avoiding upgrades can help you avoid problems in this area. For example, the messages shown in Figure 4-12 reveal problems associated with the available newer version of the Evolution email manager. Before upgrading my system, I locked Evolution in its current version. While I used these steps, other methods can work equally well:
When you've finished your modifications, click Apply again. If you've made appropriate choices, you should at least see fewer errors. Continue the process until you can update without unacceptable bugs or fatal errors. If you've saved your downloads, you may be able to use them to update other identically configured Debian computers on your network. If your Debian computers require the same updates, they won't need any additional packages. |
EAN: 2147483647
Pages: 80