Certification Objective 4.07: Network Configuration
|
| < Day Day Up > |
|
The network is where the power of Red Hat Enterprise Linux really comes alive; however, getting there may not be trivial. As in all other things Linux, it's a learning experience. Most critical settings are stored in the /etc/sysconfig directory.
In most cases, you'll configure networking when you install RHEL 3 during each exam. However, if you have problems, you may need to diagnose networking problems, especially during the troubleshooting exams.
The configuration file that provides the foundation for others in RHEL 3 networking is /etc/sysconfig/network. It can contain up to five variables, as described in Table 4-14. If you don't see the variable in your /etc/sysconfig/network file, the situation does not apply. For example, if you don't see the GATEWAYDEV variable, you probably have only one network card on your computer.
| Exam Watch | Learn the scripts in the /etc/sysconfig and /etc/sysconfig/network directories. These are crucial to the configuration of Red Hat Enterprise Linux. If you have a configuration to change or repair, it probably involves files in one of these directories. If you have a problem on the troubleshooting exam, you may find the solution in these files. Red Hat is consolidating a number of its key configuration files in its directories, so expect them to become even more important in the future.
|
The /etc/sysconfig/network-scripts Files
We'll start our tour in the /etc/sysconfig directory. This is where Red Hat Enterprise Linux stores and retrieves its networking information. With the various Red Hat configuration tools, you don't need to touch these files, but it's good to know they're there. A few representative files are shown in Table 4-15.
| File in /etc/sysconfig/network-scripts | Description |
|---|---|
| ifcfg-lo | Configures the loopback device, which is a virtual device that confirms proper installation of TCP/IP. |
| ifcfg-* | Each installed network adapter, such as eth0, gets its own ifcfg-* script. For example, eth0 gets ifcfg-eth0. This file includes the IP address information required to identify this network adapter on a network. |
| network-functions | This script contains functions used by other network scripts to bring network interfaces up and down. |
| ifup-* and ifdown-* | These scripts activate and deactivate their assigned protocols. For example, ifup-ipx brings up the IPX protocol. |
There are several closely related commands which can help you manage networking from the command line interface. I describe a few of these commands in Table 4-16.
| Network Script | Description |
|---|---|
| ifup, ifdown | These scripts start and stop a network card such as eth0. Naturally, ifup eth0 activates eth0; ifdown eth0 deactivates this device. |
| dhclient | dhclient activates a connection to a DHCP server for your network. The function of a DHCP server is to lease an IP address. Normally activated during the boot process through the ifcfg-* script in the /etc/sysconfig/network-scripts directory. Supersedes scripts from previous versions of Red Hat Linux, including pump and dhcpcd. |
| ifconfig | The main network interface configuration utility. Can return or set the network parameters on a network device. |
Setting Up a Network Interface
In this section, I illustrate how you can configure networking on your computer with text commands as well as with the Red Hat GUI Network Configuration utility. Changes are written to various configuration files, including /etc/sysconfig/network, and file and related directories. There is a text mode version of this tool, in which you can modify your system name, as well as add, remove, and edit network interfaces. While you can start it with the redhat-config-network-tui command, it's officially an experimental interface for RHEL 3 and is not nearly as capable as the GUI tool.
| On The Job | With the redhat-config-* GUI tools, Red Hat has developed a number of utilities that I believe will encourage Microsoft Windows administrators to make the switch to Linux. Unfortunately, I believe the lack of corresponding text-based tools has discouraged some Linux administrators from working with Red Hat. |
I illustrate how you can use the Network Configuration utility (see Figure 4-7) in the following exercise, and then illustrate how you can monitor and modify your network configuration with various text commands.
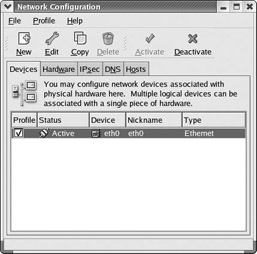
Figure 4-7: Network Configuration utility
Exercise 4-5: Modifying Network Interfaces with redhat config-network
-
You can start the Network Configuration utility in one of two ways in the GUI. You can click Main Menu | System Settings | Network. Alternatively from a GUI terminal, run redhat-config-network. This opens the Network Configuration dialog box.
-
Select the Devices tab if required.
-
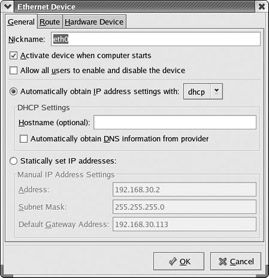
Select the adapter that you wish to modify, and then select Edit. If it is an Ethernet adapter, you'll see an Ethernet Device dialog box similar to the one shown here.
-
Pay attention to the 'Allow all users to enable and disable the device' option. If you activate it, you'll change the USERCTL variable in the ifcfg-* script to yes.
Note Record your current settings for this interface before proceeding.
-
Change the IP value to 192.168.1.11 and the network mask to 255.255.255.0.
Note If your computer is on the 192.168.1.0 private network, use a different private IP address. It should isolate you from all other hosts on the local network. Test this after step 5 by using the ping command to try to connect to other hosts on your network.
-
Click File | Save and wait for the process to complete.
-
At the command prompt, run ifconfig to check your new IP settings.
-
Repeat steps 1-3 and then reset the values to your previous settings. Run ifconfig again to make sure you've restored your original network configuration.
Many values are associated with each network interface. At minimum, each network adapter requires a valid, unique IP address, as well as an appropriate network mask. The Network Configuration utility provides five convenient tabs which you can use to customize each network adapter:
-
Devices This tab allows you to add a new network adapter or edit a configured adapter. You can revise the name of the adapter, IP address assignments, static routing, and hardware device information. Different devices are configured in the /etc/sysconfig files described earlier.
-
Hardware This tab lets you modify the IRQ port, memory location, I/O address(es), and DMA channel(s) associated with the adapter. Hardware information is documented in different files in the /proc directory.
On The Job Linux sometimes has trouble recognizing second network adapters; you may need to specify hardware addresses such as the IRQ port.
-
IPsec This tab supports Virtual Private Network connections.
-
DNS This tab lets you add the addresses of DNS servers available to network adapters on the given network, which is reflected in /etc/resolv.conf.
-
Hosts This tab allows you to modify the name, alias, and IP address assigned to the specified adapter, which is shown in /etc/hosts.
In addition, if you run Profile | New, you can create different network configurations, which can be useful for flexible configurations. For example, if you have a laptop computer and a docking port, your configuration may change depending on whether the laptop is connected to the docking port.
If you want to use this tool, some trial and error is appropriate. Make some changes, and check the effect on the files I've described.
ifup/ifdown
For each installed network adapter, there is a corresponding ifcfg-* file in /etc/sysconfig/network-scripts. You can activate or deactivate that adapter with the ifup and ifdown commands. Either one of the following commands will activate the eth0 network adapter:
ifup ifcfg-eth0 ifup eth0
ifconfig
The ifconfig command is used to configure and display network devices. Here is some sample output from this command:
# ifconfig eth0 eth0 Link encap:Ethernet HWaddr 00:50:56:40:1E:6A inet addr:192.168.30.2 Bcast:192.168.30.255 Mask:255.255.255.0 UP BROADCAST RUNNING MULTICAST MTU:1500 Metric:1 RX packets:11253 errors:0 dropped:0 overruns:0 frame:0 TX packets:1304 errors:0 dropped:0 overruns:0 carrier:0 collisions:0 txqueuelen:100 RX bytes:2092656 (1.9 Mb) TX bytes:161329 (157.5 Kb) Interrupt:10 Base address:0x10a0
The preceding command requests configuration data for the first Ethernet device on the system, eth0. If you just specify eth0 (or another device), ifconfig displays information about only the specified interface. If you don't specify a device, ifconfig shows all network adapters, including the loopback adapter.
The ifconfig command can also be used to configure network interfaces. For example, you can assign a new IP address for eth0 with the following command:
# ifconfig eth0 207.174.142.142
The first parameter, eth0, tells us which interface is being configured. The next argument, 207.174.142.142, indicates the new IP address being assigned to this interface. If we want to make sure our change worked, we issue the ifconfig command again to view its current settings.
# ifconfig eth0 eth0 Link encap:Ethernet HWaddr 00:50:56:40:1E:6A inet addr: 207.174.142.142 Bcast:207.174.142.255 Mask:255.255.255.0 UP BROADCAST NOTRAILERS RUNNING MULTICAST MTU:1500 Metric:1 RX packets:11253 errors:0 dropped:0 overruns:0 frame:0 TX packets:1304 errors:0 dropped:0 overruns:0 carrier:0 collisions:0 txqueuelen:100 RX bytes:2092656 (1.9 Mb) TX bytes:161329 (157.5 Kb) Interrupt:10 Base address:0x10a0
Looking at the output of our command, we successfully changed the IP address on the eth0 interface to 207.174.142.142. But this is not enough, as you should realize that the broadcast address doesn't work with this IP address.
With the right switch, the ifconfig command can modify a number of other settings for your network adapter. Some of these switches are shown in Table 4-17.
| Parameter | Description |
|---|---|
| up | Activates the specified adapter. |
| down | Deactivates the specified adapter. |
| netmask address | Assigns the address subnet mask. |
| broadcast address | Assigns the address as the broadcast address. Rarely required, since the default broadcast address is standard for most current networks. |
| metric N | Allows you to set a metric value of N for the routing table associated with the network adapter. |
| mtu N | Sets the maximum transmission unit as N, in bytes. |
| -arp | Deactivates the address resolution protocol, which collects network adapter hardware addresses. |
| promisc | Activates promiscuous mode. This allows the network adapter to read all packets to all hosts on the LAN. Can be used to analyze the network for problems, or |
| -promisc | Deactivates promiscuous mode. |
| irq port | Assigns a specific IRQ port. |
| io_addr address | Assigns a specific I/O address. |
netstat -r
The netstat command is used to display a plethora of network connectivity information. The most commonly used option, netstat -r, is used to display local routing tables. Here's a sample netstat -r output:
# netstat -nr Kernel routing table Destination Gateway Genmask Flags MSS Window irtt Iface 191.72.1.0 * 255.255.255.0 U 40 0 0 eth0 127.0.0.0 * 255.0.0.0 UH 40 0 0 lo 0.0.0.0 191.72.1.1 255.255.255.0 UG 40 0 0 eth0
Did you notice we used a -n flag? -n tells netstat to display addresses as IP addresses, instead of as hostnames. This makes it a little easier to see what's going on.
The Destination column lists networks by their IP addresses. The Gateway column indicates gateway addresses. If the destination is on the LAN, no gateway is required, so an asterisk is shown in this column. The Genmask column lists the network mask. Networks look for a route appropriate to the destination IP address. The IP address is compared against the destination networks, in order. When the IP address is found to be part of one of these networks, it's sent in that direction. If there is a gateway address, it's sent to the computer with that gateway. The Flags column describes how this is done. Flag values are listed in Table 4-18.
| Flag | Description |
|---|---|
| G | The route uses a gateway. |
| U | The network adapter (Iface) is up. |
| H | Only a single host can be reached via this route. |
| D | This entry was created by an ICMP redirect message. |
| M | This entry was modified by an ICMP redirect message. |
arp as a Diagnostic Tool
The Address Resolution Protocol associates the hardware address of a network adapter with an IP address. The arp command displays a table of hardware and IP addresses on the local computer. With arp, you can detect problems such as duplicate addresses on the network, or you can manually add arp entries as required. Here's a sample arp command, showing all arp entries in the local database:
# arp Address HWtype HWaddress Flags Mask Iface 192.168.0.121 ether 52:A5:CB:54:52:A2 C eth0 192.168.0.113 ether 00:A0:C5:E2:49:02 C eth0
If the arp table is empty, you haven't made any connections to other computers on your network. The address column lists known IP addresses, usually on the LAN. The HW Type column shows the hardware type of the adapter, while the HW Address column shows the hardware address of the adapter.
You can use the -H option to limit the output from arp to a specific hardware type, such as ax25, ether, or pronet. The default is ether, which is short for Ethernet.
The arp command can help you with duplicate IP addresses, which can stop a network completely. To remove the offending machine's arp entry from your arp table, use the -d option:
# arp -d bugsy
This removes all arp information for the host 'bugsy.' To add an arp entry, use the -s option:
# arp -s bugsy 00:00:c0:cf:a1:33
This entry will add the host bugsy with the given hardware address to the arp table. IP addresses won't work in this case.
DHCP Clients
You can set up your computer as a DHCP client. If the redhat-config-network configuration utility does not work, check the configuration file associated with your network card in the /etc/sysconfig/network-scripts directory. You should not need static IP configuration information, and you should see BOOTPROTO=dhcp.
In any case, if you have a working DHCP server on your network, you can connect your computer to it with the dhclient command.
| On The Job | Red Hat has used different commands to support DHCP clients in the past, including dhcpcd and pump. |
|
| < Day Day Up > |
|
EAN: N/A
Pages: 194