Certification Objective 10.06: Firewall Policies
|
| < Day Day Up > |
|
A firewall sits between your company's internal LAN and an outside network. A firewall can be configured to examine every network packet that passes into or out of your LAN. When configured with appropriate rules, it can filter out those packets that may pose a security risk to your system. To understand how packet filtering works, you have to understand a little bit about how information is sent across networks.
Before you send a message over a network, the message is broken down into smaller units called packets. Administrative information, including the type of data, the source address, and destination address, is added to each packet. The packets are reassembled when they reach the destination computer. A firewall examines these administrative fields in each packet to determine whether to allow the packet to pass.
Red Hat Enterprise Linux 3 comes with everything you need to configure a system to be a firewall. Three basic Linux firewall commands are available: ipfwadm, ipchains, and iptables. The first command, ipfwadm, was associated with Linux kernel 2.0.x and is now generally obsolete. The ipchains command was developed for Linux kernel 2.2.x and is still in active use, even on Linux distributions based on Linux kernel 2.4.x. But the default is iptables, which is available by default for RHEL 3.
| Exam Watch | The Linux 2.4.x kernel firewalling subsystem is also known as the netfilter/iptables project. The current RH300 course refers to netfilter. The Red Hat firewall tools create iptables (IP version 4) commands. Therefore, I've focused this section on iptables. |
| On The Job | RHEL 3 also includes a firewall command for IPv6 networks, ip6tables. |
Configuring iptables
The philosophy behind iptables is based on 'chains.' These are sets of rules applied to each network packet. Each rule does two things: it specifies the conditions a packet must meet to match the rule, and it specifies the action if the packet matches.
Before you can set up iptables commands, you need to make sure that the appropriate modules are part of your Linux kernel. Check your current rules. Run the iptables -L command to list the current chains. If you see error messages similar to the following:
iptables: Incompatible with this kernel
you'll need to upgrade your modules. Use the rmmod modulename command to delete any ipchains-related modules. Then use the insmod ip_tables command to add the iptables kernel module. Now you're ready to start configuring iptables rules.
The iptables command uses the following basic format:
iptables -t tabletype <action/direction> <packet pattern> -j <what to do>
Now let us analyze this command, step by step. First there is the -t tabletype switch. There are two basic tabletype options for iptables:
-
filter This sets a rule for filtering packets.
-
nat This configures Network Address Translation, which is discussed in the last section of this chapter.
The default is filter; if you don't specify a -t tabletype, the iptables command assumes that you're trying to affect a filtering rule. Next is the <action/direction>. There are four basic actions associated with iptables rules:
-
-A (--append) Appends a rule to the end of a chain.
-
-D (--delete) Deletes a rule from a chain. Specify the rule by the number or the packet pattern.
-
-L (--list) Lists the currently configured rules in the chain.
-
-F (--flush) Flushes all of the rules in the current iptables chain.
If you're appending to (-A) or deleting from (-D) a chain, you'll want to apply it to network data traveling in one of three directions:
-
INPUT All incoming packets are checked against the rules in this chain.
-
OUTPUT All outgoing packets are checked against the rules in this chain.
-
FORWARD All packets being sent to another computer are checked against the rules in this chain.
Next, you need to configure a <packet pattern>. Your firewall checks every packet against this pattern. The simplest pattern is by IP address:
-
-s ip_address All packets are checked for a specific source IP address.
-
-d ip_address All packets are checked for a specific destination IP address.
Packet patterns can be more complex. In TCP/IP, packets are transported using the TCP, UDP, or ICMP protocol. You can specify the protocol with the -p switch, followed by the destination port (--dport). For example, the -p tcp --dport 80 extension prevent users outside your network from looking for an HTTP connection.
Once the iptables command finds a packet pattern match, it needs to know what to do with that packet, which leads to the last part of the command, -j <what to do>. There are three basic options:
-
DROP The packet is dropped. No message is sent to the requesting computer.
-
REJECT The packet is dropped. An error message is sent to the requesting computer.
-
ACCEPT The packet is allowed to proceed as specified with the -A action: INPUT, OUTPUT, or FORWARD.
We will look at some examples of how you can use iptables commands to configure a firewall. The first step is always to see what is currently configured, with the following command:
# iptables -L
If iptables is properly configured, it should return chain rules in three different categories: INPUT, FORWARD, and OUTPUT.
Let's look at some examples. The following command defines a rule that rejects all traffic from the 192.168.75.0 subnet, and it sends a 'destination unreachable' error message back to any client that tried to connect:
# iptables -A INPUT -s 192.168.75.0/24 -j REJECT
This rule stops users from the computer with an IP address of 192.168.25.200 from 'pinging' your system (remember that the ping command uses the ICMP protocol):
# iptables -A INPUT -s 192.168.25.200 -p icmp -j DROP
The following command guards against TCP SYN attacks from outside our network. Assume that your network IP address is 192.168.1.0. The exclamation point (!) inverts the meaning; in this case, the command applies to all IP addresses except those with a 192.168.1.0 network address (and a 255.255.255.0 subnet mask).
# iptables -A INPUT -s !192.168.1.0/24 -p tcp -j DROP
Then, if you wanted to delete the rule related to the ping command in this list, use the following command:
# iptables -D INPUT -s 192.168.25.200 -p icmp -j DROP
The default rule for INPUT, OUTPUT, and FORWARD is to ACCEPT all packets. One way to stop packet forwarding is to add the following rule:
# iptables -A FORWARD -j DROP
Maintaining Netfilter Rules
Once you've added the iptables commands of your choice, the following command saves your new firewall configuration to a file:
# service iptables save
This saves your chains in the /etc/sysconfig/iptables configuration file. The iptables service script then reads this file, if it is active for the appropriate runlevel when you start Linux. You can configure iptables so that it is active for all network runlevels (2, 3, 4, and 5) with the chkconfig command, as follows:
# chkconfig --level 2345 iptables on # chkconfig --list iptables iptables 0:off 1:off 2:on 3:on 4:on 5:on 6:off
| Exam Watch | Knowing how to secure a Red Hat Enterprise Linux system against unauthorized access is critical. Be sure you understand the concepts and commands discussed in this chapter. |
The Red Hat Firewall Configurator
You can automate the process of configuring a firewall. RHEL 3 includes the Security Level Configuration tool. You can start it with the redhat-config-securitylevel command, or by clicking Main Menu | System Settings | Security Level. This is a straightforward tool, as shown in Figure 10-8.
If you've installed RHEL 3 before, this menu should look familiar; the choices are identical to those shown during the standard RHEL 3 installation process. There is a similar text-based version of this tool, which you can start with the redhat-config-securitylevel-tui or lokkit commands.
Red Hat has changed this tool for RHEL 3; there are no longer three security levels available. You can enable or disable a firewall for your computer. The default firewall loosely corresponds to the 'High Security' firewall that you could have configured for Red Hat Linux 9.
-
The default RHEL firewall blocks all inbound request traffic unless requested from within the network. For example, DNS replies are allowed.
-
No security disables any rules that you've previously created using the Red Hat Firewall Configurator. It does not delete any rules that you've created directly with the iptables command.
You can create exceptions to each rule. First, firewalls are not applied to 'Trusted Devices.' Therefore, if you have multiple network card on your computer, you can apply firewall rules only to one network card-say, on the card that is directly exposed to the Internet.
As shown in Figure 10-8, you can allow incoming traffic to a number of services. For example, if you select WWW (HTTP), others can connect to a Web server on your computer. With the available settings, you can also allow incoming connections to
-
A Web server, by activating the WWW (HTTP) option.
-
An FTP server such as the vsFTP service, by activating the FTP option.
-
A Secure Shell (SSH) service, by activating the SSH option. This is a common method for administering remote Linux computers; you'll read more about SSH in Chapter 11.
-
Telnet, by activating the Telnet option. This also works with the Kerberos-based Telnet service described earlier in this chapter.
-
Mail services through the sendmail or Postfix services described in Chapter 7, by activating the Mail (SMTP) option.
The settings that you create are documented in /etc/sysconfig/iptables. But there may be more firewall rules. You may have added some firewall chains with an iptables command.
In this case, the text-based version of this tool is more customizable. As you can see in Figure 10-9, you can use the 'Other Ports' text box to allow data to come through using other incoming TCP/IP ports.
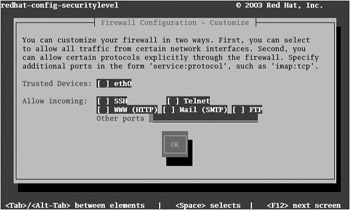
Figure 10-9: Customizing the use of the Red Hat Security Level tool in text mode
For example, if you wanted to allow secure Web communication through your firewall, you could enter the following line in the Other Ports text box:
443:udp,443:tcp
This opens communication through the TCP/IP ports associated with Secure Web services, and is equivalent to the following iptables commands:
# iptables -A INPUT -p udp --dport 443 -j ACCEPT # iptables -A INPUT -p tcp --dport 443 -j ACCEPT
|
| < Day Day Up > |
|
EAN: N/A
Pages: 194