Certification Objective 14.02-The X.org Server Configuration
Most configuration files associated with the X.org server can be found in the /etc/X11 directory. While the focus is on the xorg.conf file, there are other files in that directory. The way the X.org server is designed, you can start the X Window in multiple terminals. You can boot directly into the X Window in your choice of display managers or use startx to start it from a command line console.
X.org Server Configuration Files
A wide variety of X Window configuration files are located in the /etc/X11 directory. Many are discussed in other parts of this chapter. While I don't cover these files in detail, the Red Hat Exam Prep guide doesn't say much about configuring the X Window in detail.
Therefore, I focus here on the primary X Window configuration file, xorg.conf. It's instructive to read the associated man page carefully. It is well documented and includes a number of commented sample commands that can help you configure your system in a number of special ways. For example, it includes tips on how you can
-
Configure different keyboards.
-
Set up multiple monitors, in what is known as a "multi-head" configuration.
-
Disable switching from the GUI to other virtual terminals with the following command:
Option "DontVTSwitch" "on"
-
Disable the CTRL-ALT-BACKSPACE key sequence, which normally exits from the GUI with the following command:
Option "DontZap" "on"
This is just a small sample of the things you can do with your X Window configuration-and the kinds of problems that you may have to troubleshoot in real life. And remember that the Red Hat exam is supposed to reflect problems that you may encounter in real life.
Starting the X Window
The default server is linked to the X command. X is called up by the startx command. Both of these commands are located in the /usr/bin directory. Examine the long listing for the X command. You'll see that it's linked to the Xorg command:
# ls -l /usr/bin/X lrwxrwxrwx 1 root root 4 Jul 30 07:33 /usr/bin/X -> Xorg
The Display Settings tool normally writes its changes to /etc/X11/xorg.conf. When the X.org server starts, it reads this file.
Exercise 14-2: Starting Multiple X Servers
In this exercise, you will start two different X servers. If the X Window System is not running, you can skip steps 1 and 3.
-
If the X Window System is running, change to a text console by pressing CTRL-ALT-F1.
-
If you see a login prompt, log in at the text console as root. Otherwise, press CTRL-C to stop the X Window.
-
If you logged in at the graphical console, stop the current X Window server by typing this:
init 3
-
Start the X.org server by typing this command:
# startx &
The default GUI will start.
-
Switch back to your text console session by pressing CTRL-ALT-F1. Return to your GUI by pressing ALT-F7. Switch back again to your text console session. (If these commands do not work, check for a DontVTSwitch option in your/etc/X11/xorg.conf file.)
-
Type the following command:
# startx -- :1 &
-
You should now have two different GUIs. Switch to the first GUI by pressing CTRL-ALT-F7. Return to the second GUI by pressing CTRL-ALT-F8.
-
Log out from both GUIs. If no logout menu option is available, press CTRL-ALT-BACKSPACE.
xorg.conf in Detail
As you learn the intricacies of configuring the Linux X Window Server, it's worth some trouble to examine the /etc/X11/xorg.conf file in detail. It's interesting to note that this file is very similar to previous /etc/X11/XF86Config files on the older RHEL 3 system. The available directives are the same. The configuration file is quite a bit simpler; for example, there are no longer default sections for modules or fonts.
The first line is a comment that indicates whether your X Window System was last configured by the Red Hat installation program or the Display Settings tool. The two options are
# Xorg configuration created by pyxf86config # Xorg configuration created by system-config-display
The first section binds the other sections together. In other words, you'll see sections later in this file, each associated with an Identifier variable: Screen0, Keyboard0, and Synaptics.
Section "ServerLayout" Identifier "single head configuration" Screen 0 "Screen0" 0 0 InputDevice "Keyboard0" "CoreKeyboard" InputDevice "Synaptics" "CorePointer" EndSection
RHEL 5 can handle multiple monitors. If so configured, you'll see a different value for Identifier, such as "dual head configuration". However, as two monitors per workstation would be rather expensive (especially in a classroom with a dozen or more systems), I don't believe you need to worry about this on your exam. But as they say, your mileage may vary.
Next, take a look at a couple of different sections, both labeled InputDevice. The first configures your keyboard as a regular US keyboard with 105 keys. The second configures a PS/2 mouse. The Emulate3Buttons option, when active, configures the X server to activate middle mouse button functionality when you click the left and right mouse buttons simultaneously.
Section "InputDevice" Identifier "Keyboard0" Driver "kbd" Option "XkbModel" "pc105" Option "XkbLayout" "us" EndSection Section "InputDevice" Identifier "Synaptics" Driver "synaptics" Option "Device" "/dev/input/mice" Option "protocol" "auto-dev" Option "Emulate3Buttons" "yes" EndSection
The following Monitor, Device, and Screen sections are associated with the monitor detected during the installation process or configured with the system-config-display command:
Section "Monitor" Identifier "Monitor0" ModelName "LCD Panel 1440x900" HorizSync 31.5 - 100.0 VertRefresh 59.0 - 75.0 Option "dpms" EndSection Section "Device" Identifier "Videocard0" Driver "radeon" EndSection Section "Screen" Identifier "Screen0" Device "Videocard0" Monitor "Monitor0" DefaultDepth 24 SubSection "Display" Viewport 0 0 Depth 24 EndSubSection EndSection
As you can see, the Screen section associates the Device and Monitor as identified by Monitor0, Videocard0, and Screen0. If the Red Hat installation program or the Display Settings tool gives you the wrong DefaultDepth or inappropriate screen sizes (Modes), you can add or modify them here. I've added the matching sections from a different system for your reference.
Section "Monitor" Identifier "Monitor0" ModelName "LCD Panel 1024x768" HorizSync 31.5 - 48.5 VertRefresh 40.0 - 70.0 Option "dpms" EndSection Section "Device" Identifier "Videocard0" Driver "vesa" EndSection Section "Screen" Identifier "Screen0" Device "Videocard0" Monitor "Monitor0" DefaultDepth 24 SubSection "Display" Viewport 0 0 Depth 24 Modes "800x600" "640x480" EndSubSection EndSection
Text or Graphical GUI Access
RHEL now configures the X Window interface to start automatically when your system boots, by setting the id directive to runlevel 5 in /etc/inittab. If you set id to runlevel 3, you can choose to start the X Window System manually. In this case, the Linux GUI can be started with the startx command. If you select a graphical login, you can also select the graphical login manager of your choice.
Text Login Mode
To access a Linux system, you need to log in. In other words, you identify yourself to the system with a username and a password, using a login program. When you log into Linux at a regular command line interface, the mingetty command calls up a login program that prompts you for your username and password. Six mingetty terminals are configured through /etc/inittab.
There are six active runlevels in Linux. The two of concern here are runlevels 3 and 5. If you start Linux in runlevel 3, you get a text login. If you start Linux in runlevel 5, you get a graphical login screen.
It's easy to change the default boot mode from the X Window to the command line. Just edit the /etc/inittab file. Go to the line with the initdefault variable. To make Linux start a text console (with no GUI) automatically, use your favorite text editor and change the line in /etc/inittab that reads
id:5:initdefault:
to
id:3:initdefault:
Of course, you can reverse this process. This change does not take effect until you reboot. If you are running as the root user, you can also use the init (or telninit) command to switch between runlevel 5 and runlevel 3. Running this command,
# init 3
switches your display from X Window back to text terminal mode; whereas,
# init 5
switches you from text terminal mode to X Window, specifically the default graphical login screen, as started by the display manager. You can find more information on different runlevels and /etc/inittab in Chapter 3.
Display Managers: gdm and kdm
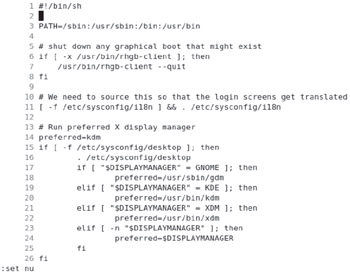
When you configure Linux to start from runlevel 5, you can log in through a special X client, the display manager. The display manager is a fairly simple program; it simply displays a dialog box on the screen asking for your username and password. You can use any of three major display managers. The default display manager is the GNOME Display Manager, or gdm. To change your display manager, edit the prefdm shell script in the /etc/X11 directory, as shown in Figure 14-2.

Figure 14-2: Set your preferred display manager in /etc/X11/prefdm.
Take the preferred directive and set it to kdm or gdm for the KDE Display Manager or GNOME Display Manager, respectively, as shown on line 14. Alternatively, set the DISPLAYMANAGER directive to GNOME or KDE in etc/sysconfig/desktop.
| On the Job | Even though the code in /etc/X11/prefdm suggests otherwise, the X Display Manager, xdm, is not included with RHEL 5. |
How you start the X Window System affects its behavior. Assume you start X Window through one of the graphical display managers. When you exit an X Window session, you're returned to the same display manager. To continue, you would need to log in again.
The default behavior for the gdm window manager launches a GNOME session. The kdm window manager by default launches a KDE session. However, you can start GNOME or KDE from either login manager.
Both the GNOME and KDE environments use their own startup files. Through the use of option buttons, both the GNOME and KDE display managers allow you to choose the desktop environment that you want to start. From the GNOME Display Manager, click the Session button. This starts a window where you can select from several desktop options, as shown in Figure 14-3.

Figure 14-3: The GNOME Display Manager, gdm
From the KDE Display Manager shown in Figure 14-4, press ALT-T. You can then select from the available desktop environments.

Figure 14-4: The KDE Display Manager, kdm
If you log in using a display manager, X Window starts somewhat differently when compared to using startx. When you run startx, the X Window runs as a child process of your text-based login shell. Even though the X Window System is running, Linux is still at runlevel 3. After you exit the X Window System, you still have to log out of this shell to terminate your login session.
If the X Window doesn't start, whether it be from the startx command or from booting into runlevel 5, make sure key files and commands exist on your system. Try reconfiguring the X Window with the system-config-display command. Check the /etc/X11/prefdm file; an error in the preferred directive gave me the same error.
Analyzing startx
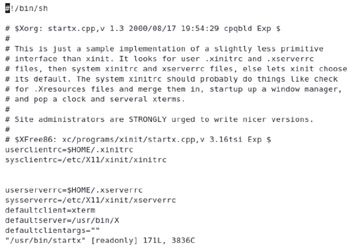
You've already seen that you can start the Linux GUI with the startx command. This command starts the X server and switches your display into graphics mode. It also runs through a series of configuration files that prompt Linux to start your selected desktop and other desired applications. The start of this script is illustrated in Figure 14-5.

Figure 14-5: The startx script
| On the Job | The startx command is actually a shell script that serves as a front end to the xinit command. The default location for both startx and xinit is /usr/bin. |
There are a number of configuration files that can help you customize the behavior of your X Window session. These are hidden files that you can install into users' home directories. If startx doesn't find a particular configuration file in a home directory, it uses a default version of the same file.
Take a look at two of the first lines in the startx script:
userclientrc=$HOME/.xinitrc sysclientrc=/etc/X11/xinit/xinitrc
When you start the X Window System with the startx command, the userclientrc directive looks for a file to run named .xinitrc in your home directory. It then reads the /etc/X11/xinit/xinitrc configuration script. This file, in turn, runs either the file $HOME /.Xclients, or, if that file doesn't exist, /etc/X11/xinit/Xclients.
A typical ~/.xinitrc file includes commands that start various X clients. (Remember that the tilde represents the home directory.)
| On the Job | You can also configure X clients to start when you start the GNOME desktop through the Sessions utility. Settings are stored in each user's home directory in the ~/.gnome2/session-manual file. |
There is more than one way to do many things in Linux, including the setup of default X clients. Knowing these options can help you troubleshoot problems during the Red Hat exams.
The following is an illustration of a simple ~/.xinitrc file:
#!/bin/bash xterm & xclock -geometry 200x200-20+20 & xclipboard -geometry 300x300-20-20 & exec twm
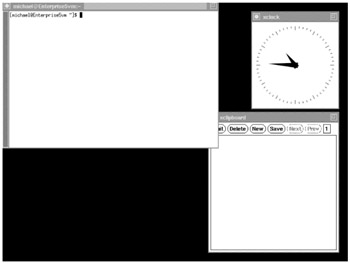
The first line sets bash as the shell for this script. The next line starts an xterm terminal client. The following line starts xclock with a specific size and location. The line after that brings up an X Window clipboard, also with a specific size and location. Notice that the first three command lines end with an ampersand (&). This is important; it tells the shell to run each command line and return control to the shell for this script. The final line uses the exec command to start the twm window manager. I illustrate the result in Figure 14-6; this supersedes any default desktop and X clients that you may have otherwise configured.

Figure 14-6: A GUI as custom configured through ~/.xinitrc
You can start other desktops through this file; for example, substitute one of the following commands for exec twm in the previous example of an .xinitrc configuration file.
exec gnome-session exec startkde
You can create an ~/.xinitrc file with a text editor of your choice. Once you've saved the file, startx executes the commands in this file, with the results shown in Figure 14-6.
Exercise 14-3: Customizing the startx Process
In this exercise, configure the X Window System to use a customized .xinitrc file.
-
If the X Window System is running, change to a text console by pressing CTRL-ALT-F1.
-
If you see a login prompt, log in at the text console as root. Otherwise, press CTRL-C to stop the current X Window session.
-
If you logged in from the GUI (using a window manager such as gdm), stop the current X Window server with the following command:
# init 3
-
Make sure you're in your home directory, logged in under your account. I access my home account from root with the su - michael command. Use your favorite text editor to create a .xinitrc file. If you're not sure what to do, use the sample file shown in the preceding section.
-
Start the X Window System with the following command:
# startx
Your X Window session should automatically start the applications in your .xinitrc file.
-
Assuming you used the sample .xinitrc file described earlier, exit from the twm desktop. To do so, left-click the desktop to bring up the twm main menu and click Exit.
-
If you want to restore your original desktop settings, to allow you to start GNOME or KDE with the startx command, remove the .xinitrc file from your home directory.
Now that you have seen how X Window clients and the X Window server work together, refer to the following Scenario & Solution for some common situations you may encounter, along with their solutions.
| SCENARIO & SOLUTION | |
|---|---|
| I'm having problems getting X.org to run on my hardware. | Check the Red Hat hardware support site. Run system-config-display. |
| I want to use a different desktop environment. | Use the switchdesk command to change your desktop environment. |
| I want to stop the X Window System without rebooting Linux. When I try logging out, all I see is a graphical login manager. | Use the init 3 (or telinit 3) command to change the system runlevel to runlevel 3. |
| I'm having problems starting an X client. | Check that the DISPLAY variable is properly set with the following command: # export DISPLAY=localhost:0.0 Check for underlying network problems. Check X security problems. |
| My X Window display is acting strangely and I can't log in. | Switch to a virtual console and log in. Check the error logs. See if your X Font Server (xfs) is running. If it isn't, check for errors in ~/.xsession-errors and /var/log/messages. Make sure your /tmp and /home directory partitions are not full. As a last resort, rerun system-config-display or Xorg -configure. |
EAN: 2147483647
Pages: 227