Certification Objective 8.06-Advanced Partitioning: Logical Volume Management
Logical Volume Management (LVM) (also known as the Logical Volume Manager) can allow you to manage active partitions. Before LVM, you had no easy way to increase or reduce the size of a partition after Linux was installed. With LVM2, you can even create read-write snapshots; but this is not part of the current exam requirements, so this book won't be addressing that feature.
For example, if you find that you have extra space on the /home directory partition and need more space on your /var directory partition for log files, LVM will let you reallocate the space. Alternatively, if you are managing a server on a growing network, new users will be common. You may reach the point at which you need more room on your /home directory partition. With LVM, you can add a new physical disk and allocate its storage capacity to an existing /home directory partition.
| On the Job | While LVM can be an important tool to manage partitions, it does not by itself provide redundancy. Do not use it as a substitute for RAID. However, you can use LVM in concert with a properly configured RAID array. |
Whenever you change an active PV, LV, or VG, unmount the volume first. If it's an essential filesystem such as the top-level root (/) directory, you may need to use linux rescue mode or a third-party bootable Linux such as Knoppix.
In essence, to create a new LVM system, you need to create a new PV, using a command such as pvcreate, assign the space to a VG with a command such as vgcreate, and allocate the space from some part of available VGs to an LV with a command such as lvcreate.
Logical Volume Management
One of the critical decisions during the Installation part of the RHCE and RHCT exams is whether you install in text or graphical mode. Text mode is faster. However, if you're required to create an LVM group during your exam, you can configure custom LVM groups with Disk Druid only it if you install RHEL in graphical mode.
I can't give you a concrete time savings between graphical and text mode; it depends on the traffic demands (how many other users) and the hardware available during your exam. I can say that when I installed the standard RHEL server configuration in graphical mode, it took 5 minutes longer than the same process in text mode. If your computer has more than 256MB of RAM (and more than 16MB of video memory), I suspect the difference would decrease.
If you forget to configure LVM during installation or are required to make changes, you can use the techniques I describe in this section to configure LVM groups after installation. Remember that the Red Hat Exam Prep guide suggests that RHCEs, during the Troubleshooting and System Maintenance portion of their exams, need to know how to
-
Add, remove, and resize logical volumes.
To add space to an existing LVM system, you need to add free space from an existing VG with a command such as lvextend. If you don't have any existing VG space, you'll need to add to it with unassigned PV space with a command such as vgextend. If all of your PVs are taken, you may need to create a new PV from an unassigned partition or hard drive with the pvcreate command.
You can also do much of this with the associated Logical Volume Management tool described near the end of this chapter.
Creating a Physical Volume
The first step in creating an LVM is to start with a physical disk. If you have a freshly installed hard disk, you can set up a PV on the entire disk. For example, if that hard disk is attached as the third PATA hard disk (/dev/hdc), and you haven't configured partitions on the drive, you'd run the following command:
# pvcreate /dev/hdc
Alternatively, you can set up a new PV on a properly formatted partition. For example, assume that you've added a new partition, /dev/hdc2. You could then use fdisk or parted to set it to the Linux LVM partition type. In fdisk, this corresponds to partition type 8e; in parted, it corresponds to lvm. The sequence of commands would look similar to the following:
# fdisk /dev/hdc Command (m for help) : t Partition number (1-4) 2 Partition ID (L to list options): 8e Command (m for help) : w
Once your partition is ready, you can run the following command to create a new PV on that partition (/dev/hdc2) with the following command:
# pvcreate /dev/hdc2
Creating a Volume Group
Once you have two or more PVs, you can create a volume group (VG). In the following command, substitute the name of your choice for volumegroup:
# vgcreate volumegroup /dev/hdc2 /dev/hdd2
You can add more room to any VG. Assume there's an existing /dev/sda1 partition, using a Linux LVM type, and the pvcreate command has been applied to that partition. You can then add that partition to an existing VG with the following command:
# vgextend volumegroup /dev/sda1
Creating a Logical Volume
However, a new VG doesn't help you unless you can mount a filesystem on it. So you need to create a logical volume (LV) for this purpose. The following command creates an LV. You can add as many chunks of disk space (a.k.a. physical extents, or PEs) as you need.
# lvcreate -l number_of_PEs volumegroup -n logvol
This creates a device named /dev/volumegroup/logvol. You can format this device as if it were a regular disk partition, and then mount the directory of your choice on your new logical volume.
But this isn't useful if you don't know how much space is associated with each PE. You could use trial and error, using the df command to check the size of the volume after you've mounted a directory on it. Alternatively, you can use the -L switch to set a size in MB. For example, the following command creates an LV named flex of 200MB:
# lvcreate -L 200M volumegroup -n flex
Using a Logical Volume
But that's not the last step. You may not get full credit for your work on the exam unless the directory gets mounted on the LVM group when you reboot your Linux computer. Based on a standard RHEL /etc/fstab configuration file, one option is to add the following line to that file:
LABEL=/home/mj /home/mj ext3 defaults 1 2
Before this line can work, you'll need to set the label for this directory with the following command:
# e2label /dev/volumegroup/logvol /home/mj
Alternatively, you can just substitute the LVM device file such as /dev/VolGroup00/ LogVol03 for LABEL=/home/mj. The /etc/fstab file, including the meaning of the data in each these columns, is described in more detail in Chapter 4.
More LVM Commands
There are a wide variety of LVM commands related to PVs, LVs, and VGs. Generally, they are pv*, lv*, and vg* in the /usr/sbin directory. Physical volume commands include those listed in Table 8-3.
| Physical Volume Command | Description |
|---|---|
| pvchange | Changes attributes of a PV: the pvchange -x n /dev/sda10 command disables the use of PEs from the /dev/sda10 partition. |
| pvcreate | Initializes a disk or partition as a PV; the partition should be flagged with the LVM file type. |
| pvdisplay | Displays currently configured PVs. |
| pvmove | Moves PVs in a VG from the specified partition to free locations on other partitions; prerequisite to disabling a PE. One example: pvmove /dev/sda10. |
| pvremove | Removes a given PV from a list of recognized volume: for example, pvremove /dev/sda10. |
| pvresize | Changes the amount of a partition allocated to a PV. If you've expanded partition /dev/sda10, pvresize /dev/sda10 takes advantage of the additional space. Alternatively, pvresize --setphysicalvolumesize 100M /dev/sda10 reduces the amount of PVs taken from that partition to the noted space. |
| pvs | Lists configured PVs and the associated VGs, if so assigned. |
| pvscan | Similar to pvs. |
As you assign PVs to VGs to LVs, you may need commands to control and configure them. Table 8-4 includes an overview of most related volume group commands. Read the information in the table; while you may need only a few of the commands, you may find use for more in time.
| Volume Group Command | Description |
|---|---|
| vgcfgbackup vgcfgrestore | Backs up and restores the configuration files associated with LVM; by default, they're in the /etc/lvm directory. |
| vgchange | Similar to pvchange, allows you to activate or deactivate a VG. For example, vgchange -a y enables all local VGs. |
| vgconvert | Supports conversions from LVM1 systems to LVM2: vgconvert -M2 VolGroup00 converts VolGroup00. |
| vgcreate | Creates a VG, from two or more configured PVs: for example, vgcreate vgroup00 /dev/ sda10 /dev/sda11 creates vgroup00 from PVs as defined on /dev/sda10 and /dev/sda11. |
| vgdisplay | Displays characteristics of currently configured VGs. |
| vgexport vgimport | Exports and imports unused VGs from those available for LVs; the vgexport -a command exports all inactive VGs. |
| vgextend | If you've created a new PV: vgextend vgroup00 /dev/sda11 adds the space from /dev/ sda11 to vgroup00. |
| vgmerge | If you have an unused VG vgroup01, you can merge it into vgroup00 with the following command: vgmerge vgroup00 vgroup01. |
| vgmknodes | Run this command if you have a problem with VG device files. |
| vgreduce | The vgreduce vgroup00 /dev/sda11 command removes the /dev/sda11 PV from vgroup00, assuming sufficient free space is available. |
| vgremove | The vgremove vgroup00 command removes vgroup00, assuming it is not assigned to any LV. |
| vgrename | Allows renaming of LVs. |
| vgs | Displays basic information on configured VGs. |
| vgscan | Scans and displays basic information on configured VGs. |
As you assign PVs to VGs to LVs, you may need commands to control and configure them. Table 8-5 includes an overview of related LVM commands. Read over the table; while you may not need to use more than a few of the commands, you may find use for others in time.
| Logical Volume Command | Description |
|---|---|
| lvchange | Similar to pvchange, changes the attributes of an LV: for example, the lvchange -a n vgroup00/lvol00 command disables the use of the LV labeled lvol00. |
| lvconvert | If there are sufficient available PVs, the lvconvert -m1 vgroup00/lvol00 command mirrors the LV. |
| lvcreate | Creates a new LV in an existing VG. For example, lvcreate -l 200 volume01 -n lvol01 creates lvol01 from 200 extents in the VG named volume01. |
| lvdisplay | Displays currently configured LVs. |
| lvextend | Adds space to an LV: the lvextend -L4G /dev/volume01/lvol01 command extends lvol01 to 4GB, assuming space is available. |
| lvreduce | Reduces the size of an LV; if there's data in the reduced area, it is lost. |
| lvremove | Removes an active LV: the lvremove volume01/lvol01 command removes all lvol01 from VG volume01. |
| lvrename | Renames an LV. |
| lvresize | Resizes an LV; can be done by -L for size. For example, lvresize -L 4GB volume01/lvol01 changes the size of lvol01 to 4GB. |
| lvs | Lists all configured LVs. |
| lvscan | Scans for all active LVs. |
Here's an example how this works. Try the vgscan command. You can verify configured volume groups (VGs) with the vgdisplay command. For example, Figure 8-9 illustrates the configuration of VG VolGroup00.
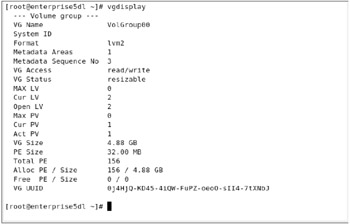
Figure 8-9: Configuration of a volume group (VG)
Before logical volumes are useful, you need to know how to add another LV. For example, if you've added more users, and they need more room than you have on the /home directory, you may need to add more LVs for other filesystems or resize the current /home directory LV.
| On the Job | Linux can't read /boot files if they're installed on a Logical Volume. If you feel the need for special provisions for the /boot directory, try a RAID 1 array. However, there have been problems with that configuration as well. |
Adding Another Logical Volume
Adding another LV is a straightforward process. For example, if you've just added a fourth SATA hard drive, it's known as device /dev/sdd. If you need more LVs for the /tmp directory, you'd follow these basic steps:
-
Add the new hard drive.
-
Configure the new hard drive with a tool such as fdisk or parted. Make sure new partitions correspond to the Linux LVM format. It's code 8e within fdisk, or flag lvm within parted. Alternatively, you can dedicate all space on the new hard drive as a physical volume (PV) with the pvcreate /dev/sdd command.
-
If you've created separate partitions, you can dedicate the space of a specific partition to a PV. If you don't already have an empty logical volume, you'll need to create more than one. For example, for the first partition /dev/sdd1, you can do this with the following command:
# pvcreate /dev/sdd1
-
Next, you'll want to create a volume group (VG) from one or more empty, properly configured partitions (or drives). One way to do this, assuming you have empty /dev/sdc3 and /dev/sdd1 partitions, is with the following command:
# vgcreate Volume01 /dev/sdc3 /dev/sdd1
-
Before proceeding, you should inspect the VG with the vgdisplay command. This was illustrated with an example in Figure 8-9.
-
You should now be able to add another LV with the lvcreate command. For example, the following command takes 20 Physical Extents (PEs) for the new LV, LogVol01:
# lvcreate -l 20 Volume01 -n LogVol01
-
You've added a new LV. Naturally, you'll need to format and mount a directory on this LV before you can use it. For the example shown, you would use the following commands:
# mkfs.ext3 /dev/Volume01/LogVol01 # mount /dev/Volume01/LogVol01 /tmp
Removing a Logical Volume
Removing an existing LV requires a straightforward command. The basic command is lvremove. If you've created an LV in the previous section and want to remove it, the basic steps are simple. However, it will work only from a rescue environment such as the linux rescue mode described in Chapter 16, or from a CD/DVD-based system such as Knoppix or the new Fedora Live DVD.
-
Save any data in directories that are mounted on the LV.
-
Unmount any directories associated with the LV. Based on the example in the previous section, you would use the following command:
# umount /dev/Volume01/LogVol01
-
Apply the lvremove command to the LV with a command such as:
# lvremove /dev/Volume01/LogVol01
-
You should now have the PEs from this LV free for use in other LVs.
Resizing Logical Volumes
If you have an existing LV, you can add a newly created PV to extend the space available on your system. All it takes is appropriate use of the vgextend and lvextend commands. For example, if you want to add PEs to the VG associated with the aforementioned /home directory, you could take the following basic steps:
-
Back up any data existing on the /home directory.
-
Unmount the /home directory from the current LV.
-
Extend the VG to include the new hard drive or partitions that you've created. For example, if you want to add /dev/sdd1 to the /home VG, you would run the following command:
# vgextend Volume00 /dev/sdd1
-
Make sure the new partitions are included in the VG with the following command:
# vgdisplay Volume00
-
Extend the current LV to include the space you need. For example, if you want to extend the LV to 2000MB, you'd run the following command:
# lvextend -L 2000M /dev/Volume00/LogVol00
The lvextend command can help you configure LVs in KB, MB, GB, or even TB. For example, you could get the same result with the following command:
# lvextend -L 2G /dev/Volume00/LogVol00
-
Reformat and remount the LV, using commands described earlier, so your filesystem can take full advantage of the new space:
# mkfs.ext3 /dev/Volume00/LogVol00 # mount /dev/Volume00/LogVol00 /home
-
Once remounted, you can restore the information you backed up from the /home directory.
The GUI LVM Management Tool
If this is all confusing, you might try the GUI LVM tool, as shown in Figure 8-10. In the GNOME desktop, you can start it by choosing System | Administration | Logical Volume Management, or running system-config-lvm from a GUI command line. In the spirit of the RHCE Troubleshooting and System Maintenance exam requirement, we'll use it to add, remove, and resize logical volumes.
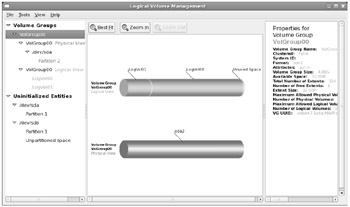
Figure 8-10: The GUI LVM tool
If possible, test the options in these three subsections in one sitting. I assume that the changes you make in the first subsection carry over to the next subsection.
Adding an LV
Assume you've added a new hard drive. For the purpose of this section, I've added a second SCSI drive (can also be a SATA drive), /dev/sdb, and created a new partition of 2500MB, set or flagged to the corresponding partition type, using the fdisk utility as described earlier in this chapter. VMware is an excellent option for this purpose.
Remember that if the GUI commands in this tool don't work, you can always use the associated regular text commands described earlier. Based on the tool shown in Figure 8-10, take the following steps:
-
Create a /test directory. (You should already know how to use the mkdir command for this purpose.)
-
Open the GUI LVM tool; one method is to run the system-config-lvm command inside the GUI.
-
Navigate to the Uninitialized Entities associated with the newly created SATA or SCSI drive, /dev/sdb.
-
Select the partition previously created; click the Initialize Entity button that appears at the bottom of the window. This action applies the pvcreate command to the new partition. (If you have a command line open, you can confirm with the pvs command.)
-
You'll see a warning that all data on the partition will be lost. Click Yes.
-
If you haven't seen it before, you'll see an Unallocated Volumes category. Select the PV that you've just initialized. You'll see three options:
-
The Create New Volume Group option allows you to create a new VG for another filesystem, which corresponds to the vgcreate command.
-
Add To Existing Volume Group allows you to increase the space associated with the VG of your choice. This corresponds to the vgextend command.
-
Remove Volume From LVM reverses the process.
As this section is based on adding a new VG, select Create New Volume Group. You'll see the window shown in Figure 8-11, where you can assign a name and set the size for the new VG; the default uses all available space. For the purpose of this section, I've named the new VG VolGroup01.
-
-
You'll see the new VG in the Volume Groups category. Navigate to the name of the new VG, in this case, VolGroup01, and select the Logical View for this group. Click the Create New Logical Volume button that appears at the bottom of the window, which opens the window shown in Figure 8-12.
-
In the Create New Logical Volume window, you can configure the amount of space assigned to the LV, the format, and the mount point. In Figure 8-12, I've allocated half the space to LogVol02, formatted it to ext3, and set it to be mounted on the previously created /test directory.
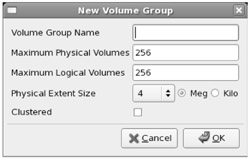
Figure 8-11: Creating a new volume group
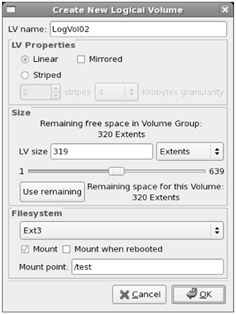
Figure 8-12: Creating a new logical volume
This new LV is now ready for a new filesystem; you can copy it to the /test directory, unmount it, and change /etc/fstab to mount it on the desired filesystem. But for the purpose of this chapter, don't make any of these changes.
Removing an LV
This section assumes that you've created an LV using the steps described in the previous section. If you're removing a different LV, substitute accordingly.
-
Open the GUI LVM tool.
-
Navigate to LogVol02, under Volume Groups, under the Logical View of VolGroup01. This is the LV assigned to and mounted on the /test directory.
-
Click the Remove Logical Volume button. Naturally, this corresponds to the lvremove command.
On the Job Before removing the LV, look at the other options. If you select Create Snapshot, you can mirror the current LV. It works only if there is sufficient unallocated space from available VGs. If you select Edit Properties, you can change the LV settings described in the previous subsection.
You'll see a warning about LogVol02 containing data from directory /test. Any data that you've copied to that directory will be lost if you click Yes. Technically, that's all you need to remove the LV. But you can do more.
-
Move up a bit in the left-hand pane to the Physical View associated with VolGroup01. Navigate down to the partition you created in the previous subsection, and then select Remove Volume From Volume Group, and select Yes when the warning appears.
-
You'll now see the partition in the Unallocated Volumes category, as shown in Figure 8-13. Navigate to and select the subject partition. Click Remove Volume From LVM. Confirm the change when prompted.
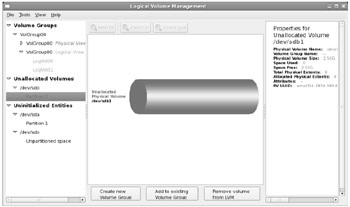
Figure 8-13: Removing a logical volume
Resizing an LV
In this subsection, you'll redo the first steps in adding an LV, as described in an earlier section. If you're resizing a different LV, substitute accordingly. Instead of creating a new LV, you'll add the new space to an existing LV. To do so, take the following steps:
-
Navigate to the Uninitialized Entities associated with the newly created SCSI drive, /dev/sdb.
-
Select the partition previously created, in this case, /dev/sdb1; click the Initialize Entity button that appears at the bottom of the window. This action applies the pvcreate command to the new partition. (If you have a command line open, you can confirm with the pvs command.)
-
If you're resizing a different LV, substitute accordingly. You'll see a warning that all data on the partition will be lost. Click Yes.
-
In the Unallocated Volumes category, select the PV that you've just initialized. In this case, you'll select Add To Existing Volume Group. You'll see the Add Physical Volume To VG window shown in Figure 8-14.
-
Select the existing volume group of your choice and click Add. At this point, you can't do any more with the GUI LVM tool. Click CTRL-Q to exit from this tool.
-
Now you can use the lvextend command to take advantage of the new space. For example, the following command extends the volume to 6.3GB of space:
# lvextend -L 6.3G /dev/VolGroup00/LogVol00
-
Finally, you can use the additional space-for a standard ext3 filesystem, that requires the resize2fs command. If you don't specify a size, it takes all available space.
# resize2fs /dev/VolGroup00/LogVol00
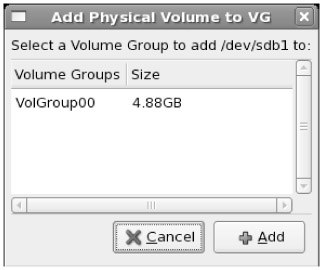
Figure 8-14: Adding a physical volume
Check the result. You should see the additional space when you run the df command.
Converting LVM1 Filesystem to LVM2
The conversion process for LVM1 partitions is straightforward; the vgconvert command is designed to help. After making sure the associated LV is backed up and unmounted, you can convert an LVM1 filesystem, which might be named VolGroup00, with the following command:
# vgconvert -M2 VolGroup00
But this is a one-way process; despite what the man page might suggest, it's not possible in most cases with current tools to convert back to LVM1.
EAN: 2147483647
Pages: 227