Section 1.5. The Desktop Is Too Big for My Monitor
1.5. The Desktop Is Too Big for My MonitorI'm nearsighted, so I don't fully appreciate the focus on higher dot pitches on the latest monitors. Yes, more dots do mean a higher level of resolution, which is important in many applications. If you're working on something with a lot of detail, such as an airplane drawing, you need to see those little details, such as those parts that might interfere with one other. However, as I type this chapter, I much prefer bigger letters. I use a resolution of 800 x 600 on my 15" laptop screen. While I could increase font sizes on a higher-resolution screen, that means additional work to customize applications, desktop icons, and more. You can configure the resolution directly in the associated X configuration file. But even most Linux geeks use tools to help. In this annoyance, I'll show you how you can use the standard X Window tool, as well as the graphical tools from Red Hat/Fedora, SUSE, and Debian. I'll also show you how to use the GNOME and KDE display tools, which allow individuals to modify the display resolution on their workstations. With the exception of the GNOME and KDE display tools, all the tools in this annoyance require root account privileges. While you can disable the GNOME and KDE display tools, I recommend against it. After all, people work more efficiently with screens set to the resolution that is most comfortable for their eyes. However, if you do want to disable those tools for individual users, use the techniques described in the "My Users Mess Up Their Desktops" annoyance in this chapter. 1.5.1. X Window ConfigurationYou can configure your GUI from the command-line interface. While it can be difficult, a Linux expert like yourself should know the basics, at least to know if the tool that you've used has caused problems with your configuration. If you aren't confident in your distribution's graphical tool, you can invoke the command-line tool with the xf86config command. Because of licensing issues, most Linux distributions have recently converted from the XFree86 to the X.org GUI server. Others, such as SUSE, use the standard X.org configuration filename /etc/X11/xorg.conf. This also affects the associated utilities; for example, the xf86config and xf86cfg utilities may be known by new names, such as xorgconfig and xorgcfg. While Red Hat Enterprise Linux 4 still uses XF86Config, in the /etc/X11 directory, Fedora and Debian have recently made the switch as well. If you're more familiar with the XFree86 configuration files, don't worry. Whatever configuration file you see in the /etc/X11/ directory, the format of the file remains the same.
Before you change any configuration file, you should back it up in a secure location such as your home directory. Many tools do back up the X configuration file. So if you make a mistake, you may be able to restore your original configuration from a file with a name such as /etc/X11/XF86Config-4.bak. However, if you make a mistake and then use the same tool again, you'll overwrite the automatic backup. So it's best to keep a working backup of the X configuration file in your home directory; then you won't be out of luck. 1.5.1.1. The X configuration fileThe X configuration file is split into several sections. If you prefer to configure your X configuration files directly, you need to know at least how these sections interact. If you need to know how each directive in your X configuration file works, refer to the online documentation for that server, either XFree86 or X.org. 1.5.1.2. xorgconfig/xf86configAs described earlier, xf86config and xorgconfig are two names for the same utility, and the name depends on whether you're using the XFree86 or X.org servers. (The GUI versions of this utility are xf86cfg and xorgcfg, respectively.) If this utility is not available on your distribution, you should be able to install the RPM or DEB package of the same or similar name. On Debian Linux, the associated package is xbase-clients; on SUSE Linux, the package is xorg-x11.
When you start the xorgconfig or xf86config utility, you'll see a warning that you need to know your video card, the amount of video memory, and the associated chipset. If you don't have this information (or if you have a problem with any of the other queries), you can press Ctrl-C to abort the utility before writing a new X configuration file. Otherwise, to run this utility, use the following steps:
1.5.2. Graphical X Configuration ToolsLinux offers additional graphical X Configuration tools. As it's one way distributions distinguish themselves, you may find different GUI tools available on each distribution that you try. As each of these tools is elementary for the geek, I'll just briefly describe the tools available for the major distributions covered in this book. 1.5.2.1. SUSE's SAXThe tool associated with SUSE Linux is known as SaX2, the SUSE advanced X11 configuration tool, version 2. If you're already in the GUI and just want to tweak your configuration, you can start SaX2 with the /usr/X11R6/bin/sax2 command. If you haven't yet configured a GUI, you may be able to start SaX2 from the command-line interface with the /usr/X11R6/bin/sax2-vesa command. In Figure 1-7, I've started SaX2 from a remote computer using the sax2-vesa command. It's helpful to be able to configure the GUI on remote workstations. Figure 1-7. SaX2 (from SUSE Linux Professional Workstation 9.3)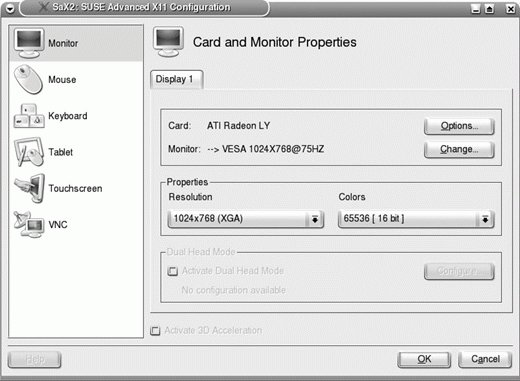 As you can see, SaX2 is quite capable. It can help you configure your GUI over and above the generic xorgconfig/xf86config tool, including (but not limited to):
1.5.2.2. Fedora/Red Hat Display settings toolThe current X configuration tool associated with Red Hat distributions is known as "Display settings," which you can start with the system-config-display command. In Figure 1-8, I've started the Red Hat GUI tool from a remote computer. Figure 1-8. Display settings tool (from Red Hat Enterprise Linux 4) This is just the latest in the evolution of Red Hat tools. Much older versions of Red Hat used the Xconfigurator, as well as the now-ancient XF86Setup tool. Prior to Fedora Core 1 and Red Hat Enterprise Linux 4, you could start the "Display settings" tool with the redhat-config-display command. As you can see, the "Display settings" tool is quite capable. It can help you configure your GUI over and above the generic xorgconfig/xf86config tool, including the ability to configure two monitors for this workstation. 1.5.2.3. Debian's X configuration toolDebian's X configuration tool is surprisingly straightforward. It's a frontend to the xorgconfig/xf86config tool, which you can start with the following command: dpkg-reconfigure xserver-xfree86 This command walks you through the different steps associated with the text-based tool, as described earlier. One weakness is that you can't easily exit from this tool, because Ctrl-C does not stop the utility. Run the ps aux | grep dpkg command to find the associated process and then use the standard kill command to stop the process. 1.5.2.4. GNOME's X configuration toolGNOME includes a very simple tool, Screen Resolution Preferences, that can help you reconfigure the resolution and refresh rate applied to your display. It works within the limits configured by the previously mentioned X configuration tools. Start the Screen Resolution Preferences tool with the gnome-display-properties command. This command can be invoked by regular users on each of the distributions discussed in this book. The settings are limited to what was previously configured for the monitor and video card. Both the GNOME and KDE X configuration tools use the X resize, rotate, and reflection (Xrandr) extension, which is designed to help individual users customize the resolution of their GUI desktops. Changes are reflected in the user's home directory, in the ~/.gconf/%gconf-tree.xml configuration file. For more information, see http://www.xfree86.org/4.4.0/Xrandr.3.html.
1.5.2.5. KDE's X configuration toolKDE includes a similar tool, which also uses the Xrandr extensions to help individual users customize the resolutions on their desktops. You can start it as a regular user with the kcmshell display command. It starts the Configure - Display tool, associated with the KDE Control Center. This command can be invoked by regular users on each of the distributions discussed in this book. The settings are limited to what was previously configured for the monitor and video card. Changes are saved to each user's home directory, in the ~/.kde/share/config/kcmrandrrc configuration file. |

EAN: 2147483647
Pages: 144