Encrypting HTTP Messages Using the Secure Sockets Layer (SSL)
|
|
To prevent a hacker from intercepting and viewing (and possibly changing) the data you send to a remote website or web service, you must encrypt the data. Although encryption does not prevent the hacker from intercepting data, the encrypted data would be meaningless to the hacker. Further, should the hacker try to change the data, checksum information stored within the encrypted data will alert the recipient to the change.
Before a client and server can exchange encrypted messages, the two must agree on an encryption key that both will use to encrypt and decrypt messages. A program calling a web service could, for example, pass the encryption key to the service using one of the service’s methods, as shown here:
WebObject.SelectKey("123KAJ456"); After the web service received the key, it could use the key to encrypt messages. Unfortunately, passing the key as a parameter to the web service in this way exposes the key to a hacker, who could intercept the message containing the key and then use the key to decrypt the messages the program and web service exchanged. As you will learn in the next section, rather than passing the encryption key “in the clear,” the secure sockets layer uses the server’s public encryption key to encrypt the key that the two programs will later use (as shown in Figure 9.6).
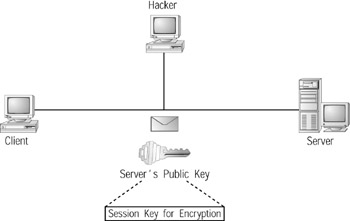
Figure 9.6: To prevent a hacker from intercepting the encryption key, a client and server must encrypt the message that contains the key they will later use to encrypt and decrypt messages.
Understanding Public-Key Encryption
Across the Internet, public-key encryption is the most widely used encryption technique. Tens of millions of users rely on public-key encryption to exchange secure e-mail messages.
Public-key encryption is based on the use of two encryption keys: a private key and a public key. The private key resides within a file on the user’s system, protected from access by other users. In contrast, users can freely distribute their public key to friends and associates, as shown in Figure 9.7. Normally, users distribute their public key by sending it to others within an e-mail message.
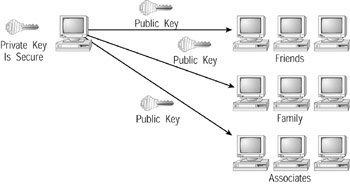
Figure 9.7: Public-key encryption relies on two keys—a rivate key that a user protects and a public key the user distributes.
After another user receives your public key, she can use your key to encrypt messages that she sends to you. When you receive the encrypted message, you use your private key to decrypt the message, as shown in Figure 9.8.
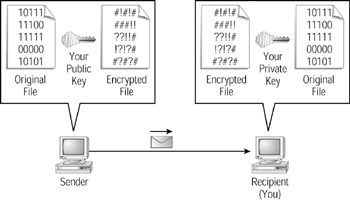
Figure 9.8: Other users use your public key to encrypt messages they send to you. To decrypt those messages, you use your private key.
The only operation another user can perform using your public key is to encrypt a message that your private key can later decrypt. Another user cannot use your public key to decrypt messages that are sent to you. The public key is only good for encrypting messages. That is why you can freely distribute your public key to everyone you know.
| Note | In Chapter 8 you examined ways to authenticate users within a web service. Across the Web, many sites use digital certificates to authenticate users. A user’s digital certificate contains the user’s public key. When a user digitally signs an e-mail message by attaching his digital signature, the user provides the message’s recipient with a copy of his public key. |
Obtaining Your Own Public and Private Key Pair
Several companies on the Web offer ways you can get your own public and private encryption keys. The VeriSign website, at www.verisign.com, lets you download trial keys, as shown in Figure 9.9. You can also purchase encryption keys from the VeriSign website. The trial keys will last for 60 days.
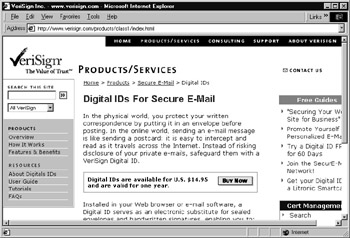
Figure 9.9: You can download your own public and private encryption keys from the VeriSign website.
The VeriSign website will provide you with instructions that describe the steps you must perform to begin using your keys. After you download and install your keys from VeriSign, others can use your public key to send you encrypted e-mail messages.
As discussed, before other users can encrypt the messages they send to you, the users must know your public key. Using your e-mail program, you can send your public key to other users by sending the users a message that you digitally sign using your key. After the users receive your message, they can save your public-key information along with other contact information in their e-mail program’s address book. After that, they can use your public key to encrypt the messages they send to you. When you are ready to read an encrypted message, your e-mail program will use your private key to decrypt the message.
When you receive an encrypted message, your e-mail program will likely not display the message’s contents until you open the message. For example, Figure 9.10 shows an encrypted message within the Microsoft Outlook inbox. Rather than displaying the message contents, Outlook displays a message telling you the message is encrypted. Outlook will not decrypt the message contents until you double-click on the message to read it.
| Remember | To send an encrypted message to another user, you must know that user’s public key. |
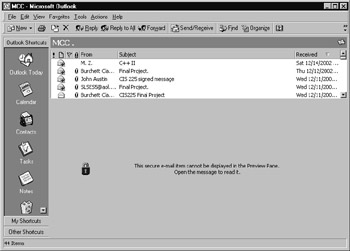
Figure 9.10: Most e-mail programs will not display the contents of an encrypted message until you open the message.
Visiting a Secure Website
As you surf the Web, most of the sites that you visit will not use the secure sockets layer to encrypt data. That’s because the information most sites provide is not sensitive data. In general, you would not care if a hacker intercepted data about a new car you are viewing at an automotive website, or information about a book you are shopping for online. Certainly, each of us is concerned with privacy, but the overhead that would be required to encrypt general information would slow down the Web considerably. Instead, most sites use a secure link only when the site is going to exchange sensitive information with the user.
Normally (unless you have disabled notification within your browser), when you move from an unsecure site connection to a secure page, your browser will display a message similar to that shown in Figure 9.11, which informs you that you are about to establish a secure link.
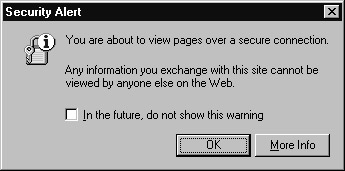
Figure 9.11: Your browser will notify you when you connect to a page that requires a secure link.
As you view a web page over a secure connection, your browser will display an icon indicating the secure link. In the case of Microsoft Internet Explorer, the browser will display a lock icon similar to that shown in Figure 9.12. Later, when you direct your browser to leave the secure page, your browser will again display a dialog box that informs you that you are leaving the secure connection and returning to normal operations.
![]()
Figure 9.12: Internet Explorer displays a lock icon to indicate a secure link.
When your browser is connected to a secure web page, you can view the site’s digital certificate that contains specifics about the site, as shown in Figure 9.13. To display a site’s certificate, simply double-click the lock icon. As you will learn later in this chapter, a website receives its certificate from a third party (a company) called a Certificate Authority. In general, you can think of the Certificate Authority as someone who is willing to vouch for the identity of another person or company, much as a notary public does. Before a Certificate Authority will grant a company with a web server certificate, the Certificate Authority will request copies of the company’s articles of incorporation, Dun & Bradstreet information, and other materials that validate the company’s identity.
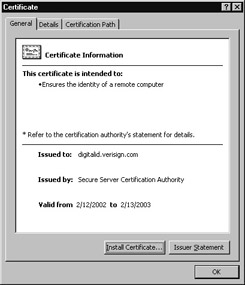
Figure 9.13: Viewing a server’s certificate within your browser
When you view a server certificate, you should make sure the certificate has not expired and that the certificate was issued by a reputable Certificate Authority. If a certificate does not appear valid (perhaps it is expired), you should question its authenticity. A trustworthy company that is performing e-commerce operations on the Web will have a valid certificate.
Understanding Where SSL Resides within the Network Layers
Network programmers often use the seven-layer ISO/OSI model, shown in Figure 9.14, to describe network operations. Table 9.1 briefly describes each of the model’s layers.
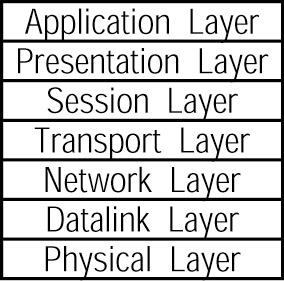
Figure 9.14: The ISO/OSI network model
| Layer | Purpose |
|---|---|
| Physical layer | Contains the communication channel, such as coaxial or fiber optic cable, a wireless communication channel, and so on. |
| Datalink layer | Corresponds to your network interface card. Sends and receives data across the physical channel. |
| Network layer | Routes network messages between computers on the network and identifies messages for the current system. |
| Transport layer | Routes local messages to the corresponding program, such as messages for a browser, chat, or e-mail program. |
| Session layer | Manages a client/server session. Often performs authentication using username and password data. |
| Presentation layer | Specifies how the network presents itself to users and to programs (such as the network application program interface). |
| Application layer | Corresponds to the network programs, such as browser or C# application that uses a web service. |
When a program uses the secure sockets layer to encrypt communication, you can envision SSL as residing beneath the application layer, as shown in Figure 9.15. By placing SSL support below the application layer, each network program can choose to use or not use encryption.
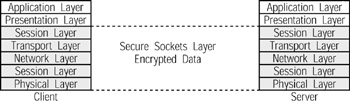
Figure 9.15: The secure sockets layer resides beneath the application layer.
Across the Internet, the Secure Socket Layer (SSL) protocol provides the mainstay for secure transactions. Today, most software programs support SSL version 3.0. As SSL continues to evolve, it will likely become the Transport Layer Security (TLS) protocol—an encryption protocol that is built into the transport layer itself. TLS is based upon SSL version 3.0. That said, TLS and SSL are different protocols. Currently, a TLS-based server would not interact with an SSL-based browser.
Looking Behind the Scenes at an SSL Connection
To establish a secure connection, a client program (such as a browser) and the server must agree on the encryption key they will use to encrypt and decrypt messages, as well as the encryption algorithm. Programmers refer to the encryption key as a session key because the key is only meaningful during the period of time the client and browser communicate (for their session). If a client establishes a secure session and then leaves a server, the session will end. Should the client return to the server, the client must establish a new secure session.
To create a secure session, a client will connect to a remote address that uses the URL prefix https:// as opposed to http://. Behind the scenes, the client will send a Client.Hello message to the server that contains the information about the browser and the request (which would be identical to those the browser would send for a standard http:// operation). In addition, as shown in Figure 9.16, the Client.Hello message contains a list of encryption algorithms the browser supports.
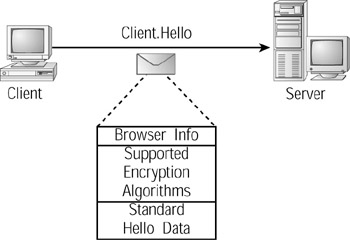
Figure 9.16: To begin a secure session, a client sends a Hello message to the server.
The server will respond to the client’s Hello message by sending a Server.Hello message that contains a list of compatible encryption algorithms (meaning encryption algorithms that both the client and server support) as well as the server’s public key, as shown in Figure 9.17.
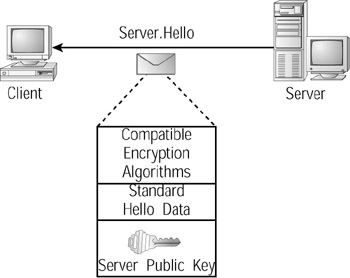
Figure 9.17: The server responds to a client’s Hello message by sending a Server.Hello message that contains the server’s public key.
Next, the client will select an encryption algorithm and use some of the data the client and server exchanged in the previous Hello messages to create a session key that the client and server will later use to encrypt the messages they exchange. The client will package information about the algorithm and session key into a message. As shown in Figure 9.18, the client will encrypt the message using the server’s public key. After the server receives the message, the server will decrypt the message using its private key. By encrypting the message in this way, the client and server prevent a hacker from intercepting the session key.
| Note | To take advantage of the secure sockets layer, a client does not have to have its own public and private keys. Only the server must have a public and private key. |
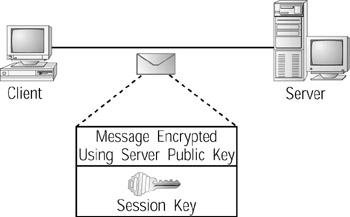
Figure 9.18: The client places the session key into a message that it then protects (encrypts) using the server's public key.
|
|
EAN: 2147483647
Pages: 161