77.

Creating Loops

In his classic book The Wealth of Nations, economist Adam Smith asked how much it would cost to make a single straight pin compared with how much it would cost to make 10,000 straight pins. The cost of one pin is almost as great as the cost of all 10,000 pins. Similarly, writing a macro that runs once is almost as much work as writing a macro that runs thousands of times in a loop.

Loop Through a Collection Using a For Each Loop

Excel allows you to protect a worksheet so that nobody can change anything in cells that aren't specifically unlocked. You must, however, protect each sheet individually. Suppose that you have a workbook containing budgets for ten different departments and that you want to protect all the worksheets.

The Chapter07 workbook includes a macro named ProtectSheets. Here's what it looks like:

Sub ProtectSheets()     Dim mySheet As Worksheet     Set mySheet = Worksheets(1)     mySheet.Select     mySheet.Protect "Password", True, True, True End Sub

This macro assigns a reference to the first worksheet to the mySheet variable, selects that sheet, and then protects it. (Selecting the sheet really isn't necessary, but it makes it easier to see what the macro is doing.) Now see how you can convert this macro to protect all the worksheets in the workbook.

  1. Click in the ProtectSheets macro, and press F8 repeatedly to step through the macro. Make sure you understand everything that the original macro does.

  2. In the third line, replace Set with For Each, replace the equal sign with In, and remove the parentheses and the number between them.

  3. Indent the next two statements, add a line break at the end of the second statement, and then type the statement Next mySheet. The revised macro should look like this:

    Sub ProtectSheets()     Dim mySheet As Worksheet     For Each mySheet In Worksheets         mySheet.Select         mySheet.Protect "Password", True, True, True     Next mySheet End Sub

    For Each acts just like Set. It assigns an object reference to a variable. But instead of assigning a single object to the variable, it assigns each object from a collection to the variable. Then, for each (get it?) object in the collection, Visual Basic executes all the statements down to the Next statement. Statements beginning with For Each and ending with Next are called For Each structures or For Each loops. (Technically, you don't need to put the variable name after Next. If you do use it, Visual Basic requires that it match the variable name after For Each. Always using a variable after Next can help you keep the right Next with the right For.)

  4. Press F8 repeatedly to step through the macro, watching as it works on each worksheet in turn.

  5. Switch to Excel, and try typing a value into a cell on any worksheet. (Then close the error message box that opens.)

    click to expand

  6. Create a new macro named UnprotectSheets that unprotects all the worksheets. (Try to write the macro without looking at the finished code that follows. Hint: you'll need to use the Unprotect method of the worksheet object, with a single argument that gives the password.) Here's what your macro should look like:

    Sub UnprotectSheets()     Dim mySheet As Worksheet     For Each mySheet In Worksheets         mySheet.Select ‘ This statement is optional.         mySheet.Unprotect "Password"     Next mySheet End Sub
  7. Save the workbook, press F5 to test the UnprotectSheets macro, and try changing a value on a worksheet.

Looping through a collection is as easy as assigning a single value to an object. Just replace Set with For Each, specify the collection, and add a Next statement.

Tip 

A For Each loop is a handy way of browsing collections in the Immediate window. However, in the Immediate window, everything you type must be on a single line. You can put multiple statements on a single line by separating the statements with colons. For example, here's what you'd type in the Immediate window to see the names of all the worksheets in the active workbook: For Each x In Worksheets: ?x.Name: Next x. (In the Immediate window, it's all right to use short, meaningless names for variables.)

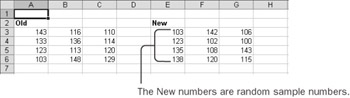
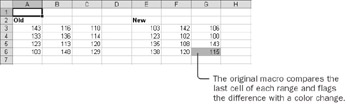
Loop with a Counter Using a For Loop

Sometimes you want to perform actions repeatedly but can't use a For Each loop. For example, a For Each loop can work through only a single collection. If you want to compare two parallel collections-such as two ranges-you can't use a For Each loop. In that situation, Visual Basic has another, more generalized way to loop: a For loop.

The Compare worksheet in the Chapter07 workbook contains two named ranges. The one on the left is named Old, and the one on the right is named New. You can think of these as being an original forecast and a revised forecast. The cells in the Old range contain values. The cells in the New range contain a formula that will calculate a random number each time you press F9 to recalculate the workbook. (The formula in those cells is =ROUND(RAND()*50+100,0), which tells Excel to calculate a random number between 0 and 1, multiply it by 50, add 100, and round to the nearest whole number. Because the numbers are randomly generated, the ones you see will differ from the ones in the figure.)

click to expand

The Chapter07 module in the Visual Basic Editor contains a macro named CompareCells, which looks like this:

Sub CompareCells()     Dim i As Integer     Calculate     i = Range("New").Cells.Count     If Range("New").Cells(i) > Range("Old").Cells(i) Then         Range("New").Cells(i).Interior.Color = vbYellow     Else         Range("New").Cells(i).Interior.Color = vbCyan     End If End Sub

The macro first executes the Calculate method, which is like pressing the F9 function key to calculate new values for all the cells in the New range. Then the macro compares only the last cell in the New range with the last cell in the Old range. If the New value is greater than the Old, the new value turns yellow; otherwise, it turns blue. The macro assigns the Count of cells in the range to the variable i. The macro uses that number several times, and i requires less typing than Range("New").Cells.Count.

Tip 

If you're not comfortable with If structures, review the first half of this chapter.

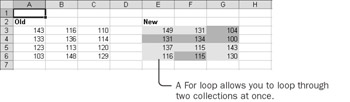
Now see how you can convert this macro to compare all the cells at once.

  1. Click in the CompareCells macro, and press F8 repeatedly to step through the macro. Make sure you understand everything the original macro does.

    click to expand

  2. In the statement that assigns the Count to the variable, insert the word For in front of the variable, and then insert 1 To after the equal sign.

  3. Type Next i before the End Sub statement, and indent all the statements between For and Next. The revised macro should look like this:

    Sub CompareCells()     Dim i As Integer     Calculate     For i = 1 To Range("New").Cells.Count         If Range("New").Cells(i) > Range("Old").Cells(i) Then             Range("New").Cells(i).Interior.Color = vbYellow         Else             Range("New").Cells(i).Interior.Color = vbCyan         End If     Next I End Sub

    The keyword For works just like a simple assignment statement. It assigns a number to the variable. (The For keyword assigns a number to a variable, and For Each assigns an object reference to a variable.) The variable that gets assigned the number is called a loop counter. You specify the first value For should assign (in this case, 1) and the last value it should assign (in this case, the number of cells in the range).

    Each time For assigns a number to the loop counter, Visual Basic executes all the statements down to the Next statement. Then For adds 1 to the loop counter and executes all the statements again, until the loop counter is greater than the value you specified as the last value.

  4. Press F8 repeatedly to watch the macro work. Step through at least two or three loops, and then press F5 to finish the macro.

    click to expand

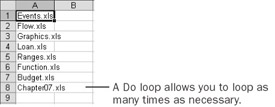
In many cases, using a For Each loop is more convenient than using a For loop. However, a For loop is a more general tool in that you can always use a For loop to reproduce the behavior of a For Each loop. For example, here's how you could write the ProtectSheets macro without using For Each:

Sub ProtectSheets()     Dim mySheet As Worksheet     Dim i As Integer     For i = 1 to Worksheets.Count         Set mySheet = Worksheets(i)         mySheet.Select         mySheet.Protect "Password", True, True, True     Next I End Sub 

If you were going to be marooned on a desert island and could take only one of these two looping structures with you, you'd probably be better off choosing For. Fortunately, however, you don't have to make the choice. In the many cases where For Each loops can work, use them and be happy. In cases where you need a numeric counter, use For loops.

Loop Indefinitely Using a Do Loop

A For Each loop works through a collection. A For loop cycles through numbers from a starting point to an ending point. In some situations, however, neither of these options works. For example, Visual Basic has a function that tells you the names of files in a folder (or directory). The function is named Dir, after the old MS-DOS operating system command of the same name. The first time you use Dir, you give it an argument that tells which kind of files you want to look at. To retrieve the name of the first Excel workbook in the current directory, you use the statement myFile = Dir("*.xls"). To get the next file that matches the same pattern, you use Dir again, but without an argument. You must run Dir repeatedly because it returns only one file name at a time. When Visual Basic can't find another matching file, the Dir function returns an empty string.

Suppose that you want to create a macro that retrieves the names of all the Excel files in the current folder. The list of files in the directory isn't a collection, so you can't use a For Each loop. You can't use a For loop either because you don't know how many files you'll get until you're finished. Fortunately, Visual Basic has one more way of controlling a loop: a Do loop.

The ListFiles macro in the Chapter07 workbook retrieves the first two Excel files from the current directory and puts their names into the first two cells in the first column of the active worksheet. Here's the original macro:

Sub ListFiles()     Dim myRow As Integer     Dim myFile As String         myRow = 1     myFile = Dir("*.xls")     Cells(myRow, 1) = myFile         myRow = myRow + 1     myFile = Dir     Cells(myRow, 1) = myFile End Sub

Aside from the variable declaration statements, this macro consists of two groups of three statements. In each group, the macro assigns a row number to myRow, retrieves a file name using the Dir function, and then puts the file name into the appropriate cell. The first time the macro uses Dir, it specifies the pattern to match. The next time, the macro simply uses Dir without an argument to retrieve the next matching file.

Now see how you can convert this macro to loop until it has found all the files in the folder.

  1. In the Chapter07 workbook, activate the Files worksheet. On the File menu, click Open, change to the folder containing the practice files for the book, and then click Cancel. Performing the actions in the preceding sentence ensures that the current folder contains Excel workbooks.

  2. In the Visual Basic Editor, click in the ListFiles macro and press F8 repeatedly to step through the macro. (The names of the files your macro retrieves might differ from those in the figures.) Make sure you understand the original macro.

    click to expand

    Tip 

    As you step through the macro, move the mouse pointer over a variable name to see the current value stored in that variable.

  3. Type Do Until myFile = "" on a new line after the first statement that contains a Dir function.

    This statement begins the loop. You begin the loop after the first Dir function because you use Dir with an argument only once.

  4. Type Loop on a new line after the second statement that contains a Dir function.

    This statement ends the loop. After running this statement, Visual Basic goes back to the Do Until statement and checks to see whether it's time to quit.

  5. Delete the second Cells(myRow, 1) = myFile statement. You don't need this statement because the loop repeats the assignment statement as many times as needed.

  6. Indent the three statements between the Do and Loop statements. The revised macro should look like this:

    Sub ListFiles()     Dim myRow As Integer     Dim myFile As String         myRow = 1    myFile = Dir("*.xls")     Do Until myFile = ""         Cells(myRow, 1) = myFile                 myRow = myRow + 1         myFile = Dir     Loop End Sub

    The phrase after Do Until is a conditional expression, precisely like one you'd use with an If structure. The conditional expression must be something that Visual Basic can interpret as either True or False. Visual Basic simply repeats the loop over and over until the conditional expression is True.

    If you want to increment a number during the loop, you must enter a statement to do so. You must always be careful to cause something to happen during the loop that will allow the loop to end. In this case, you retrieve a new file name from the Dir function.

  7. Press F8 repeatedly to watch the macro work. Step through at least two or three loops, and then press F5 to finish the macro.

    click to expand

    Important 

    If you run a macro that contains an infinite loop, stop the macro by pressing Ctrl+Break. (The Break key often functions the same as the Pause key.)

A Do loop is very flexible, but it's also a little bit dangerous because you have to be sure you provide a way for the loop to end. For example, if you forgot to add the statement to retrieve a new file name, or if you had included the argument to the Dir function inside the loop (so that Dir would keep returning the first file name over and over), you'd have what is called an infinite loop.

Tip 

Do loop structures have several useful variations. You can loop until the conditional expression is True or while the expression is True. You can put the conditional expression at the top of the loop (in the Do statement) or at the bottom of the loop (in the Loop statement). To find out more about Do loop structures, enter the words do loop in the Ask A Question box of the Visual Basic Editor.


Microsoft Excel 2002 Visual Basic for Applications Step by Step
FrameMaker 6: Beyond the Basics
ISBN: 735613591
EAN: 2147483647
Year: 2005
Pages: 122
Authors: Lisa Jahred

flylib.com © 2008-2017.
If you may any questions please contact us: flylib@qtcs.net