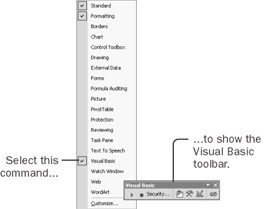
40.

Creating a Simple Macro

Excel has a large collection of convenience tools readily available as shortcut keys and as buttons on toolbars. Sometimes, however, a built-in convenience tool doesn't work quite the way you want. Enhancing a built-in tool is a good first macro to create.

Show the Visual Basic Toolbar

Before you start creating the macros, take one small step that will make your work with macros much easier.

  1. Point to any toolbar, and click the right mouse button. (This is called right-clicking.) The toolbar shortcut menu appears, showing most of the available toolbars.

  2. Select Visual Basic from the toolbar list. The Visual Basic toolbar appears. You can change the location and shape of this toolbar just as you can any other Excel toolbar.

    click to expand

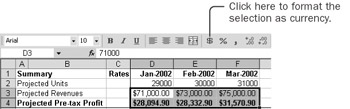
The buttons on the toolbar are supposed to resemble controls on a VCR. When you're ready to record a macro, click the circle on the toolbar-the 'record' button. Then, when you're ready to run a macro, click the triangle-the 'play' button.

Format Currency with a Built-In Tool

On the Formatting toolbar, Excel has a button that formats the current selection as currency: the Currency Style button.

  1. In the Chapter01 workbook, select cells D3:F4 on the Budget worksheet.

    Currency Style

  2. Click the Currency Style button on the Formatting toolbar. Excel reformats the selected cells as currency.

    click to expand

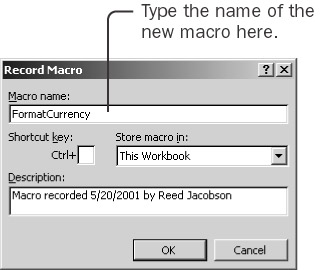
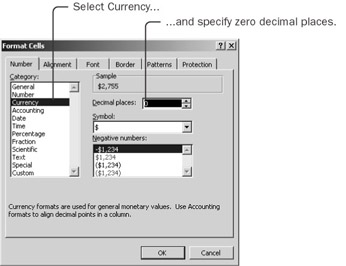
The currency format that Excel applies when you click the Currency Style button has two decimal places. In your checkbook, you might want to display currency with two decimal places. But your budget contains estimates, and displaying values to the penny seems silly. You want to create a macro that formats selected cells as currency with no decimal places.

Record a Macro to Format Currency

  1. On the Budget worksheet, select cells D7:F8.

    Record Macro

  2. On the Visual Basic toolbar, click the Record Macro button.

  3. Replace the default macro name with FormatCurrency, and then click OK. A macro name must begin with a letter, and it can contain uppercase and lowercase letters, numbers, and underscores, but no spaces or other special characters.

    The word Recording appears in the status bar, and a Stop Recording toolbar appears. You're recording.

  4. On the Format menu, click the Cells command. If necessary, click the Number tab in the Format Cells dialog box.

  5. Select Currency from the Category list.

  6. Replace the value in the Decimal Places box with a zero.

  7. Select Custom from the Category list, and look in the Type text box. The characters $#,##0 represent a currency format with no decimal places. This is the format that gets applied to the selected cells. (To learn more about format strings, type 'number format codes' in the Excel Help box.)

    click to expand

  8. Click OK to format the selected cells as currency without decimal places.

    Stop Recording

  9. Click the Stop Recording button, and save the Chapter01 workbook.

That's it. You recorded a macro to format a selection with the currency format you want. Now you probably want to try the macro to see how it works.

Run the Macro

  1. On the Budget worksheet, select cells D9:F10.

  2. On the Visual Basic toolbar, click the Run Macro button.

  3. Select the FormatCurrency macro in the list, and click Run.

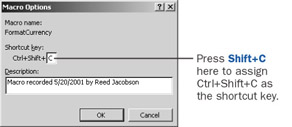
Your macro applies your customized currency format to the selected cells. Running the macro from the Macro dialog box isn't much easier than directly assigning the number format. To make the macro easy to run, you can use a shortcut key.

Assign a Shortcut Key to the Macro

Run Macro

  1. On the Visual Basic toolbar, click the Run Macro button.

  2. Select the FormatCurrency macro in the list, and then click the Options button. The Macro Options dialog box allows you to change the macro's shortcut key assignment and its description. You can also assign a shortcut key at the time you first record a macro.

  3. Assign Ctrl+Shift+C as the shortcut key. With the box below the Shortcut Key label selected, press Shift+C.

    click to expand

    Important 

    Excel uses many Ctrl key combinations as built-in shortcuts. For example, Ctrl+C is Copy and Ctrl+Z is Undo. If you assign one of these shortcuts to your macro, pressing the shortcut key combination runs your macro rather than the built-in command. If you always use Ctrl+Shift key combinations when you assign shortcut keys to your macros, you'll be much less likely to override a built-in shortcut.

  4. Click OK to return to the Macro dialog box, and then click Cancel to get back to the worksheet.

  5. Select cells D11:F12, and press Ctrl+Shift+C to run the macro.

  6. Save the Chapter01 workbook.

Now you've successfully recorded, run, and enhanced a macro-all without seeing the macro itself. Maybe you'd like to actually see what you created.

Look at the Macro

The macro is hidden away in the workbook, and you need to open the Visual Basic Editor to see it.

Run Macro

  1. On the Visual Basic toolbar, click the Run Macro button.

  2. Click FormatCurrency, and then click Edit.

    The Visual Basic Editor window appears. The Visual Basic Editor appears to be a separate program, but it is 'owned' by Excel-that is, if you quit Excel, the editor automatically shuts down. Inside the Visual Basic Editor, a window captioned Module1 appears as well.

  3. Maximize the Module1 window so that it fills the Visual Basic Editor, and then resize the Visual Basic Editor window so that you can see the Excel workbook in the background.

  4. If any other windows are visible in the Visual Basic Editor, close them now.

    click to expand

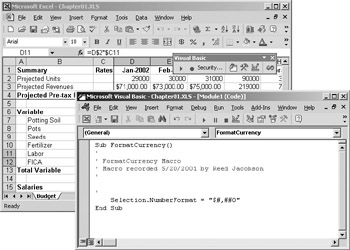
The window has the caption Module1. A module is the place where the recorder puts macros. Your macro is in the Module1 module. The macro looks like this:

Sub FormatCurrency() ‘ ‘ FormatCurrency Macro ‘ Macro recorded 5/20/2001 by Reed Jacobson ‘ ‘     Selection.NumberFormat = "$#,##0" End Sub

The five lines that start with apostrophes are comments. An apostrophe tells Visual Basic to ignore all remaining text on the line. (The blank line among the comments, without even an apostrophe, is where the recorder would have put the shortcut key combination if you had assigned it when you recorded the macro.) The recorder puts in the comments partly to remind you to add comments as you write a macro. You can add to them, change them, or delete them as you want without changing how the macro runs. Comments appear in green to help you distinguish them from statements. Everything in Visual Basic that is not a comment is a statement. A statement tells Visual Basic what to do.

The first statement in the macro begins with Sub, followed by the name of the macro. This statement tells Visual Basic to begin a new macro. Perhaps the word Sub is used because a macro is typically hidden, or out of sight, like a submarine. Or maybe Sub is used for historical reasons. The last statement of a macro is always End Sub. This statement tells Visual Basic to stop running the macro.

All the statements between Sub and End Sub form the body of the macro. These are the statements that do the real work. The first (and only) statement in the body of the FormatCurrency macro begins with Selection.NumberFormat. The word Selection refers to an object-the currently selected range of cells. The word NumberFormat refers to an attribute-or property-of that object. Whenever the macro recorder creates a statement that contains an equal sign, the word to the left of the equal sign is a property. The property is preceded by an object, and the object and its property are separated by a period. The value to the right of the equal sign is what gets assigned to the property. In this example, the value assigned to the NumberFormat property is the number format code you saw earlier in the Format dialog box. To interpret a Visual Basic statement, read it from right to left. For example, read this statement as, 'Let such-and-such be the number format of the selection.'

Tip 

Some people wonder why NumberFormat comes after Selection if you read Selection.NumberFormat as 'number format of the selection.' Macro statements in Visual Basic work backward, the same as actions do in an Excel worksheet. In a macro statement, you state what you're going to work on and then you do something to it. The order is similar to the way you interact with cells in an Excel worksheet: You don't specify an action first and then the object. ('Copy these cells. Paste the copy in those cells.') Instead, you select the object first and then perform the action. ('These cells-copy. Those cells-paste.') Selecting the object first makes carrying out multiple actions more efficient.


Microsoft Excel 2002 Visual Basic for Applications Step by Step
FrameMaker 6: Beyond the Basics
ISBN: 735613591
EAN: 2147483647
Year: 2005
Pages: 122
Authors: Lisa Jahred

flylib.com © 2008-2017.
If you may any questions please contact us: flylib@qtcs.net