Creating Custom Command Buttons Toolbar buttons and menu commands respond to a single event: a click. You tell the button or command which macro to run by using the Assign Macro command. Command buttons, on the other hand, not only can trigger an event when you click them, but also can respond to additional events, such as the simple movement of the mouse above the button. Because command buttons can respond to a complex set of events, they require a whole new way of linking a macro to the button. This new approach uses what are called event handler procedures. Event handler procedures are special macros that are linked to an object such as a command button. First create a command button, and then you can see how to add event handler procedures to make it work. Create a Custom Command Button A command button is useful for running macros that relate to a specific worksheet. Command buttons are usually large and easy to click, with a label describing what the button does. Control Toolbox  -
With the Chapter09 workbook open, click the Control Toolbox button on the Visual Basic toolbar to display the Control Toolbox toolbar. 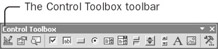 The Control Toolbox is a toolbar that contains a number of controls that you can use on a worksheet or on a form. These controls are called ActiveX controls. An ActiveX control is a special kind of drawing object that carries out an action when you click it. The ActiveX control we'll work with in this chapter is the command button control. Command Button  -
Click the Command Button button, and drag a rectangle on the worksheet from the upper left corner of cell A1 to the lower right corner of cell B2. A command button appears on the worksheet. It has white handles on the edges, showing that it is currently selected. 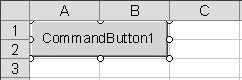 | Tip | You can easily 'snap' any drawing object to align with the corners of a cell by pressing the Alt key as you drag a rectangle for the object. You can also press and hold the Alt key to snap to cell gridlines as you move or resize an existing drawing object. | While the command button is selected, you can change its properties. As you're aware, you can use Visual Basic statements to change the properties of objects. ActiveX controls also have a special Properties window that allows you to change properties interactively. Properties  -
On the Control Toolbox toolbar, click the Properties button. The Properties window appears. The box at the top shows you which object's properties are being displayed. In this case, it's CommandButton1, which is a CommandButton object. 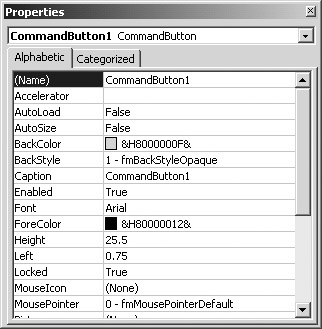 The Properties window shows various properties of the command button. One important property of the command button is its name. This property appears as (Name) in the Properties window. (The parentheses make the Name property sort to the top of the list.) The Name property affects how you use the button in your macros. -
Replace the default value of the Name property with btnZoomIn. You can't put spaces into the name. Many people use three-letter prefixes when naming controls. The three-letter prefix helps identify what kind of control it is; in this case, btn stands for button. 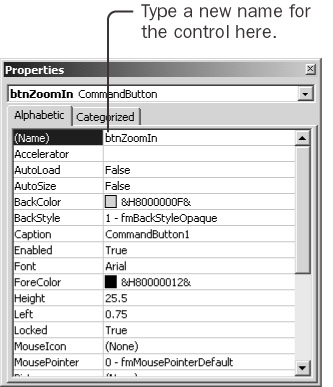 Changing the name of the button doesn't change the label displayed on it, however. That's the function of the Caption property. -
Replace the default value of the Caption property with Zoom In. The caption on the button changes as soon as you change the Caption property. With ActiveX controls, you don't use an ampersand to specify the accelerator key; instead, there's a separate Accelerator property for that purpose. 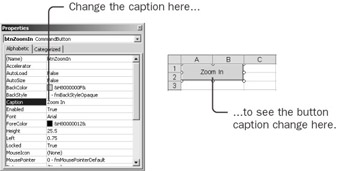 -
For this button, the letter I would make a good accelerator key. Type I as the value of the Accelerator property. As soon as you assign I to the Accelerator property, the letter I in the caption becomes underlined. 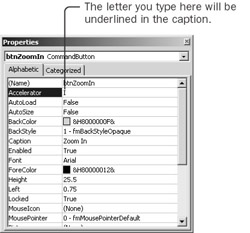 There's one more property that you should set when you create a custom command button. It controls how the command button interacts with the active cell in Excel. Suppose cell B4 is the active cell when you click the command button. You'd normally expect cell B4 to be the active cell even after clicking the button (unless the button runs a macro that changes the active cell). But the default behavior of a command button is to remove the dark border around the active cell, making it impossible to see which cell is active. -
Scroll down to the TakeFocusOnClick property, and change it to False in the resulting drop- down list. (TakeFocusOnClick is a complicated name for a simple property. Setting it to False simply means, 'Leave the active cell alone when you click this button.') 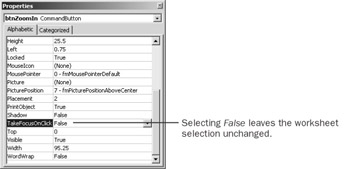 You've now created and customized the command button. All that's left is to link it to a macro and make it run. Link a Command Button to a Macro You don't assign a macro to a command button. Instead, you create a macro with a special name, in a special place, and the macro automatically links to the button. Fortunately, the Control Toolbox has a button that will do all the work of naming the macro for you. View Code  -
With the command button still selected, click the View Code button. 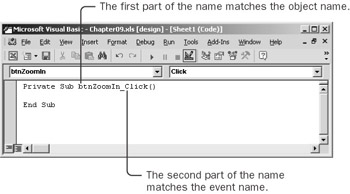 The Visual Basic Editor window appears with a new macro. The word Private before the macro name means that this macro won't appear in the Run Macro dialog box. The macro name is btnZoomIn_Click. The name is important. The part of the name that precedes the underscore matches the name of the command button. The part of the name that follows the underscore matches the name of the event that this macro will handle. In this example, the macro runs whenever you click the button. A macro linked to an event like this is called an event handler. | Important | The word procedure is a more technical synonym for a macro. Excel uses the word macro because macro recorder is less intimidating than procedure recorder. In general, this book uses macro to refer to those procedures that you can run from the Macro dialog box and procedure to refer to functions and event handlers. | You could copy the code from the ZoomIn macro into the btnZoomIn_Click procedure, but it's easier simply to run that macro (since it already exists) from this one. -
Type ZoomIn as the body of the procedure to make the procedure appear as follows: Private Sub btnZoomIn_Click ZoomInEnd Sub You're now ready to try clicking the button. -
Switch back to Excel, click in any cell in the worksheet to deselect the button, and then click the button. The procedure doesn't run. You simply reselected the button. You need some way of letting Excel know whether clicking an ActiveX control should run the event handler or simply select the control. You do that by controlling design mode. When Excel is in design mode, clicking a control selects it. When Excel isn't in design mode (a condition called run mode), clicking a control runs the event handler procedure. Whenever you put an ActiveX control on a worksheet, Excel automatically switches to design mode. Exit Design Mode  -
Click the Exit Design Mode button. The selection handles disappear from the command button. -
Try the button: click it. Press Alt+I to try the accelerator key. Design Mode  -
Click the Design Mode button to turn design mode back on, and click the command button. The command button becomes selected. Attaching an event handler procedure to a control is different than attaching a macro to a toolbar button. -
With a toolbar button, you can name the macro whatever you want and then use the Assign Macro dialog box to link the macro to the button. With an event handler, the combination of the name and the location of the procedure is what creates the link to the control. -
With a toolbar button, you make Excel ignore events by opening the Customize dialog box. With a control, you do this by clicking the Design Mode button. Create an Event Handler on Your Own While you can create an event handler for a control by clicking the View Code button, you might find it enlightening to see how you can also create an event handler directly in the Visual Basic Editor. -
Create a Zoom Out command button by roughly following steps 2 through 7 of the section 'Create a Custom Command Button,' as follows: Drag a rectangle on the worksheet from the upper left corner of cell A3 to the lower right corner of cell B4. In the Properties window, give it the name btnZoomOut, give it the caption Zoom Out, and assign the letter O as its accelerator. Also, set the TakeFocusOnClick property to False. Don't click the View Code button. -
Switch to the Visual Basic Editor, and click anywhere in the btnZoomIn_Click procedure.  Above the code portion of the window are two boxes. The box on the left contains the first half of the procedure name (btnZoomIn), and the box on the right contains the second half of the procedure name (Click). These two boxes are named Object and Procedure, respectively. -
Click the arrow next to the Object list. The list shows all the objects related to the current worksheet that can have event handlers. In this case, they are btnZoomIn, btnZoomOut, and Worksheet. 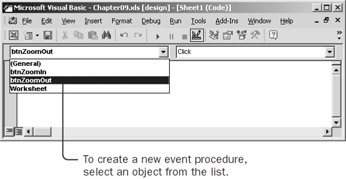 -
Select btnZoomOut from the list. A new procedure appears. Click is the default event for a button, so the new procedure is named btnZoomOut_Click, which is precisely what you need. -
Type ZoomOut as the body of the procedure. -
Switch to Excel, turn off design mode, and try both buttons. The lists at the top of the code window can help you build event handlers by combining an object name with an event name. Make a Button Respond to Mouse Movements The command button can recognize several different events. Three of the most useful events are a click (the Click event), a double-click (the DblClick event), and a mouse movement (the MouseMove event). The MouseMove event is especially fun to write an event handler for because it provides information to the procedure in the form of arguments. -
In the Visual Basic Editor, select btnZoomOut from the Object list and then select MouseMove from the Procedure list. 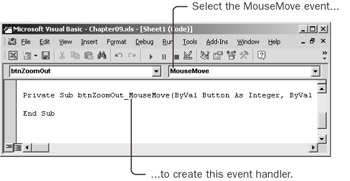 The declaration for the new procedure is relatively long. This is what it looks like when divided into shorter lines: Private Sub btnZoomOut_MouseMove( _ ByVal Button As Integer, _ ByVal Shift As Integer, _ ByVal X As Single, _ ByVal Y As Single) This event handler procedure has four arguments: Button, Shift, X, and Y. (The word byVal means that Excel will ignore any changes the procedure makes to an argument.) The arguments communicate information to you that you can take advantage of as you write the macro. The Button argument indicates whether a mouse button is down as the mouse moves. The Shift argument indicates whether the Shift, Ctrl, or Alt key is pressed. The X and Y arguments indicate the horizontal and vertical position of the mouse. -
Insert ZoomOut as the body of the new procedure, switch to Excel, and move the mouse over the Zoom Out button. (You don't even have to click. Just moving the mouse over the button causes the procedure to run. Events can happen quickly.) 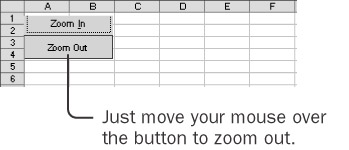 You can use the arguments that the MouseMove event provides you to control the procedure. Specifically, if the value of the Shift argument is equal to 1, the Shift key is down. If the value of the Shift argument is equal to 2, the Ctrl key is down. If the value of the Shift argument is 3, both the Shift and Ctrl keys are down. You can change the procedure so that it zooms in when the Shift key is down and zooms out when the Ctrl key is down. -
Replace the body of the btnZoomOut_MouseMove procedure with these statements: If Shift = 1 Then ZoomIn ElseIf Shift = 2 Then ZoomOut End If | Tip | The ElseIf keyword allows you to combine Else and If statements into a single statement. | -
Switch to Excel, and try the event handler. Try moving the mouse by itself. Then try pressing and holding the Shift key as you move the mouse. Then try pressing and holding the Ctrl key as you move the mouse. As you move the mouse over the button, you can practically see the procedure running over and over. Each time the button detects the mouse moving, it triggers another event and the event handler procedure runs again. Event handler procedures can be a powerful way to make things happen. Explore the Visual Basic Project You might wonder where all these event handlers are stored and how they relate to the macros that you create with the macro recorder. When you use the macro recorder to create a macro, the macro is stored in a module. You can have multiple macros in a single module, and you can have multiple modules in a workbook. (Each time you close and reopen a workbook, the macro recorder creates a new module for any new macros you record.) Event handler procedures for a command button are attached to the worksheet that contains that button. Visual Basic refers to all the code in a single workbook- whether the code is in a module or attached to a worksheet-as a project. The Visual Basic Editor has a special window that allows you to explore the project. Project Explorer  -
In the Visual Basic Editor, click the Project Explorer button. The Project window appears. The name of the project is VBAProject, and the name of the workbook (Chapter09.xls) appears in parentheses. Procedures can be stored either on module sheets (grouped under Modules in the Project window) or attached to workbooks and worksheets (grouped under Microsoft Excel Objects in the Project window). 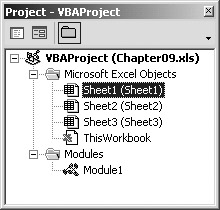 Associated with each worksheet is a page that contains any code for that worksheet or for objects on that worksheet. When you create a new worksheet, a new code page appears in the Project window. When you delete a worksheet, the worksheet's code page disappears. -
Double-click the entry labeled Module1. The main Visual Basic Editor window displays the macros stored in Module1. 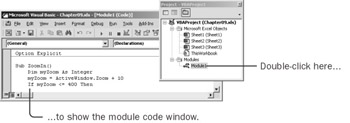 -
Double-click the entry labeled Sheet1. The main Visual Basic Editor window displays the event handlers for the objects on Sheet1. 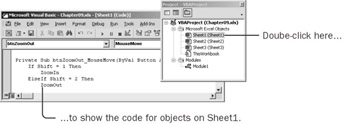 -
In Excel, drag the sheet tab for Sheet1 to the right, and then press and hold the Ctrl key as you release the mouse. Excel creates a copy of the sheet. The copy's name is Sheet1 (2), and it has its own copy of the command buttons. 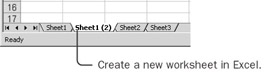 -
Switch to the Visual Basic Editor, and look at the Project window. There's a new sheet in the list under Microsoft Excel Objects. The name in parentheses, Sheet1 (2), matches the name on the worksheet tab. The name in front of the parentheses, Sheet4, is a unique name that Visual Basic generates. Now that you have a sheet with Sheet4 as the internal name, if you use Insert Worksheet to create a new Sheet4, Visual Basic will give it Sheet5 as its internal name! 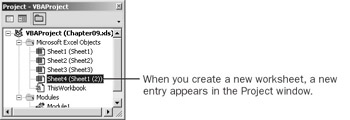 -
Double-click the Sheet4 worksheet item in the Project window. The main Visual Basic Editor window now shows the event handler procedures for the copies of the command buttons. These procedures look just like the procedures that are linked to the command buttons on Sheet1, but they're now separate entities. Even if you change the btnZoomIn_Click procedure on Sheet4, the btnZoomIn_Click procedure on Sheet1 remains unchanged. 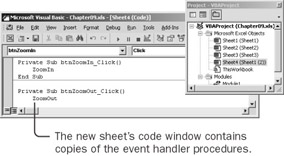 -
In Excel, delete the Sheet1 (2) worksheet. Then switch back to the Visual Basic Editor and look at the Project window. As you probably anticipated, the entry for Sheet4 has disappeared, along with the procedures that were associated with it.  | Important | When you delete a worksheet that has event handler procedures associated with it, all the procedures are destroyed with the worksheet. Save your work frequently when you write event handlers for worksheets so that you can recover your work if you accidentally delete a worksheet. | |