Handling Worksheet and Workbook Events ActiveX controls aren't the only objects in Excel that can have events. Worksheets and workbooks have events, too. Each of these objects has different events that it can respond to. Run a Procedure When the Selection Changes -
In the Visual Basic Editor, activate the Sheet1 code window. (Activate the Project window, and double-click Sheet1.) -
From the Objects list, at the top left of the code window, select Worksheet. A new procedure appears with the name Worksheet_SelectionChange. This event happens whenever you change the selection on the worksheet. It doesn't matter whether you click in a cell or use the arrow keys to move around; the event happens either way. 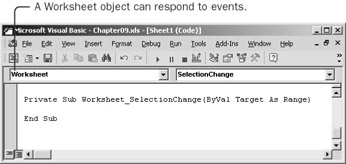 Just to see what events are available for a worksheet, click the arrow next to the Procedure list, at the upper right of the code window. The list shows the nine events that a worksheet can respond to. SelectionChange is the default event for a worksheet, just as Click is the default event for a command button. 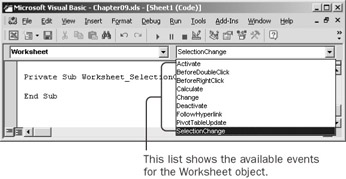 -
Press the Esc key to close the list of events, and enter these statements as the body of the Worksheet_SelectionChange procedure: If ActiveCell.Interior.Color = vbCyan Then Selection.Interior.Color = vbYellow Else Selection.Interior.Color = vbCyan End If Cyan is the Visual Basic name for the color labeled Turquoise in the Excel color palette. The procedure now changes all the selected cells to turquoise unless the active cell already happens to be turquoise. -
Activate Sheet1 in Excel, and click in several different cells. Press arrow keys to move between cells. Drag a selection rectangle through several cells. The cell colors change each time you change which cells are selected. 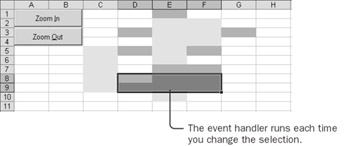 -
Now activate Sheet2 and select a cell. Nothing happens. The Worksheet_SelectionChange event handler is active only for the associated worksheet. Handle an Event on Any Worksheet When you create an event handler for the Sheet1 SelectionChange event, that handler applies only to that worksheet. If you activate Sheet2 and change the selection, nothing happens. Worksheet event handlers respond to events only on their own worksheet. To handle an event on any worksheet, you must use a workbook-level event handler. -
In the Visual Basic Editor, activate the Project window and double-click the ThisWorkbook item. -
From the Object list, select Workbook. A new procedure appears with the name Workbook_Open. Open is the default event for a workbook. This is the event you'd use if you wanted to run a procedure every time you open the workbook. 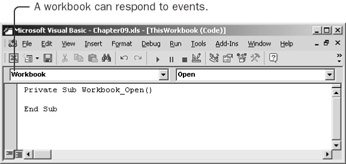 -
Click the Procedures list to see the events available for a workbook. 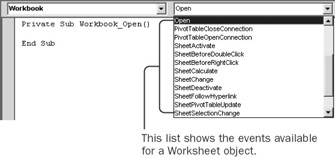 A workbook can respond to any of 23 different events. It just so happens that 9 of the events begin with Sheet. These 9 workbook Sheet events correspond to the 9 events for a worksheet, except that they apply to any worksheet in the workbook, even worksheets that don't exist yet. -
Select the SheetSelectionChange event. This creates a new Workbook_SheetSelectionChange procedure. -
Delete the Workbook_Open procedure. You won't need this one. -
Type Selection.Interior.Color = vbRed as the body of the new procedure.  -
Switch to Excel, activate Sheet2, and click in various cells. The cells change to red. -
Activate Sheet1, and click in various cells. The cells change to red. What happened to the SelectionChange event handler procedure for this sheet? It might seem that the event handler for the workbook replaces the one for an individual sheet, but that's not quite true. In fact, they both ran. The workbook one just ran last. The property for the interior color of the cell changed to blue (or yellow) and then quickly changed to red. You didn't see the intermediate color because Windows doesn't refresh the screen until the macro finishes. So all you ever see is the final color. You can create event handler procedures for events that take place on a worksheet. You can put those event handler procedures either at the worksheet level or at the workbook level. If the procedure is at the workbook level, it handles events for all worksheets, regardless of whether a worksheet has an event handler of its own. Suppress a Workbook Event It might seem strange that a worksheet event handler wouldn't override a workbook event handler for the same event. In fact, having the worksheet event occur first gives you a great deal of control over how to take advantage of events. If you want both event handlers to run, you don't have to do anything. If you want the worksheet event handler to suppress the workbook event handler, you can make the worksheet event handler tell the workbook event handler to do nothing. The way you do that is by creating a custom property at the workbook level. -
Double-click ThisWorkbook in the Project window. At the top of the code window, enter this statement above the event handler procedure: Public ProcessingEvent As Boolean This declares ProcessingEvent as a public variable in ThisWorkbook. When you declare a variable above all the procedures in a module, the variable becomes visible to all the procedures in that one module and is called a module-level variable. If you use the word Public to declare a module-level variable, that variable is then visible to any procedure in the entire workbook. A public variable is essentially a simple property. Declaring the variable as Boolean means that it can be only True or False. If you don't assign something to it, it will be False. -
Change the body of the Workbook_SheetSelectionChange event handler to this: If ProcessingEvent = True Then ProcessingEvent = False Else Selection.Interior.Color = vbRed End If The event handler will now change the color of the selection only if the ProcessingEvent variable is not True. If ProcessingEvent is True, the event handler changes the variable back to False. (If you didn't change ProcessingEvent back to False, suppressing the event handler once would disable this event handler until you close the workbook.) -
Double-click Sheet1 in the Project window. In the Worksheet_SelectionChange event handler, type ThisWorkbook.ProcessingEvent = True just before the End Sub statement. 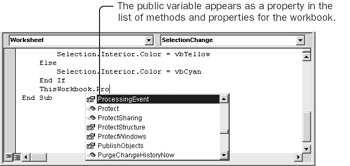 The new ProcessingEvent property is in the list of members. It even has a standard Property icon next to it. With this statement, the worksheet event handler tells the workbook event handler not to do anything. -
Activate Sheet1 in Excel, and change the selection. The selection should change to yellow or blue. The worksheet event handler is suppressing the workbook event handler. -
Activate Sheet3, and change the selection. The selection should change to red. The workbook event handler still functions properly as long as it's not suppressed by the worksheet. Creating a simple custom property inside ThisWorkbook in the form of a public variable allows you to suppress the workbook event handler. You now have total control over which event handlers function at which time. You can have an event handler run only at the worksheet level, only at the workbook level, at both levels, or as a mixture. Cancel an Event Some events are made to be canceled. For example, Excel displays a shortcut menu when you right-click on a worksheet. What if you want to prevent the shortcut menu from appearing? You can create an event handler procedure that cancels that event. Events that can be canceled all have the word Before in front of the event name. A worksheet has a BeforeDoubleClick event and a BeforeRightClick event. A workbook has corresponding SheetBeforeDoubleClick and SheetBeforeRightClick events, and also BeforeClose, BeforeSave, and BeforePrint events. Each event procedure that can be canceled has a Cancel argument. To cancel the corresponding event, assign True to the Cancel argument. -
In the Sheet1 code window, select Worksheet from the Object list and BeforeRightClick from the Procedures list. -
In the event handler procedure that appears, type Cancel = True as the body.  -
Activate Excel, and select Sheet1. Try right-clicking in a cell. The color changes, but the shortcut menu doesn't appear. Your custom event handler executed before the built-in handler and prevented that built-in handler from executing. -
Select Sheet2, and try right-clicking in a cell. The color changes, and the shortcut menu also appears. Press Esc to remove the menu. -
Save and close the Chapter09 workbook. Toolbars and menus can be linked to macros. Command buttons, worksheets, and workbooks can be linked to event handlers. All these tools allow you to create applications that are easy for anyone to use. |