Consuming REST Web Services
| | ||
| | ||
| | ||
REST (Representational State Transfer) allows you to request information from a web service through a URL. You make your request by adding the parameters in the URL. Unlike SOAP, REST isnt a standardrather, it is a description of a style of web service.
A company with a URL at http://www.mycompany.com could provide a REST web service about products at the following URL:
-
http://www.mycompany.com/WebServices/Products
When a user opened this URL in a web browser, the browser could display an XML document containing the response. The company could refine the process and provide information about a specific product through a more detailed URL, for example:
-
http://www.mycompany.com/WebServices/Products/XA-123
You can try a REST-style web service yourself. Enter the following URL in your favorite web browser. The URL points to the Web Developer news web service from Moreover:
-
http://p.moreover.com/cgi-local/page?c=Web%20developer%20news&o=xml
Figure 9-1 shows the page open in Internet Explorer.
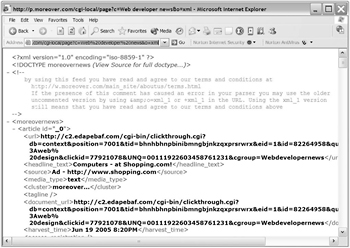
Figure 9-1: Internet Explorer showing the Moreover Web Developer news
You can see that the root node is <moreovernews> and that this element contains a number of <article> elements. Each article has a set of child elements that describe everything from the heading to the URL of the original document. You can find a complete list of Moreover XML news web services at http://w.moreover.com/categories/category_list.html.
RSS is one form of REST web services. However, it provides more strict guidelines about the XML elements used in the response. In the next section, well work through two examples, one using a REST web service and the other consuming an RSS news feed.
Using REST in Flash
To consume a REST web service in Flash, you need to know the URL. If the web service has a cross-domain security policy in place, you can request the contents directly within Flash. In most cases, however, that wont be the case, so youll need to write a server-side page to make the request and provide access to the information locally. This is known as proxying the data.
The server-side page will receive the response from the web service and provide it to Flash. Because the server-side page is local to the Flash movie, you wont need to consider Flash Player security. You can include the proxied content by using the XML class or XMLConnector component.
Creating a proxy file
To proxy the XML data, youll need to create a server-side file that queries the web service and provides the information to Flash. You can write the file in any language familiar to you, including ColdFusion, PHP, or Java. I use ASP.NET because Im a .NET developer.
Macromedia provide some examples of proxy files at www.macromedia.com/cfusion/knowledgebase/index.cfm?id=tn_16520. At the time of writing, ColdFusion, PHP, ASP, and Java Servlet examples were available.
Your server-side file will need to run through a web server before that data is included in Flash. Because Im a .NET developer, I have Internet Information Services (IIS) installed on my computer. Youll refer to the file in Flash using its full URL, for example, http://localhost/FOE/proxyWebService.aspx. This allows the web server to process the server-side code before providing the results to Flash.
Understanding an ASP.NET proxy file
In the following code, Ive shown one approach to proxying a REST web service using ASP.NET. Im sure there are other ways you could achieve the same outcome.
<%@ Page Language="VB"%> <%@ import Namespace="System.XML" %> <script runat="server"> sub Page_Load dim strContents as String dim myXmlDocument as XmlDocument = new XmlDocument() dim strURL as String = "URL goes here" myXmlDocument.load (strURL) strContents = myXmlDocument.OuterXML response.write (strContents) end sub </script>
This code uses the System.XML namespace. It creates some variables , including a new XmlDocument . It uses the load method of the XmlDocument to load the REST URL and writes the OuterXML content to the browser window. To use this approach, youll need to replace URL goes here in the code with your own URL.
You can find an example that uses this code saved with your resources as genericWSRequest.aspx . The example file loads the Web Developer news from Moreover. If you open this page in a web browser, youll see the XML contents displayed. Dont forget to include the full web server path in the address. The URL on my computer is http://localhost/FOE/genericWSRequest.aspx. If you prefer to work with PHP, you can find a PHP version saved in the resource file genericWSRequest.php . Again, youll need to use the full web server path to test this file.
Consuming the XML content
Once youve gathered the information using your web service proxy, you can include the data in Flash. You could use the XML class to work through the XML document tree and add the content to the relevant parts of the movie. If you have Flash Professional, you can also use the XMLConnector component to load the content. One advantage of this approach is that you can bind the data directly to user interface (UI) components . You can also use the XMLConnector class and script the bindings. Chapter 8 describes this approach in greater detail.
Well look at an example where we use a proxy file to load a REST-style web service. Ill use the file genericWSRequest.aspx to consume the Web Developer news from Moreover. Well display the news headings and users will be able to open the news item in a web browser. If youd prefer to work in PHP, you can use the resource file genericWSRequest.php .
Youll need to have IIS or another web server installed to complete the exercise. If youre working with ASP.NET, youll also need to have the .NET Framework installed. Make sure youre connected to the Internet before you work through this exercise.
| |
In this exercise, well consume the Web Developer news web service from Moreover and view the news headings in a List component. Well use the XML class, and youll be able to click each heading to view the details of the news item in a web browser.
-
Open Flash and create a new movie. If necessary, create a folder called FOE within your web server. Im running IIS so the path to my folder is C:\Inetpub\ wwwroot \FOE . Copy the genericWSRequest.aspx file to the FOE folder. If youd prefer to work with PHP, you can use the file genericWSRequest.php instead. Save the Flash file as news.fla in the same folder.
-
Rename Layer 1 as UI and add another layer called actions .
-
Add a List component to the UI layer and give it the instance name news_list . Resize it to the width of the movie. Add a static text field with the title Web Developer News . Add a dynamic text field over the List component and enter the text Loading . Name the field error_txt . Make sure the dynamic text field can display two lines of text as it will also display error messages. Figure 9-2 shows the interface.
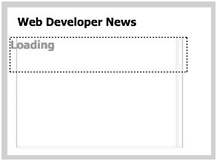
Figure 9-2: The Flash interface for the Web Developer News movie -
Add the following code to load the XML content into Flash. If youve written your own server-side file or youre using the PHP resource file, change the file name in the load line. Dont forget to include the full server path to the file.
news_list.visible = false; var RootNode:XMLNode; var News_xml:XML = new XML(); News_xml.ignoreWhite = true; News_xml.onLoad = FormatXML; News_xml.load("http://localhost/FOE/genericWSRequest.aspx"); function FormatXML(success:Boolean):Void { if (success) { error_txt._visible = false; RootNode = this.firstChild; trace (RootNode); } else { error_txt.text = "Could not load news file"; } }The code hides the news_list component and loads the XML document. Note that Ive included the full path to the server-side file. If this file doesnt load successfully, an error message displays in the error_txt text field. Otherwise, Flash hides the error_txt field and brings up an Output window containing the RootNode variable.
-
Test the movie and you should see an Output window displaying the XML content from the proxy file. If you see an error message, test the server-side file through a web browser to make sure it is correctly loading the XML content.
-
Modify the FormatXML function as shown here. Ive indicated the new lines in bold.
function FormatXML(success:Boolean):Void { if (success) { error_txt._visible = false; RootNode = this.firstChild; var headline_str:String; var headingNode:XMLNode; for (var i:Number = 0; i < RootNode.childNodes.length; i++) { headingNode = RootNode.childNodes[i].childNodes[1]; headline_str = headingNode.firstChild.nodeValue; headline_str = headline_str.substr(0,60) + "... "; news_list.addItem({label: headline_str}); } news_list.visible = true; } else { error_txt.text = "Could not load news file"; } }In the new lines, we create the new variables headline_str and headingNode . We loop through each of the childNodes of the RootNode , that is, each article, and find the headingNode . This node is the second child, childNodes[1] , of each article. To find the heading text, we use headingNode.firstChild.nodeValue . Before adding it as the label of the List component, we find the first 60 characters using the substr method. We use the addItem method to add each heading to the List.
-
Test the movie and you should see something similar to Figure 9-3.
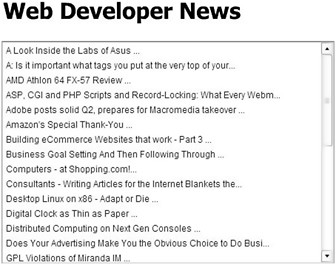
Figure 9-3: The Flash interface showing the loaded Web Developer newsNothing happens when you click each headline, so well need to add an eventListener to the List component. The listener will detect when a new selection is made in the List and respond by calling a function.
-
Add the following code above the var RootNode line:
var ListListener:Object = new Object(); ListListener.change = function(evtObj:Object):Void{ var ListNum:Number = evtObj.target.selectedIndex; var articleNode:XMLNode = RootNode.childNodes[ListNum]; var theURL:String = articleNode.childNodes[0].firstChild.nodeValue; getURL (theURL); }; news_list.addEventListener("change", ListListener);This code creates a new listener called ListListener that responds to the change event in the List component. It finds the selectedIndex of the chosen item and stores it in the variable ListNum . The code sets another variable called articleNode , which locates the selected node. A variable called theURL stores the link, and we use the getURL action to display the link.
-
Test the movie and click one of the headlines. You should see the article displayed in a web browser window.
When we test this movie from within Flash, a new web browser window will open each time we click an article heading. If you test the movie from within a web browser, clicking an article title will replace the Flash movie.
You can open each article in a new window by adding some JavaScript to the web page hosting the Flash movie and by changing the code in the ListListener object. Youll also need to set your Flash publish settings appropriately.
-
Publish an HTML page from the Flash movie and rename it as newsJS.html . This will prevent you from overwriting the HTML file each time you republish your Flash movie.
-
Open the newsJS.html page in a text or HTML editor and add the following JavaScript function between the <head> </head> tags:
<script language="JavaScript"> function popWin(popName, popPage) { var strParams = "width=800,height=600,scrollbars=yes,"; strParams += "status=no,menubar=no"; var popWindow=window.open(popPage,popName,strParams); } </script>The function accepts parameters for the name of the new window and the URL. It shows a window 800—600 pixels in size with scroll bars but without a status bar and menu bar.
-
Modify the change function in Flash as shown in the following code. The new line (shown in bold) calls the JavaScript function, passing the window name and the page URL.
ListListener.change = function(evtObj:Object):Void{ var ListNum:Number = evtObj.target.selectedIndex; var articleNode:XMLNode = RootNode.childNodes[ListNum]; var theURL:String = articleNode.childNodes[0].firstChild.nodeValue; theURL = "JavaScript:popWin('News','" + theURL + "')"; getURL (theURL); };
-
To access the web server from the Flash Player, youll need to change the publish settings in File
 Publish Settings Flash . Change the Local playback security option to Access network only .
 -
Open the file newsJS.html in a web browser using the web server pathhttp://localhost/FOE/newsJS.htmland click one of the headlines. You should see the news item open in a new web browser window. Note that once you change the theURL variable within Flash, youll need to test the Flash file from a web browser instead of within Flash. You can view the completed resource files news.fla and newsJS.html . The resource files newsPHP.fla and newsJSPHP.html contain the PHP file references.
In this exercise, we used an ASP.NET file to request an XML document from Moreover. The XML document provided content for a List component, and we were able to click the heading to pop up each news item in a new web browser window. The ASP.NET file provided a local copy of the XML document to Flash so we could avoid the security restrictions of the Flash Player. Because we were using the web server, we needed to change the publish settings for the file.
Another application of REST is in RSS news feeds. RSS uses a specific XML vocabulary to share information.
| |