13.2 Database-Driven JSP Applications
| This section outlines what is probably one of the most excruciatingly difficult ways to build a web application. There are lots of other, better ways to do it. If you are a web developer who is comfortable with talking to a relational database directly from JSP, I'd strongly recommend a commercial product such as Macromedia's Dreamweaver MX. If you're building database-driven Swing applications, look at some of the tools described in Chapter 2. If you're working on a larger site with several developers in different roles, consider using XML and XSLT, possibly in conjunction with Apache Cocoon (http://xml.apache.org/cocoon) and/or Struts (http://jakarta.apache.org/struts). These disclaimers aside (hopefully delivering me from a thousand emails about what I am about to write), this application-building process is a very useful learning tool. Now let's discuss how to build and debug a simple JSP application. The concept is to build a simple web application that executes simple SQL commands via a web browser using JSP. This section uses the MySQL database installation created in Chapter 12. The rest of this chapter assumes that you've installed MySQL as described and created the macjava database. See Chapter 12 for more details if you need a quick review. 13.2.1 Setting Up the DatabaseBefore getting data to display with your web application, you need to put some data into the database. Save the contents of Example 13-1 as init.sql in your home directory (or somewhere you can easily locate). Example 13-1. Setting up the databaseUSE macjava; DROP TABLE IF EXISTS Contact; DROP TABLE IF EXISTS Company; CREATE TABLE Contact ( ID BIGINT UNSIGNED AUTO_INCREMENT NOT NULL PRIMARY KEY ); ALTER TABLE Contact ADD firstName CHAR(50); /* First name */ ALTER TABLE Contact ADD lastName CHAR(50); /* Last name */ ALTER TABLE Contact ADD email CHAR(255) NOT NULL;/* email address */ ALTER TABLE Contact ADD companyID BIGINT NOT NULL;/* company worked for */ CREATE TABLE Company ( ID BIGINT UNSIGNED AUTO_INCREMENT NOT NULL PRIMARY KEY ); ALTER TABLE Company ADD name CHAR(255); /* Company public name */ INSERT INTO Company (ID, name) VALUES (1, "Big Dog Corp"); INSERT INTO Company (ID, name) VALUES (2, "Little Hampster Inc"); INSERT INTO Contact (ID, firstName, lastName, email, companyID) VALUES (1, "Biff", "Beefeater", "biff@null.com", 1); INSERT INTO Contact (ID, firstName, lastName, email, companyID) VALUES (2, "Angry", "Master", "darkone@null.com", 1); INSERT INTO Contact (ID, firstName, lastName, email, companyID) VALUES (3, "Smooth", "Slinker", "smooth@null.com", 2); INSERT INTO Contact (ID, firstName, lastName, email, companyID) VALUES (4, "Glass", "Opal", "shatter@null.com", 2); These commands describe how to set up two tables in MySQL and add a small amount of data to these tables. To actually add the data, execute the following command: /Developer/mysql-3.23/bin/mysql --user javadev --password < ~/init.sql
Running this script should prompt you for the javadev user's password and then run silently. Any errors will be reported by line number. Note that the first two commands ( DROP TABLE IF EXISTS ) wipe out these tables and their data each time this script is run. This means that if you make a mistake, you can simply rerun the command to reenter the data, but any changes that are made later to the database will be destroyed without warning if this script is rerun. 13.2.2 Building the Web ApplicationThe rest of this chapter shows how to build a web application from scratch. The process is time-consuming , but it should help you understand the different files and directories involved. Start by creating a few supporting directories, as shown in Figure 13-3. Inside the webapps directory, create a directory called jspdbtodo . Inside that directory, create a directory called WEB-INF . Inside that directory, create another directory called lib . Remember that capitalization matters! Figure 13-3. Initial directory layout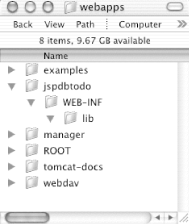 The WEB-INF directory is a special directory that is hidden to remote clients (such as web browsers) and lets you add protected resources specific to this application, such as configuration files that might store sensitive information (like passwords used to connect to a database). The lib directory inside WEB-INF contains JAR files that will automatically be added to this web application's classpath. 13.2.2.1 Creating your first JSPCreate a text file immediately inside the jspdbtodo directory called index.jsp . Enter the contents of this text file as shown in Example 13-2. Example 13-2. A "Hello World" JSP page<%@ page language="java" %> <HTML> <BODY> Hello World! <BR> <%= new java.util.Date().toString( ) %> </BODY> </HTML> The first, slightly odd-looking tag is a page directive that tells Tomcat that the scripts in the page are Java. The page directive isn't strictly necessary, but is good form for adhering to the JSP specification. Next , you'll notice what looks like a bit of Java code that creates a new java.util.Date object and converts it to a String , embedded within a <%= %> tag. This tag tells Tomcat to evaluate whatever code is placed inside as a String and to output the results of that expression to the page. Experiment a bit and use your favorite browser to open this file directly from the filesystem (without it being translated by Tomcat). If you've installed things in the locations shown in this chapter, you should be able to simulate this effect by opening the URL file:///Developer/tomcat-4.1.8/webapps/jspdbtodo/index.jsp in your browser.
Depending on your browser, you may get a timeout, see the "Hello World!" test but no date and time, or see "Hello World!" and the page's raw JSP scripts. Your browser gets the information directly from the disk and attempts to parse it, but browsers don't understand JSP pages. For this reason, your results are unpredictable and often inconsistent. What you need, of course, is for a web container to translate this page into standard HTML, which your browser can understand. Try to view the same page rendered through the JSP engine. Make sure that Tomcat is running, and go to http://localhost:8080/jspdbtodo/index.jsp . This time, you should see "Hello World!" and the current date and time, as shown in Figure 13-4. Figure 13-4. Hello World in a JSP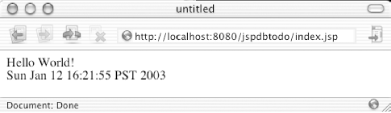 13.2.2.2 Debugging JSP pagesNow that you've gotten started with JSP, you need to learn how to figure out what's happening when things go wrong. Using the Terminal, cd to the work directory inside your Tomcat installation. You should see a series of directories that correspond to the JSP you were just working with. Inside these directories, you'll see two files: index$jsp.java and index$jsp.class . These are also shown in the Finder, as seen in Figure 13-5. Figure 13-5. A JSP's compiled files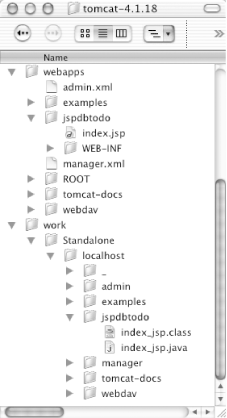 As mentioned earlier, when you first view a JSP using Tomcat, it will automatically translate the JSP into a Java servlet source file (the index$jsp.java file) using Jasper, and then use the javac compiler included with the Mac OS X JDK to compile that Java source file into the corresponding index$jsp.class file. This class file will be loaded and executed, and if the JSP is then modified, the corresponding source files will be regenerated. When a problem arises, you will get an exception and stack trace that correspond to this Java source file, not your original JSP. Open the corresponding Java source to find the offending line. Try to "break" your JSP ”don't terminate a String , or put gibberish inside the <% .. . %> tags. Watch and see what happens, and take note of the displayed error message. Look at the .java source generated by your .jsp file, and try to understand the relationship between the different errors you get and the different places where files are generated. If the JSP precompiler reports an error, you'll get an error notification with a line number that corresponds to the original JSP file; however, runtime errors are reported against the Java source file. 13.2.3 Talking to the DatabaseAfter covering the basics of JSP, you're ready to write a JSP that accesses your MySQL database. As described in the last chapter, the Connector/J JDBC driver is perfect for using Java to talk to a MySQL database. Copy the JDBC driver JAR file, mysql-connector-java-2.0.14-bin.jar , to your web application's WEB-INF/lib directory, as shown in Figure 13-6. This will make the driver available to your web application. Figure 13-6. Installing the MySQL JDBC driver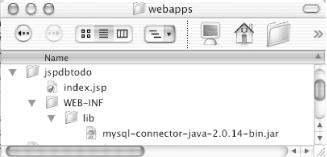 Next, alongside the "Hello World" index.jsp file, add a new file called test.jsp with the code shown in Example 13-3 (using the proper password for the javadev MySQL user instead of "special", of course). Example 13-3. A database-driven JSP <%@ page language="java" import="java.sql.*" %> <HTML> <BODY> <% Driver myDriver = null; Connection myConnection = null; String SQLstatement = "select now( )"; try { String jdbcURL = "jdbc:mysql://127.0.0.1/macjava"; String jdbcUsername = "javadev"; String jdbcPassword = "special"; myDriver = (Driver)Class.forName("com.mysql.jdbc.Driver").newInstance( ); myConnection = DriverManager.getConnection( jdbcURL, jdbcUsername, jdbcPassword); PreparedStatement myStatement; ResultSet myResults; myStatement = myConnection.prepareStatement(SQLstatement); myResults = myStatement.executeQuery( ); while(myResults.next( )) { %> <%= myResults.getString(1) %> <% } } catch (Exception e) { %> <%= e.getMessage( ) %> <% e.printStackTrace( ); System.out.println(SQLstatement); return; } finally { try { myConnection.close( ); } catch (Exception e) { /* Silent failure */} } %> </BODY> </HTML> Before going any further, note that this situation is probably the worst possible case for using JSP. There is virtually no HTML ”all you have done here is put a bunch of Java code in a tiny bit of HTML. Also, most of this code accesses the database directly, which is another violation of good coding principles. In a more realistic application, you would probably write helper Java classes to access the database, and make these classes available through JSP tag libraries. Then you could access the tag libraries from an HTML interface using JSP. However, that scenario is beyond the scope of this book, and has little to do with Mac OS X. Try to follow along, but understand that this example of using JSP on Mac OS X is not necessarily the ideal guide for great Java coding practices. That said, it works, and it's pretty easy to understand. Ironically, the output is virtually identical to the previous JSP except that the current date and time are retrieved from the database instead of the Java runtime. This JSP is also a great way to test that everything is installed properly ”that your JSPs are compiled properly, that the connection with the database works, and so forth. 13.2.4 Retrieving DataThis section builds two pages that talk to the database. The first lets users view a list of companies within the database. Clicking on a company name tunnels you down into a detail page, which shows all contacts for that company. For a real project, you would factor out all of the logic into JavaBeans, or break it out into custom tags. This project, however, will make a very simple set of JSP pages. You shouldn't duplicate our database connection logic, however, so you'll actually create four pages:
Place all four files directly in the web application directory itself. When you're done, the directory structure will look like Figure 13-7. Figure 13-7. Database web application layout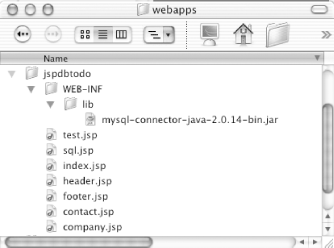 The index.jsp page and the test.jsp page are left over from the earlier examples. Enter the text shown in Example 13-4 and save it as header.jsp . You'll note that the code is apparently a snippet of Java source inside a set of brackets. You'll also notice that the variable SQLstatement is used but never declared or initialized ”the subpages will handle that step. The try block is incomplete; it will be closed off in the footer.jsp file. Also, the myResults variable is initialized but never used. Example 13-4. Opening a database connection <% Driver myDriver = null; Connection myConnection = null; try { String jdbcURL = "jdbc:mysql://localhost/macjava"; String jdbcUsername = "javadev"; String jdbcPassword = "special"; myDriver = (Driver)Class.forName("org.gjt.mm.mysql.Driver").newInstance( ); myConnection = DriverManager.getConnection(jdbcURL, jdbcUsername, jdbcPassword); PreparedStatement myStatement; ResultSet myResults; myStatement = myConnection.prepareStatement(SQLstatement); myResults = myStatement.executeQuery( ); %> Next, create the corresponding footer.jsp file with the contents shown in Example 13-5. Example 13-5. Closing the database connection <% } catch (Exception e) { %> <%= e.getMessage( ) %> <% e.printStackTrace( ); System.out.println(SQLstatement); return; } finally { try { myConnection.close( ); } catch (Exception e) { /* Silent failure */} } %> Here, you'll do some basic error handling and cleanup. You'll notice that a catch and finally match the try block from header.jsp . A key point here is that you can't use the header.jsp and footer.jsp without being aware of the expectations (for example, an input SQLstatement variable) and the outcome (a ResultSet object declared as myResults ). This sort of variable management can be used for a variety of JSP tricks, not the least of which is the enforcement of compile-time rules about your pages. In essence, then, these two components are hardcoded to depend on each other, as well as on certain aspects of pages that will include them. Take care to document these requirements so other developers don't misuse these components . Now create the company.jsp file shown in Example 13-6. Example 13-6. JSP for listing companies <%@ page language="java" import="java.sql.*" %> <HTML> <BODY> <% String SQLstatement = "select ID, name from Company"; %> <%@ include file="header.jsp" %> <H1>Company List Report</H1> <TABLE border="1" cellpadding="3" width="50%"> <% while(myResults.next( )) { %> <TR> <TD> <%= myResults.getString("ID") %> </TD><TD> <A HREF="contact.jsp?companyID=<%=myResults.getString("ID") %>"> <%= myResults.getString("name") %> </A> </TD> </TR> <% } %> </TABLE> <%@ include file="footer.jsp" %> </BODY> </HTML> This page is starting to look more like normal HTML. It still has a bit of Java in it, but nowhere near as much as the prior test.jsp example. Most heavy lifting is done in the include files ( header.jsp and footer.jsp ). You'll notice that the SQLstatement variable is initialized here, and that the myResults object is used to iterate over the resulting data. The resulting data is massaged into a HTML TABLE , and links are created to the contact.jsp subpage with the specified company ID value appended as a parameter. Create the final detail page, contact.jsp , as detailed in Example 13-7. Example 13-7. The company detail page <%@ page language="java" import="java.sql.*" %> <HTML> <BODY> <% long companyID = new Long(request.getParameter("companyID")).longValue( ); String SQLstatement = "select firstName, lastName, email, companyID from Contact where companyID = " + companyID; %> <%@ include file="header.jsp" %> <H1>Contact List for Company</H1> <TABLE border="1" cellpadding="3" width="50%"> <% while(myResults.next( )) { %> <TR> <TD> <%= myResults.getString("firstName") %> </TD><TD> <%= myResults.getString("lastName") %> </TD><TD> <%= myResults.getString("email") %> </TD><TD> </TR> <% } %> </TABLE> <BR><BR> <A HREF="company.jsp">Return to Company List</A> <%@ include file="footer.jsp" %> </BODY> </HTML> This page is similar to the previous company.jsp page. The SQLstatement is initialized against the incoming company ID. A link provided at the bottom of the page lets users bounce back to the opening page.
You'll quickly see several different aspects to the development of web applications: tracking user input in the form of links and forms, retrieving data, formatting the results for different browsers or devices, handling multiple languages, allowing user defined layouts, and so on. Designing web applications and user interfaces can quickly become complicated. Having a clear idea of what JSP and Tomcat let you do is the first step in getting a handle on these programming topics. 13.2.5 Reviewing the ApplicationLook at the final arrangement of the files on disk. As shown in Figure 13-7, you've got several files in your web directory. Visiting the http://localhost:8080/jspdbtodo/company.jsp URL displays the output shown in Figure 13-8. Figure 13-8. Company HTML page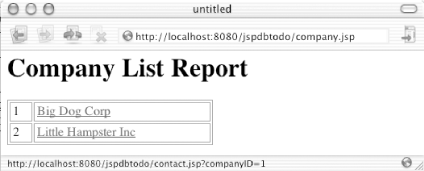 Clicking the links on this page take you to a detail page that provides information on the company's contacts, as shown in Figure 13-9. Figure 13-9. Contact HTML page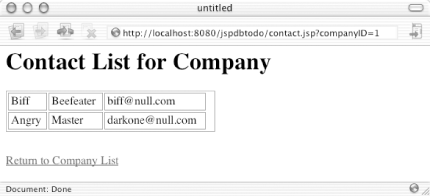 It's easy to imagine building a web application with tremendous additional functionality, such as search or the ability to add contacts. |

EAN: 2147483647
Pages: 105