3.3 Jakarta Ant
| As you work with Java, you'll often encounter references to Ant, an open source tool for managing build processes and other tasks. Ant is a great companion tool to IDEs and text editors, as it can manage complex build tasks , compilation, and even those nasty classpath issues discussed earlier. This section will describe Ant in some detail. Ant is part of Apache's Jakarta project. Originally created to provide a cross-platform, portable replacement for the Unix make command, it has become a powerful development, deployment, and installation tool. To use Ant, run scripts from the command line, passing in an XML build file. Inside the build file, you can define variables and tasks to be performed at build time. 3.3.1 Installation and SetupYou can download Ant from http://ant.apache.org/. The latest version as of this writing is 1.5.1, and you can select a ZIP file or a gzipped version. I downloaded jakarta-ant-1.5.1-bin.tar.gz . Expand the file to jakarta-ant-1.5.1 and copy the resultant directory somewhere easily accessible (I used ~/dev for a user -specific installation). Then put the bin subdirectory in your path : [Wills-Laptop:~] wiverson% setenv PATH ~/dev/jakarta-ant-1.5.1/bin:$PATH To run Ant, use the ant script ( ant.bat on Windows, and just plain ant on Unix-based systems such as Mac OS X): [Wills-Laptop:~] wiverson% ant Buildfile: build.xml does not exist! Build failed As the message here indicates, Ant expects a build file, generally called build.xml , to give it instructions. 3.3.2 Ant BasicsLet's look at writing a simple Ant project and building a file. Suppose you want to write a single Ant file that handles the drudgery of compiling an application, bundles the results into a JAR file, and then copies the resulting files into a new distribution directory. First, create a new file and call it build.xml . As shown in Example 3-4, this file is perhaps one of the smallest possible useful build scripts. Example 3-4. A simple build script <project default="compile" basedir="."> <property name="src" location="src"/> <property name="build" location="build"/> <target name="compile"> <javac srcdir="${src}" destdir="${build}"/> </target> </project> In this example, anything in the src directory is compiled, and the resulting class files are placed in the build directory. Both paths are based on the current working directory. This is a pretty complicated way to tell javac to compile a directory and place the results in another directory, but it's also very flexible. Let's look at some of the key syntax elements. First, you'll notice that two property tags are supplied just inside the project tag. They are then referenced and expanded below by using the ${...} syntax. In addition to the properties you specify, you could also use ${basedir} to refer to the project base directory, as well as the different values available to the Ant JVM. These values would be available programmatically through System.getProperties( ) and related methods . For example, ${os.name} retrieves the operating system, and ${file.separator} retrieves the pesky file separator, which is platform-specific. The next thing you'll notice is a target tag, which is named "compile". This is the default target (or task) that will be executed by the build.xml file. Target names are a way of breaking the Ant build file into different sections. Using these names can be useful for different stages in the development process, such as cleaning up, compiling, and deploying an application. The javac task is a built-in task for Ant. You will find one or more tasks inside a target. A number of tasks are available from within Ant 1.5; popular tasks include creating JAR files and copying files to other locations. 3.3.3 Running the BuildAssuming that you've installed Ant as described above, an installation of Ant is available in your path. To give you an idea of how things work, assume the directory structure shown in Figure 3-15. Figure 3-15. Ant sample directory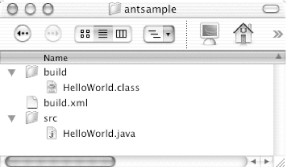 Given this structure, you can execute the following commands to build the single Java source file: [Localhost:~] wiverson% cd antsample/ [Localhost:~/antsample] wiverson% ls build build.xml src [Localhost:~/antsample] wiverson% /usr/local/ant/bin/ant Buildfile: build.xml compile: BUILD SUCCESSFUL Total time: 5 seconds [Localhost:~/antsample] wiverson% You'll notice the cd command at the beginning of this output. This command sets the current working directory, and Ant will automatically look for a file called build.xml to use as its instruction set. If you have a more complex build script and would like to be able to call Ant scripts from within them without changing the current working directory, you can use the -buildfile option: [Localhost:~] wiverson% ant -buildfile ~/antsample/build.xml Buildfile: /Users/wiverson/antsample/build.xml compile: BUILD SUCCESSFUL Total time: 4 seconds [Localhost:~] wiverson% 3.3.4 Ant DocumentationFor a complete reference on Ant, you should pick up Ant: The Definitive Guide , by Jesse Tilly and Eric Burke (O'Reilly). This book includes sections that explain how to expand Ant with your own custom tasks, as well as a wealth of information on Ant's built-in features. Probably the most commonly requested item is a list of Ant tasks. For a complete list of these tasks, visit the Apache web site at http://jakarta.apache.org/ant/manual/tasksoverview.html. You'll also find a complete online manual at http://jakarta.apache.org/ant/manual. However, much of this information is available in printed form from O'Reilly. |
EAN: 2147483647
Pages: 105